- Running a Java Web Start Application
- Running a Java Web Start Application From a Browser
- Running a Java Web Start Application From the Java Cache Viewer
- Running a Java Web Start Application From the Desktop
- README Java TM Web Start Technology
- Installation Instructions
- Using Java Web Start Software
- Release Notes
Running a Java Web Start Application
Note: To run applications deployed with Java Web Start technology, you must have a compatible version of the Java Runtime Environment (JRE) software. The complete Java Java Development Kit (JDK) is not required.
Running a Java Web Start Application From a Browser
You can run a Java Web Start application from a browser by clicking a link to the application’s JNLP file. The following text is an example of a link to a JNLP file.
Java Web Start software loads and runs the application based on instructions in the JNLP file.
Running a Java Web Start Application From the Java Cache Viewer
If you are using at least Java Platform, Standard Edition 6 or later, you can run a Java Web Start application through the Java Cache Viewer.
When Java Web Start software first loads an application, information from the application’s JNLP file is stored in the local Java Cache Viewer. To launch the application again, you do not need to return to the web page where you first launched it; you can launch it from the Java Cache Viewer.
To open the Java Cache Viewer:
- Open the Control Panel.
- Double click on the Java icon. The Java Control Panel opens.
- Select the General tab.
- Click View. The Java Cache Viewer opens.
The application is listed on the Java Cache Viewer screen.
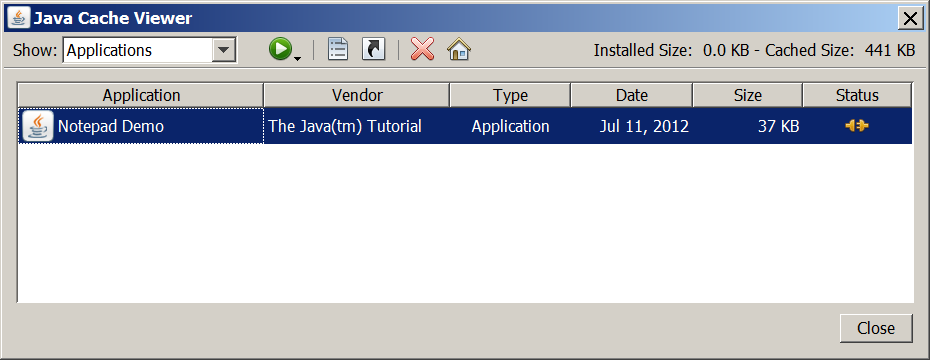
Java Cache Viewer application
To run the application, select it and click the Run button, , or double click the application. The application starts just as it did from the web page.
Running a Java Web Start Application From the Desktop
You can add a desktop shortcut to a Java Web Start application. Select the application in the Java Cache Viewer. Right-click and select Install Shortcuts or click the Install button, .
A shortcut is added to the desktop.

You can then launch the Java Web Start application just as you would launch any native application.
README
Java TM Web Start Technology
Java TM Web Start is a deployment solution for Java-technology-based applications. It is the plumbing between the computer and the Internet that allows the user to launch and manage applications right off the Web. Java Web Start provides easy, one-click activation of applications, and guarantees that you are always running the latest version of the application, eliminating complicated installation or upgrade procedures.
Distributing software across the Web in the tradition manner requires the user to find the installer on the Web, download the installer, locate the installer on the system, and then execute the installer. Once the installer is executed, it prompts for installation directories and installation options such as full, typical, or minimum. This is a time-consuming and complicated task, and one that must be repeated for each new version of the software.
By contrast, Web-deployed applications, such as your favorite HTML-based email client and calendar, auction sites, and so on, are a breeze to install and use. The Web browser has automated the entire process. There is no complicated download, setup, and configuration steps, and you are guaranteed to always be running the latest version.
Java Web Start technology provides the same benefits to full-featured applications as described above for HTML-based applications. Java Web Start technology is an application deployment solution for the Web. Using a full-featured application instead of an HTML-based client can have many benefits:
- A highly-interactive user interface, comparable to traditional applications, such as word processors and spreadsheets.
- Lower bandwidth requirements. An application does not necessarily have to connect back to the Web server on each click, and it can cache already-downloaded information. Thus, it can provide better interactivity on slow connections.
- Support for off-line use.
On each launch, Java Web Start checks the Web server to see if a new version of the application is available, and if so, automatically downloads and launches it. Thus, applications are automatically brought up to date. There is no complicated upgrade procedure.
Java Web Start is built on top of the Java 2 platform, which provides a comprehensive security architecture. Applications launched with Java Web Start will, by default, run in a restricted environment («sandbox») with limited access to files and network. Thus, launching applications using Java Web Start maintains system security and integrity.
An application can request unrestricted access to your system. In this case, Java Web Start will display a Security Warning dialog when the application is launched for the first time. The security warning will show information about the vendor who developed the application. If you choose to trust the vendor, then the application will be launched. The information about the origin of the application is based on digital code signing.
Installation Instructions
Using Java Web Start Software
Java Web Start allows you to launch Java-technology-based applications directly from the Web. An application can be launched in three different ways:
- From a Web browser by clicking on a link.
- From Java Web Start’s built-in Application Manager, which tracks recently used applications and provides quick access to your favorite applications.
- From desktop icons or the Start Menu (Microsoft Windows only).
Regardless of which way is used, Java Web Start will connect back to the Web server each time an application is launched to check whether an updated version of the application is available.
Launching from a Web browser
On the ( Java Web Start demos page), there are links to a number of applications that can be launched with a single click of a mouse. Try launching the different applications by clicking on the Launch buttons. The Web browser will launch Java Web Start, which will then download, cache, and execute the given application. You will notice that the second time you launch an application, it starts much more quickly since it is already present locally and does not need to be downloaded again.
Most of the demos on the page are just downloaded and executed without any user intervention. These applications run in a restricted environment in which they are prevented from accessing the local disk and network, and can be guaranteed not to install any viruses on your computer.
Some demos require extra privileges, such as access to your local hard disk. For these applications, a security dialog will pop up with information about the origin of the application based on who digitally signed the code. The application will run only if you decide to trust the vendor.
That is really all there is to using Java Web Start, but how does it work? The HTML links that launch the applications are, in fact, standard HTML links. However, instead of pointing to another Web page, they link to a special configuration file called a JNLP file. The Web browser examines the file extension and/or the MIME type of the file, and sees that it belongs to Java Web Start. It then launches Java Web Start with the downloaded JNLP file as an argument. Java Web Start proceeds with downloading, caching, and running the application as directed by the JNLP file.
Launching from the built-in Application Manager
The Application Manager is a built-in part of the Java Web Start product. It lets you quickly and easily launch applications that have previously been launched by Java Web Start. It is a combination of a History menu and a Start/Programs menu for your Web deployed Java-technology-based applications. The Application Manager also allows you to see additional information about the applications, with links the applications’ home pages.
You launch an application from the Application Manager by double clicking on the application icon or by clicking the launch button.
Another important feature of the Application Manager is the Preferences dialog which lets you examine and modify settings used by Java Web Start. For example, this includes tabs which allow you to:
- Specify an HTTP Proxy (or tell Java Web Start to use the default browser settings).
- Clear the cache of downloaded applications.
- Specify the location of the different versions of Java runtime environments.
- Select whether a Java console is to be displayed.
- View the set of root security certificates.
The Application Manager is launched by either clicking on the Java Web Start icon on the desktop or in the Start Menu on Microsoft Windows. On the Solaris TM Operating Environment and Linux, it is launched by invoking the javaws command in the Java Web Start installation directory. The Application Manager can also be launched from a Web browser; see, for example, the ( demos page).
Launching from desktop icons and the Start Menu (Microsoft Windows only)
Java Web Start technology can automatically create shortcuts on the Microsoft Windows desktop and in the Start Menu for Web deployed Java-technology-based applications. By default, Java Web Start asks the second time an application is launched, if a shortcut should be created. This can be changed using the Preference panel.
Shortcuts can also be added and removed by using the Application Manager, using the Application/Create Shortcut, and using Application/Remove Shortcut menu item.
Using Java Web Start Software Behind a Proxy Server/Firewall
Java Web Start software must be configured with the correct proxy settings in order to launch applications from outside your firewall. Java Web Start software will automatically try to detect the proxy settings from the default browser on your system (Internet Explorer or Netscape TM browsers on Microsoft Windows, and Netscape browsers on the Solaris Operating Environment and Linux). Java Web Start technology supports most web proxy auto-configuration scripts. It can detect proxy settings in almost all environments.
If the proxy setting cannot be automatically detected, then you will be prompted to specify the proxy settings the first time you use Java Web Start. Java Web Start will also prompt you for a user name and password required to access an authenticating proxy server. This user name and password will be stored for the current invocation of Java Web Start. However, at the time a newly invoked Java Virtual Machine, if accessing a secure web site, will prompt you for the user name and password since this information is stored within a Java Virtual Machine instance.
You can also use the Java Web Start Preferences panel to view or edit the proxy configuration. Launch the Application Manager, either by clicking on the icon on the desktop (Microsoft Windows), or type ./javaws in the Java Web Start installation directory (Solaris Operating Environment and Linux), and then select Edit/Preferences. If you are in an environment where access to the Web is through a proxy server, you are encouraged to use the Java Web Start Preferences panel to check that these are set-up correctly.
Release Notes
For a list of bug fixes and enhancements that were made for this release of the Java Web Start software, please refer to the release notes.