Remote Debugging Java Applications With JDWP
Most of Java developers have had the need to debug their applications, usually to find and fix an issue there. In many cases, the application to debug (known as the “debuggee”) is launched from within the IDE used by the developer, while the debugger is also integrated in the IDE, allowing easy inspection of the program state in a step-by-step manner. Sometimes, however, the debuggee JVM is launched from a separate command line, or by executing it on a separate host. In such scenarios, debugging necessitates launching the JVM with some options suitable for debugging, while your IDE debugger would have to connect to it. This is where JDWP (Java Debug Wire Protocol) comes into play.
What is JDWP?
In order to debug remotely executed JVMs (where the debuggee is separately launched locally or on another machine), the Java platform defines a protocol for communication between the JVM and the debugger. JDWP dictates the format of the commands sent by the debugger (e.g. to evaluate a local variable), and replies by the JVM. The exact way of transporting the packets is not specified and is up to the implementation to define transport mechanisms. What JDWP specifies is the format and layout of packets containing commands and those containing replies. Therefore it is conceptually very simple.
JDWP is only one part of the debugging infrastructure in the Java platform. The endpoints (debugger and debuggee) communicating over JDWP implement other specifications to provide the actual debugging functionality. The JVM implements the JVM Tool Interface (JVMTI) to provide debugging functionality for it, for example, to control executions using breakpoints or inspecting the current object. JVMTI is the low-level layer implemented natively in the JVM. The debugger implements another interface called the Java Debug Inteface (JDI) that provides a high-level way to carry debugging requests from the debugger process. JDI is a pure Java interface. Together, JVMTI, JDWP and JDI form the main layers of the Java Platform Debugger Architecture. Links to official references about all these specifications are provided at the end.
In the Oracle Java implementation, there are two transport mechanisms provided: the socket transport, and the shared memory transport for Windows only. The socket transport ( dt_socket ) relies on TCP sockets bound to listen on a port for connections, and using that connection to transfer the debug session packets. Shared memory transport ( dt_shmem ) uses shared memory to send and receive packets. The main difference is that socket transport allows debugging a target JVM application running on a remote machine, while shared memory allows only debugging locally running applications. For the examples that follow, we’ll focus only on socket transport.
Debugging remotely using JDWP
The way a debugger connects to a target JVM is by having one act as the server listening for an incoming connection, and the other attaching to the server. The server endpoint could be either the JVM or the debugger. This applies for both socket transport and shared memory transport. Therefore, there are two steps to perform in order to remotely debug a target app:
- Launch either the JVM or the debugger in server mode, so that it listens at a certain address, namely an assigned IP address and port number.
- Attach the other part to the listening server on that address.
java -agentlib:jdwp=transport=dt_socket,server=y,suspend=y,address=8000 . MainClass
- transport=dt_socket tells the JDWP agent to use socket transport.
- server=y means that the JVM will listen for a debugger to attach to it.
- suspend=y means the JVM will wait for the debugger to attach before executing the main class. This is also the default value. If set to n, the JVM will immediately execute the main class, while listening for the debugger connection.
- address=8000 specifies the address at which the debug socket will listen. In this case, the JVM will listen at port 8000 for incoming connections only from the local host (starting JDK 9).
The second step is to attach the debugger at that address. All popular IDEs provide a way to easily do this. In Eclipse for example, it can be configured by going to Run -> Debug Configuration and creating a Remote Java Application configuration:

Notice that the host and port must match the address of the JDWP agent on JVM side.
[JDK 9+] Binding listen socket to all addresses
In the previous example, the address was set to 8000 (port number) without any host name or IP address. Before JDK 9, this would mean the JVM would listen on all available IP addresses making the socket accessible by debuggers on remote machines. Starting JDK 9, this was changed to only allow local connections for better security. In other words, -agentlib:jdwp=transport=dt_socket,server=y,address=8000 is now equivalent to -agentlib:jdwp=transport=dt_socket,server=y,address=localhost:8000 .
To bind the socket to addresses allowing remote connections, either prefix the port with the host name, IP address, or an asterisk ( * ) to bind to all available IP addresses:
More examples
Adding a timeout
We can add a timeout for the JDWP agent listening for the debugger. To make the JVM exit after 10 seconds without any debugger attaching:
Listening at a dynamic port
If server=y (i.e. JVM is listening for connection), we can skip the address option, which will make it use a dynamically assigned port. Since no address was specified, this allows only local connections. The chosen port will be displayed at stdout of the JVM, e.g.:
Listening for transport dt_socket at address: 12345
The other way around: attaching to a debugger
We can set server=n on the JVM command line option (or just remove the server option as it defaults to n ), and tell it to attach to a debugger at a certain address. We would first run the debugger in listening mode:

Let’s say the debugger was started on host2 . We would then run the JVM with the option:
Delaying JDWP connection establishment until a specific exception is thrown
A useful option to the JDWP agent is to start the JVM as normal and wait until a specific exception is thrown. For example, say you want to debug a failing application with a MyCustomException but don’t want to initiate the debugger connection until it is thrown. This can be done with the onthrow option:
This would start the application normally without listening on the address. When the exception is thrown, the agent will listen on port 8000 and a debugger can be attached to it. The launch option is a mandatory option along with onthrow used to start a certain process when the exception is thrown. The process will be given the transport and port number as arguments. It can be used for example to automatically launch the debugger to attach to the listening VM upon the exception being thrown.
Удаленная отладка Spring Boot приложений (IntelliJ + Eclipse)
Локальная разработка на вашей машине удобна. Но как только вы развернете свое приложение, у вас будет совсем другая среда, что может привести к непредвиденному поведению или ошибкам. Использование ручной печати
System.out.println («Теперь мы находимся здесь, а переменная X is =» + x); делает код вашего приложения довольно громоздким и его выполнение занимает много времени. К счастью в Java есть зрелая отладочная экосистема. Это позволяет нам удаленно отлаживать приложения Spring Boot и анализировать его рабочий процесс на удаленном сервере / облаке.
Чтобы показать вам, насколько на самом деле проста удаленная отладка с помощью Java, я буду использовать приложение Spring Boot 2.3, работающее на Java 11. Я разверну приложение как в виде контейнера Docker, так и с помощью старой школы java -jar… way. Наконец, вы узнаете, как удаленно отлаживать интерфейс REST с помощью IntelliJ IDEA (2019.1) и Eclipse (2019-03).
Настройка проекта
Для приложения я выбрал простое приложение Spring Boot 2.3. Он включает в себя встроенную базу данных H2 и JPA для обслуживания книг, которые генерируются случайным образом при запуске.
Класс контроллера, который я позже буду использовать для отладки, выглядит следующим образом:
@Slf4j @RestController @RequestMapping("/api/books") public class BookController < @Autowired private BookRepository bookRepository; @GetMapping public ListgetAllBooks() < log.info("Retrieving all available books"); ListallAvailableBooks = bookRepository.findAll(); return allAvailableBooks; > @GetMapping("/") public Book getBookById(@PathVariable("id") Long id) < log.info("Retrieving book with id: <>", id); Optional book = bookRepository.findById(id); if (book.isEmpty()) < throw new BookNotFoundException("Can't find book with id: " + id); >return book.get(); > >Остальная часть приложения опущена, но вы можете найти весь исходный код на GitHub.
Развертывание
Чтобы иметь возможность удаленной отладки вашего Java-приложения Spring Boot, мы должны передать в JVM следующие аргументы:
-agentlib:jdwp=transport=dt_socket,server=y,suspend=n,address=*:8000Указанный порт в этом аргументе позже используется для подключения наших IDE к работающей JVM и не должен совпадать с портом приложения.
Аргумент может быть передан в JVM с помощью следующей команды:
java -agentlib:jdwp=transport=dt_socket,server=y,suspend=n,address=*:8000 -jar target/remote-debugging-spring-boot-application.jarПри использовании Docker мы можем добавить этот аргумент в нашу ENTRYPOINT и просто нужно отобразить дополнительный порт при запуске Docker контейнера:
FROM openjdk:11-jdk-slim VOLUME /tmp COPY target/remote-debugging-spring-boot-application.jar app.jar ENTRYPOINT ["java","-agentlib:jdwp=transport=dt_socket,server=y,suspend=n,address=*:8000","-jar","/app.jar"]docker run -d -p 8080:8080 -p 8000:8000 --name debug-me debug-meВажное замечание: Чтобы выполнить удаленную отладку на удаленном сервере в следующих шагах, убедитесь, что никакое правило брандмауэра не блокирует этот порт, и вы можете получить к нему доступ с локального компьютера.
Удаленная отладка приложений Spring Boot с помощью IntelliJ IDEA
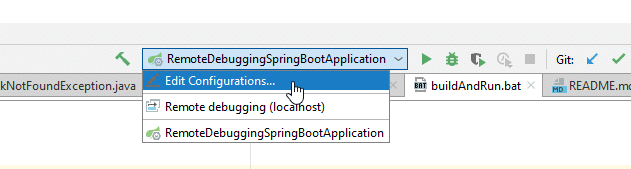
Удаленная отладка приложения Spring Boot с IntelliJ IDEA требует, чтобы вы открыли проект (исходный код) с IntelliJ. Затем мы можем перейти к редактированию конфигурации… в правом верхнем углу рядом с зеленой кнопкой запуска:
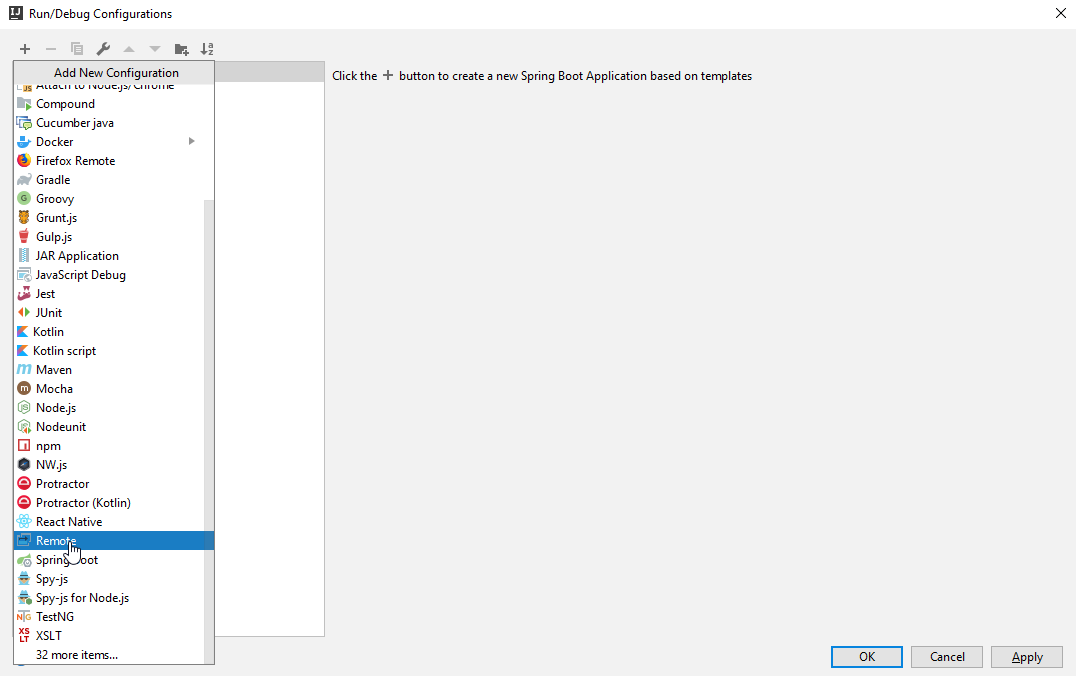
Выберите создание новой конфигурации Run / Debug, нажимая кнопку +, и выберите Remote. Старые версии IntelliJ могут иметь разные названия, такие как Remote Debugging (удаленная отладка), Debugging (отладка) и т.д.:
Затем введите имя для выбранной вами конфигурации удаленной отладки и укажите порт и хост, к которому вы хотите подключиться (в нашем примере это порт 8000). Убедитесь, что вы выбрали правильный проект для Use module classpath (Использовать classpath модуля) и нажмите Apply или Ok:
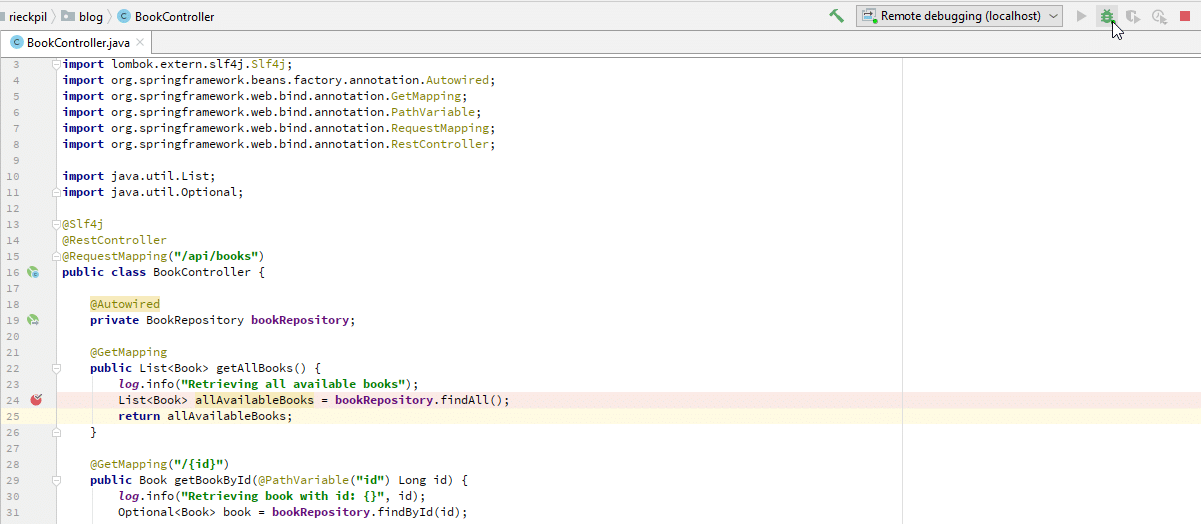
Теперь отметьте в исходном коде строку, которую вы хотите отладить, и запустите конфигурацию удаленной отладки Remote debugging configuration(убедитесь, что ваше приложение уже запущено):
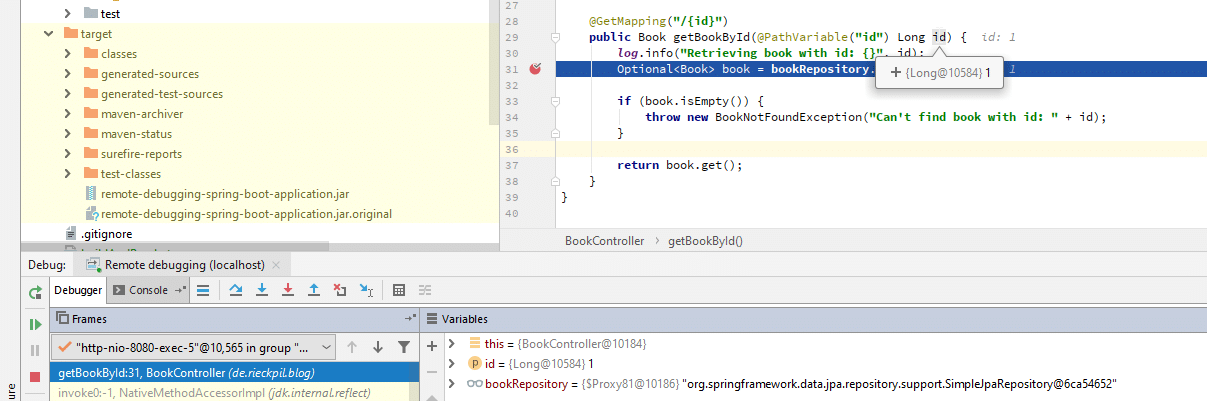
Теперь попробуйте получить доступ к конечной точке (http://localhost:8080/api/books в этом примере) с помощью браузера или клиента API, и вы сможете отладить указанную часть вашего приложения в вашей IDEA:
Чтобы остановить удаленную отладку приложения, просто нажмите красную кнопку остановки.
Удаленная отладка приложений Spring Boot в Eclipse
Для Eclipse вы также сначала должны импортировать проект, а затем перейти к пункту меню Run -> Debug Configurations: