How to add JAR Files in Eclipse Project’s Build path? Example
In this Java Eclipse tutorial, I will show you two ways to add external JAR files in Eclipse Java projects. Many times we need to use external JAR files in our Java application for different needs like for general purposes you may use Google Guava or Apache Commons. If you are using Spring or Hibernate framework then you need their JAR files as well. In order to use any third-party library or framework, we have to add their JAR files in the classpath, to compile and run our Java programs. Since Eclipse is the most popular IDE for developing Java applications, it’s important to know how you can add external JARs into your Java project’s build path.
For example, suppose, you have downloaded an Apache commons JAR file from the internet and want to add that file to your Java project. In order to use classes and methods from that library, your project must reference those and this is what we will learn here.
You can even attach Java source files, corresponding to a JAR file for seeing actual code while navigating and debugging your Java program. This is really useful when you are stepping into the source code of a third-party library or any internal library while debugging. In my last article, I have shown you how to attach sources to a JAR file, which ideally should be next to this article, but never mind you can refer to them now.
Though you can add any external JAR files in your Java project on Eclipse, I suggest using Maven as a build tool for dependency management, it’s a lot easier to manage a central local repository using Maven for keeping those useful JAR files, instead of searching on the internet, downloading it and then manually adding into your Java project’s build path.
2 ways to add JAR file in Java project build path in Eclipse
Here are a couple of ways to add .jar files in the Java project on Eclipse IDE. Though there are different ways you can reuse JAR files e.g. in form of a library, Eclipse provides its own bundled JRE and JUnit library, but most of the time, we add .jar files as an external dependency. These are the JAR files, which you might have downloaded from the internet or copied from any other project.
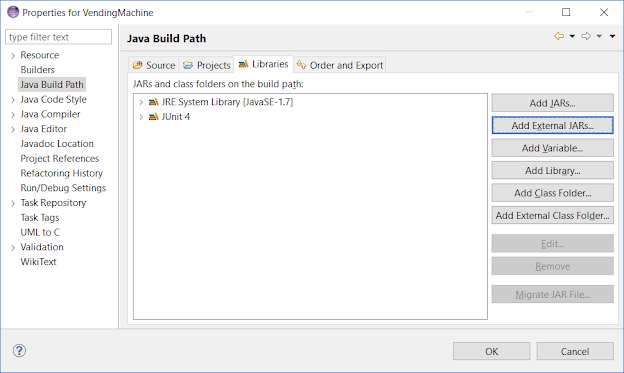
1) Open project properties windows by following steps, Select Project -> Right Click -> Properties, then select Java Build Path and go to Libraries tab and click on Add External JARs. This allows you to reference any JAR file in any folder on your machine.
Just make sure that the location of the JAR file is accessible. Once you have selected the JAR file after browsing, it will appear inside your project as Referenced Libraries.
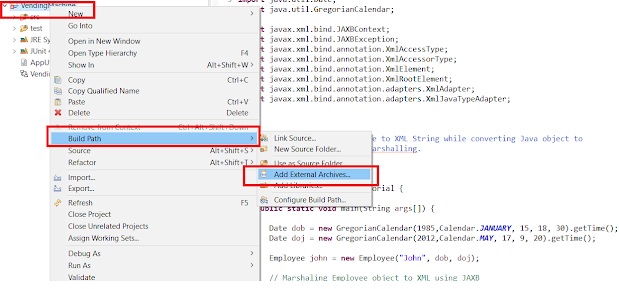
2. This is the shortcut of the earlier method, In this method, you don’t need to navigate project properties windows. Just Select project -> Right Click -> Build Path -> Add external archives .
This will open the same file explorer as the earlier method, which allows you to browse through directories and choose external JAR. Once successfully added, it will appear inside Referenced Libraries of your project.
That’s all on how to add JAR files in the Eclipse project build path. The second way is much quicker than the first way, as you only need a couple of selections, but knowledge of project properties windows helps a lot, like while changing compiler settings for your project as seen in my post avoiding must override method error in Eclipse. You can use it anyway as per your liking, but make sure that JAR appears in referenced libraries inside your project when you see it from project explorer.
- Top 30 Eclipse keyboard shortcuts for Java programmers (shortcuts)
- 3 Books to Learn Eclipse IDE for Java Programmers (books)
- 10 Essential Eclipse debugging tips for Java developers (tips)
- How to do remote debugging in Eclipse (guide)
- Eclipse shortcut to comment and uncomment several lines (article)
- How to increase heap size of Java Program in Eclipse (tutorial)
- How to solve the «main class not found error» in Eclipse? (guide)
- How to connect Eclipse to the Oracle database? (guide)
How to Create a Config.Properties file in Eclipse and Load it

In here we are going to see how to create a config.properties file in Eclipse and how to load it and bring it in use. You see it’s a good idea to place all your properties in a different file. So that you retrieve your data using your code, so that nothing is hard coded.
It is a good coding practice to use a config.properties file where you can store all your fixed client requirements and use your code to call each values using the getProperty() method.

In here, we are going to see exactly that – how to create a config.properties file in Eclipse, load it and then use it effectively.
How to Create a config.properties file in Eclipse
Step 1: Right click on the folder you wish to place your config file in and then click on New> File

Step 2: Then in the New File dialog box, in the text box File Name, type the name as “config.properties”:

Step 3: Click on Finish

It will create a blank properties file for you where you can now store all your properties to be extracted whenever you need an input somewhere in your code.
I will just go ahead and add some properties that I may need for my code in the long run.
Step 4: Provide properties in your config.properties file:

Now you can load these properties to be used in your code. Loading properties is important or your Eclipse would treat it as just an unclaimed file.
How to Load Properties in Eclipse
This is the next important step while working with config.properties file. You need to load it as well. Here are the steps:
First of all, we need to initialize properties.
Step 1: Type the following in your class:
If you notice an error popping up at Properties, just import the following:
import java.util.Properties;
or put your mouse cursor on Properties and it will flare options to consider. Click on the option that says java.util.

Step 2: Now instantiate it by calling the constructor of Properties.
There! It has been instantiated as well.
Step 3: Now you need to make Eclipse take the inputs from it using an Input Stream or really you can use any method described in how to read a file tutorial.
For that we will initialize FileInputStream first and then instantiate it in a similar manner:
First we will initialize it.
Step 4: Time to instantiate it:
fis = new FileInputStream(FILEPATH);
Replace the FILEPATH with the actual path of your config file.
Make sure you import java.io for it to work:

You might also have to use try catch to handle exceptions:

If you aren’t sure how to handle exceptions, feel free to check out that tutorial as well.
Step 5: Now is the time to actually load the config.properties file.
You can do so by simply adding a piece of code which takes InputStream as a parameter.
The above line will load the file input stream
So your code might look like this:

How to Use the Properties in Your Code
Now let’s see how we are going to use it in our code.
In order to call the properties all you have to do is use the Properties instance to call and use the method getProperty() to obtain the said property.
Append the following in your code:

As you can see we are simply using the getProperty() method of Properties class to retrieve information from the config.properties file.
Run the program and you will get the following result:

Noiiice! Hope this page was useful.