- Different ways to load classpath resources in Java
- Example
- Compiling with javac
- Compiling with javac using the output folder option
- Resource loading in a Maven project
- Maven Output:
- Where are target resources after maven build?
- How to change maven default ‘resources’ directory?
- Conclusion:
- Java path source folder
Different ways to load classpath resources in Java
Followings are the preferred ways to load resources in classpath.
- this.getClass().getResource(resourceName): It tries to find the resource in the same package as ‘this’ class unless we use absolute path starting with ‘/’
- Thread.currentThread().getContextClassLoader().getResource(resourceName): A ClassLoader can be passed (shared) when creating a new thread using Thread.setContextClassLoader, so that different thread contexts can load each other classes/resources. If not set, the default is the ClassLoader context of the parent Thread. This method is not appropriate if we want to load resources inside the packages unless we use complete paths starting from root.
- ClassLoader.getSystemClassLoader().getResource(resourceName) : ClassLoader.getSystemClassLoader() gives the class loader used to start the application. we have to use complete path for the resources starting from root.
If we don’t create any threads in the entire application, the main thread will end up with the system class loader as their context class loader.
Example

In above example, we created a simple project using IntelliJ IDE 15.0.2 and JDK 1.8. Notice how resources are copied in output folder . Resources are loaded from output folder during runtime.
----------------------------------------- using this.getClass().getResource ----------------------------------------- -> attempting input resource: test-pkg-resource.txt absolute resource path found : C:/load-resource/out/production/load-resource/com/logicbig/example/test-pkg-resource.txt file content: test file, local to package -> attempting input resource: /test-pkg-resource.txt no resource found: /test-pkg-resource.txt -> attempting input resource: root-resource.txt no resource found: root-resource.txt -> attempting input resource: /root-resource.txt absolute resource path found : C:/load-resource/out/production/load-resource/root-resource.txt file content: root test file ----------------------------------------- using current thread context loader ----------------------------------------- -> attempting input resource: test-pkg-resource.txt no resource found: test-pkg-resource.txt -> attempting input resource: /test-pkg-resource.txt no resource found: /test-pkg-resource.txt -> attempting input resource: root-resource.txt absolute resource path found : C:/load-resource/out/production/load-resource/root-resource.txt file content: root test file -> attempting input resource: /root-resource.txt no resource found: /root-resource.txt ----------------------------------------- using ClassLoader.getSystemClassLoader() ----------------------------------------- -> attempting input resource: test-pkg-resource.txt no resource found: test-pkg-resource.txt -> attempting input resource: /test-pkg-resource.txt no resource found: /test-pkg-resource.txt -> attempting input resource: root-resource.txt absolute resource path found : C:/load-resource/out/production/load-resource/root-resource.txt file content: root test file -> attempting input resource: /root-resource.txt no resource found: /root-resource.txt
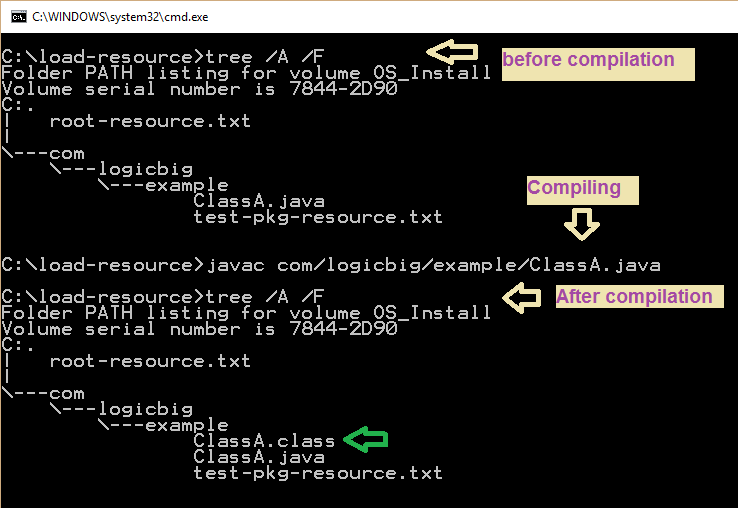
Compiling with javac
By default javac compiles the java source files in the same directory. In above example if we run this command in Windows O.S:
C:\load-resource>javac com/logicbig/example/ClassA.java
The compilation will end up like this:
Now run ‘java’ from command line:
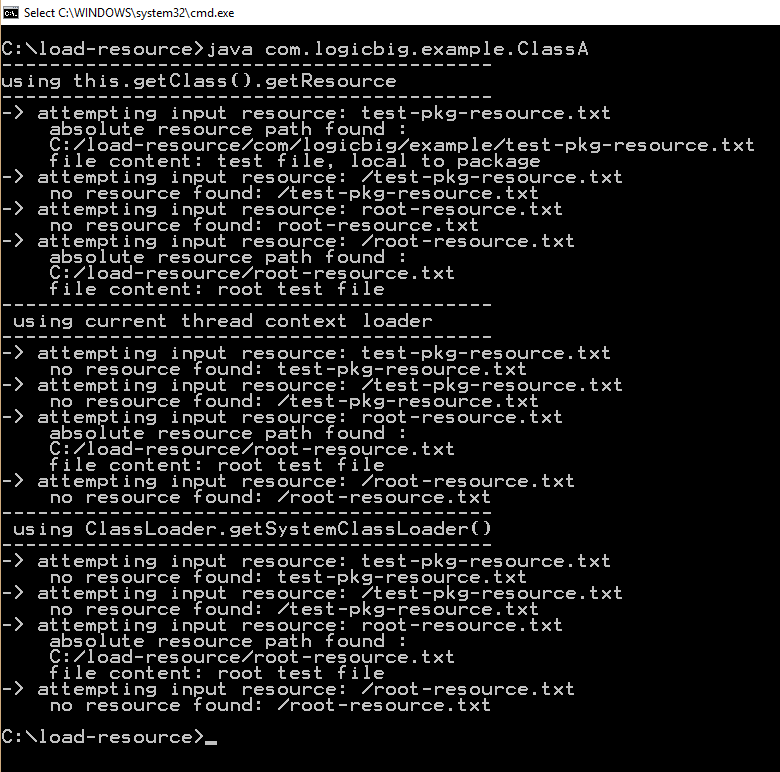
The output is same as we saw with IntelliJ project above because relative locations of the resource files are sill same from .class file.
Compiling with javac using the output folder option
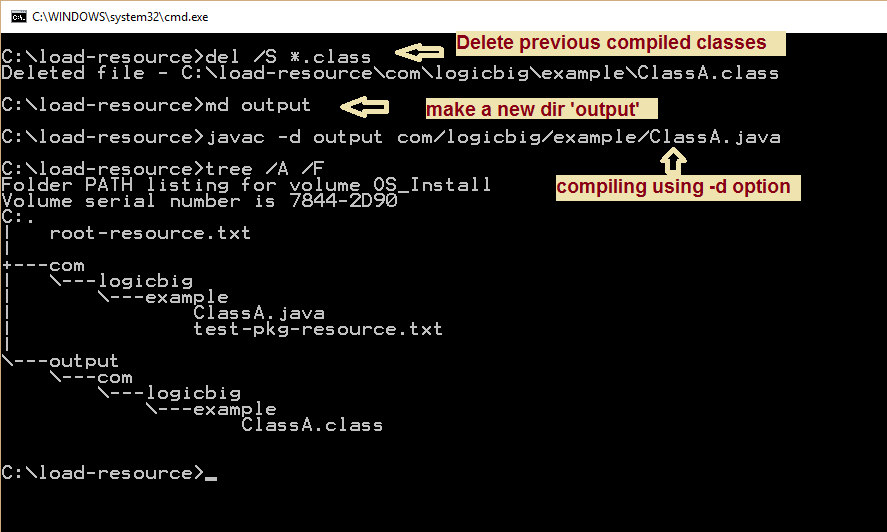
The resources in this case are not copied at all. We have to copy them manually or better use some IDE or build tool like maven.
Resource loading in a Maven project
Maven by default has a standard directory structure. During build it only copies resources to ‘/target/classes’ folder which were originally placed under src/main/resources directory. If resources are somewhere else they are ignored (this is default behavior which can be customized, we will explore that later).
Let’s delete the previously created output folder and convert our above example to the maven project. We just need to add a pom and put all java sources under src/main/java (see quick tutorials on maven here ):
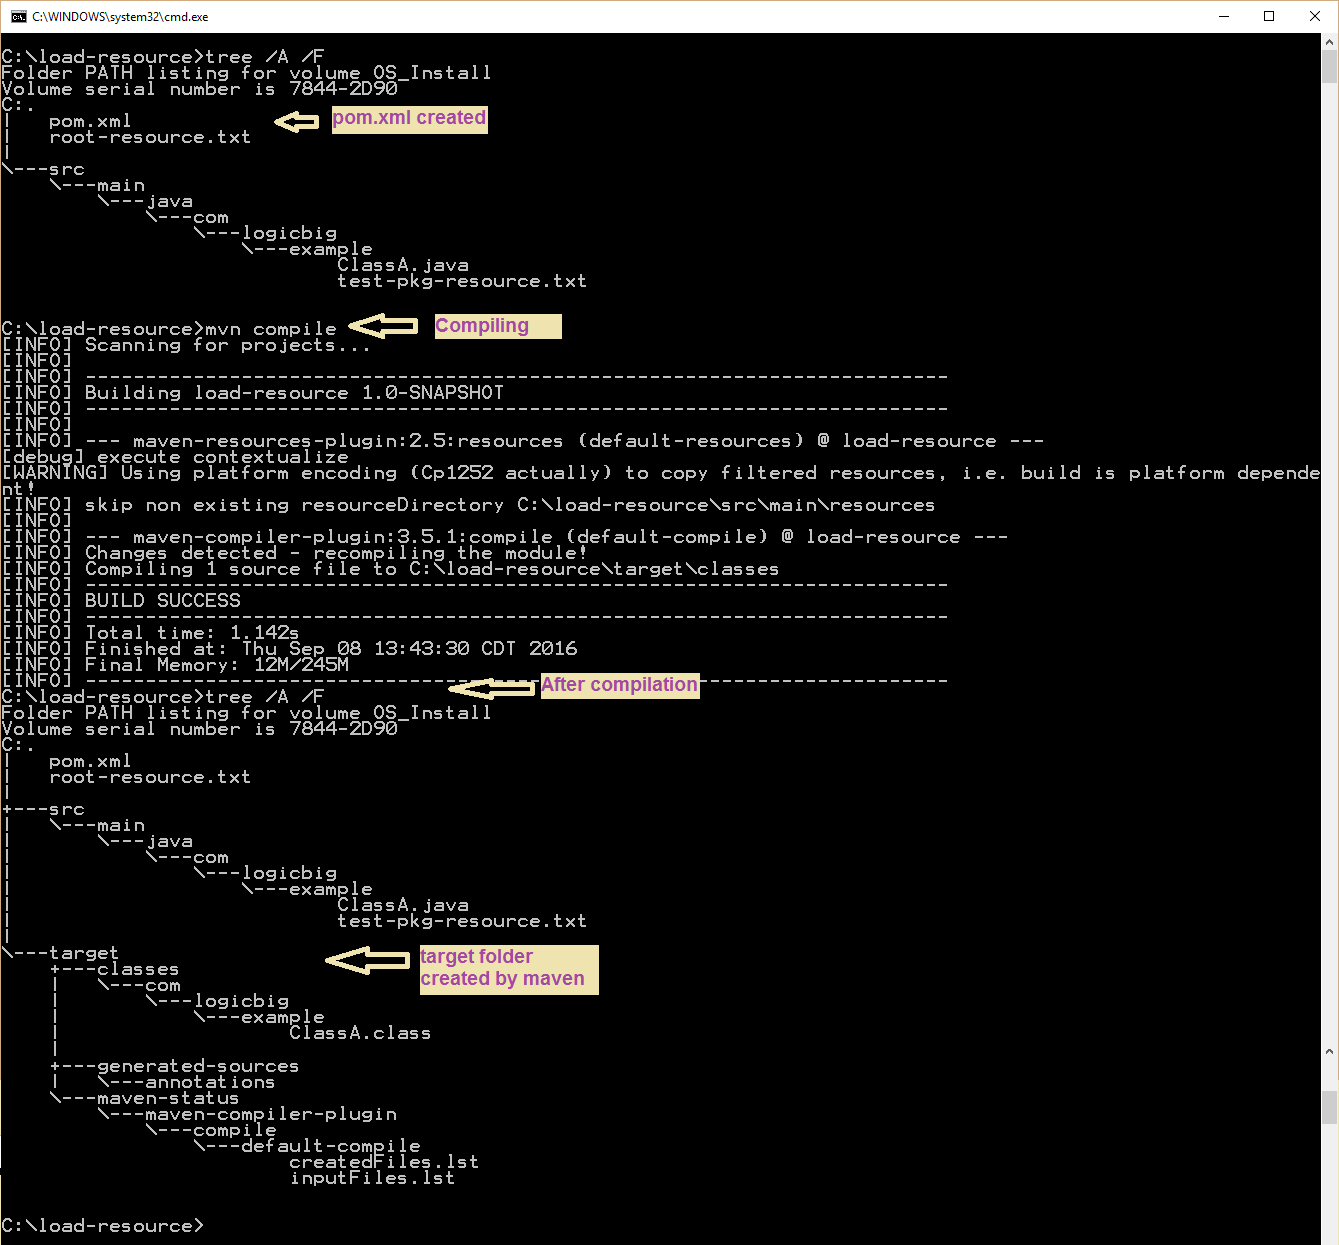
We can see there are no resources copied because we have to place all our txt files in the ‘resources’ folder.
Here’s the complete maven project with all txt files in the ‘resources’ folder:
Dependencies and Technologies Used:
Maven Output:
C:\load-resource>mvn exec:java -Dexec.mainClass="com.logicbig.example.ClassA" [INFO] Scanning for projects. [INFO] [INFO] ------------------------------------------------------------------------ [INFO] Building load-resource 1.0-SNAPSHOT [INFO] ------------------------------------------------------------------------ [INFO] [INFO] --- exec-maven-plugin:1.4.0:java (default-cli) @ load-resource --- ----------------------------------------- using this.getClass().getResource ----------------------------------------- -> attempting input resource: test-pkg-resource.txt no resource found: test-pkg-resource.txt -> attempting input resource: /test-pkg-resource.txt absolute resource path found : C:/load-resource/target/classes/test-pkg-resource.txt file content: test file, local to package -> attempting input resource: root-resource.txt no resource found: root-resource.txt -> attempting input resource: /root-resource.txt absolute resource path found : C:/load-resource/target/classes/root-resource.txt file content: root test file ----------------------------------------- using current thread context loader ----------------------------------------- -> attempting input resource: test-pkg-resource.txt absolute resource path found : C:/load-resource/target/classes/test-pkg-resource.txt file content: test file, local to package -> attempting input resource: /test-pkg-resource.txt no resource found: /test-pkg-resource.txt -> attempting input resource: root-resource.txt absolute resource path found : C:/load-resource/target/classes/root-resource.txt file content: root test file -> attempting input resource: /root-resource.txt no resource found: /root-resource.txt ----------------------------------------- using ClassLoader.getSystemClassLoader() ----------------------------------------- -> attempting input resource: test-pkg-resource.txt absolute resource path found : C:/load-resource/target/classes/test-pkg-resource.txt file content: test file, local to package -> attempting input resource: /test-pkg-resource.txt no resource found: /test-pkg-resource.txt -> attempting input resource: root-resource.txt absolute resource path found : C:/load-resource/target/classes/root-resource.txt file content: root test file -> attempting input resource: /root-resource.txt no resource found: /root-resource.txt
Where are target resources after maven build?
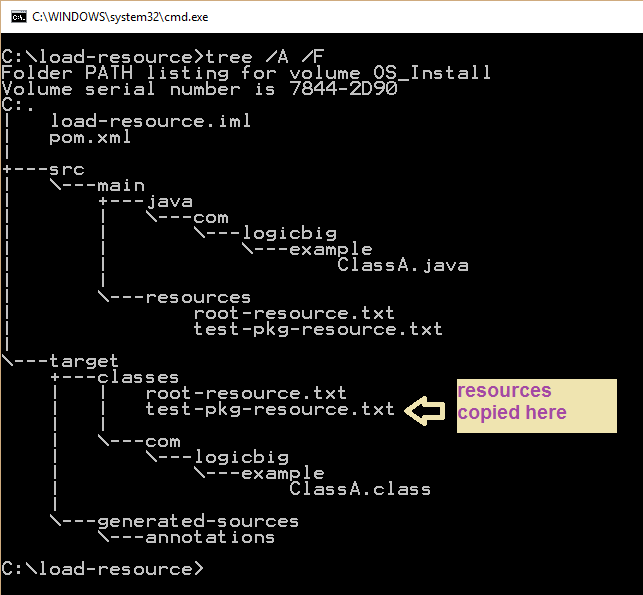
Here we learn followings about resource loading in maven
- this.getClass().getResource: This works if we use path from root, /root-resource.txt . That makes sense because our resources are just under ‘classes’ in the target folder.
- Thread.currentThread().getContextClassLoader().getResource(resourceName): This works without a leading slash ‘/’
- ClassLoader.getSystemClassLoader().getResource(resourceName): Same as context class loader, it only works without a leading slash ‘/’.
How to change maven default ‘resources’ directory?
We can use in pom.xml to override default resource location. In the followings, we are specifying ‘java’ and ‘resources’ directories as resources.
.src/main/java src/main/resources
.
Conclusion:
The java runtime behavior is consistent in all above cases. Although output is different because of the different locations of resource files relative to .class files. It all depends where our build process places the resources files in output/target directory.
Java path source folder
Path testFile = Paths.get(«C:\\Users\\jleom\\Desktop\\java\\javarush task\\test.txt»); Path testFile2 = Paths.get(«C:\\Users\\jleom\\Desktop»); System.out.println(testFile.relativize(testFile2));
Класс Path и класс Paths предназначены для работы с файловой системой в Java, однако они предоставляют разные функции и методы. Path — это интерфейс, который определяет методы для работы с путями к файлам и каталогам в файловой системе. Он предоставляет ряд методов для работы с путями, таких как resolve(), relativize(), getParent(), getFileName(), toAbsolutePath() и другие. Paths — это утилитный класс, который предоставляет статические методы для создания экземпляров класса Path. Он не имеет методов для работы с путями напрямую, но предоставляет методы для создания экземпляров Path из строковых значений или URI. Еще методы по классу Paths: getFileSystem(): возвращает объект FileSystem, представляющий файловую систему, которой принадлежит данный путь. getDefault(): возвращает объект FileSystem, представляющий файловую систему по умолчанию. getTempDirectory(): возвращает объект типа Path, представляющий временный каталог. getHomeDirectory(): возвращает объект типа Path, представляющий домашний каталог пользователя. exists(Path path, LinkOption. options): проверяет, существует ли файл или каталог, представленный указанным путем. Класс Paths удобен для работы с файловой системой, так как он предоставляет простой и удобный API для работы с путями.
Надо добавить в статью, Paths.get был в 8 Java. Потом появился Path.of. Если у вас не работает Path.of (версия Java не позволяет), только тогда нужен Paths.get