Java loading screen thread
Splash screens are simple graphics which load quickly upon startup, and assure the user that the application is loading promptly. The SplashScreen class was added to JSE 6, and should be used if available.
If JSE 6 is not available, then the following technique is provided as an alternative.
Various policies for controlling the appearance and disappearance of the splash screen are possible. Here, the splash screen disappears when a main window has finished loading.
This example is also of interest since it demonstrates clearly that the launch thread is unusual — it’s distinct from the event dispatch thread, where most of the work of a Swing application takes place:
- upon launch, the launch thread shows a splash screen, which activates the event dispatch thread
- once the splash screen is showing (or, more precisely, is «realized»), the launch thread acts as a «worker thread», and can only close the splash screen indirectly, using EventQueue.invokeLater to properly inject an event into the event dispatch thread
package hirondelle.stocks.main; import java.awt.*; import java.net.URL; import java.awt.image.ImageObserver; /** * Present a simple graphic to the user upon launch of the application, to * provide a faster initial response than is possible with the main window. * * Adapted from an * item * on Sun's Java Developer Connection. * * This splash screen appears within about 2.5 seconds on a development * machine. The main screen takes about 6.0 seconds to load, so use of a splash * screen cuts down the initial display delay by about 55 percent. * * When JDK 6+ is available, its java.awt.SplashScreen class should be used instead * of this class. */ final class SplashScreen extends Frame < /** * Construct using an image for the splash screen. * * @param aImageId must have content, and is used by * to retrieve the splash screen image. */ SplashScreen(String aImageId) < /* * Implementation Note * Args.checkForContent is not called here, in an attempt to minimize * class loading. */ if (aImageId == null || aImageId.trim().length() == 0)< throw new IllegalArgumentException("Image Id does not have content."); > fImageId = aImageId; > /** * Show the splash screen to the end user. * * Once this method returns, the splash screen is realized, which means * that almost all work on the splash screen should proceed through the event * dispatch thread. In particular, any call to dispose for the * splash screen must be performed in the event dispatch thread. */ void splash()< initImageAndTracker(); setSize(fImage.getWidth(NO_OBSERVER), fImage.getHeight(NO_OBSERVER)); center(); fMediaTracker.addImage(fImage, IMAGE_ID); try < fMediaTracker.waitForID(IMAGE_ID); >catch(InterruptedException ex)< System.out.println("Cannot track image load."); > SplashWindow splashWindow = new SplashWindow(this,fImage); > // PRIVATE private final String fImageId; private MediaTracker fMediaTracker; private Image fImage; private static final ImageObserver NO_OBSERVER = null; private static final int IMAGE_ID = 0; private void initImageAndTracker()< fMediaTracker = new MediaTracker(this); URL imageURL = SplashScreen.class.getResource(fImageId); fImage = Toolkit.getDefaultToolkit().getImage(imageURL); > /** * Centers the frame on the screen. * *This centering service is more or less in ; * this duplication is justified only because the use of * would entail more class loading, which is * not desirable for a splash screen. */ private void center()< Dimension screen = Toolkit.getDefaultToolkit().getScreenSize(); Rectangle frame = getBounds(); setLocation((screen.width - frame.width)/2, (screen.height - frame.height)/2); > private final class SplashWindow extends Window < SplashWindow(Frame aParent, Image aImage) < super(aParent); fImage = aImage; setSize(fImage.getWidth(NO_OBSERVER), fImage.getHeight(NO_OBSERVER)); Dimension screen = Toolkit.getDefaultToolkit().getScreenSize(); Rectangle window = getBounds(); setLocation((screen.width - window.width) / 2,(screen.height - window.height)/2); setVisible(true); > @Override public void paint(Graphics graphics) < if (fImage != null) < graphics.drawImage(fImage,0,0,this); > > private Image fImage; > /** * Developer test harness shows the splash screen for a fixed length of * time, without launching the full application. */ private static void main(String. aArgs)< SplashScreen splashScreen = new SplashScreen("StocksMonitor.gif"); splashScreen.splash(); try < Thread.sleep(2000); > catch(InterruptedException ex) < System.out.println(ex); >System.exit(0); > >
- *
- log basic system information *
- promptly show a splash screen upon startup *
- show the main screen *
- remove the splash screen once the main screen is shown *
Java Practices 3.012
© 2023 John O’Hanley
Source Code | Contact | License | RSS
Individual code snippets have a BSD license
Over 1,000,000 unique IPs last year
Last updated 2023-01-03
— In Memoriam : Bill Dirani —
41 Post

Android: how to create a loading screen – Part 2
Posted by Dimitri | Jan 21st, 2012 | Filed under Programming
This is the second tutorial from the post series that explains how to code a loading screen on Android. The first one can be found here. This post has a similar approach to the previous one, except this time, instead of using a AsyncTask to execute code on the background thread, a Thread and Handler objects are going to be used to achieve the same results.
The Activity featured below is somewhat similar to the first post, except this time, the UI rendering related functions calls will be more scattered throughout the Activity’s body. Additionally, the Runnable interface is going to be implemented multiple times in the below code. Not only that, but now it’s necessary to “kill” the thread manually after the code executes, a task that is handled automatically by the AsyncTask class (see this thread for more info).
All code has been developed and tested in Android 2.1, and is available for download at the end of the post.
package fortyonepost.com.lsth; import android.app.Activity; import android.app.ProgressDialog; import android.os.Bundle; import android.os.Handler; public class LoadingScreenActivity extends Activity implements Runnable < //A ProgressDialog View private ProgressDialog progressDialog; //A thread, that will be used to execute code in parallel with the UI thread private Thread thread; //Create a Thread handler to queue code execution on a thread private Handler handler; /** Called when the activity is first created. */ @Override public void onCreate(Bundle savedInstanceState) < super.onCreate(savedInstanceState); //Create a new progress dialog. progressDialog = new ProgressDialog(LoadingScreenActivity.this); //Set the progress dialog to display a horizontal bar . progressDialog.setProgressStyle(ProgressDialog.STYLE_HORIZONTAL); //Set the dialog title to 'Loading. '. progressDialog.setTitle("Loading. "); //Set the dialog message to 'Loading application View, please wait. '. progressDialog.setMessage("Loading application View, please wait. "); //This dialog can't be canceled by pressing the back key. progressDialog.setCancelable(false); //This dialog isn't indeterminate. progressDialog.setIndeterminate(false); //The maximum number of progress items is 100. progressDialog.setMax(100); //Set the current progress to zero. progressDialog.setProgress(0); //Display the progress dialog. progressDialog.show(); //Initialize the handler handler = new Handler(); //Initialize the thread thread = new Thread(this, "ProgressDialogThread"); //start the thread thread.start(); >//Initialize a counter integer to zero int counter = 0; @Override public void run() < try < //Obtain the thread's token synchronized (thread) < //While the counter is smaller than four while(counter >); > > > catch (InterruptedException e) < e.printStackTrace(); >//This works just like the onPostExecute method from the AsyncTask class handler.post(new Runnable() < @Override public void run() < //Close the progress dialog progressDialog.dismiss(); //Call the application's main View setContentView(R.layout.main); >>); //Try to "kill" the thread, by interrupting its execution synchronized (thread) < thread.interrupt(); >> > To use the Thread and Handler objects the first thing to do is to implement the Runnable interface. By doing this, the run() method must be overridden and defined on the Activity, which we is going to be explained in detail in the next paragraphs (line 8). At the beginning of the the above class, three member variables are being declared: a ProgressDialog object to display the background operation progress; a Handler object, to update the UI from a background thread and a Thread object, to execute code on the background (lines 11 through 15).
Next, the Activity’s onCreate() method is being defined. It initializes and displays the ProgressDialog object (lines 24 through 40). Not only that, but the handler and thread member variables are initialized. The Handler object is initialized with the default constructor. On the other hand, the Thread object is initialized by passing a Runnable and the name of the thread as a String (lines 43 and 45).
Since the Activity is implementing the Runnable interface and overriding the run() method, this can be passed as the first parameter to the Thread constructor (line 45). The thread is started in line 47, meaning that the code defined later on the run() method will be scheduled by the operational system to be executed in the recently started thread.
After the onCreate() method body, the integer counter is created and initialized to zero (line 51). Finally the aforementioned run() method is defined (lines 54 through 106). To simulate an expensive operation running on the background thread, the while block calls the wait() method of the background thread every 850 milliseconds, until the counter is equal or greater than 4 (lines 62 through 67).
Still inside this while block, the counter is incremented and the post() method is called from handler (line 70). This method updates the UI from another thread and it takes a Runnable instance as a parameter, which, in turn, requires that the virtual run() method to be defined (lines 72 through 77). Inside this inner run() method, the UI thread is updated by incrementing the progressDialog progress bar (line 76).
Then, after the thread execution is out of the while block, the handler.post() method is called again, and another Runnable is instantiated, requiring the definition of another run() method. However, this time, the progress dialog is being closed and the main view is being initialized by loading the data from the main.xml layout file (lines 88 through 99).
Finally, since we are done with the thread, there’s no need for it to be alive. For that reason, the interrupt() method is being called (lines 102 through 105).
As you can see, using the Thread and Handler objects makes the code a lot less readable than the Activity featured on the first part of this series. Although this is still useful when the background code execution can’t be solved by subclassing the AsyncTask class.
Comparing to the previous post AsyncTask method definitions, the code on the onPreExecute() method has been placed inside the onCreate() method before thread.start() has been called. The code at inside doInBackground() has basically been placed into the first run() method definition (the one that is required because of the Runnable implementation at the class declaration).
The code on onProgressUpdate() has been placed on the first handler.post() Runnable definition and the code in the onPostExecute() has been transplanted inside the second handler.post() Runnable instance.
That’s it! The above behaves much like the code on the first post of the series:
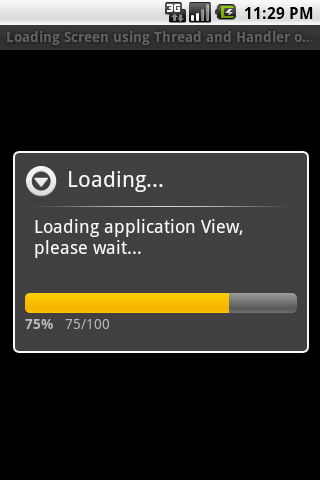
This is what the application looks like right after it’s launched. The current progress is displayed on the left and the current/remaining items are being displayed on the right.
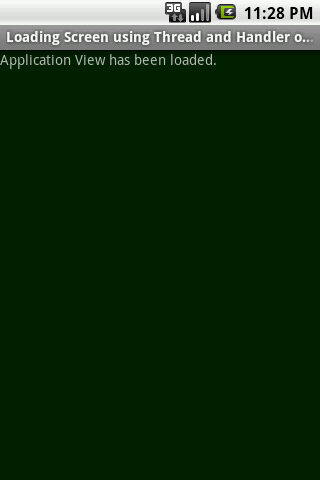
After the loading process has finished, the progress dialog is closed and this View is loaded. Its background has been set to green on purpose to differentiate it from the previous View.
Downloads
On the next post: how to create a customized View for displaying the loading progress of a background code execution without an instance of the ProgressDialog. Keep an eye on 41 Post for updates!
Want to see more posts like this more often? Please donate by clicking at the button below:
Don’t feel like donating? Alternatively, you can support the site by purchasing the FULL version of the Arrows Live Wallpaper app at the Google Play Store™:

Thanks a lot!