- Java Downloads
- JDK Development Kit 20.0.2 downloads
- Release information
- JDK Development Kit 17.0.8 downloads
- Release information
- GraalVM for JDK 20.0.2 downloads
- Release information
- GraalVM for JDK 17.0.8 downloads
- Release information
- Protect your investment—and more
- Java SE subscribers have more choices
- Java SE Development Kit 8u381
- JRE 8
- Server JRE 8
- Which Java 8 package do I need?
- Release information
- How to Set Up Your Java Development Environment
- How to Install the Java Development Kit (JDK)
- How to Set the JAVA_HOME Environment Variable
- Know the JDK Installation Directory
- How to Access Environment Variables
- Set the JAVA_HOME Environment Variable
- Verify the JAVA_HOME Environment Variable
- Choose an Integrated Development Environment (IDE)
- How to Configure Your IDE
- Set the JDK
- Customize Editor Preferences
- Install Plugins
- Explore Additional Tools and Libraries
- Conclusion
Java Downloads
JDK 20 is the latest release of Java SE Platform and JDK 17 LTS is the latest long-term support release for the Java SE platform.
JDK Development Kit 20.0.2 downloads
JDK 20 binaries are free to use in production and free to redistribute, at no cost, under the Oracle No-Fee Terms and Conditions.
JDK 20 will receive updates under these terms, until September 2023 when it will be superseded by JDK 21.
Release information
JDK Development Kit 17.0.8 downloads
JDK 17 binaries are free to use in production and free to redistribute, at no cost, under the Oracle No-Fee Terms and Conditions.
JDK 17 will receive updates under these terms, until September 2024, a year after the release of the next LTS.
Release information
GraalVM for JDK 20.0.2 downloads
GraalVM for JDK 20 binaries are free to use in production and free to redistribute, at no cost, under the GraalVM Free Terms and Conditions.
GraalVM for JDK 20 will receive updates under these terms, until September 2023 when it will be superseded by GraalVM for JDK 21.
Oracle GraalVM uses the Graal just-in-time compiler and includes the Native Image feature as optional early adopter technology.
Native Image is extensively tested and supported for use in production, but is not a conformant implementation of the Java Platform. GraalVM for JDK 20 without the Native Image feature included is available for customers at My Oracle Support.
Release information
GraalVM for JDK 17.0.8 downloads
GraalVM for JDK 17 binaries are free to use in production and free to redistribute, at no cost, under the GraalVM Free Terms and Conditions.
GraalVM for JDK 17 will receive updates under these terms, until September 2024, a year after the release of the next LTS.
Oracle GraalVM uses the Graal just-in-time compiler and includes the Native Image feature as optional early adopter technology.
Native Image is extensively tested and supported for use in production, but is not a conformant implementation of the Java Platform. GraalVM for JDK 17 without the Native Image feature included is available for customers at My Oracle Support.
Release information
Script-friendly Download URLs
The URLs listed above will remain the same for update releases to allow their use in scripts.
![]()
Protect your investment—and more
Java SE subscribers get support for JDK 17, receive updates until at least October 2029, are entitled to GraalVM Enterprise, Java Management Service, and bundled patch releases (BPRs) with fixes not yet available to nonsubscribers, and more.
Java SE subscribers have more choices
Also available for development, personal use, and to run other licensed Oracle products.
Java SE Development Kit 8u381
Java SE subscribers will receive JDK 8 updates until at least December 2030.
The Oracle JDK 8 license changed in April 2019
The Oracle Technology Network License Agreement for Oracle Java SE is substantially different from prior Oracle JDK 8 licenses. This license permits certain uses, such as personal use and development use, at no cost — but other uses authorized under prior Oracle JDK licenses may no longer be available. Please review the terms carefully before downloading and using this product. FAQs are available here.
Commercial license and support are available for a low cost with Java SE Universal Subscription.
Java SE 8u381 checksums and OL 8 GPG Keys for RPMs
JRE 8
Java SE Runtime Environment 8u381
Server JRE 8
Server JRE (Java SE Runtime Environment) 8u381
Which Java 8 package do I need?
Software developers: Java SE Development Kit (JDK) For Java developers. Includes a complete JRE plus tools for developing, debugging, and monitoring Java applications.
Running headless Linux workloads at or near your systems’ CPU or memory limits Enterprise Performance Pack brings significant memory and performance improvements including modern garbage collection algorithms, reduced memory usage and many other optimizations. Learn more
Administrators running applications on a server Server Java Runtime Environment (Server JRE). For deploying Java applications on servers. Includes tools for JVM monitoring and tools commonly required for server applications, but does not include browser integration (Java plug-in), auto-update, or an installer. Learn more
End user running Java on a desktop: Java Runtime Environment (JRE) Covers most end-users needs. Contains everything required to run Java applications on your system.
Release information
How to Set Up Your Java Development Environment

Isah Jacob

Setting up an efficient Java development environment is key if you’re a Java dev. It helps streamline your coding process and makes you more productive.
In this article, I will walk you through the important steps you need to set up a Java development environment. We’ll cover how to install the Java Development Kit (JDK), the Integrated Development Environment (IDE), and configure the necessary tools and libraries. Let’s dive in!
How to Install the Java Development Kit (JDK)
To begin, you need to install the JDK, which includes the Java Runtime Environment (JRE) as well as development tools, like the Java compiler and debugger.
- Visit the official Oracle website.
- Download the latest version of the JDK that matches your operating system.
- Run the installer and follow the on-screen instructions.
- After installation, set the JAVA_HOME environment variable to the JDK installation directory.
How to Set the JAVA_HOME Environment Variable
Know the JDK Installation Directory
The first step you need to take before setting the JAVA_HOME environment variable, is to know the installation directory of the JDK. Take note of the path where the JDK is installed on your machine.
How to Access Environment Variables
To access the environment variables on your machine, follow the steps below:
- On Windows: Right-click on the «This PC» or «My Computer» icon on your desktop or File Explorer and select «Properties.» In the System window, click on «Advanced system settings» on the left-hand side. You can now copy the environment variables.
- On macOS: Go to «System Preferences» and click on «Security & Privacy.» Then, click on the «Privacy» tab and select «Full Disk Access» from the left-hand side. Click on the lock icon at the bottom left and enter your password to make changes. Now, you can copy the environment variables.
Set the JAVA_HOME Environment Variable
Depending on your operating system, follow the instructions below:
- In the System Properties window, click on the «Environment Variables» button.
- In the «System Variables» section, click on the «New» button.
- Set the «Variable name» as JAVA_HOME .
- In the «Variable value» field, enter the path to the JDK installation directory. For example, if the JDK is installed in «C:\Program Files\Java\jdk1.8.0_XXX» (where XXX represents the specific update number), enter that path.
- Click «OK» to save the changes.
- In the System Preferences window, click on «Security & Privacy» and navigate to the «Privacy» tab.
- Scroll down and select «Full Disk Access» from the left-hand side.
- Click on the «+» button and navigate to the Applications > Utilities folder.
- Open the «Terminal» application and click «Open.»
- In the Terminal, enter the following command:
echo export JAVA_HOME=/Library/Java/JavaVirtualMachines//Contents/Home >> ~/.bash_profileReplace with the actual version number of the installed JDK without the curly braces <>.
Then you can close the Terminal and you should be all set.
Verify the JAVA_HOME Environment Variable
To ensure that the JAVA_HOME environment variable is set correctly, open a new terminal or command prompt window and enter the following command:
For Windows:
The command above should display the path to the JDK installation directory that you previously set.
Congratulations! You have successfully set the JAVA_HOME environment variable to the JDK installation directory. This variable is now accessible to Java applications and tools on your system.
Choose an Integrated Development Environment (IDE)
An IDE makes coding simple and gives you various features like code editing, debugging, and project management.
There are many popular IDEs for Java development. I recommend IntelliJ because of its advanced refactoring tools.
You can download IntelliJ IDEA Community Edition or Ultimate Edition, depending on your requirements. Install it, and you will be guided through the setup process, including selecting key plugins and themes. If you are a student of any university, you can get the Github Student Pack.
How to Configure Your IDE
Once you have downloaded IntelliJ as your chosen IDE, you need to configure it to suit your needs.
The following configurations are some of the things you can do once you have downloaded the IntelliJ IDE.
Set the JDK
You’ll need to point your IntelliJ to the JDK installation directory so that it uses the correct Java version for compilation and execution.
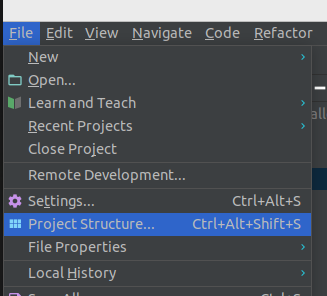
Open IntelliJ IDEA and go to «File» in the menu bar, I am using Ubuntu to demonstrate this.

then select «Project Structure»:
In the Project Structure dialog, navigate to the «SDKs» section (under «Platform Settings») on the left-hand side.

Click the «+» button on the top right-hand side to add a new JDK. You can see what this looks like from the screenshot above.
In the «Add JDK» dialog, locate and select the directory where your JDK is installed. I am on Ubuntu.
/usr/lib/jvm/java-11-openjdk-amd64
The JDK installation directory typically has a structure like this:
After adding the JDK, go to the «Project» section (under «Project Settings») on the left-hand side of the Project Structure dialog.

In the «SDK» dropdown, select the JDK you just added.

If you want to set the JDK for a specific module, go to the «Modules» section (under «Project Settings») on the left-hand side, select the module, and then choose the JDK from the «Module SDK» dropdown.

Click «OK» to apply the changes and close the Project Structure dialog.
IntelliJ IDEA should now be configured to use the JDK you selected for compilation and execution of your Java projects.
Customize Editor Preferences
Adjust the code editor’s font, indentation, and code style settings to match your coding style. This enhances readability and consistency.
Install Plugins
IntelliJ offers a wide range of plugins to extend functionality. Install plugins for version control systems (for example, Git), build tools (for example, Maven), icons, and any other tools you frequently use.
Explore Additional Tools and Libraries
Java offers a vast ecosystem of tools and libraries that can enhance your development experience.
Some popular options include:
- JUnit: A unit testing framework for Java that helps write and execute tests to ensure code quality.
- Apache Commons: A library containing reusable components and utilities, such as handling file operations, collections, and string manipulation.
- Log4j: A logging framework that assists in generating log statements during runtime.
Conclusion
In this article, you learned how to set up Java development environment that is tailored to your needs.
Specifically, you learned how to install the JDK, select an IDE, configure it appropriately, and leverage build tools and libraries that will empower you to write efficient, high-quality Java code.