- Java Update checker – Auto Update/Disable Java Updater
- What is a Java Update Checker?
- RelatedPosts
- How to get to BIOS on an MSI motherboard
- Five Ways to Protect Against Ransomware
- How to Clean and Optimize Your PC?
- How to Enable Java Update Checker?
- How to Disable Java update checker?
- How to manually check for Java Updates?
- Final Words!
- The Ultimate Guide to Java Update Check
- Java Update on Windows 10
- How to check Java version
- How Do I Check for a Java Update?
- Why is it Important to Check Java Updates?
- How to Turn off Java Automatic Update?
- Conclusion
- How to Turn off Annoying Java Update Notification in Windows?
- How to Turn off Annoying Java Update Notification in Windows?
- Prior Check: Examine the Operating System Version
- Approach 1: Disable Java Updates From “Control Panel”
- Step 1: Open “Control Panel”
- Step 2: Disable Checking Updates Automatically
- Approach 2: Disable Java Update Notification Via “Registry Editor”
- Step 1: Open “Registry Editor”
- Step 2: Navigate to “EnableJavaUpdate” Value
- Step 3: Change the “Value data”
- Conclusion
- About the author
- Umar Hassan
Java Update checker – Auto Update/Disable Java Updater
Java offers you an excellent option to set Multiple Java version parameters for handling the java applets that run on your computer. However, if the Java auto-updater shows you a message like “A new version of Java is ready to be installed” and is constantly hammering you with multiple java updates, it becomes annoying while working on some important stuff on your computer. then there are various tools that Java offers in order to disable the auto-update feature. Below we are going to discuss everything you need to know about the Java Update Checker.
Java is a programming language that is used on almost every platform today. It offers the ability to develop complex and advanced apps for Windows and Android. Most of the High-end software or apps that we use today are mostly developed in Java.
You require various Java applets in order to run different applications on your computer. These applets help programs to run smoothly and use different libraries of Java. However, it requires your computer to constantly update all the files related to Java ensuring your system is compatible with all Latest Java Versions.
What is a Java Update Checker?
Java update checker is a tool designed by Oracle that determines which Java script version is required on your computer and installs it on your computer. It helps you to run any type of software on your computer by constantly keeping your libraries and java versions updated. If there is a broken or corrupt code in your java applet, this tool can fix it by downloading and replacing it with a patched copy.
This tool is important for apps to perform smoothly and seamlessly on your computer. visit the official website of java to get more information on Java Update Checker
RelatedPosts
How to get to BIOS on an MSI motherboard
Five Ways to Protect Against Ransomware
How to Clean and Optimize Your PC?
How to Enable Java Update Checker?
As this tool is crucial for running software on your computer, by default, it is enabled for checking updates on your system. There is no need to enable or activate it and this tool can work in the background without any manual input. However, for downloading updates, it might ask you for confirmation.
If it rarely asks you for confirmation before downloading any update then you should keep it enabled or running. However, if it constantly interrupts you in your work or while doing something on your computer then you can follow the below-given steps to disable Java Update Checker
How to Disable Java update checker?
Oracle, the company behind Java, has recommended keeping the Auto-update feature enabled on your computer. These updates contain various security fixes, Broken code patches, and important system-related updates. If you miss any of the updates, you can get yourself or your system into trouble and hackers can easily use the loophole to attack your computer and gain valuable information and files. If you want to disable the Java auto-update checker, follow these steps.
- Click on the Windows start bar and type “File Explorer”.
- Go to the “C” Drive and then open the Program Files (x86) or Program Files (x64) folder.
- If the folders are hidden then Right-click on the top section of your File Explorer tab and select Properties>> Show Hidden Files/folders.
- Inside the Program Files folder, go to Java >> jre7 >> bin.
- Look for the “ javacpl.exe ” file, right-click it and select “Run as Administrator”. Enter your system password if required.
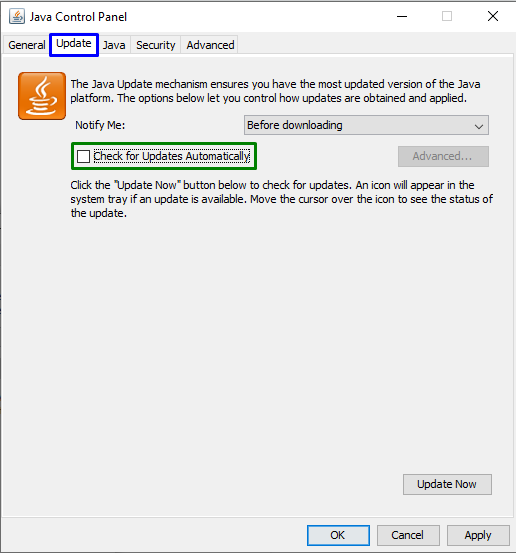
- Head over to the “Update” tab on the Java Control Panel and uncheck the box which says “Check for Updates Automatically”.
- Finally, click on the OK button and reboot your system to apply the changes.
That’s it! You have successfully disabled the java auto-update checker. Even though after disabling the auto-update checker, you should still check for the updates once a month to keep your system up to date.
How to manually check for Java Updates?
Even though you have disabled the Java auto-updates checker on your computer, you can still update it manually or check for the latest version available.
Follow these steps to manually update Java on your PC
Step 1: Open the start menu on your system and type “Control Panel“.
Step 2: Open the Java Control Panel by clicking on the “Java” icon.
Step 3: Under the “General” tab, click on the “About” button to know about the version of installed Java software.
Step 4: In the Java-Applet Runtime Settings, Click Java >> View. Here you can see the latest available version of Java software. Note the Version code and compare it with the previously seen version.
Step 5: If both the code matches, your system is up to date. Otherwise, download and install the update on your Computer.
Final Words!
If it is not necessary then don’t disable the Java auto-update checker tool. This way you can keep your system secure, efficient, and free of any security or programming related bug. Even if you disable the auto-update checker on your system, it is recommended to check for updates at least once a month.
Please let us know if you have any questions or comments regarding the Java Auto-updater.
The Ultimate Guide to Java Update Check
In this quick tutorial, we’ll take a close look at how to check for Java updates.
We’ll get started with some insight into how to check the Java version. Then, we’ll explain in detail how to perform a Java update check. Lastly, we’ll shed light on how to disable Java automatic updates.
Java Update on Windows 10
In general, when we install Java on Windows 10, another small program that checks and tracks Java updates get installed too.
As a matter of fact, there are many simple methods that we can use to check whether there is a new Java update.
However, before checking for Java updates, we may need to know which version is installed on our machine. So, let’s see together how to do that!
How to check Java version
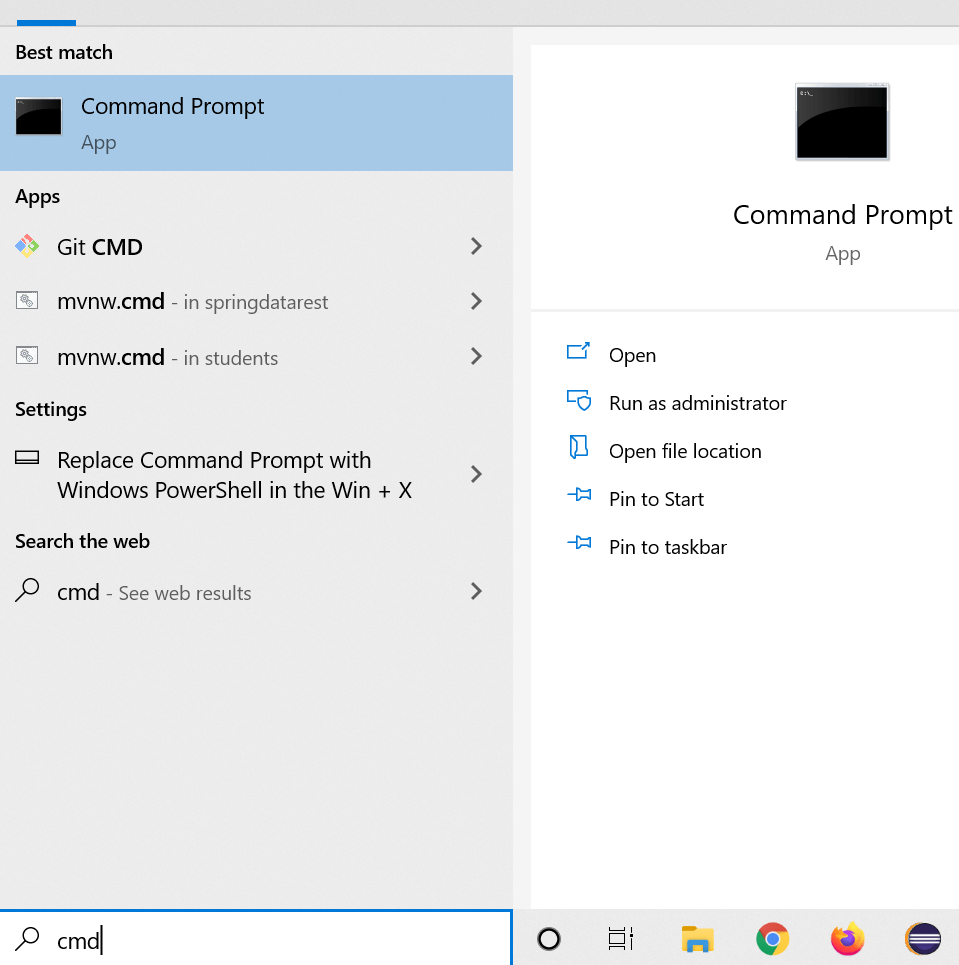
The most simple way to check the current installed Java version is to use the command prompt.
First, we need to open the command prompt. To do that, we need to type cmd in the search bar:
Then, we have to type: java -version in the command prompt:
Microsoft Windows [Version 10.0.19041.572] (c) 2020 Microsoft Corporation. All rights reserved. C:\Users\Asus>java -version java version "1.8.0_261" Java(TM) SE Runtime Environment (build 1.8.0_261-b12) Java HotSpot(TM) 64-Bit Server VM (build 25.261-b12, mixed mode) C:\Users\Asus> As we can see, the command line java -version displays the current Java version that is installed on our computers.
Now, let’s dig deeper to see how to perform a Java update check.
How Do I Check for a Java Update?
The process of checking Java update on windows 10 is pretty simple. All we need to do is follow the following steps:
First, we need to click on Show hidden icons — a special icon that we can find in the bottom right corner of the window.
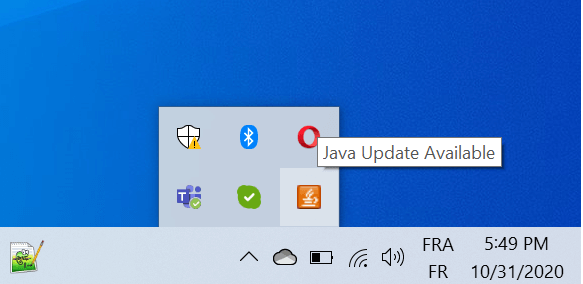
Then, we need to click on Java Update Available – This will open the following window:

Furthermore, as shown above, the windows will tell us everything we need to know. We can click on the update button to continue and get more information about the available Java update.
Now, let’s see how we can use another method to accomplish the same thing.
Firstly, we can type Check For Updates on the search bar. Then a new window named Java Control Panel will open for us.
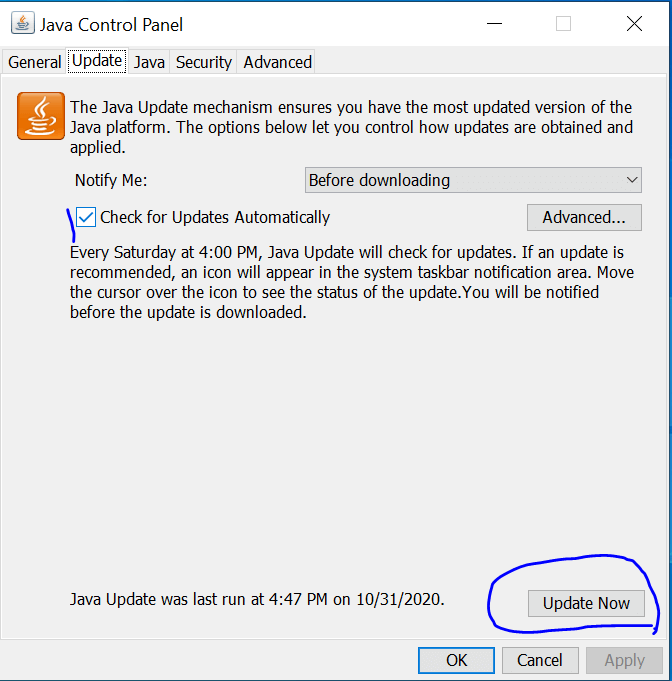
Then, we can go to the update tab to check if there is a new Java update. Easy, peasy right?
We can click on the update button if we want to start the process of updating Java. Once done, our Java will be upgraded to a new version.
Next, we’re going to explain a third method that we can use to check Java updates.
First thing we need to do is open the https://www.java.com/en/ URL in our favorite browser.
Then, we click on the big Java Download button. This will redirect us to a new page where we can find all the information about the last Java version and its release date.
We can also visit the following URL: https://www.java.com/en/download/uninstalltool.jsp to check for Java versions and updates on our computer.
Why is it Important to Check Java Updates?
In general, software updates are important because they provide fixes and improvements, and even patches to security vulnerabilities.
Since Java can be a critical component for many applications that we may install on our computers, then we need to make sure to update it continuously.
Fortunately to us, Java Update is a handy feature that tracks new Java releases. It periodically checks for new versions to keep your Windows computer up-to-date.
Bear in mind that we need to update Java to the newer version to prevent unwanted security issues and enhance performance.
You can refer to this URL https://java.com/en/download/help/java_update.html to explore more about how Java auto-update works.
How to Turn off Java Automatic Update?
Sometimes we may need to disable Java updates — I know what you’re going to say: WHY? This can generate security issues 🙂 — Yes and you’re right!
Keep in mind that it’s highly recommended that you do not turn off automatic updates. However, if you want that do it at your own risk.
Java provides a convenient and simple way to disable automatic periodic Java update checks.
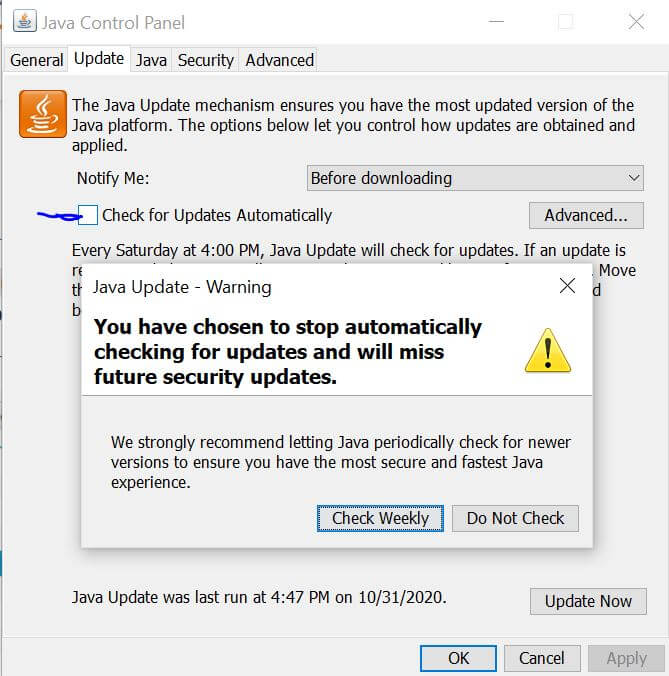
First, we need to open the Java Control Panel window, then navigate to the Update tab, and make sure that Automatically check for updates checkbox is unchecked:
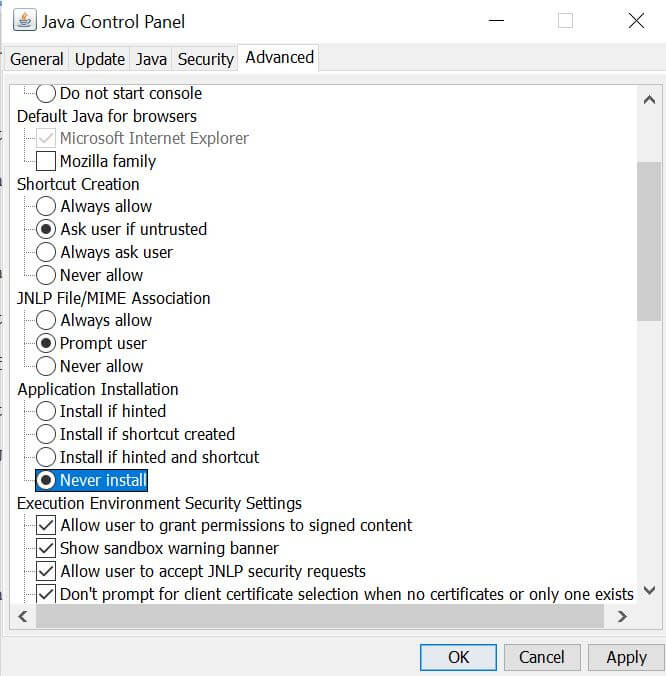
Next, we navigate to the Advanced tab and search for the Application Installation. We need to make sure that the Never install value is selected.
Conclusion
To sum it up, we have explained how to perform a Java update check step by step. Along the way, we have showcased how to check the Java version on Windows 10.
We hope you enjoyed reading this article and learned something new from it.
Liked the Article? Share it on Social media!
How to Turn off Annoying Java Update Notification in Windows?
![]()
The “Annoying Java Update notification” in Windows is indicated every time Windows 10 boots or whenever a Java Update is available. One of the solutions to cope with such a limitation can be to uninstall Java from the system, but as many apps and games are dependent on Java, so it is not an authentic approach. Therefore, sort out the faced limitation by simply configuring the settings in the PC/Laptop.
This article will discuss the solution to disable Java update notifications in Windows.
How to Turn off Annoying Java Update Notification in Windows?
To turn off Java update notification in Windows, disable these notifications via the following approaches:
Prior Check: Examine the Operating System Version
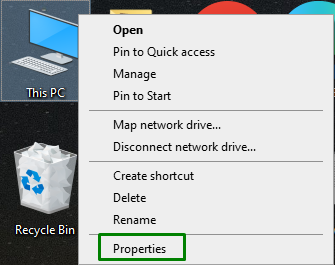
Analyze your OS version by simply right-clicking on “This PC” and hitting “Properties”:
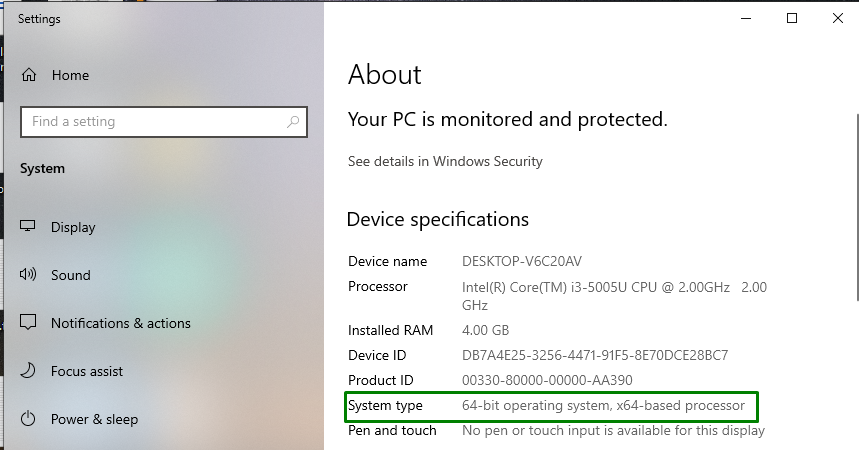
After that, view the OS version supported by your system, as indicated below:
Approach 1: Disable Java Updates From “Control Panel”
Java Updates can be disabled from the “Control Panel” directly by switching to the “Java” application and configuring its settings.
Step 1: Open “Control Panel”
Firstly, switch to “Control Panel” via Startup menu:
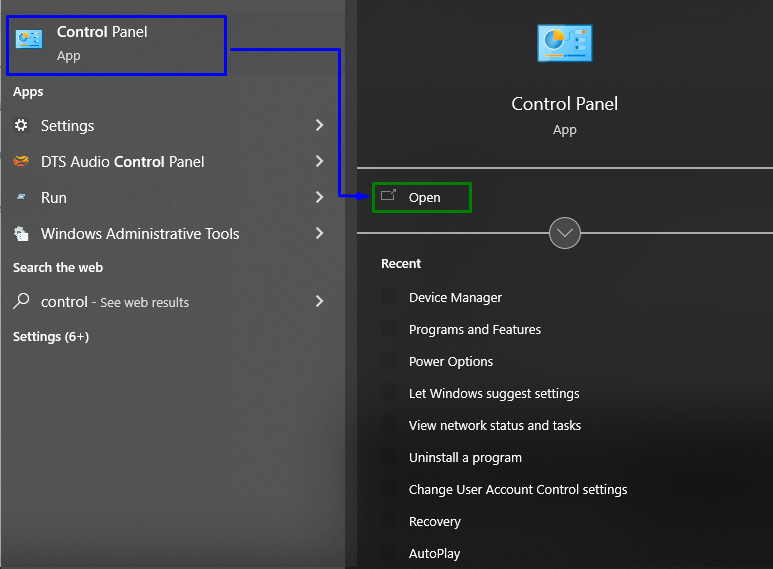
Now, type “java” in the search bar and navigate to the appeared “Java” app:

Step 2: Disable Checking Updates Automatically
Here, unmark the highlighted checkbox:
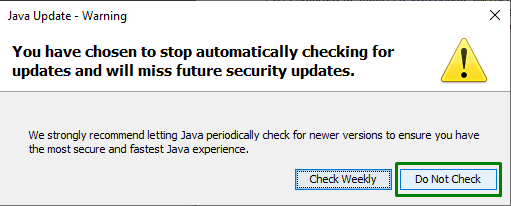
In the appeared pop-up, trigger the“Do Not Check” button and hit “Apply-> OK” to get rid of the annoying Java update notification(s):
Approach 2: Disable Java Update Notification Via “Registry Editor”
Configuring the relevant registry value, i.e., “EnableJavaUpdate” can also assist in getting rid of the faced issue. For doing so, utilize the following steps.
Step 1: Open “Registry Editor”
Firstly, type “regedit” in the below-given Run Box to switch to “Registry Editor”:

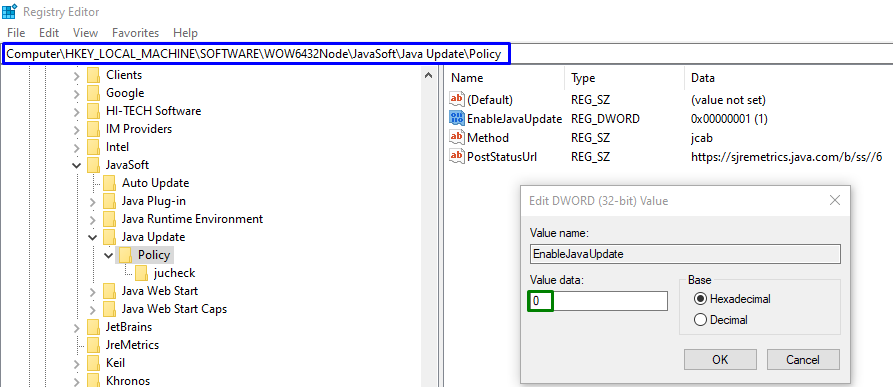
Step 2: Navigate to “EnableJavaUpdate” Value
Now, navigate to the stated value by following the below-provided path.
For 64-bit OS
For 32-bit OS
Note: In this case, the “64-bit” path is followed.
Step 3: Change the “Value data”
Lastly, change the value of “EnableJavaUpdate” to “0” to disable update notifications:
After applying either of the discussed solutions, the faced annoying limitation will likely resolve.
Conclusion
To turn off annoying Java update notifications in Windows, disable Java Update notifications from the “Control Panel” or disable the “EnableJavaUpdate” value in the “Registry Editor”. This write-up discussed the approaches to disable Java update notification in Windows.
About the author
Umar Hassan
I am a Front-End Web Developer. Being a technical author, I try to learn new things and adapt with them every day. I am passionate to write about evolving software tools and technologies and make it understandable for the end-user.