- Spring — Java Based Configuration
- @Configuration & @Bean Annotations
- Example
- Injecting Bean Dependencies
- Example
- The @Import Annotation
- Lifecycle Callbacks
- Specifying Bean Scope
- Reading and writing configuration for Java application using Properties class
- 1. Creating a Properties object
- 2. Loading properties file
- 3. Getting properties values
- 4. Setting properties values
- 5. Saving properties file
- 6. Sample Swing application
- Other Java Coding Tutorials:
- About the Author:
Spring — Java Based Configuration
So far you have seen how we configure Spring beans using XML configuration file. If you are comfortable with XML configuration, then it is really not required to learn how to proceed with Java-based configuration as you are going to achieve the same result using either of the configurations available.
Java-based configuration option enables you to write most of your Spring configuration without XML but with the help of few Java-based annotations explained in this chapter.
@Configuration & @Bean Annotations
Annotating a class with the @Configuration indicates that the class can be used by the Spring IoC container as a source of bean definitions. The @Bean annotation tells Spring that a method annotated with @Bean will return an object that should be registered as a bean in the Spring application context. The simplest possible @Configuration class would be as follows −
package com.tutorialspoint; import org.springframework.context.annotation.*; @Configuration public class HelloWorldConfig < @Bean public HelloWorld helloWorld()< return new HelloWorld(); >>
The above code will be equivalent to the following XML configuration −
Here, the method name is annotated with @Bean works as bean ID and it creates and returns the actual bean. Your configuration class can have a declaration for more than one @Bean. Once your configuration classes are defined, you can load and provide them to Spring container using AnnotationConfigApplicationContext as follows −
public static void main(String[] args)
You can load various configuration classes as follows −
public static void main(String[] args)
Example
Let us have a working Eclipse IDE in place and take the following steps to create a Spring application −
| Steps | Description |
|---|---|
| 1 | Create a project with a name SpringExample and create a package com.tutorialspoint under the src folder in the created project. |
| 2 | Add required Spring libraries using Add External JARs option as explained in the Spring Hello World Example chapter. |
| 3 | Because you are using Java-based annotations, so you also need to add CGLIB.jar from your Java installation directory and ASM.jar library which can be downloaded from asm.ow2.org. |
| 4 | Create Java classes HelloWorldConfig, HelloWorld and MainApp under the com.tutorialspoint package. |
| 5 | The final step is to create the content of all the Java files and Bean Configuration file and run the application as explained below. |
Here is the content of HelloWorldConfig.java file
package com.tutorialspoint; import org.springframework.context.annotation.*; @Configuration public class HelloWorldConfig < @Bean public HelloWorld helloWorld()< return new HelloWorld(); >>
Here is the content of HelloWorld.java file
package com.tutorialspoint; public class HelloWorld < private String message; public void setMessage(String message)< this.message = message; >public void getMessage() < System.out.println("Your Message : " + message); >> Following is the content of the MainApp.java file
package com.tutorialspoint; import org.springframework.context.ApplicationContext; import org.springframework.context.annotation.*; public class MainApp < public static void main(String[] args) < ApplicationContext ctx = new AnnotationConfigApplicationContext(HelloWorldConfig.class); HelloWorld helloWorld = ctx.getBean(HelloWorld.class); helloWorld.setMessage("Hello World!"); helloWorld.getMessage(); >> Once you are done creating all the source files and adding the required additional libraries, let us run the application. You should note that there is no configuration file required. If everything is fine with your application, it will print the following message −
Your Message : Hello World!
Injecting Bean Dependencies
When @Beans have dependencies on one another, expressing that the dependency is as simple as having one bean method calling another as follows −
package com.tutorialspoint; import org.springframework.context.annotation.*; @Configuration public class AppConfig < @Bean public Foo foo() < return new Foo(bar()); >@Bean public Bar bar() < return new Bar(); >>
Here, the foo bean receives a reference to bar via the constructor injection. Now let us look at another working example.
Example
Let us have a working Eclipse IDE in place and take the following steps to create a Spring application −
| Steps | Description |
|---|---|
| 1 | Create a project with a name SpringExample and create a package com.tutorialspoint under the src folder in the created project. |
| 2 | Add required Spring libraries using Add External JARs option as explained in the Spring Hello World Example chapter. |
| 3 | Because you are using Java-based annotations, so you also need to add CGLIB.jar from your Java installation directory and ASM.jar library which can be downloaded from asm.ow2.org. |
| 4 | Create Java classes TextEditorConfig, TextEditor, SpellChecker and MainApp under the com.tutorialspoint package. |
| 5 | The final step is to create the content of all the Java files and Bean Configuration file and run the application as explained below. |
Here is the content of TextEditorConfig.java file
package com.tutorialspoint; import org.springframework.context.annotation.*; @Configuration public class TextEditorConfig < @Bean public TextEditor textEditor()< return new TextEditor( spellChecker() ); >@Bean public SpellChecker spellChecker() < return new SpellChecker( ); >>
Here is the content of TextEditor.java file
package com.tutorialspoint; public class TextEditor < private SpellChecker spellChecker; public TextEditor(SpellChecker spellChecker)< System.out.println("Inside TextEditor constructor." ); this.spellChecker = spellChecker; >public void spellCheck() < spellChecker.checkSpelling(); >> Following is the content of another dependent class file SpellChecker.java
package com.tutorialspoint; public class SpellChecker < public SpellChecker()< System.out.println("Inside SpellChecker constructor." ); >public void checkSpelling() < System.out.println("Inside checkSpelling." ); >> Following is the content of the MainApp.java file
package com.tutorialspoint; import org.springframework.context.ApplicationContext; import org.springframework.context.annotation.*; public class MainApp < public static void main(String[] args) < ApplicationContext ctx = new AnnotationConfigApplicationContext(TextEditorConfig.class); TextEditor te = ctx.getBean(TextEditor.class); te.spellCheck(); >>
Once you are done creating all the source files and adding the required additional libraries, let us run the application. You should note that there is no configuration file required. If everything is fine with your application, it will print the following message −
Inside SpellChecker constructor. Inside TextEditor constructor. Inside checkSpelling.
The @Import Annotation
The @Import annotation allows for loading @Bean definitions from another configuration class. Consider a ConfigA class as follows −
@Configuration public class ConfigA < @Bean public A a() < return new A(); >>
You can import above Bean declaration in another Bean Declaration as follows −
@Configuration @Import(ConfigA.class) public class ConfigB < @Bean public B b() < return new B(); >>
Now, rather than needing to specify both ConfigA.class and ConfigB.class when instantiating the context, only ConfigB needs to be supplied as follows −
public static void main(String[] args) < ApplicationContext ctx = new AnnotationConfigApplicationContext(ConfigB.class); // now both beans A and B will be available. A a = ctx.getBean(A.class); B b = ctx.getBean(B.class); >
Lifecycle Callbacks
The @Bean annotation supports specifying arbitrary initialization and destruction callback methods, much like Spring XML’s init-method and destroy-method attributes on the bean element −
public class Foo < public void init() < // initialization logic >public void cleanup() < // destruction logic >> @Configuration public class AppConfig < @Bean(initMethod = "init", destroyMethod = "cleanup" ) public Foo foo() < return new Foo(); >>
Specifying Bean Scope
The default scope is singleton, but you can override this with the @Scope annotation as follows −
@Configuration public class AppConfig < @Bean @Scope("prototype") public Foo foo() < return new Foo(); >> Reading and writing configuration for Java application using Properties class
This tutorial will help you getting how to use the Properties class for reading and writing configuration for your Java applications. And at the end, we have a sample Swing application that demonstrates reading and writing configuration for database settings.
Table of content:
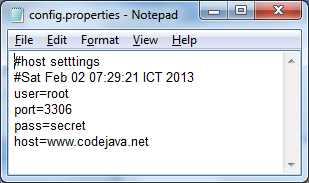
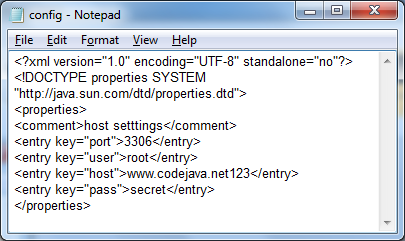
.properties format XML format
First, let’s look at two small examples:
The following code loads config.properties file and read out a property called “host”:
File configFile = new File("config.properties"); try < FileReader reader = new FileReader(configFile); Properties props = new Properties(); props.load(reader); String host = props.getProperty("host"); System.out.print("Host name is: " + host); reader.close(); >catch (FileNotFoundException ex) < // file does not exist >catch (IOException ex) < // I/O error > The following code writes value of a property to the config.properties file:
File configFile = new File("config.properties"); try < Properties props = new Properties(); props.setProperty("host", "www.codejava.net"); FileWriter writer = new FileWriter(configFile); props.store(writer, "host settings"); writer.close(); >catch (FileNotFoundException ex) < // file does not exist >catch (IOException ex) < // I/O error > 1. Creating a Properties object
Properties props = new Properties();
Properties defaultProps = new Properties(); // set default properties. // create main Properties object Properties props = new Properties(defaultProps);
The default Properties object would be useful if you want to have a list of default properties which can be used when some properties do not exist in the physical file.
2. Loading properties file
We can load the properties file ( .properties or XML) using either subclasses of java.io.Reader class or java.io.InputStream class. Following are some examples:
- Load properties from a .properties file using a FileReader object:
File configFile = new File("config.properties"); FileReader reader = new FileReader(configFile); Properties props = new Properties(); // load the properties file: props.load(reader); File configFile = new File("config.properties"); InputStream inputStream = new FileInputStream(configFile); Properties props = new Properties(); props.load(inputStream); props.loadFromXML(inputStream);
InputStream inputStream = MyProgram.class.getResourceAsStream("/net/codejava/config/config.properties"); Properties props = new Properties(); props.load(inputStream); NOTE: the methods load() or loadFromXML() do not close the reader nor the input stream, so you should close them afterward:
3. Getting properties values
-
- String getProperty(String key) : returns value of the property specified by the given key. It returns null if the key not found.
- String getProperty(String key, String defaultValue) : like the above method, but this method will return a default value if the key not found.
String host = props.getProperty("host");String host = props.getProperty("host", "localhost");NOTE: The method getProperty() searches in the current property list (loaded from the properties) file, then in the default properties list (if specified when constructing the Properties object).
4. Setting properties values
Object setProperty(String key, String value)
This method returns previous value of the property specified by the given key.
props.setProperty("host", "www.codejava.net");NOTE: the method setProperty() does not update the properties file, it just updates the internal properties list.
5. Saving properties file
To save the properties into the file permanently, use the store() method for plain text file and storeToXML() method for XML file. And we have to supply either a java.io.Writer object or an OutputStream object to these methods and also a comment text. Following are some examples:
- Save to plain text file using a Writer object:
File configFile = new File("config.properties"); FileWriter writer = new FileWriter(configFile); props.store(writer, "host settings");File configFile = new File("config.xml"); OutputStream outputStream = new FileOutputStream(configFile); props.storeToXML(outputStream, "host settings");NOTE: the methods store() or storeToXML() do not close the writer nor the output stream, so you should close them explicitly:
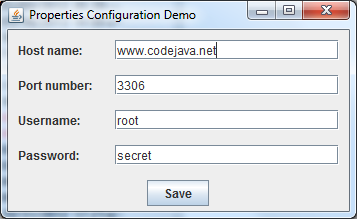
6. Sample Swing application

On startup, the program will try to load properties from config.properties file. If the file has not existed before, it will use the default properties. When clicking on the Save button, the properties values will be stored in the config.properties file.
You can download the program’s source code and executable jar file in the attachments section.
Other Java Coding Tutorials:
About the Author:

Nam Ha Minh is certified Java programmer (SCJP and SCWCD). He started programming with Java in the time of Java 1.4 and has been falling in love with Java since then. Make friend with him on Facebook and watch his Java videos you YouTube.