- Saved searches
- Use saved searches to filter your results more quickly
- Not supported for this JVM #248
- Not supported for this JVM #248
- Comments
- Fix: Java error: Release version 19 not supported
- What causes “Java error: Release version 19 not supported”?
- How to fix “Java error: Release version 19 not supported”?
- Update Java compiler settings
- Check third-party dependencies
- Update JDK
- Reinstall Java
- Yadullah Abidi
- IntelliJ — Error:java: release version 5 not supported
- 1. Update Java Compiler
- 2. Update SDK Version
- 3. Add property to pom.xml
- Fix: Java: Error: Release version 17 not supported
- What cause the Java: Error: Release version 17 not supported error?
- How to fix the Java: Error: Release version 17 not supported error?
- Update Java compiler settings
- Update JDK
- Reinstall Java
- java: error: release version 17 not supported
- Solution 2
- Solution 3
- Solution 4
- Solution 5
Saved searches
Use saved searches to filter your results more quickly
You signed in with another tab or window. Reload to refresh your session. You signed out in another tab or window. Reload to refresh your session. You switched accounts on another tab or window. Reload to refresh your session.
Have a question about this project? Sign up for a free GitHub account to open an issue and contact its maintainers and the community.
By clicking “Sign up for GitHub”, you agree to our terms of service and privacy statement. We’ll occasionally send you account related emails.
Already on GitHub? Sign in to your account
Not supported for this JVM #248
Not supported for this JVM #248
Comments
Describe the bug
Using,
- JVM: OpenJDK 64-Bit Server VM (14.0.1+7, mixed mode, sharing)
- Java: version 14.0.1, vendor AdoptOpenJDK
for both VisualVM and other Java app.
VisualVM shows CPU graph successfully, while other Java app does not.
To Reproduce
- Execute VisualVM
- See the Monitoring section of VisualVM app
- CPU section shows graph successfully
- Execute other Java app
- See the Monitoring section of the Java app
- CPU sectinos shows ‘Not supported for this JVM’
Expected behavior
CPU graph should be displayed, instead of ‘Not supported for this JVM’
VisualVM log
Please attach VisualVM messages.log file to help diagnose your problem.
visualvm-logfile.txt

Screenshots
If applicable, add screenshots to help explain your problem.
Desktop (please complete the following information):
- OS: MacOS Catalina 10.15.6
- JDK version: OpenJDK 64-Bit Server VM (14.0.1+7, mixed mode, sharing), version 14.0.1, vendor AdoptOpenJDK
- VisualVM Version: 2.0.4
Additional context
Only VisualVM’s CPU graph is shown successfully, while all other Java app shows ‘Not supported for this JVM’.
The text was updated successfully, but these errors were encountered:
Fix: Java error: Release version 19 not supported

Java is one of the most popular programming languages in the world but as easy as it is to learn, it isn’t perfect and can cough up random errors and glitches occasionally. More often than not, the error message itself will be descriptive enough for you to work out the problem on your own, but if it isn’t, that can leave many novice developers stranded.
In this article, we’re talking about how to fix “Java error: release version 19 not supported”, and the reasons that might cause the error in the first place.
What causes “Java error: Release version 19 not supported”?
There are actually a number of reasons why you might experience this problem. Some of the most common factors include:
- Outdated JVM or JDK version
- Incorrect IDE configuration
- Project bytecode settings aren’t proper
- Issues caused by third-party libraries
How to fix “Java error: Release version 19 not supported”?
Here are four fixes you can try out.
Update Java compiler settings
The error often happens in IntelliJ after a Java version update. All you have to do is head over to IntelliJ settings, followed by Java Compiler settings. Once there, make sure that the Project bytecode version is set to the preferred Java version or in this case, version 19. Restart your IDE and you should be good to go.

Check third-party dependencies
If you’re using any third-party libraries or APIs in your code, check to see if their configuration files are set up properly and that they’re using the appropriate JDK versions. If your project works on version 19 but the library uses some other version, you can run into errors like this.
Update JDK
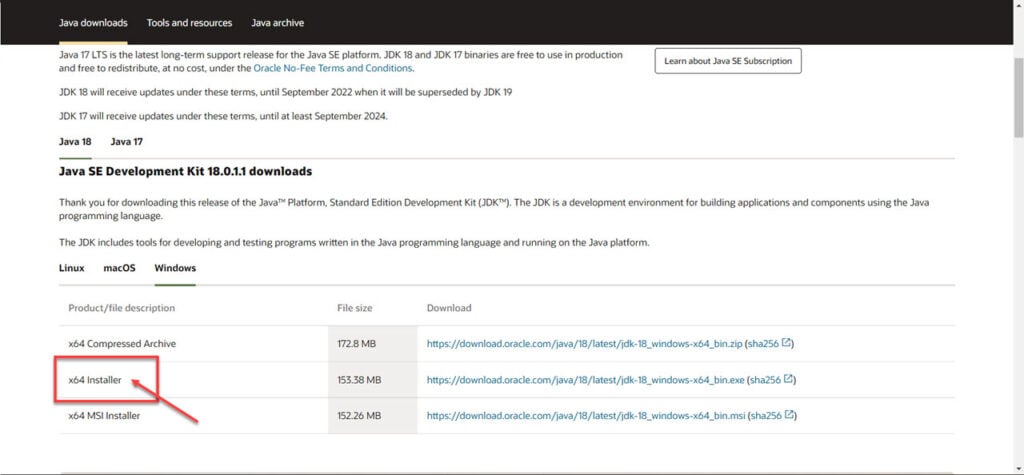
Updating your JDK version can also help get rid of uncalled-for compilation issues. Head over to Oracle’s JDK download page and download the x64 installer for the latest JDK version. Install the downloaded installer once the download is complete.
Reinstall Java
If nothing else works, you will have to remove Java from your PC and reinstall it again to iron out any issues.
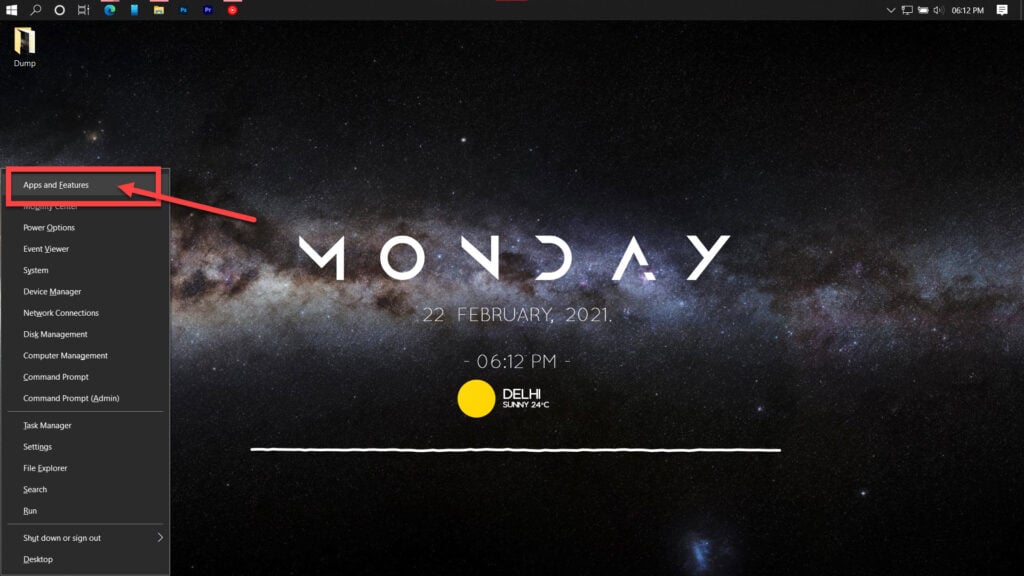
Step 1: Press Windows key + X to bring up the quick access menu. Select Apps and Features from this menu.
Step 2: Find Java in the list, click on it and select Uninstall.
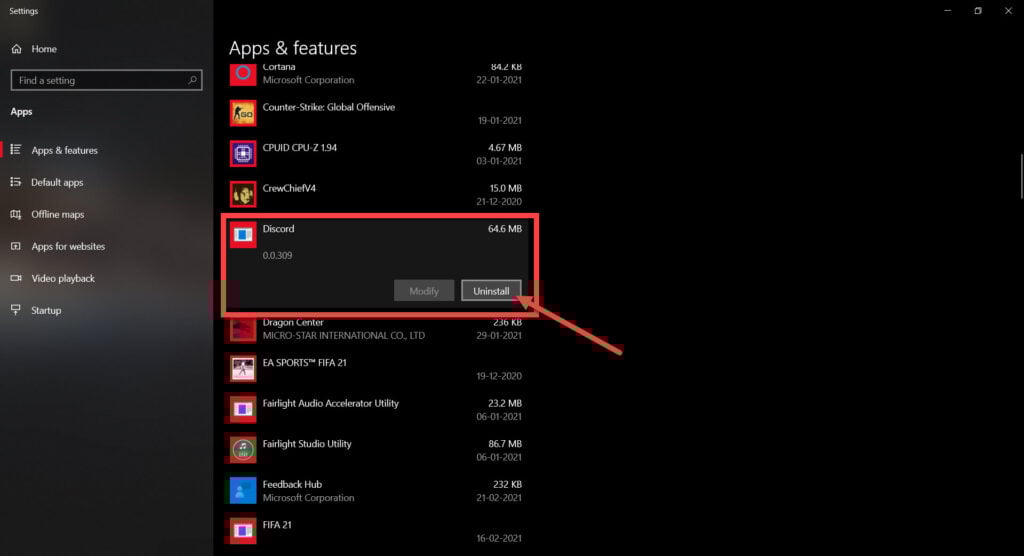
Once the uninstaller is complete, you can download Java and reinstall it to fix the problem.
Yadullah Abidi
Yadullah is a Computer Science graduate who writes/edits/shoots/codes all things cybersecurity, gaming, and tech hardware. When he’s not, he streams himself racing virtual cars. He’s been writing and reporting on tech and cybersecurity with websites like Candid.Technology and MakeUseOf since 2018. You can contact him here: [email protected]
IntelliJ — Error:java: release version 5 not supported
A common error in IntelliJ when attempting to run a new Java maven project is Error:java: release version 5 not supported . Here are 3 techniques to resolve this. Try them in order. If one doesn’t resolve the issue, try the next.
1. Update Java Compiler
- Go to IntelliJ IDE menu item (or File on Windows) -> Preferences -> Build, Execution, Deployment -> Java Compiler
- Delete value under Target bytecode version, then click OK

- Refresh maven
- Try running again. If problem persists, continue on to number 2 below

2. Update SDK Version

- Go to File -> Project Structure -> Project Settings -> Project. Make sure you have the correct Java version selected. It should be the same as the one you downloaded
- Also on this same panel, go to Platform Settings -> SDKs. Make sure you have the correct Java version selected
- Click OK
- Refresh maven
- Try running again. If problem persists, continue on to number 3 below
3. Add property to pom.xml
- Within IntelliJ, open pom.xml file
- Add this section before (If your file already has a section, just add the lines below to that existing section):
- Change the x in 1.8 to your Java version. For example, if you’re using Java 13, change 1.8 to 1.13
- Refresh maven
Fix: Java: Error: Release version 17 not supported

Programming has become a lot easier than it used to be thanks to the internet and the hundreds of thousands of online resources readily available to developers around the world. However, random bugs and glitches are still very much part of the development process and can show up out of nowhere to surprise you.
In this article, we’re talking about the Java: Error: Release version 17 not supported error, its causes and what you can do to fix the problem.
What cause the Java: Error: Release version 17 not supported error?
As the error message suggests, the Java compiler is trying to use release version 17 to compile your project but the project in question either doesn’t support it or you don’t have an active version 17 installation for the compiler to use. The issue can be resolved by either changing your project settings or specifying which Java version needs to be used.
How to fix the Java: Error: Release version 17 not supported error?
Here are three fixes you can try out.
Update Java compiler settings
The error often happens in IntelliJ after a Java version update. All you have to do is head over to IntelliJ settings, followed by Java Compiler settings. Once there, make sure that the Project bytecode version is set to the preferred Java version or in this case, version 17. Restart your IDE and you should be good to go.
Update JDK
Updating your JDK version can also help get rid of uncalled-for compilation issues. Head over to Oracle’s JDK download page and download the x64 installer for the latest JDK version. Install the downloaded installer once the download is complete.
Reinstall Java
If nothing else works, you will have to remove Java from your PC and reinstall it again to iron out any issues.
Step 1: Press Windows key + X to bring up the quick access menu. Select Apps and Features from this menu.
Step 2: Find Java in the list, click on it and select Uninstall.
Once the uninstaller is complete, you can download Java and reinstall it to fix the problem.
java: error: release version 17 not supported
I have faced the same error while trying to use version 16.This is because the new version you are trying to use is unstable.
- you have to uninstall the version 17 go to: file ->project structure ->SDKs .delete sdk 17 by right clicking on it and then delete. right click on highlighted version(in your case its 17)
- now you have to change project sdk go to: file ->project structure ->project . select the previous version which use to work for you , in my case its 15 java version «15.0.2». set project language level to default (SDK default(15-Text blocks)) changing project sdk and project language level
- the last part is to change the project configuration sdk go to your navigation bar where you debug your project then select edit configurations . select the sdk 16 for your project (in my case its 15) to change the project configuration sdk
Solution 2
See this answer for the relevant screenshots. Make sure all the source/target levels are configured correctly in all the dialogs. It may be a typo somewhere and 17 is used instead of 1.7 (Java 7).
Inspect .idea/misc.xml file in the project directory, make sure it specifies the correct versions. See also the language levels specified in *.iml module files and in .idea/compiler.xml file.
Solution 3
I had the same problem. What helped in my case is the following. In IntelliJ IDEA I opened File -> Project structure and then clicked Modules and changed the Language level to 17. Then I was able to run my code without problems.

Solution 4
This issue happened to me while upgrading to Java 17, I solved it by configuring the new SDK in project structure and invalidate the caches : File —> invalidate caches —> default selection and restart.
Solution 5
In my case, updating .idea/misc.xml didn’t help. I was upgrading from Intellij 2020.2 -> Intellij 2020.4 -> Intellij 2020.1.1. Ended up with a reset: File -> Manage IDE Settings -> Restore Default Settings.