- Android LogCat And Logging Best Practice
- 1. Android Log Methods.
- 2. Android Log Methods Example.
- 3. Android Log Example Source Code.
- 3.1 Main Layout Xml File.
- 3.2 Activity Java File.
- 3.3 Log Tag Name Tip.
- 4. LogCat Filter.
- 4.1 There are four items in the LogCat filter drop-down list.
- 4.2 How To Edit LogCat Filter.
- 5. LogCat Operation.
- 6. How To Retrieve Android Crash Logs Use ADB Command.
- Урок 12. Логи и всплывающие сообщения
- Логи приложения
- Всплывающие сообщения
Android LogCat And Logging Best Practice
android.util.Log is the log class that provides the log function. It provides the below methods to log data into the LogCat console.
1. Android Log Methods.
- Log.v(): Print verbose level log data. The verbose level is the lowest log level, if you print so much this kind of log data, it is not meaningful.
- Log.d(): Print debug level log data. Debug level is one step higher than verbose level. Debug log data is usually useful in android application development and testing.
- Log.i(): Print info level log data. Info level is one step higher than debug level. Info log data is used to collect user actions and behaviors.
- Log.w(): Print warn level log data. Warn level is one step higher than info level. When you see this kind of log data, it means your code exists potential risks, you need to check your code carefully.
- Log.e(): Print error level log data. Error level is the highest level. It is always used in java code catch block to log exception or error information. This kind of log data can help you to find out the root cause of app crashes.
2. Android Log Methods Example.
If you can not watch the above video, you can see it on the youtube URL https://youtu.be/ciBUMesUfVo
- This example is very simple. When you click the button, it will print above 5 kinds of log data in the LogCat console.
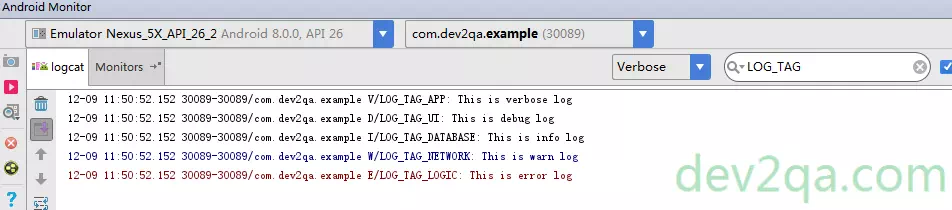
- When you input the search keyword LogActivity in the LogCat panel, the app log data will be filtered out. For each line of log data, there are the log time, class name, and log message.
- You can also filter out the log data by it’s type, verbose, info, debug, warn, or error. This can make log data search more easily and accurately, you can see the below demo video.
If you can not watch the above video, you can see it on the youtube URL https://youtu.be/zyUvmTF_Mzw
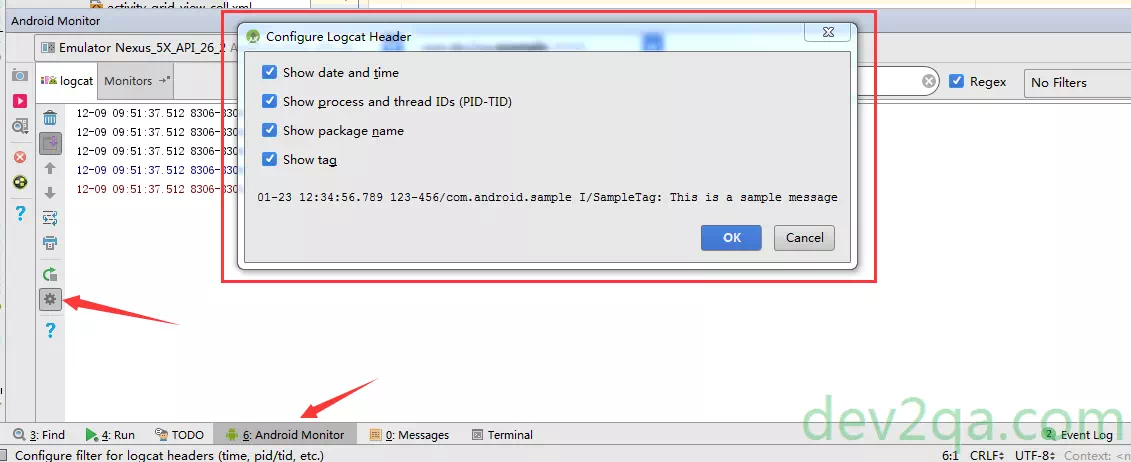
- Click the Settings icon in the LogCat panel, you can configure which column to be displayed for each line of the log.
- The columns include Show date and time, Show process and thread IDs(PID-TID), Show package name, Show tag, you can see it in the below picture.
3. Android Log Example Source Code.
3.1 Main Layout Xml File.
3.2 Activity Java File.
package com.dev2qa.example; import android.os.Bundle; import android.support.v7.app.AppCompatActivity; import android.util.Log; import android.view.View; import android.widget.Button; public class LogActivity extends AppCompatActivity < private static final String LOG_TAG = "LogActivity"; @Override protected void onCreate(Bundle savedInstanceState) < super.onCreate(savedInstanceState); setContentView(R.layout.activity_log); setTitle("dev2qa.com --- Android Log Methods Example."); // Get the button instance. Button createLogButton = (Button)findViewById(R.id.createLogButton); // When the button is clicked, print log data. createLogButton.setOnClickListener(new View.OnClickListener() < @Override public void onClick(View view) < Log.v(LOG_TAG, "This is verbose log"); Log.d(LOG_TAG, "This is debug log"); Log.i(LOG_TAG, "This is info log"); Log.w(LOG_TAG, "This is warn log"); Log.e(LOG_TAG, "This is error log"); >>); > > 3.3 Log Tag Name Tip.
- The first parameter for the log method is a tag name, we can use this tag name to filter out the useful log data easily.
- Commonly the tag is the class name. You can simply create the tag name follow the below method in the activity java file.
- Write the log data in the activity java file outside of the onCreate() method.
- Click the Tab key, then the android studio will generate the tag name automatically. You can see this step demo video on URL https://youtu.be/ZxhnFly4-2o.
- Besides the class name, you can create the tag name by the class function also. You had better create a class that includes all static String Constant that used as tag name as below.
package com.dev2qa.example.constant; public class LogTagName < public static final String LOG_TAG_UI = "LOG_TAG_UI"; public static final String LOG_TAG_NETWORK = "LOG_TAG_NETWORK"; public static final String LOG_TAG_DATABASE = "LOG_TAG_DATABASE"; public static final String LOG_TAG_LOGIC = "LOG_TAG_LOGIC"; public static final String LOG_TAG_APP = "LOG_TAG_APP"; >Log.w(LogTagName.LOG_TAG_NETWORK, "This is warn log");
4. LogCat Filter.
4.1 There are four items in the LogCat filter drop-down list.
- Show only selected applications.
- Firebase. This is a log analytic tool provided by Google.
- No Filters.
- Edit Filter Configuration.
4.2 How To Edit LogCat Filter.
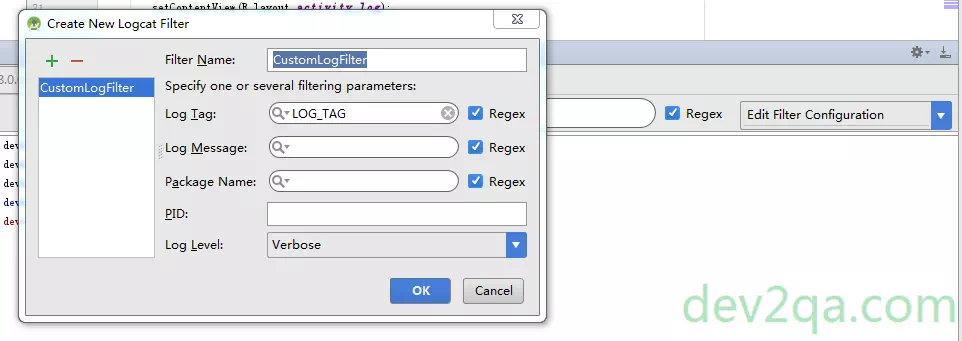
- Select the Edit Filter Configuration item in the LogCat filter drop-down list, there will popup the Create New Logcat Filter dialog window that lets you create or edit log filters.
- You can specify the below conditions to filter out related logs. For example, filter by Log Tag, filter by Log Message, filter by Package Name, filter by PID and filter by Log Level. The Log Tag, Log Message, and Package Name filter keyword support regular expression.
5. LogCat Operation.
- You can clear the Logcat content by right click the Logcat output console log message area, then click the Clear logcat menu item in the popup menu list.
- If you find the log data can not be cleared after the above action. That means the emulator has been stopped or disconnected . You need to select an activity emulator in the drop-down list to run the android app and watch the log data.
6. How To Retrieve Android Crash Logs Use ADB Command.
- You have learned how to record logs in android studio. But how to get those log data when you need to analyze the data for development. You can follow the below steps.
- But before you can try, you had better read the below 2 articles if you do not know. How To Use Android Debug Bridge (ADB), How To Enable USB Debugging Mode On Android Device.
- Now you can follow the below steps to save Logcat log data to a local text file.
- Open a dos command, cd to your %ANDROID_HOME% \ platform-tools folder.
- Input the command adb devices, this command will list all devices that are connected.
- Run command adb logcat>>logcatData.txt, after a while, you can find the file in the platform-tools folder. This file will include all the Logcat logs in it. The log file will increase while the emulator runs.
Урок 12. Логи и всплывающие сообщения
Создадим в main.xml экран, знакомый нам по прошлым урокам про обработчики:
Алгоритм приложения будет тот же. По нажатию кнопок меняется текст. Обработчик — Activity.
public class MainActivity extends Activity implements OnClickListener < TextView tvOut; Button btnOk; Button btnCancel; /** Called when the activity is first created. */ @Override public void onCreate(Bundle savedInstanceState) < super.onCreate(savedInstanceState); setContentView(R.layout.main); // найдем View-элементы tvOut = (TextView) findViewById(R.id.tvOut); btnOk = (Button) findViewById(R.id.btnOk); btnCancel = (Button) findViewById(R.id.btnCancel); // присваиваем обработчик кнопкам btnOk.setOnClickListener(this); btnCancel.setOnClickListener(this); >@Override public void onClick(View v) < // по id определяем кнопку, вызвавшую этот обработчик switch (v.getId()) < case R.id.btnOk: // кнопка ОК tvOut.setText("Нажата кнопка ОК"); break; case R.id.btnCancel: // кнопка Cancel tvOut.setText("Нажата кнопка Cancel"); break; >> > Сохраним, запустим. Убедимся, что все работает.
Логи приложения
Когда вы тестируете работу приложения, вы можете видеть логи работы. Они отображаются в окне LogCat. Чтобы отобразить окно откройте меню Window > Show View > Other … В появившемся окне выберите Android > LogCat

Должна появится вкладка LogCat

Рассмотрим эту вкладку подробней. Логи имеют разные уровни важности: ERROR, WARN, INFO, DEBUG, VERBOSE (по убыванию). Кнопки V D I W E (в кружках) – это фильтры и соответствуют типам логов. Опробуйте их и обратите внимание, что фильтр показывает логи не только своего уровня, но и уровней более высокой важности. Также вы можете создавать, редактировать и удалять свои фильтры – это мы рассмотрим чуть дальше.
Давайте смотреть, как самим писать логи. Делается это совсем несложно с помощью класса Log и его методов Log.v() Log.d() Log.i() Log.w() and Log.e(). Названия методов соответствуют уровню логов, которые они запишут.
Изменим код MainActivity.java. Возьмем все каменты из кода и добавим в DEBUG-логи с помощью метода Log.d. Метод требует на вход тэг и текст сообщения. Тэг – это что-то типа метки, чтобы легче было потом в куче системных логов найти именно наше сообщение. Добавим описание тега (TAG) и запишем все тексты каментов в лог.
public class MainActivity extends Activity implements OnClickListener < TextView tvOut; Button btnOk; Button btnCancel; private static final String TAG = "myLogs"; /** Called when the activity is first created. */ @Override public void onCreate(Bundle savedInstanceState) < super.onCreate(savedInstanceState); setContentView(R.layout.main); // найдем View-элементы Log.d(TAG, "найдем View-элементы"); tvOut = (TextView) findViewById(R.id.tvOut); btnOk = (Button) findViewById(R.id.btnOk); btnCancel = (Button) findViewById(R.id.btnCancel); // присваиваем обработчик кнопкам Log.d(TAG, "присваиваем обработчик кнопкам"); btnOk.setOnClickListener(this); btnCancel.setOnClickListener(this); >@Override public void onClick(View v) < // по id определяем кнопку, вызвавшую этот обработчик Log.d(TAG, "по id определяем кнопку, вызвавшую этот обработчик"); switch (v.getId()) < case R.id.btnOk: // кнопка ОК Log.d(TAG, "кнопка ОК"); tvOut.setText("Нажата кнопка ОК"); break; case R.id.btnCancel: // кнопка Cancel Log.d(TAG, "кнопка Cancel"); tvOut.setText("Нажата кнопка Cancel"); break; >> > Eclipse ругнется, что не знает класс Log. Обновите импорт (CTRL+SHIFT+O) и, если спросит, выберите android.util.Log. Запустим приложение, понажимаем кнопки и посмотрим логи

Видно, что все отлично записалось. Чтобы сделать просмотр удобней, создадим свой фильтр. Жмем значок +

Имя фильтра произвольное, например, «My logs». Log Tag – это как раз значение константы TAG, которая описана в нашем коде и использовалась в методе Log.d, т.е. — «myLogs«. Pid оставляем пустым, это id процесса. Уровень поставим Debug

и жмем OK. Появилась новая вкладка My logs, на которой отображаются логи, соответствующие только что созданному фильтру.
Мы помещали в лог текст, но разумеется, вы можете писать, например, значения интересующих вас переменных (приведенные к типу String).
Иногда бывает, что логи не отображаются во вкладке LogCat, хотя AVD запущен, приложение работает без проблем. В таком случае должно помочь следующее: в Eclipse идем в меню Window > Open Perspective > Other > DDMS. Откроется немного другой набор окон чем обычно. Там найдите вкладку Devices и в ней должно быть видно ваше AVD-устройство, кликните на него и логи должны появиться. Чтобы вернуться в разработку: Window > Open Perspective > Java.
Всплывающие сообщения
Приложение может показывать всплывающие сообщения с помощью класса Toast. Давайте подредактируем метод onClick. Сделаем так, чтобы всплывало сообщение о том, какая кнопка была нажата.
public void onClick(View v) < // по id определяем кнопку, вызвавшую этот обработчик Log.d(TAG, "по id определяем кнопку, вызвавшую этот обработчик"); switch (v.getId()) < case R.id.btnOk: // кнопка ОК Log.d(TAG, "кнопка ОК"); tvOut.setText("Нажата кнопка ОК"); Toast.makeText(this, "Нажата кнопка ОК", Toast.LENGTH_LONG).show(); break; case R.id.btnCancel: // кнопка Cancel Log.d(TAG, "кнопка Cancel"); tvOut.setText("Нажата кнопка Cancel"); Toast.makeText(this, "Нажата кнопка Cancel", Toast.LENGTH_LONG).show(); break; >> Разберем синтаксис вызова. Статический метод makeText создает View-элемент Toast. Параметры метода:
— context – пока не будем вдаваться в подробности, что это такое и используем текущую Activity, т.е. this.
— text – текст, который надо показать
— duration – продолжительность показа ( Toast.LENGTH_LONG — длинная, Toast.LENGTH_SHORT — короткая )
Toast создан и чтобы он отобразился на экране, вызывается метод show(). Сохраняем, запускаем, проверяем.

Если у вас есть Андроид-смартфон, я думаю вы уже видели подобные сообщения. Теперь вы знаете, как это делается )
Присоединяйтесь к нам в Telegram:
— в канале StartAndroid публикуются ссылки на новые статьи с сайта startandroid.ru и интересные материалы с хабра, medium.com и т.п.
— в чатах решаем возникающие вопросы и проблемы по различным темам: Android, Compose, Kotlin, RxJava, Dagger, Тестирование, Performance
— ну и если просто хочется поговорить с коллегами по разработке, то есть чат Флудильня