- 5 ways to add multiple JAR in to Classpath in Java — Examples
- 5 ways to add multiple JARs in Classpath
- 1. Include the JAR name in the CLASSPATH environment variable.
- 2. Include the name of the JAR file in -classpath command-line option.
- 3. Include the jar name in the Class-Path option in the manifest.
- 4. Use Java 6 wildcard option to include multiple JAR
- 5. Adding JAR in ext directory e.g. C:\Program Files\Java\jdk1.6.0\jre\lib\ext
- 6 comments :
- How to Add JAR file to Classpath in Java?
- Method 1 – Using Eclipse IDE
- Method 2 – Using the command line
- Подключение библиотек в Java
- Подключение Джава-библиотек в Eclipse
- Подключение библиотек Java в Maven и Apache-Ant
- Как подключить Java-библиотеку вручную
- Подключение jar-библиотек в Java
5 ways to add multiple JAR in to Classpath in Java — Examples
Adding JAR into classpath is a common task for Java programmers and different programmers do it in different ways. Since Java allows multiple ways to include JAR files in the classpath, it becomes important to know the pros and cons of each approach and How exactly they work. There are 5 ways to add jars into classpath in Java some of them we have already seen in How classpath works in Java and How to set Path in Java . In this post, we will revisit some of those techniques and explore Java 1.6 wildcard to add multiple JAR into the classpath.
In short knowledge of Path, Classpath and Classloaders are a must for any Java programmer, not only from a knowledge point of view but also to successfully debug and resolve issues related to Classpath e.g. NoClassDefFoundError and java.lang.ClassNotFoundException in Java.
5 ways to add multiple JARs in Classpath
Here are some of the ways you can add jar files in the classpath of a Java program :
1. Include the JAR name in the CLASSPATH environment variable.
The CLASSPATH environment variable is case insensitive and it can be either Classpath or classpath as well. This is similar to a PATH environment variable which is used to locate Java binaries e.g. javaw and java command. By the way here are 5 ways to add the JAR file into the classpath.
2. Include the name of the JAR file in -classpath command-line option.

This is the preferred option if you are passing –classpath option while running your Java program as java –classpath $ Main . Here CLASSPATH shell variable can contain a list of Jar files required by your application.
Another advantage of using –classpath command-line option is that, it allows every application to have its own set of JAR in the classpath, unlike the previous option which is available to all Java programs running on the same host.
3. Include the jar name in the Class-Path option in the manifest.
If you are running an executable JAR file, you might have noticed the Class-Path attribute in the manifest file inside the META-INF folder. The Class-Path option takes the highest priorities and overrides both the CLASSPATH environment variable and the –classpath command-line option. This is also a good place to include all JAR files required by Java applications.
4. Use Java 6 wildcard option to include multiple JAR
From Java 1.6+ onwards you can use a wildcard to include all jars in a directory into the set classpath or provide it to the Java program directly using -classpath command-line option. Following Java, the command example shows how to add multiple JAR into classpath using Java 6 wildcard method.
$ java.exe -classpath E:\lib\* Main
This is the newest option of adding multiple JAR files into the classpath. The above command will include all JAR files inside the E:\lib directory into the classpath. One thing which is worth noting while using a wildcard to include multiple JAR is that syntax must be correct.
In fact, that’s a common mistake many Java programmers make. Here are few more important points about using Java 6 wildcard to include multiple JAR in classpath :
2) If you have JAR and class files in the same directory then you need to include each of them separately. Wildcard only matches JAR files and not classes. E.g.
$ java –classpath /classes;/lib/*
4) One more important point is that wildcard to include all JAR is not honored in case if you are running a Java program with a JAR file and that have Class-Path attribute in the manifest file. JAR wildcard is honored If you use the –cp or –classpath option. See Core Java for Impatient for more details:
5. Adding JAR in ext directory e.g. C:\Program Files\Java\jdk1.6.0\jre\lib\ext
This is another way you can add multiple JAR in your classpath. JAR from ext directory is loaded by extension Classloader and it has higher priority than application class loader which loads JAR from either CLASSPATH environment variable or directories specified in –classpath or –cp option. By the way, I don’t suggest this way of adding JAR into Classpath as it’s not standard, it is just for information purposes.
These were a couple of ways you can include JAR files in your Classpath . Java 6 wildcard is the preferred way of adding multiple JAR in classpath along with the –cp and –classpath command-line option. If you are working in multiple operating systems then it’s also good to remember that two directories in classpath are separated using a semicolon(;) in windows and with colon : in UNIX based system.
6 comments :
The opposite of this problem is quite a bigger one: Given classpath, for instance inside an application server like jboss, or inside an IDE like eclipse, how can I determine,from which part of this given classpath a certain class comes from?
To add JAR in eclipse classpath, if we are using Maven, the command «mvn eclipse:eclipse» will populate classpath and if we are using Gradle, command «gradle eclipse» will populate classpath
Does not work! There is no folder called «C:\», and the correct seperator character is a forward slash (/)! Where is the default classpath?
How to set the classpath at RUNTIME (I am using Eclipse)
I have a program that can be downloaded by GIT users using Windows or Linux.
The program needs to start, detect Operating System, copy/deploy JARs for the particular O/S path //home/username/xyz or c:\appdata\selenium\xyz
If you are using the Class-Path option in the manifest file, what is the syntax for multiple jar files contained, for example, in a lib folder within the jar file?
Sorry, I don’t remember on top of my head but just separating them with comma should work, did you try that?
How to Add JAR file to Classpath in Java?
JAR is an abbreviation of JAVA Archive. It is used for aggregating multiple files into a single one, and it is present in a ZIP format. It can also be used as an archiving tool but the main intention to use this file for development is that the Java applets and their components(.class files) can be easily downloaded to a client browser in just one single HTTP request, rather than establishing a new connection for just one thing. This will improve the speed with which applets can be loaded onto a web page and starts their work. It also supports compression, which reduces the file size and the download time will be improved.
Methods: JAR file can be added in a classpath in two different ways
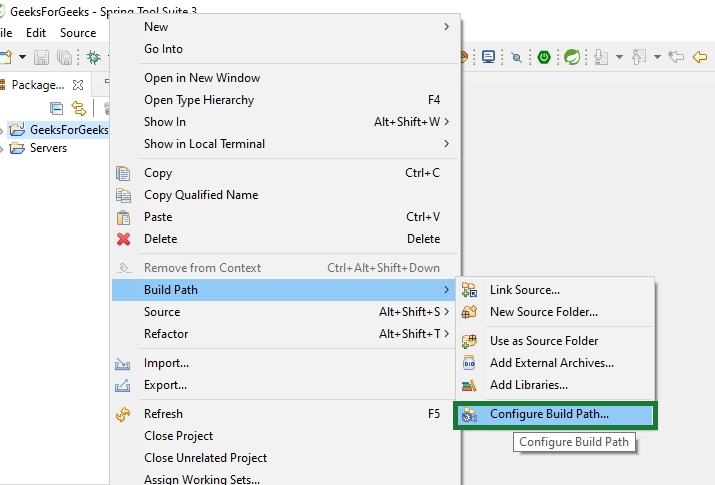
Method 1 – Using Eclipse IDE
Step 1: Right-Click on your project name
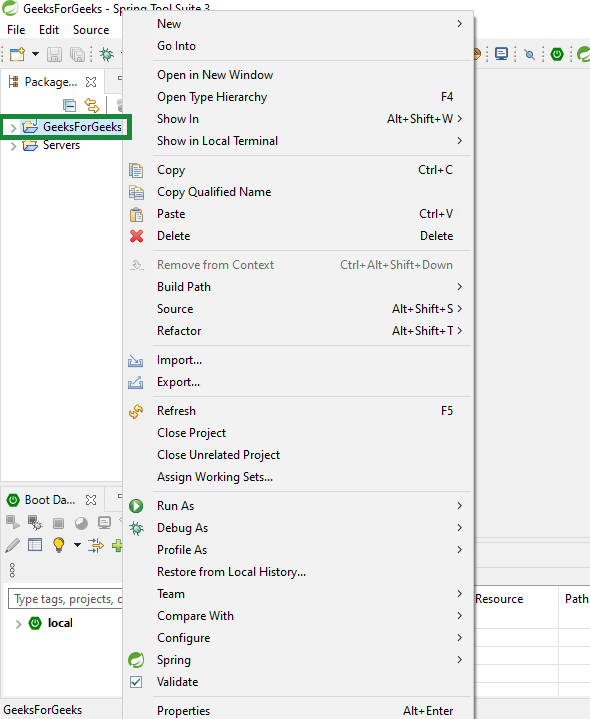
Step 2: Click on Build Path
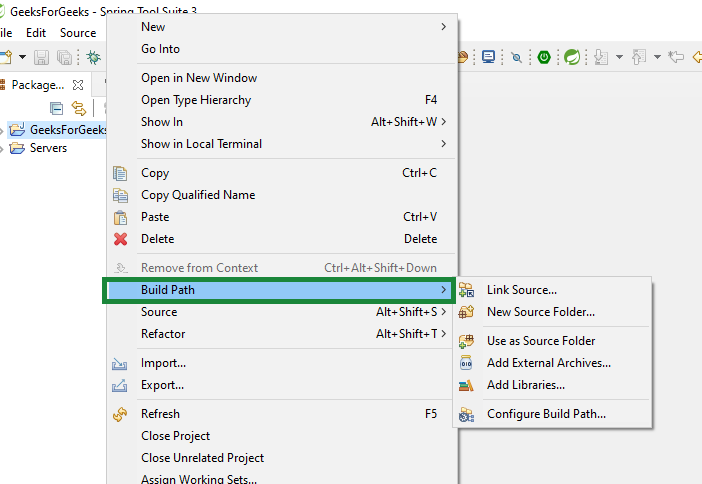
Step 3: Click on configure build path
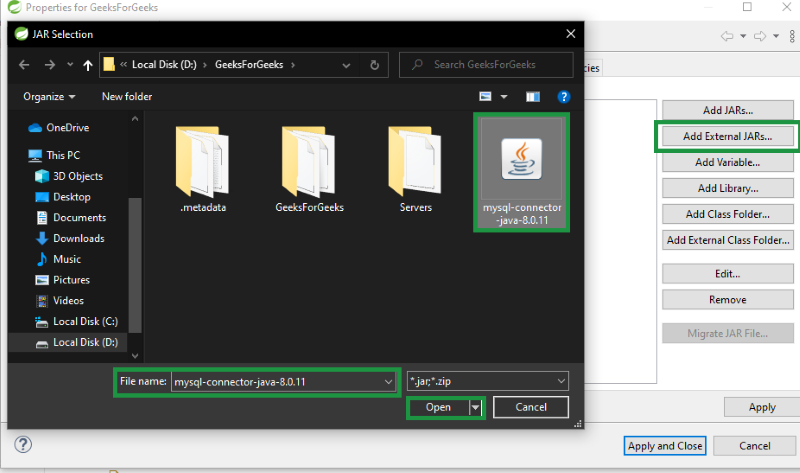
Step 4: Click on libraries and click on “Add External JARs”
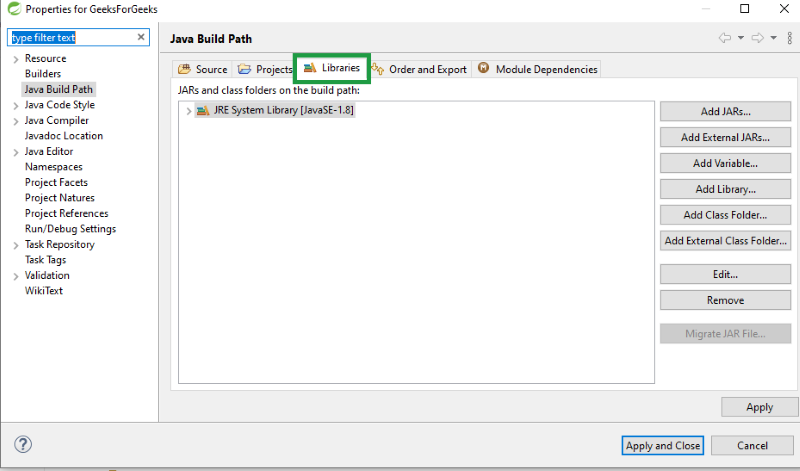
Step 5: Select the jar file from the folder where you have saved your jar file
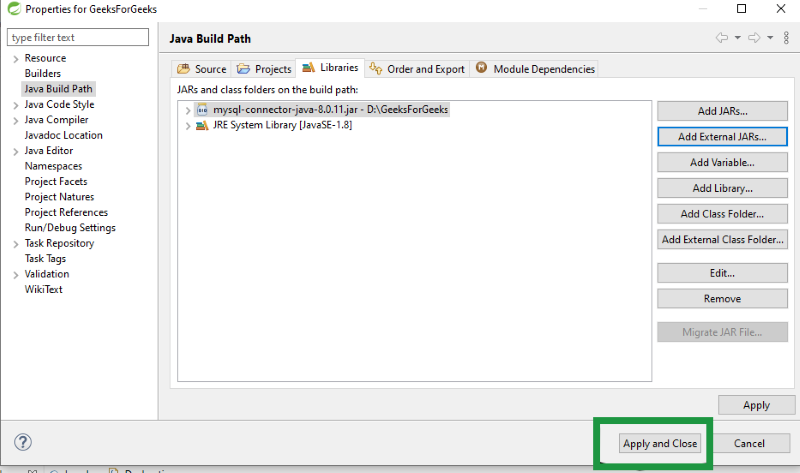
Step 6: Click on Apply and Ok.
Method 2 – Using the command line
Command 1: By including JAR name in CLASSPATH environment variable
CLASSPATH environment variable is not case-sensitive. It can be either Classpath or classpath which is similar to PATH environment variable which we can use to locate Java binaries like javaw and java command.
Command 2: By including name of JAR file in -a classpath command-line option
This option is viable when we are passing –classpath option while running our java program like java –classpath $(CLASSPATH) Main. In this case, CLASSPATH shell variable contains the list of Jar file which is required by the application. One of the best advantages of using classpath command-line option is that it allows us to use every application to have its own set of JAR classpath. In other cases, it’s not available to all Java program which runs on the same host.
Command 3: By including the jar name in the Class-Path option in the manifest
When we are running an executable JAR file we always notice that the Class-Path attribute in the file inside the META-INF folder. Therefore, we can say that Class-Path is given the highest priority and it overrides the CLASSPATH environment variable as well as –classpath command-line option. Henceforth, we can deduce that its a good place to include all JAR files required by Java Application.
Command 4: By using Java 6 wildcard option to include multiple JAR
From Java 1.6+ onwards we can use a wildcard for including all jars in a directory to set classpath or else to provide Java program using classpath command-line option. We can illustrate the Java command example to add multiple JAR into classpath using Java 6 wildcard method as follows,
java.exe -classpath D:\lib\*Main
In this method, we include all JAR files inside ‘D:\lib’ directory into the classpath. We must ensure that syntax is correct. Some more important points about using Java 6 wildcard to include multiple JAR in classpath are as follows:
Whenever JAR and classfile are present in the same directory then we need to include both of them separately
Java -classpath /classes: /lib/*
In Java 6 wildcard which includes all JAR, it will not search for JARs in a subdirectory.
Wildcard is included in all JAR is not honored in the case when we are running Java program with JAR file and having Class-Path attribute in the manifest file. JAR wildcard is honored when we use –cp or –classpath option
Command 5: Adding JAR in ext directory example be it ‘C:\Program Files\Java\jdk1.6.0\jre\lib\ext’
By using the above method we can add multiple JAR in our classpath. JAR from ext directory can be loaded by extension Classloader. It has been given higher priority than application class loader which loads JAR from either CLASSPATH environment variable or else directories specified in –classpath or –cp
Подключение библиотек в Java

Библиотека — готовый набор классов и компонентов, который встраивают в программу, чтобы реализовать некий функционал. Например, в тысячах казуальных игр музыку можно проигрывать одним и тем же способом. Чтобы не тратить время на работу со звуком, программисту достаточно подключить подходящую библиотеку.
Подключение Джава-библиотек в Eclipse
Если вы пользуетесь средой разработки Eclipse, подключение библиотек в Java займёт у вас меньше минуты:
- Разворачиваем дерево проекта в Package Explorer и находим папку libs. Если её нет — создаем.
- Кладем нужный .jar в libs.
- В появившемся окне выбираем «копирование файлов» (copy files) и жмём OK.
- Обновляем проект: правый клик — «Refresh».
Классы подключены и готовы к вызову из нашей программы.
Подключение библиотек Java в Maven и Apache-Ant
Минус подключения библиотек через IDE в том, что для пересборки проекта на другой машине нужна та же среда. Чтобы не зависеть от среды, используют системы сборки Maven и Ant.
Чтобы «прикрутить» библиотеку к проекту Maven, нужно указать её среди зависимостей в файле pom.xml. С библиотекой может подтянуться еще несколько зависимостей, которые подключаются к этой библиотеке. В случае с jar этого не происходит.
Как будет выглядеть наш pom.xml:
xmlns="http://maven.apache.org/POM/4.0.0" xmlns:xsi="http://www.w3.org/2001/XMLSchema-instance" xsi:schemaLocation="http://maven.apache.org/POM/4.0.0 http://maven.apache.org/maven-v4_0_0.xsd"> 4.0.0 ru.team.project test-app 1.0 dependency> Допустим, нам нужна Javassist для редактирования байткода. ----> org.javassist javassist 3.21.0-GA Теперь при компиляции проекта библиотека войдет в конечный .jar-файл.
В Ant принцип схожий, но редактировать нужно файл build.xml. Путь к подключаемым библиотекам пишут с помощью тегов и . Сначала объясняем, где искать библиотеку:
И далее передаём этот адрес тегу :
Как подключить Java-библиотеку вручную
Ваша IDE умеет подключать библиотеки, но как она это делает? Давайте посмотрим, что происходит на уровне файлов. Если библиотека написана на Джаве, её компоненты хранятся либо в архиве .jar, либо в исходниках .java. Более сложный вариант с интеграцией библиотек на C++ пока рассматривать не будем.
Подключение jar-библиотек в Java
Если на компьютере только одна версия Джавы — всё просто. Чтобы подключить .jar, достаточно положить его в папку lib директории Java на жестком диске. Виртуальная машина при ближайшем запуске сама возьмет код из библиотеки.
Когда вы используете одновременно несколько версий Java-машины, раскладывать файлы библиотек для каждой из них утомительно. Лучше указать путь к нужным классам с помощью ключа -classpath.
Открываем терминал и пишем:
java -classpath ./classes ru.аuthor.libname.Main
ru.аuthor.libname.Main — наша библиотека
Точкой перед «/» отмечают текущую директорию.
Можно перечислить несколько библиотек, код из которых компилятор соберет в порядке их перечисления:
java -classpath ./classes;./lib/l1-0.1.jar;./lib/l2-1.5.jar ru. аuthor.libname.Main
Теперь вы умеете подключать библиотеки даже в нестандартной ситуации: когда не установлена IDE или нужно скорректировать очередность подключения.