- Maven Setup For Testing Java Applications
- What Do We Need Maven For?
- Creating a New Maven Project
- Java test java version command linux code example
- Detecting Windows or Linux? [duplicate]
- Find all java versions linux
- linux command to see all the java version installed
- linux command to see all the java version installed
- How to run TestNG from command line
- Linux switch between java versions
- linux change java
- How to check the java compiler version from a java class file?
- About Krishna Srinivasan
Maven Setup For Testing Java Applications
Starting with a new programming language is always exciting. However, it can be overwhelming as we have to get comfortable with the language, the tools, conventions, and the general development workflow. This holds true for both developing and testing our applications. When testing Java applications with Maven, there are several concepts and conventions to understand: Maven lifecycles, build phases, plugins, etc. With this blog post, we’ll cover the basic concepts for you to understand how testing Java applications with Maven works.
What Do We Need Maven For?
When writing applications with Java, we can’t just pass our .java files to the JVM (Java Virtual Machine) to run our program. We first have to compile our Java source code to bytecode ( .class files) using the Java Compiler ( javac ). Next, we pass this bytecode to the JVM ( java binary on our machines) which then interprets our program and/or compiles parts of it even further to native machine code.
Given this two-step process, someone has to compile our Java classes and package our application accordingly. Manually calling javac and passing the correct classpath is a cumbersome task. A build tool automates this process. As developers, we then only have to execute one command, and everything get’s build automatically.
The two most adopted build tools for the Java ecosystem are Maven and Gradle. Ancient devs might still prefer Ant, while latest-greatest devs might advocate for Bazel as a build tool for their Java applications.
We’re going to focus on Maven with this article.
To build and test our Java applications, we need a JDK (Java Development Kit) installed on our machine and Maven. We can either install Maven as a command-line tool (i.e., place the Maven binary on our system’s PATH ) or use the portable Maven Wrapper.
The Maven Wrapper is a convenient way to work with Maven without having to install it locally. It allows us to conveniently build Java projects with Maven without having to install and configure Maven as a CLI tool on our machine
When creating a new Spring Boot project, for example, you might have already wondered what the mvnw and mvnw.cmd files inside the root of the project are used for. That’s the Maven Wrapper (the idea is borrowed from Gradle).
Creating a New Maven Project
There are several ways to bootstrap a new Maven project. Most of the popular Java application frameworks offer a project bootstrapping wizard-like interface. Good examples are the Spring Initializr for new Spring Boot applications, Quarkus, MicroProfile.
If we want to create a new Maven project without any framework support, we can use a Maven Archetype to create new projects. These archetypes are a project templating toolkit to generate a new Maven project conveniently.
Maven provides a set of default Archetypes artifacts for several purposes like a new web app, a new Maven plugin project, or a simple quickstart project.
We bootstrap a new Java project from one of these Archetypes using the mvn command-line tool:
Java test java version command linux code example
The path may vary so to be sure just open the installation location of eclipse, go to plugins and search for jcommander.jar. Solution 1: apache commons lang has a class SystemUtils.java you can use : Solution 2: Try: http://docs.oracle.com/javase/7/docs/api/java/lang/System.html#getProperties%28%29 Solution 3: you can use this Useful simple class: linux command to see all the java version installed linux command to see all the java version installed Solution 1: You need to have the under classpath. try Update: Under linux I ran this command and it would be some thing similar on Windows either Directory structure: Once I compile all sources they go under bin directory.
Detecting Windows or Linux? [duplicate]
apache commons lang has a class SystemUtils.java you can use :
SystemUtils.IS_OS_LINUX SystemUtils.IS_OS_WINDOWS you can use this Useful simple class:
public class OSValidator < private static String OS = System.getProperty("os.name").toLowerCase(); public static void main(String[] args) < System.out.println(OS); if (isWindows()) < System.out.println("This is Windows"); >else if (isMac()) < System.out.println("This is MacOS"); >else if (isUnix()) < System.out.println("This is Unix or Linux"); >else if (isSolaris()) < System.out.println("This is Solaris"); >else < System.out.println("Your OS is not supported!!"); >> public static boolean isWindows() < return OS.contains("win"); >public static boolean isMac() < return OS.contains("mac"); >public static boolean isUnix() < return (OS.contains("nix") || OS.contains("nux") || OS.contains("aix")); >public static boolean isSolaris() < return OS.contains("sunos"); >public static String getOS() < if (isWindows()) < return "win"; >else if (isMac()) < return "osx"; >else if (isUnix()) < return "uni"; >else if (isSolaris()) < return "sol"; >else < return "err"; >> > How to run JUnit test cases from the command line, If your project is Maven-based you can run all test-methods from test-class CustomTest which belongs to module ‘my-module’ using next command: mvn clean test -pl :my-module -Dtest=CustomTest Or run only 1 test-method myMethod from test-class CustomTest using next command: mvn clean test -pl :my-module …
Find all java versions linux
linux command to see all the java version installed
sudo update-alternatives --display java
linux command to see all the java version installed
sudo update-alternatives --config java
How To Write Test Cases In Java, The code snippet is shown below: Here, we have used the New Junit 4 test. To test a class or method, we need to use the testing annotations, and here we have @Test annotation before the test method.. Note: We have taken a sample project that can be tested manually, but when doing a big project, it may consist of numerous …
How to run TestNG from command line
You need to have the testng.jar under classpath.
try C:\projectfred> java -cp «path-tojar/testng.jar:path_to_yourtest_classes» org.testng.TestNG testng.xml
Under linux I ran this command and it would be some thing similar on Windows either
test/bin# java -cp ". /lib/*" org.testng.TestNG testng.xml /bin - All my test packages are under bin including testng.xml /src - All source files are under src /lib - All libraries required for the execution of tests are under this. Once I compile all sources they go under bin directory. So, in the classpath I need to specify contents of bin directory and all the libraries like testng.xml, loggers etc over here. Also copy testng.xml to bin folder if you dont want to specify the full path where the testng.xml is available.
/bin -- testng.xml -- testclasses -- Properties files if any. /lib -- testng.jar -- log4j.jar Go to the folder MyProject and type run the java command like the way shown below:-
java -cp ".: C:\Program Files\jbdevstudio4\studio\plugins\*" org.testng.TestNG testng.xml I believe the testng.xml file is under C:\Users\me\workspace\MyProject if not please give the full path for testng.xml file
If you are using Maven, you can run it from the cmd line really easy, cd into the directory with the testng.xml (or whatever yours is called, the xml that has all the classes that will run) and run this cmd:
mvn clean test -DsuiteXmlFile=testng.xml This page explains it in much more detail: How to run testng.xml from Maven command line
I didn’t know it mattered if you were using Maven or not so I didn’t include it in my search terms, I thought I would mention it here in case others are in the same situation as I was.
Ok after 2 days of trying to figure out why I couldn’t run the example from
http://www.tutorialspoint.com/testng/testng_environment.htm the following code did not work for me
C:\TestNG_WORKSPACE>java -cp "C:\TestNG_WORKSPACE" org.testng.TestNG testng.xml The fix for it is as follows: I came to the following conclusion: First off install eclipse, and download the TestNG plugin. After that follow the instructions from the tutorial to create and compile the test class from cmd using javac, and add the testng.xml. To run the testng.xml on windows 10 cmd run the following line:
java -cp C:\Users\Lenovo\Desktop\eclipse\plugins\org.testng.eclipse_6.9.12.201607091356\lib\*;C:\Test org.testng.TestNG testng.xml to clarify: C:\Users\Lenovo\Desktop\eclipse\plugins\org.testng.eclipse_6.9.12.201607091356\lib\* The path above represents the location of jcommander.jar and testng.jar that you downloaded by installing the TESTNG plugin for eclipse. The path may vary so to be sure just open the installation location of eclipse, go to plugins and search for jcommander.jar. Then copy that location and after that add * to select all the necessary .jars.
The path above represents the location of the testing.xml in your project. After getting all the necessary paths, append them by using «;».
I hope I have been helpful to some of you guys 🙂
Java command not found on Linux, In Oracle Enterprise Linux when I type java I am getting bash: java: command not found I have installed Java 1.6 and I have the following sudo update-alternatives —config java There are 2 pro
Linux switch between java versions
linux change java
sudo update-java-alternatives -s java-8-oracle export JAVA_HOME=/usr/lib/jvm/java-8-oracle/ export PATH=$PATH:$JAVA_HOME 123
How to check the java compiler version from a java class file?
This tutorial provides a great way to find Java compiler version for a class file generated. It is one of the common problem among Java developers to know the exact version in which the JAR file is created. If you receive a JAR file, can you find what is the target compiler version for that JAR file to be deployed?. If developer not aware of the details, it is difficult for them to test the compatibility issues. If the run the code with different version, runtime exception will be thrown. Before start reading this article, If you want to understand the basics of Java compiler and JVM architecture, please go through the articles Java Compiler API, JVM, JRE and JDK difference and JVM.
java.lang.UnsupportedClassVersionError: test class : Unsupported major.minor version 51.0 at java.lang.ClassLoader.defineClass1(Native Method) at java.lang.ClassLoader.defineClassCond(Unknown Source)
Without knowing the Java version in which the JAR is created is difficult for the developers. There is no way to check the version in the JAR file itself. We can check the version details only using the class files inside the JAR file. Unzip the JAR and take out any one class file to be verified.
- JDK 1.0 — major version 45 and minor version 3
- DK 1.1 — major version 45 and minor version 3
- JDK 1.2 — major version 46 and minor version 0
- JDK 1.3 — major version 47 and minor version 0
- JDK 1.4 — major version 48 and minor version 0
- JDK 1.5 — major version 49 and minor version 0
- JDK 1.6 — major version 50 and minor version 0
- JDK 1.7 — major version 51 and minor version 0
These version could be different for each implementation of the compiler. The above details are specific to Oracle/Sun JDK. JDK has javap command to find the version details.
You will find the following details displayed on the screen.
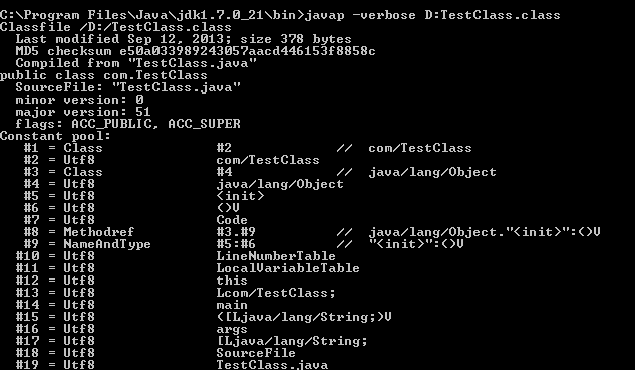
javapThere is simple program which can get you the Java version details. Run the below program by passing the class file name as the arguments, this would return you the major version details.
package com; import java.io.DataInputStream; import java.io.FileInputStream; import java.io.IOException; public class GetVersion < public static void main(String[] args) throws IOException < System.out.println(getVersionDetails(args[0])); >public static String getVersionDetails(String filename) throws IOException < String version = ""; DataInputStream stream = new DataInputStream(new FileInputStream(filename)); int magicBytes = stream.readInt(); if (magicBytes != 0xcafebabe) < System.out.println(filename + " is not a valid java file!"); >else < int minorVersion = stream.readUnsignedShort(); int majorVersion = stream.readUnsignedShort(); version = majorVersion + "." + minorVersion; >stream.close(); return version; > >
javap command returns the complete details of the bytecode. In that there is major version and minor version which is for identifying the Java version details. I hope this tutorial have provided nice tip on finding the version details for the Java class. If you have any more tips, please contact us, we will publish it in our website.
Reference Books:
About Krishna Srinivasan
He is Founder and Chief Editor of JavaBeat. He has more than 8+ years of experience on developing Web applications. He writes about Spring, DOJO, JSF, Hibernate and many other emerging technologies in this blog.