- overflow
- Try it
- Constituent properties
- Syntax
- Values
- Description
- Formal definition
- Formal syntax
- Examples
- Demonstrating results of various overflow keywords
- HTML
- CSS
- Result
- Accessibility concerns
- Specifications
- Browser compatibility
- See also
- Found a content problem with this page?
- Как стилизовать или убрать полосу прокрутки — CSS скроллбар
- 1 Как убрать полосу прокрутки CSS
- 2 Как изменить скроллбар CSS
- 3 CSS стили
overflow
The overflow CSS shorthand property sets the desired behavior when content does not fit in the parent element box (overflows) in the horizontal and/or vertical direction.
Try it
Constituent properties
This property is a shorthand for the following CSS properties:
Syntax
/* Keyword values */ overflow: visible; overflow: hidden; overflow: clip; overflow: scroll; overflow: auto; overflow: hidden visible; /* Global values */ overflow: inherit; overflow: initial; overflow: revert; overflow: revert-layer; overflow: unset;
Values
Overflow content is not clipped and may be visible outside the element’s padding box. The element box is not a scroll container. This is the default value of the overflow property.
Overflow content is clipped at the element’s padding box. There are no scroll bars, and the clipped content is not visible (i.e., clipped content is hidden), but the content still exists. User agents do not add scroll bars and also do not allow users to view the content outside the clipped region by actions such as dragging on a touch screen or using the scroll wheel on a mouse. The content can be scrolled programmatically (for example, by setting the value of the scrollLeft property or the scrollTo() method), in which case. The element box is a scroll container.
Overflow content is clipped at the element’s overflow clip edge that is defined using the overflow-clip-margin property. As a result, content overflows the element’s padding box by the value of overflow-clip-margin or by 0px if not set. Overflow content outside the clipped region is not visible, user agents do not add a scroll bar, and programmatic scrolling is also not supported. No new formatting context is created. To establish a formatting context, use overflow: clip along with display: flow-root . The element box is not a scroll container.
Overflow content is clipped at the element’s padding box, and overflow content can be scrolled into view using scroll bars. User agents display scroll bars in both horizontal and vertical directions if only one value is set, whether or not any content is overflowing or clipped. The use of this keyword, therefore, can prevent scroll bars from appearing and disappearing as content changes. Printers may still print overflowing content. The element box is a scroll container.
Overflow content is clipped at the element’s padding box, and overflow content can be scrolled into view. Unlike scroll , user agents display scroll bars only if the content is overflowing and hide scroll bars by default. If content fits inside the element’s padding box, it looks the same as with visible but still establishes a new formatting context. The element box is a scroll container.
Note: The keyword value overlay is a legacy value alias for auto . With overlay , the scroll bars are drawn on top of the content instead of taking up space.
Description
Overflow options include hiding overflowing content, enabling scroll bars to view overflow content or displaying the content flowing out of an element box into the surrounding area, and combinations there of.
The following nuances should be kept in mind while using the various keywords for overflow :
- Specifying a value other than visible (the default) or clip for overflow creates a new block formatting context. This is necessary for technical reasons; if a float intersects with a scrolling element, it would forcibly rewrap the content after each scroll step, leading to a slow scrolling experience.
- For an overflow setting to create the desired effect, the block-level element must have either a set height ( height or max-height ) or white-space set to nowrap .
- Setting one axis to visible (the default) while setting the other to a different value results in visible behaving as auto .
- The JavaScript Element.scrollTop property may be used to scroll through content in a scroll container, including when overflow is set to hidden .
Formal definition
- overflow-x : as specified, except with visible / clip computing to auto / hidden respectively if one of overflow-x or overflow-y is neither visible nor clip
- overflow-y : as specified, except with visible / clip computing to auto / hidden respectively if one of overflow-x or overflow-y is neither visible nor clip
Formal syntax
overflow =
[ visible | hidden | clip | scroll | auto ]
Examples
Demonstrating results of various overflow keywords
HTML
div> code>visiblecode> p class="visible"> Maya Angelou: "I've learned that people will forget what you said, people will forget what you did, but people will never forget how you made them feel." p> div> div> code>hiddencode> p class="hidden"> Maya Angelou: "I've learned that people will forget what you said, people will forget what you did, but people will never forget how you made them feel." p> div> div> code>clipcode> p class="clip"> Maya Angelou: "I've learned that people will forget what you said, people will forget what you did, but people will never forget how you made them feel." p> div> div> code>scrollcode> p class="scroll"> Maya Angelou: "I've learned that people will forget what you said, people will forget what you did, but people will never forget how you made them feel." p> div> div> code>autocode> p class="auto"> Maya Angelou: "I've learned that people will forget what you said, people will forget what you did, but people will never forget how you made them feel." p> div> div> code>overlaycode> p class="overlay"> Maya Angelou: "I've learned that people will forget what you said, people will forget what you did, but people will never forget how you made them feel." p> div>
CSS
body display: flex; flex-wrap: wrap; justify-content: start; > div margin: 2em; font-size: 1.2em; > p width: 5em; height: 5em; border: dotted; margin-top: 0.5em; > div:nth-of-type(5), div:nth-of-type(6) margin-top: 200px; > p.visible overflow: visible; > p.hidden overflow: hidden; > p.clip overflow: clip; overflow-clip-margin: 1em; > p.scroll overflow: scroll; > p.auto overflow: auto; > p.overlay overflow: overlay; > Result
Accessibility concerns
A scrolling content area cannot be scrolled by a keyboard-only user, with the exception of users on Firefox (which makes the container keyboard focusable by default).
As a developer, to allow non-Firefox keyboard-only users to scroll the container, you will need to give it a tabindex using tabindex=»0″ . Unfortunately, when a screen reader encounters this tab-stop, they will have no context for what it is and their screen reader will likely announce the entirety of its contents. Giving it an appropriate WAI-ARIA role ( role=»region» , for example) and an accessible name (via aria-label or aria-labelledby ) can mitigate this.
Specifications
Browser compatibility
BCD tables only load in the browser
See also
Found a content problem with this page?
This page was last modified on Jul 18, 2023 by MDN contributors.
Your blueprint for a better internet.
Как стилизовать или убрать полосу прокрутки — CSS скроллбар

Стилизованные полосы прокрутки становятся популярными, думаю, вы уже сталкивались с такими сайтами, которые имеют уникальный скроллбар (к примеру, наш сайт). Есть два способа реализации этой задачи: с помощью CSS3 или используя jQuery плагин. Мы будем использовать наиболее простой — напишем CSS стили.

Примечание: стилизовать полосу прокрутки через -webkit префикс возможно только в браузерах, использующих механизм рендеринга Webkit (и Blink). То есть в Firefox и IE этот способ не сработает.
Часто бывает необходимо убрать или скрыть скроллбар css совсем. Для начала, давайте рассмотрим как это сделать.
1 Как убрать полосу прокрутки CSS
Скрыть полосу прокрутки можно как у отдельного элемента на странице, так и у всей страницы целиком. Сделать это не сложно, достаточно написать следующее свойство:
CSS /*Убрать полосу прокрутки у элемента*/ .element::-webkit-scrollbar { width: 0; } /*Убрать полосу прокрутки для всей страницы*/ ::-webkit-scrollbar { width: 0; } 2 Как изменить скроллбар CSS
Теперь давайте рассмотрим базовую структуру полосы прокрутки:
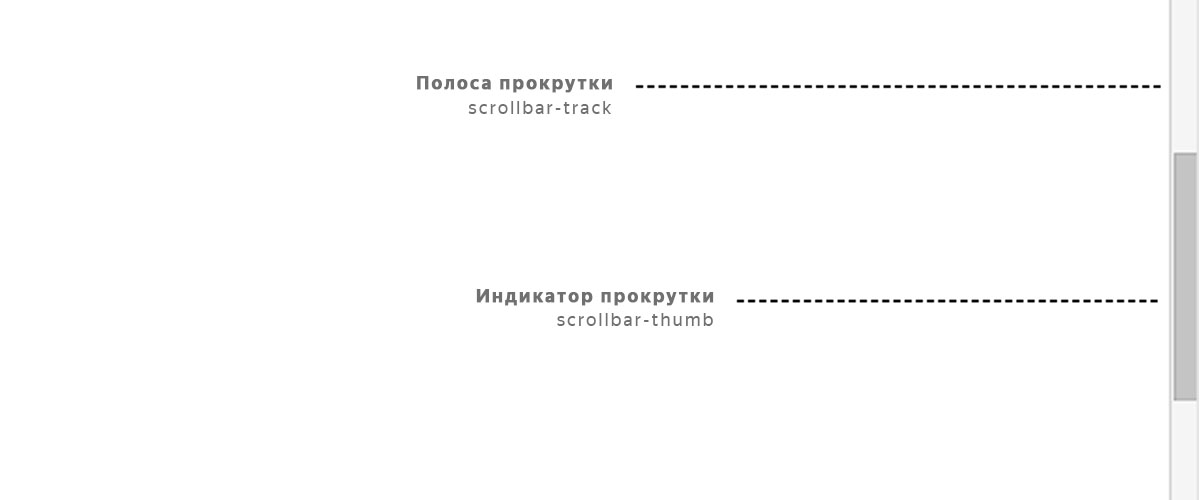
-webkit-scrollbar состоит различных псевдо-элементов.
- ::-webkit-scrollbar — это фон самого скроллбара.
- ::-webkit-scrollbar-button — кнопки направления на полосе прокрутки.
- ::-webkit-scrollbar-track — пустое пространство под индикатором прокрутки.
- ::-webkit-scrollbar-thumb — индикатор прокрутки, перетаскиваемый элемент.
Проверим как все это работает. Чтобы попробовать изменить скроллбар css, создадим пустой HTML документ. Вам необходимо добавить style.css ваш HTML файл. В разметку добавим div с id element, имеющий полосу прокрутки, чтобы применить на него наши стили.
3 CSS стили
Для того, чтобы у элемента div появилась полоса прокрутки, добавим следующие свойства.
CSS #element { overflow-y: scroll; background-color: #ffffff; width: 200px; height: 200px; } .overflow { min-height: 400px; } Теперь давайте используем псевдоэлемент для создания пользовательского скроллбара. Заменим ширину по умолчанию на новую — в 7 пикселей. Затем, добавим цвет полосы через свойство background-color: #f9f9fd .
Если вы хотите изменить ширину скролла всей страницы, а не отдельного элемента, то используйте ::-webkit-scrollbar без дополнительных селекторов.
CSS #element::-webkit-scrollbar { width: 7px; background-color: #f9f9fd; } Мы уже знаем, что скроллбар состоит из полосы, кнопки и индикатора прокрутки. Используем псевдо элемент ::-webkit-scrollbar-thumb , для того чтобы стилизовать индикатор.
CSS #element::-webkit-scrollbar-thumb { background-color: #223c50; } Добавим свойство box-shadow полосе, чтобы добавить скроллбару контрастность. Подобрать подходящую тень можно в нашем box-shadow генераторе.
CSS #element::-webkit-scrollbar-track { -webkit-box-shadow: 5px 5px 5px -5px rgba(34, 60, 80, 0.2) inset; background-color: #f9f9fd; } В заключении: вот еще несколько вариантов, которые вы можете использовать на своем сайте.
Пример 1 #element::-webkit-scrollbar { width: 10px; background-color: #f9f9fd; } #element::-webkit-scrollbar-thumb { border-radius: 10px; background-color: #18aaaa; } #element::-webkit-scrollbar-track { -webkit-box-shadow: inset 0 0 6px rgba(0,0,0,0.2); border-radius: 10px; background-color: #f9f9fd; } Пример 2 #element::-webkit-scrollbar { width: 10px; } #element::-webkit-scrollbar-track { -webkit-box-shadow: 5px 5px 5px -5px rgba(34, 60, 80, 0.2) inset; background-color: #f9f9fd; } #element::-webkit-scrollbar-thumb { background-color: #f2bf93; background-image: -webkit-linear-gradient(45deg,rgba(255, 255, 255, .25) 25%, transparent 25%, transparent 50%, rgba(255, 255, 255, .25) 50%, rgba(255, 255, 255, .25) 75%, transparent 75%, transparent); } Пример 3 #element::-webkit-scrollbar { width: 10px; } #element::-webkit-scrollbar-track { -webkit-box-shadow: 5px 5px 5px -5px rgba(34, 60, 80, 0.2) inset; background-color: #f9f9fd; } #element::-webkit-scrollbar-thumb { background-color: #356184; background-image: -webkit-gradient(linear, 0 0, 0 100%, color-stop(.5, rgba(255, 255, 255, .25)), color-stop(.5, transparent), to(transparent)); } В четвертом примере мы используем градиент. Настроить его можно в CSS генераторе градиента.
Пример 4 #element::-webkit-scrollbar { width: 10px; } #element::-webkit-scrollbar-track { -webkit-box-shadow: 5px 5px 5px -5px rgba(34, 60, 80, 0.2) inset; background-color: #f9f9fd; border-radius: 10px; } #element::-webkit-scrollbar-thumb { border-radius: 10px; background: linear-gradient(180deg, #00c6fb, #005bea); }