- Стилизация форм
- Стилизация полей ввода
- Промежутки у полей ввода
- Поля ввода с рамкой
- Цветные поля ввода
- Поля ввода в фокусе
- Поле ввода с иконкой/изображением
- Анимированное поле ввода
- Стилизация области ввода
- Стилизация меню выбора
- Стилизация кнопок ввода
- Set width of an input text box in HTML, CSS, and JavaScript
- 1. Set width in HTML
- 2. Set width with CSS
- HTML
- CSS
- HTML
- CSS
- 3. Set width with JavaScript
- JS
- HTML
- CSS Input Width
- Input field:
- Example 1:
- Example 2: CSS selector
- Example 3:
- Conclusion:
- About the author
- Aqsa Yasin
Стилизация форм
При помощи CSS можно качественно улучшить внешний вид HTML форм:
Стилизация полей ввода
Для определения ширины поля ввода можно использовать свойство width :
В приведенном выше примере стили будут применяться ко всем элементам . Если же вам нужно настроить стили для поля ввода определенного типа, то вы можете использовать селекторы атрибутов:
- input[type=text] — выберет только текстовые поля ввода
- input[type=password] — выберет только поля ввода паролей
- input[type=number] — выберет только цифровые поля ввода
- и так далее..
Промежутки у полей ввода
Чтобы добавить дополнительные промежутки внутри поля ввода, используйте свойство padding .
Когда в форме много полей ввода, идущих друг за другом, также может потребоваться использовать свойство margin , чтобы добавить дополнительные отступы снаружи поля ввода:
Обратите внимание, что мы установили для свойства box-sizing значение border-box . Это сделано для того, чтобы промежутки и рамки включались в ширину и высоту элементов.
Поля ввода с рамкой
Чтобы изменить цвет и размер рамки поля ввода, используйте свойство border . Для добавления закругленных углов, используйте свойство border-radius :
Если вы хотите, чтобы рамка была только снизу поля ввода, то используйте свойство border-bottom :
Цветные поля ввода
Чтобы добавить фоновый цвет для поля ввода, используйте свойство background-color . Чтобы изменить цвет текста в поле ввода, используйте свойство color :
Поля ввода в фокусе
По умолчанию, некоторые браузеры добавляют синюю внешнюю рамку вокруг поля ввода, когда оно получает фокус (пользователь кликает на него). Вы можете убрать такое поведение добавив для поля ввода свойство outline: none; .
Чтобы определить какой-нибудь свой стиль для поля ввода, находящегося в фокусе, используйте псевдокласс :focus :
Поле ввода с иконкой/изображением
Если вы хотите внутри поля ввода разместить иконку, то используйте свойство background-image . Позиционировать ее можно при помощи свойства background-position . Также, обратите внимание, что мы добавляем большой отступ слева, чтобы зарезервировать место для иконки:
Анимированное поле ввода
В следующем примере мы используем свойство transition , чтобы добавить анимацию на изменение ширины поля ввода, когда оно получает фокус:
input[type=text] < transition: width 0.4s ease-in-out; >input[type=text]:focus
Стилизация области ввода
Чтобы запретить изменять размер области текстового ввода (отключить «захват» в левом нижнем углу), используйте свойство resize :
Стилизация меню выбора
Стилизация кнопок ввода
input[type=button], input[type=submit], input[type=reset]
Чтобы ширина кнопки была во весь экран, используйте width: 100%; .
Set width of an input text box in HTML, CSS, and JavaScript
This post will discuss how to set the width of an input text box in HTML, CSS, and JavaScript.
1. Set width in HTML
In HTML, you can use the width attribute to set the width of an element.
Alternatively, you can also use the size attribute to define the width of the .
2. Set width with CSS
It is good practice to separate CSS from HTML markup. The idea is to define a class to set the width CSS property.
HTML
CSS
Alternatively, you can also use the CSS selector of an input text box for setting the width CSS property.
HTML
CSS
3. Set width with JavaScript
With JavaScript, you can use the setAttribute() method to set the value of the size attribute on the input text box.
You can also dynamically change the width of a text box to match the length of the input. We can easily do this by setting the size attribute on key events.
JS
HTML
That’s all about setting the width of an input text box in HTML, CSS, and JavaScript.
Average rating 4.01 /5. Vote count: 83
No votes so far! Be the first to rate this post.
We are sorry that this post was not useful for you!
Tell us how we can improve this post?
Thanks for reading.
Please use our online compiler to post code in comments using C, C++, Java, Python, JavaScript, C#, PHP, and many more popular programming languages.
Like us? Refer us to your friends and help us grow. Happy coding 🙂
This website uses cookies. By using this site, you agree to the use of cookies, our policies, copyright terms and other conditions. Read our Privacy Policy. Got it
CSS Input Width
![]()
Cascading style sheets use several properties to style any HTML content. One of the basic effects that are used is to increase the dimension of the content in any specific direction only (e.g., width, and height.) This article will discuss the WIDTH property which is the displacement in the original size of the content in the horizontal direction.
Input field:
While creating a form in the webpage, we often use different text fields to get the data entered into this field by the user. This is done by the input type of the field, ‘text’. We will use the width property to enhance the size of the input fields of HTML.
Example 1:
This example will include the sample implementation of a text box that is declared in the HTML body along with an inline CSS. Inline CSS is the type of CSS that is declared inside the HTML tag of the body. First, we will declare a simple text box by using the width property directly in the input type tag. This code will have a body portion directly in the code as there is no need to use a head section. Inside the body, a background color is applied.
While filling out an online form, you must have noticed that a small text is written aside with the text box or the text field. This text describes the purpose of the text box and the type of text the user is supposed to enter. For instance, the name, age, and address are the information required fields of the text. These names of all the fields are known as LABEL. In HTML, a specified label tag is used to declare the label for each text field, respectively.
This tag uses the name of the text field to whom it belongs and will appear before that specified field is declared on the web page. Then, the name of the label is mentioned. After that, we will declare the text box content. As we write the text, the input field is saved or fetched by the system. The type of input, by using the id of it, will be a text with the name of the field.
The third property in this tag belongs to the CSS. The width property is added with the style statement to add the horizontal dimension of the text box. This is done through the width.
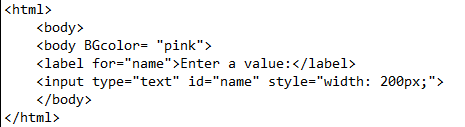
Save this code in the text editor with the HTML extension to view the web page of this code in any browser. Open this code with an option in the browser.

You will see that a simple text box with the label is formed. A specified width is given to the box otherwise it would have a small area to take input.
This concept can also be done by using a separate style code in the head portion to make the code easily understandable. This type of CSS in which the style is added separately in the head section is known as internal CSS. This is accomplished by using ids and classes for the specific tag on which we want to add the effect. For example, ‘helo’ class is created to add width to the input box.
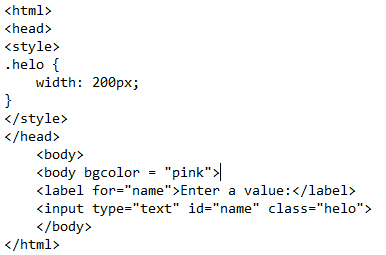
The name of this class ‘helo’ will be added to the input tag as a reference to add all the properties to this input type text box.

On execution, the same text box is created.
Example 2: CSS selector
Unlike the previous concept of declaring the width property to the text box as the inline and internal CSS through the class phenomenon, there is another feature that is used to apply any effect to the HTML content. This is a CSS selector. This selector is different for each HTML content. The selector declaration is also done like the internal CSS inside the style tag in the head section.
This is done by using the keyword input inside the brackets. The input type is mentioned that specifies the declaration of a text field. Inside this declaration, the width of the field is applied.
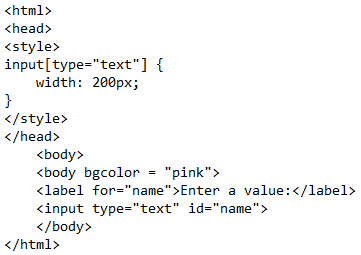
Inside the body, there is no need to add any class name or further details for reference. When we declare the input type for the text box creation, it is automatically connected to the style tag inside the head section.
Example 3:
There is another example of applying the width to the text box. This is done by using the style tag inside the html input content tag and further adding margin and padding to the text fields to enhance the width property. The width property is applied to one text field only while the other one contains the default settings. This will show the difference in declaring a text inbox type box with and without width styling. Now let us start with the HTML body code to elaborate the working of the width style tag.
First, inside the body, we have declared a heading. Then, use a div container to the webpage. The main function of this container is to add HTML content to it with specified alignment to keep them in the proper place. Inside the tag, use the label tag to add the the name. Then, use the input tag for the text field and add a size of 10 to it. The difference in size and width is that the width enlarges the text box in pixels. Whereas, the size is also used to increase the dimensions of any object, but it goes for vertical and horizontal enlargements.
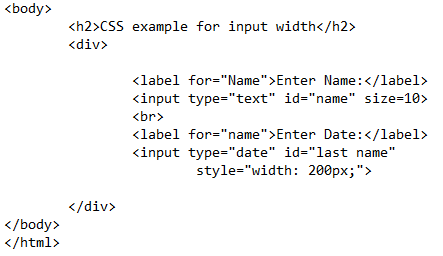
Take a break through the
tag. Then, again use another text box for the data. Add the data type input field so that the user can add only the date according to the format. The calendar symbol will also be formed which is a built-in feature.
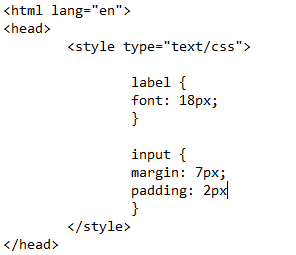
In the CSS portion, the font for the label is added. And to the input field, we have used the margin and padding properties.
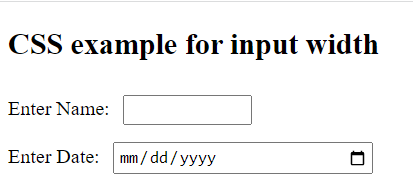
On execution, you will see that the size attribute has enlarged the overall size of the name text box. Whereas, the width property has increased the horizontal size.
Conclusion:
A CSS input width is a feature that is used to enhance the size of the input type fields, these fields are text boxes, text areas, and checkboxes as well. We used the text boxes to elaborate the working of the width property in CSS inline and internal CSS. The difference between the size and the width feature is also explained. The width property plays a major role in the alignment of the form by keeping the value of the width ratio the same for all the text fields.
About the author
Aqsa Yasin
I am a self-motivated information technology professional with a passion for writing. I am a technical writer and love to write for all Linux flavors and Windows.