- Как выровнять картинку по вертикали
- 1. Нам не известны ни размеры картинки, ни размеры блока
- Вариант 1. Картинка с абсолютным позиционированием
- Пример:
- Вариант 2. Через table-cell
- Пример:
- 2. Нам известна высота блока, но не известна высота картинки
- Способ через line-height. Высота картинки должна быть меньше высоты блока.
- Пример:
- Нам известна высота картинки, но неизвестна высота блока
- Способ через абсолютное позиционирование картинки
- How to Center an Image Vertically and Horizontally with CSS
- Here’s an interactive scrim about how to center an image vertically and horizontally:
- Centering an Image Horizontally
- Text-Align
- Margin: Auto
- Display: Flex
- Centering an Image Vertically
- Display: Flex
- Position: Absolute & Transform Properties
- Step 1: Define Position Absolute
- Step 2: Define Top & Left Properties
- Step 3: Define the Transform Property
- Выровнять картинку по вертикали в CSS
- How to Position an Image in CSS?
- Pre-requisite
- Syntax
- Methods
- Conclusion
Как выровнять картинку по вертикали
Итак, у нас есть картинка и есть блок div. Как выровнять картинку по вертикали?
1. Нам не известны ни размеры картинки, ни размеры блока
Вариант 1. Картинка с абсолютным позиционированием
1 2 3 4 5 6 7 8 9 10 11 12
.outer { height: 100px; position: relative; } .outer img { position: absolute; margin: auto; left: 0; top: 0; bottom: 0; right: 0; }
Height введен только чтобы расширить блок, он может быть динамическим, и картинка всегда будет по центру.
Пример:
Вариант 2. Через table-cell
Верстка как и в первом примере:
.outer1 { display: table-cell; vertical-align: middle; text-align: center; width: 500px; height: 100px; }
Здесь тоже высота может быть динамической. Но есть одно НО – ширину блока уже нельзя указать в 100%, должен быть задан width.
Пример:
2. Нам известна высота блока, но не известна высота картинки
Способ через line-height. Высота картинки должна быть меньше высоты блока.
.outer2 { height: 100px; line-height: 100px; text-align: center; } .outer2 img { vertical-align: middle; }
Пример:
Нам известна высота картинки, но неизвестна высота блока
Способ через абсолютное позиционирование картинки
Суть этого способа заключается в добавлении картинке position: absolute, отодвигании ее сверху на 50% через свойство top, а потом добавлении отрицательного margin, равного половине высоты этой картинки. Также можно выравнивать картинку и по горизонтали (добавлением свойств top: 50% и margin-top, равного половине ширины картинки).
Верстка:
1 2 3 4 5 6 7 8 9 10 11 12
How to Center an Image Vertically and Horizontally with CSS

Cem Eygi

Many developers struggle while working with images. Handling responsiveness and alignment is particularly tough, especially centering an image in the middle of the page.
So in this post, I will be showing some of the most common ways to center an image both vertically and horizontally using different CSS properties.
Here’s an interactive scrim about how to center an image vertically and horizontally:
I’ve gone over the CSS Position and Display properties in my previous post. If you’re not familiar with those properties, I recommend checking out those posts before reading this article.
Here’s a video version if you want to check it out:
Centering an Image Horizontally
Let’s begin with centering an image horizontally by using 3 different CSS properties.
Text-Align
The first way to center an image horizontally is using the text-align property. However, this method only works if the image is inside a block-level container such as a :
Margin: Auto
Another way to center an image is by using the margin: auto property (for left-margin and right-margin).
However, using margin: auto alone will not work for images. If you need to use margin: auto , there are 2 additional properties you must use as well.
The margin-auto property does not have any effects on inline-level elements. Since the tag is an inline element, we need to convert it to a block-level element first:
Secondly, we also need to define a width. So the left and right margins can take the rest of the empty space and auto-align themselves, which does the trick (unless we give it a width of 100%):
Display: Flex
The third way to center an image horizontally is by using display: flex . Just like we used the text-align property for a container, we use display: flex for a container as well.
However, using display: flex alone will not be enough. The container must also have an additional property called justify-content :
The justify-content property works together with display: flex , which we can use to center the image horizontally.
Finally, the width of the image must be smaller than the width of the container, otherwise, it takes 100% of the space and then we can’t center it.
Important: The display: flex property is not supported in older versions of browsers. See here for more details.
Centering an Image Vertically
Display: Flex
For vertical alignment, using display: flex is again really helpful.
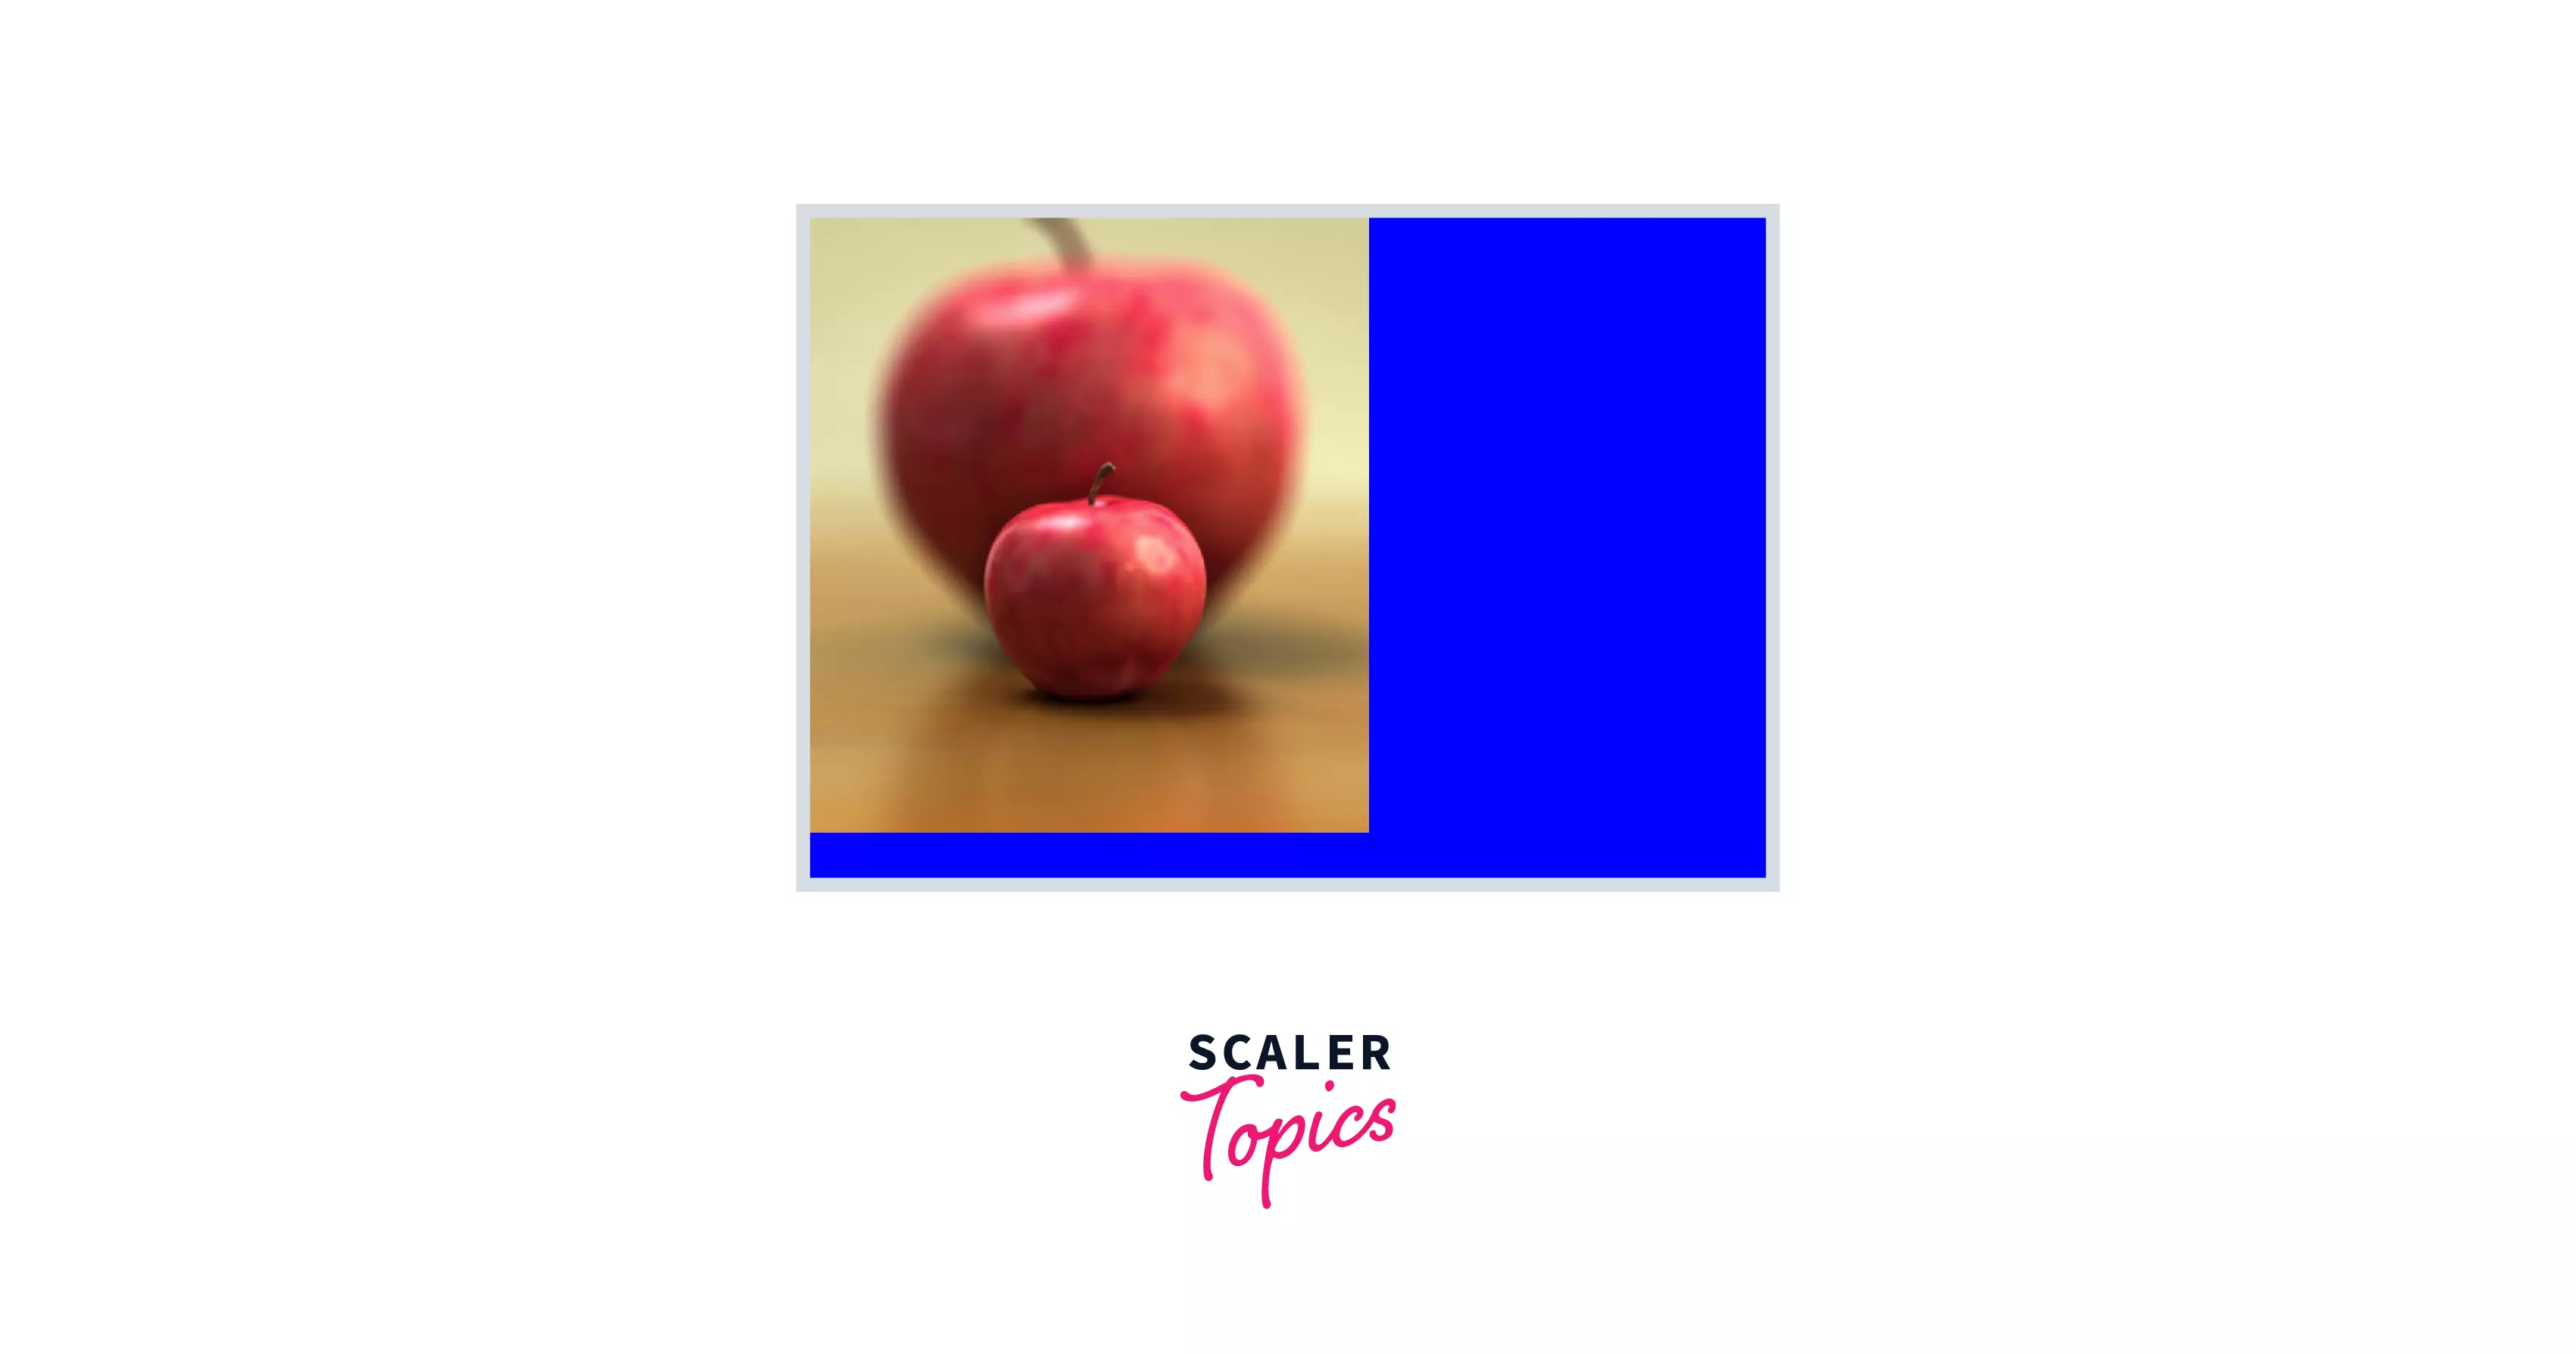
Consider a case where our container has a height of 800px, but the height of the image is only 500px:
Now, in this case, adding a single line of code to the container, align-items: center , does the trick:
The align-items property can position elements vertically if used together with display: flex .
Position: Absolute & Transform Properties
Another method for vertical alignment is by using the position and transform properties together. This one is a bit complicated, so let’s do it step by step.
Step 1: Define Position Absolute
Firstly, we change the positioning behavior of the image from static to absolute :
Also, it should be inside a relatively positioned container, so we add position: relative to its container div.
Step 2: Define Top & Left Properties
Secondly, we define the top and left properties for the image, and set them to 50%. This will move the starting point(top-left) of the image to the center of the container:
Step 3: Define the Transform Property
But the second step has moved the image partially outside of its container. So we need to bring it back inside.
Defining a transform property and adding -50% to its X and Y axis does the trick:
There are other ways to center things horizontally and vertically, but I’ve explained the most common ones. I hope this post helped you understand how to align your images in the center of the page.
If you want to learn more about Web Development, feel free to visit my Youtube Channel for more.
Выровнять картинку по вертикали в CSS

От того, как вы хотите видеть картинку, и здесь будет последствие, чтоб выравнять ее и сделать корректно. При выравнивании картинок или элемента будет располагаться только влево, вправо, а также по центру с текстом, который следует до и после изображения.
Выравнивание оставляет довольно много пустого пространства на вашем сайте. Вы увидите пустое пространство, когда вы пройдете через секцию выравнивания. Для этого нам нужно изображение и блок div, для того, чтоб выровнять картинку по вертикали.
Первое, это нам не известны ни реальные размеры как изображение, так и размеры блока.
Вариант 1. Изображение с абсолютным позиционированием
.kartinku-vertikali <
height: 100px;
position: relative;
>
.kartinku-vertikali img <
position: absolute;
margin: auto;
left: 0;
top: 0;
bottom: 0;
right: 0;
>
Здесь нужно добавить, что Height был поставлен для расширение блока, так как он может быть динамическим, где изображение всегда будет по центру

Вариант 2. Где задействуем table-cell
Верстка идет в аналогичном примере под номер один:
.kartinku-vertikali <
display: table-cell;
vertical-align: middle;
text-align: center;
width: 500px;
height: 100px;
>
В аналогичном порядке высота может быть динамической. Но также здесь присутствует одно НО – это безусловно ширину блока, где уже нельзя указать на 100%, она должна быть задана width.
2. Здесь уже известна высота блока, но не известна высота изображения
Здесь пригодится вариант, где все можно исполнить через line-height, где изначальная высота снимка должна быть меньше высоты основного блока.
.vestnav-usotoka <
height: 100px;
line-height: 100px;
text-align: center;
>
.vestnav-usotoka img <
vertical-align: middle;
>
Вот и все, осталось посмотреть пример, как все выглядит.

Также можно посмотреть распространенный способ через абсолютное позиционирование изображения.
Здесь все заключается в прописывание изображение position: absolute, что автоматически происходит отступ ее сверху на 50% через всем известное свойство top, с последствием выставления отрицательного margin, которое автоматически делает равным половине высоты поставленного изображение.
Аналогично можно применить при выравнивать разных картинок в горизонтальном виде, где просто прописываем свойств top: 50% и margin-top, что как уже было сказано, это идет ровно половине ширины изображения.
.polodsen-svuketun <
position: relative;
border: 1px solid #09b3b3;
width: 100%;
height: 100px;
>
.polodsen-svuketun img <
position: absolute;
top: 50%;
left: 50%;
margin-top: -23px;
margin-left: -20px;
>
Это пример посмотрим на demo страницы, чтоб вообще понимать, как правильно выравнивать изображение по вертикали при помощи HTML И CSS.
Свойство CSS обычно используется для поворота и масштабирования элементов, но с его функцией теперь мы можем вертикально выравнивать элементы. Обычно это должно быть сделано с абсолютным позиционированием или установкой высоты строки.
How to Position an Image in CSS?

The image position in CSS can be changed by using CSS properties like object-position property and float property. Object-position property is used to align the position with respect to the x,y coordinates of the image within its container. The float property is used to float an element inside the container toward the left or right side.
Pre-requisite
You should know how to use CSS properties on elements. This article will explain the object-position property and float property with an example that will be easy to understand.
Syntax
1. object-position property: The Syntax of object position property :
position can be a numerical value that specifies the distance from the left of the content box( i.e x axis ) and the distance from the top of the content box (i.e., y-axis). It can also take values like left, right, top, bottom, and initial and inherit them as a string to specify the position.
2. Float property : The Syntax of the float property :
Methods
Method 1: Using object-position Property
object-position property: The object position property is used to position any element within a container to the required position within the container. The < img >element or < video >element are mostly positioned within a container using the object position property.
The Syntax for the object position property is
Position can take numerical , specific string values , percentage , length , and edge offsets values . Some values are shown in the examples below.
Example Let’s see a simple example of object position property and place the img to the top left of the container.
Method 2: Using float Property
float property: float property is used to change the image position in CSS to the extreme left or extreme right of the container. Float is used to position an element only horizontally. The Syntax of the float property is as follows:
left: place the element to the extreme left of the container right: place the element to the extreme right of the container inherit: inherits floating property from its parent (div, semantic element, etc.) none: element is displayed at its original position as it is.
Some examples of float properties values are as follows:
Let’s take an example in which float property is being used on an actual image :
The output of the above HTML code using the float right property is:

Conclusion
- object-property and float properties are used to position an element inside a container.
- object-position property can be used to change the image position in CSS both horizontally as well as vertically within the container of the image.
- float property can be used to change the image position in CSS horizontally within the container of the image.
- The position property in the object position can take both numerical values as well as some specified string values like left, right, top and bottom.
- Float property takes some specific values like left, right, inherit, and none.