- How to resize an image in HTML?
- Manu Chaudhary
- Manu Chaudhary
- Table of contents
- Resizing an image in CSS
- Preserving the aspect ratio while resizing images
- Responsive image which adjusts based on available width
- How to resize & crop image to fit an element area?
- Resizing background image
- object-fit CSS property
- Downsides of client-side image resizing
- 1. Slow image rendering
- 2. Poor image quality
- 3. Bandwidth wastage
- 4. Increased memory and processing requirements on client devices
- Summary
- How to Set Image Width and Height Using HTML
- Community Q&A
How to resize an image in HTML?
Learn different techniques to resize images in HTML, when you should avoid browser-side resizing, and the right way to manipulate & serve images on the web.
Manu Chaudhary
Manu Chaudhary
Table of contents
If your image doesn’t fit the layout, you can resize it in the HTML. One of the simplest ways to resize an image in the HTML is using the height and width attributes on the img tag. These values specify the height and width of the image element. The values are set in px i.e. CSS pixels.
For example, the original image is 640×960.
https://ik.imagekit.io/ikmedia/women-dress-2.jpg
We can render it with a height of 500 pixels and a width of 400 pixels

If the image element’s required height and width don’t match the image’s actual dimensions, then the browser downscales (or upscale) the image. The exact algorithm used by the browser for scaling can vary and depends on the underlying hardware and OS.
There are a couple of downsides of client-side image resizing, mainly poor image quality and slower image rendering. To overcome this, you should serve already resized images from the server. You can use Thumbor or a free image CDN like ImageKit.io to resize images dynamically using URL parameters.
Resizing an image in CSS
You can also specify the height and width in CSS.
Preserving the aspect ratio while resizing images
When you specify both height and width , the image might lose its aspect ratio. You can preserve the aspect ratio by specifying only width and setting height to auto using CSS property.
This will render a 400px wide image. The height is adjusted accordingly to preserve the aspect ratio of the original image. You can also specify the height attribute and set width as auto , but most layouts are generally width constrained and not height.
Responsive image which adjusts based on available width
You can specify the width in percentage instead of an absolute number to make it responsive. By setting width to 100% , the image will scale up if required to match the parent element’s width. It might result in a blurred image as the image can be scaled up to be larger than its original size.
Alternatively, you can use the max-width property. By setting
the image will scale down if it has to, but never scale up to be larger than its original size.
How to resize & crop image to fit an element area?
So far, we have discussed how to resize an image by specifying height or width or both of them.
When you specify both height and width , the image is forced to fit the requested dimension. It could change the original aspect ratio. At times, you want to preserve the aspect ratio while the image covers the whole area even if some part of the image is cropped. To achieve this, you can use:
Resizing background image
background-image is a very powerful CSS property that allows you to insert images on elements other than img . You can control the resizing and cropping of the image using the following CSS attributes-
- background-size — Size of the image
- background-position — Starting position of a background image
background-size
By default, the background image is rendered at its original full size. You can override this by setting the height and width using the background-size CSS property. You can scale the image upward or downward as you wish.
Possible values of background-size :
- auto — Renders the image at full size
- length — Sets the width and height of the background image. The first value sets the width, and the second value sets the height. If only one value is given, the second is set to auto . For example, 100px 100px or 50px .
- percentage — Sets the width and height of the background image in percent of the parent element. The first value sets the width, and the second value sets the height. If only one value is given, the second is set to auto . For example, 100% 100% or 50% .
It also has 2 special values contain and cover :
background-size:contains
contains — It preserves the original aspect ratio of the image, but the image is resized so that it is fully visible. The longest of either the height or width will fit in the given dimensions, regardless of the size of the containing box.
background-size:cover
cover — It preserves the original aspect ratio but resizes the image to cover the entire container, even if it has to upscale the image or crop it.
object-fit CSS property
You can use the object-fit CSS property on the img element to specify how the image should be resized & cropped to fit the container. Before this CSS property was introduced, we had to resort to using a background image.
Along with inherit , initial , and unset , there are 5 more possible values for object-fit:
- contain : It preserves the original aspect ratio of the image, but the image is resized so that it is fully visible. The longest of either the height or width will fit in the given dimensions, regardless of the size of the containing box.
- cover : It preserves the original aspect ratio but resizes the image to cover the entire container, even if it has to upscale the image or crop it.
- fill : This is the default value. The image will fill its given area, even if it means losing its aspect ratio.
- none : The image is not resized at all, and the original image size fills the given area.
- scale-down : The smaller of either contain or none.
You can use object-position to control the starting position of the image in case a cropped part of the image is being rendered.
Let’s understand these with examples.
The following image’s original width is 1280px and height is 854px. Here it is stretching to maximum available width using max-width: 100% .


object-fit:contains
The original aspect ratio of the image is same, but the image is resized so that it is fully visible. We have added 1px border around the image to showcase this.
object-fit:cover
The original aspect ratio is preserved but to cover the whole area image is clipped from the left and right side.
object-fit:fill
Image is forced to fit into a 200px wide container with height 300px, the original aspect ratio is not preserved.
object-fit:none
object-fit:scale-down
object-fit:cover and object-position:right
Downsides of client-side image resizing
There are certain downsides of client-side resizing that you should keep in mind.
1. Slow image rendering
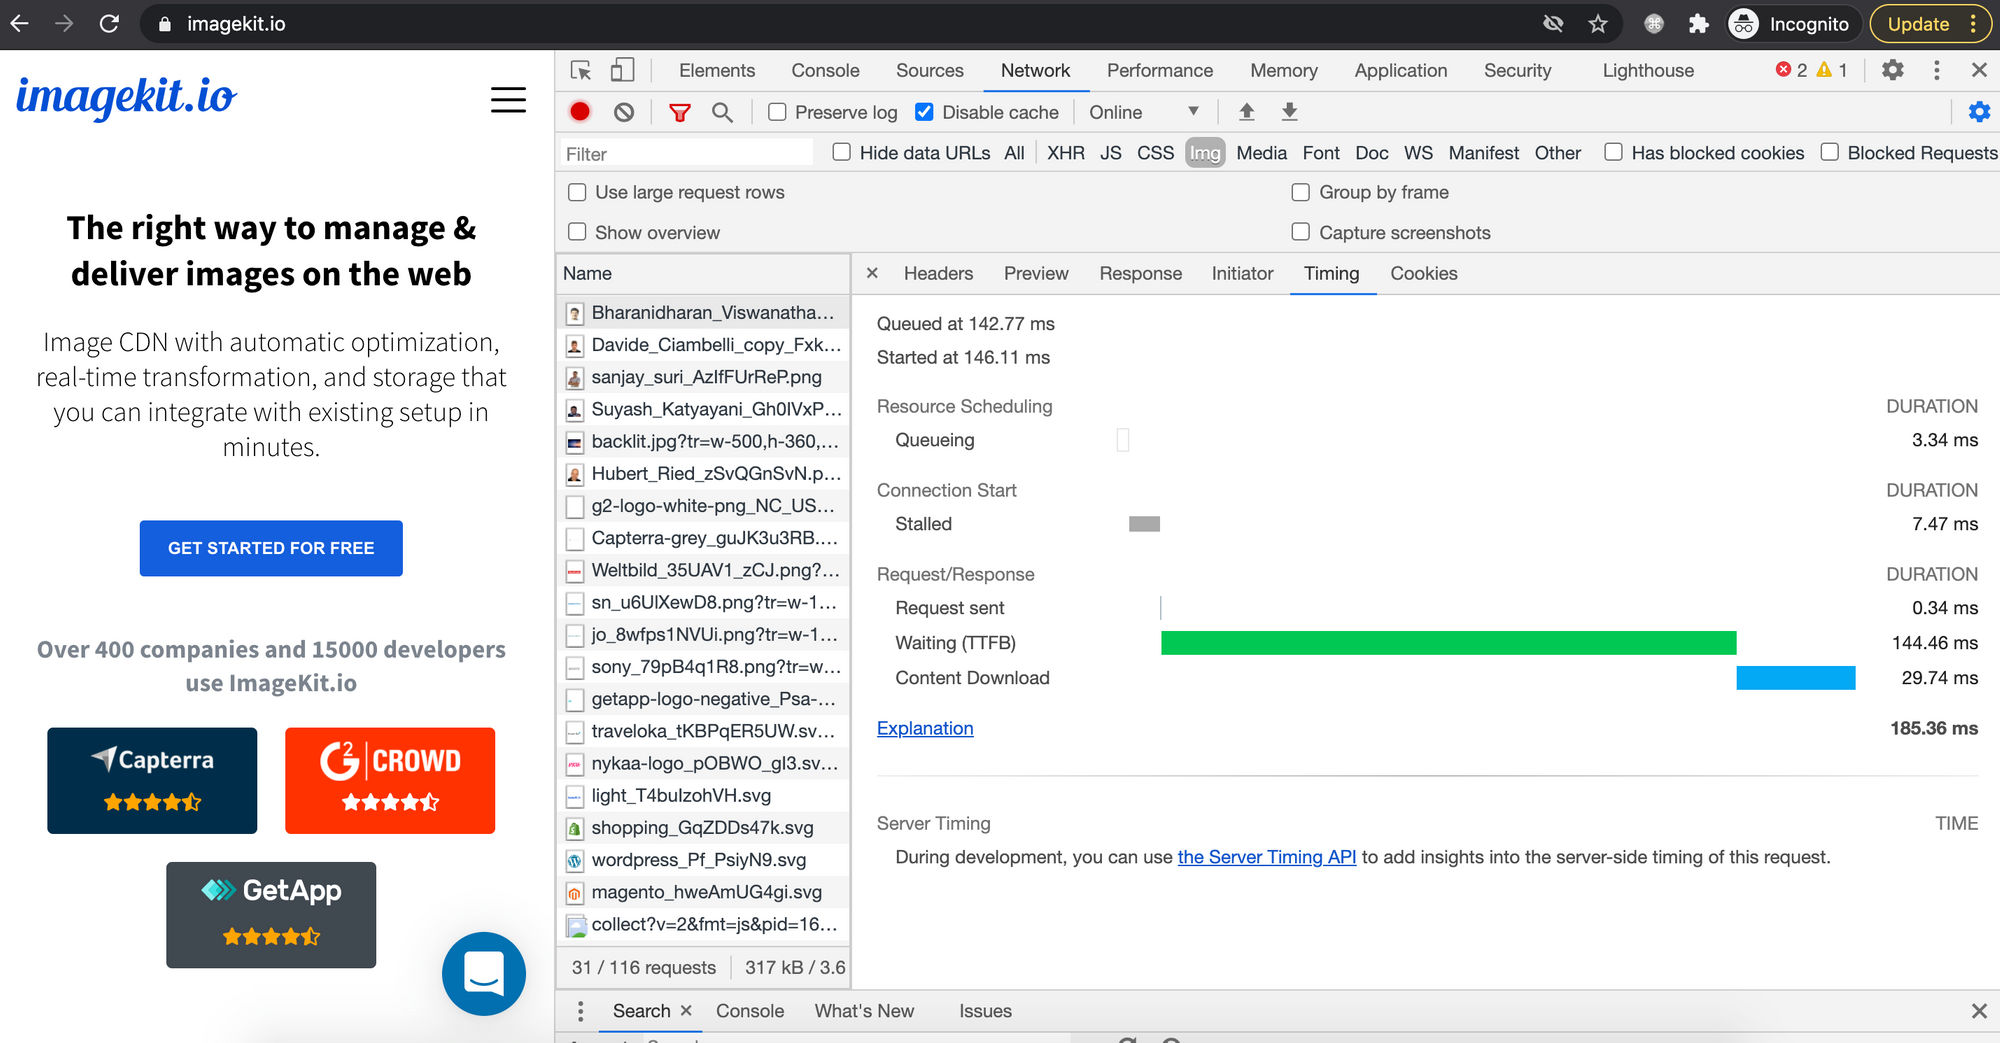
Since the full-sized image is loaded anyway before resizing happens in the browser, it takes more time to finish downloading and finally rendering. This means that if you have a large, 1.5 megabyte, 1024×682 photograph that you are displaying at 400px in width, the whole 1.5-megabyte image is downloaded by the visitor before the browser resizes it down to 400px.
You can see this download time on the network panel, as shown in the screenshot below.
On the other hand, if you resize the image on the server using some program or an image CDN, then the browser doesn’t have to load a large amount of data and waste time decoding & rendering it.
With ImageKit.io, you can easily resize an image using URL parameters. For example —
Original image
https://ik.imagekit.io/ikmedia/women-dress-2.jpg
400px wide image with aspect ratio preserved
https://ik.imagekit.io/ikmedia/women-dress-2.jpg?tr=w-400
2. Poor image quality
The exact scaling algorithm used by the browser can vary, and its performance depends upon underlying hardware and OS. When a relatively bigger image is resized to fit a smaller container, the final image could be noticeably blurry.
There is a tradeoff between speed and quality. The final choice depends upon the browser. Firefox 3.0 and later versions use a bilinear resampling algorithm, which is tuned for high quality rather than speed. But this could vary.
You can use the image-rendering CSS property, which defines how the browser should render an image if it is scaled up or down from its original dimensions.
/* Keyword values */ image-rendering: auto; image-rendering: crisp-edges; image-rendering: pixelated; /* Global values */ image-rendering: inherit; image-rendering: initial; image-rendering: unset; 3. Bandwidth wastage
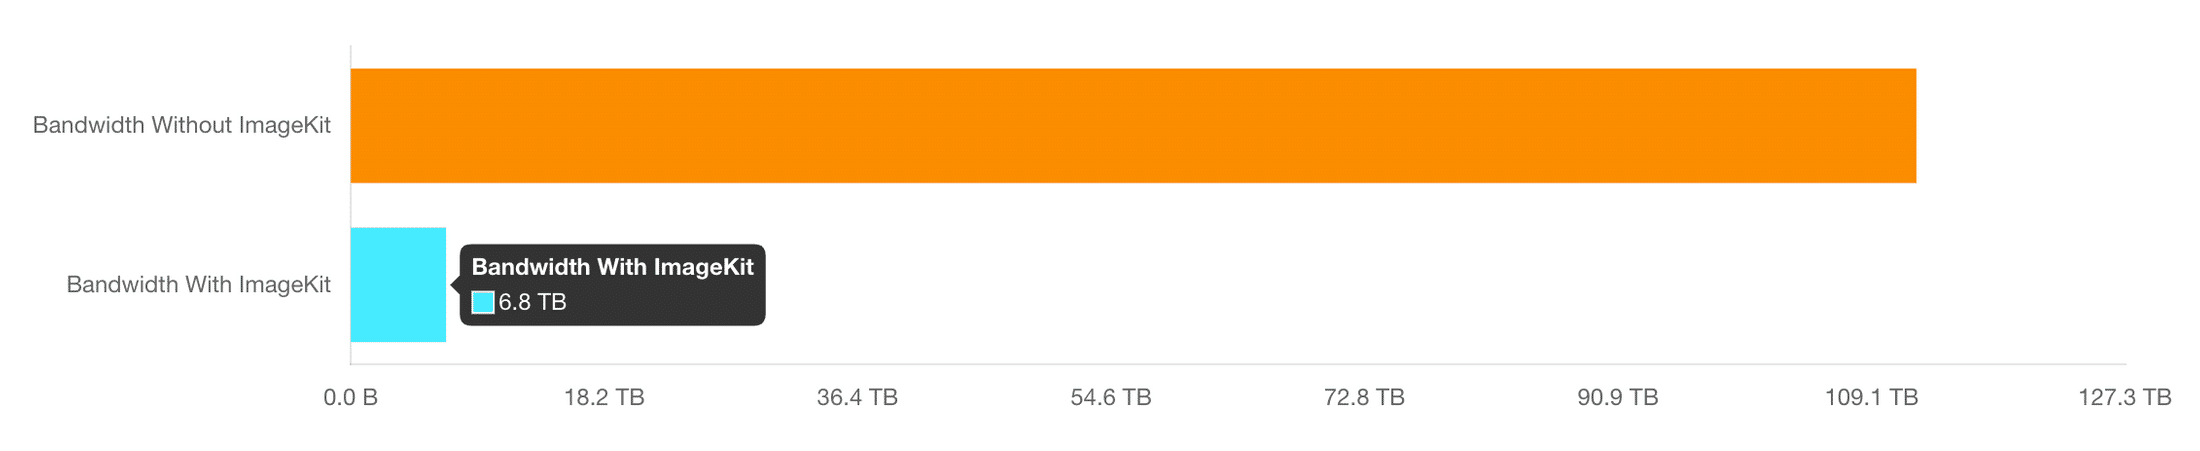
Since the full-sized image is being loaded anyway, it results in wastage of bandwidth, which could have been saved. Data transfer is not cheap. In addition to increasing your bandwidth bills, it also costs your users real money.
If you are using an image CDN, you can further reduce your bandwidth consumption by serving images in next-gen formats e.g. WebP or AVIF.
The user friendly dashboard will also show you how much bandwidth you have saved so far
4. Increased memory and processing requirements on client devices
Resizing large images to fit a smaller container is expensive and can be painful on low-end devices where both memory and processing power is limited. This slows down the whole web page and degrades the user experience.
Summary
When implementing web pages, images need to fit the layout perfectly. Here is what you need to remember to be able to implement responsive designs:
- Avoid client-side (browser) resizing at all if you can. This means serve correctly sized images from the server. It results in less bandwidth usage, faster image loading, and higher image quality. There are many open-source image processing libraries if you want to implement it yourself. Or better, you can use a free image CDN which will provide all these features and much more with a few lines of code.
- Never upscale a raster image i.e. JPEG, PNG, WebP, or AVIF images, should never be upscaled as it will result in a blurred output.
- You should use the SVG format for icons and graphics if required in multiple dimensions in the design.
- While resizing, if you want to preserve the aspect ratio of original images — Only specify one of width and height and set the other to auto .
- If you want the image to fit the entire container while preserving the aspect ratio, even if some part is cropped or the image is upscaled — Use the object-fit CSS property or set a background image using the background-image CSS property.
- Control the starting position of the image using object-position while using object-fit . In background images, use background-position .
How to Set Image Width and Height Using HTML
This article was co-authored by wikiHow staff writer, Darlene Antonelli, MA. Darlene Antonelli is a Technology Writer and Editor for wikiHow. Darlene has experience teaching college courses, writing technology-related articles, and working hands-on in the technology field. She earned an MA in Writing from Rowan University in 2012 and wrote her thesis on online communities and the personalities curated in such communities.
This article has been viewed 183,824 times.
The width and height attributes in HTML specify the size of an image in pixels. In HTML 4.01, the height could be defined in pixels or in % of the containing element. In HTML5, the value must be in pixels. This wikiHow teaches you how to specify the size of an image in your HTML code.

Open your HTML document a text editor. Windows and Mac computers come with default text editor programs like Notepad and Text Edit that will work to create or edit HTML. You can either open the HTML document within the program by clicking Open from the File tab, or you can right-click the file in your file browser and click Open With….


Add this line to your script:
- src is the file path to your image.
- alt is the tag you give for image.
- Note that those numbers are in pixels.
- You can also use the style tag. For example, you’d have the following code in your text: . The style tag ensures the image stays that size and overrides any further image size commands. [1] X Research source

Change height and width numbers. For example, if you enter 21 in the width and 21 in the height areas, you’ll get an image half the size as the original.

Save the file and open the file using any browser to see the effect. If you don’t like the size of the image, you can repeat the previous steps. [2] X Research source
Community Q&A
Make sure that the image that you want to use is stored in the same folder as the HTML document. Also, make sure that you have put the right file name in the actual HTML coding.
Thanks! We’re glad this was helpful.
Thank you for your feedback.
As a small thank you, we’d like to offer you a $30 gift card (valid at GoNift.com). Use it to try out great new products and services nationwide without paying full price—wine, food delivery, clothing and more. Enjoy! Claim Your Gift If wikiHow has helped you, please consider a small contribution to support us in helping more readers like you. We’re committed to providing the world with free how-to resources, and even $1 helps us in our mission. Support wikiHow