- HTMLImageElement
- Свойства
- Методы
- Пример
- Спецификации
- Совместимость
- Смотрите также
- Found a content problem with this page?
- Create Image Elements in JavaScript
- Show Image in Plain HTML
- Set Src Attribute in JavaScript
- Set Multiple Src Attributes in JavaScript
- Create Image Element in JavaScript
- Add Inline Style to the Image in JavaScript
- Add ID Attribute to the Image in JavaScript
- Add Class Attribute to the Image in JavaScript
- Html image element javascript
- # Create an Image Element using JavaScript
- How can I select an element programmatically using JavaScript?
- 7 Answers 7
HTMLImageElement
Интерфейс HTMLImageElement предоставляет специальные свойства и методы (расширяя обычный интерфейс HTMLElement ) для управления вёрсткой и отображением элемента .
Свойства
Наследует свойства родителя, HTMLElement .
| Имя | Тип | Описание |
|---|---|---|
| align | DOMString | Указывает расположение картинки зависящее от окружающего контента. Возможные значения: «left» , «right» , «justify» , и «center» . |
| alt | DOMString | Повторяет атрибут HTML alt указывающий на запасной контекст картинки. |
| border | DOMString | Ширина рамки вокруг картинки. Устарело и вместо него следует использовать свойство CSS border . |
| complete Только для чтения | Boolean (en-US) | Возвращает true, если браузер закончил загрузку картинки с ошибкой или успешно. Также возвращает true, когда не установлено значение src (en-US), во всех остальных случаях — false. |
| crossOrigin | DOMString | Является DOMString , с настройками CORS для этого элемента изображения. Дополнительная информация: Атрибуты настроек CORS (en-US) . |
| currentSrc Только для чтения Экспериментальная возможность | DOMString | Возвращает DOMString с URL-адресом текущего изображения (что может измениться, например, в ответ на запросы мультимедиа). |
| height | unsigned long | Отражает атрибут height HTML, указывая визуализированную высоту изображения в пикселях CSS. |
| hspace | long | Space to the left and right of the image. |
| isMap | Boolean (en-US) | Reflects the ismap HTML attribute, indicating that the image is part of a server-side image map. |
| longDesc | DOMString | URI of a long description of the image. |
| lowSrc | DOMString | A reference to a low-quality (but faster to load) copy of the image. |
| name | DOMString | |
| naturalHeight Только для чтения | unsigned long | Intrinsic height of the image in CSS pixels, if it is available; otherwise, 0 . |
| naturalWidth Только для чтения | unsigned long | Intrinsic width of the image in CSS pixels, if it is available; otherwise, 0 . |
| src | DOMString | Reflects the src HTML attribute, containing the URL of the image. |
| srcset Экспериментальная возможность | ||
| useMap | DOMString | Reflects the usemap HTML attribute, containing a partial URL of a map element. |
| vspace | long | Space above and below the image. |
| width | unsigned long | Reflects the width HTML attribute, indicating the rendered width of the image in CSS pixels. |
| x Только для чтения Non-standard | long | The horizontal offset from the nearest layer. (Mimic an old Netscape 4 behavior) |
| y Только для чтения Non-standard | long | The vertical offset from the nearest layer. (Mimic an old Netscape 4 behavior) |
Методы
The Image() constructor, taking two optional unsigned long , the width and the height of the resource, creates an instance of HTMLImageElement not inserted in a DOM tree.
Пример
var img1 = new Image(); // Конструктор HTML5 img1.src = 'image1.png'; img1.alt = 'alt'; document.body.appendChild(img1); var img2 = document.createElement('img'); // Используем HTMLImageElement img2.src = 'image2.jpg'; img2.alt = 'alt text'; document.body.appendChild(img2); // выбираем первое изображение на странице alert(document.images[0].src);
Спецификации
| Спецификация | Статус | Комментарий |
|---|---|---|
| HTML Living Standard Определение ‘HTMLAnchorElement’ в этой спецификации. | Живой стандарт | The following property has been added: srcset . |
| HTML5 Определение ‘HTMLAnchorElement’ в этой спецификации. | Рекомендация | A constructor (with 2 optional parameters) has been added. The following properties are now obsolete: name , border , align , hspace , vspace , and longdesc . The following properties are now unsigned long , instead of long : height , and width . The following properties have been added: crossorigin , naturalWidth , naturalHeight , and complete . |
| Document Object Model (DOM) Level 2 HTML Specification Определение ‘HTMLImgElement’ в этой спецификации. | Устаревшая | The lowSrc property has been removed. The following properties are now long , instead of DOMString : height , width , hspace , and vspace . |
| Document Object Model (DOM) Level 1 Specification Определение ‘HTMLImgElement’ в этой спецификации. | Устаревшая | Initial definition. |
Совместимость
BCD tables only load in the browser
Смотрите также
Found a content problem with this page?
This page was last modified on 21 июн. 2023 г. by MDN contributors.
Your blueprint for a better internet.
Create Image Elements in JavaScript
In this JavaScript tutorial, you’re going to learn 14 common scenarios you’ll probably run into, if you have not already when working with images.
Show Image in Plain HTML
img src="https://picsum.photos/200/300" /> As you can see, I use the picsum website for demonstration purposes. It lets me get a random image URL with specific dimensions passed at the end of the URL.
Set Src Attribute in JavaScript
const img = document.querySelector("img"); img.src = "https://picsum.photos/200/301"; Then, assign an image URL to the src attribute of the image element. Alternatively, you can set a src attribute to the image tag using the square brackets syntax like this:
img["src"] = "https://picsum.photos/200/301"; Set Multiple Src Attributes in JavaScript
![]() // image 1 .
// image 1 . ![]() // image 2 .
// image 2 . ![]() // image 2
// image 2Using ID or class attribute, you can easily target each image element separately to set a different value to the src attribute which I will cover later in this chapter. Let me show you what 🛑 NOT to do when having multiple static image tags in your HTML page.
const img = document.querySelector("img"); In the previous example, I used the querySelector() method to target the image element which works fine for a single image element. To get a reference to all three image elements, we’ll need to use querySelectorAll().
const img = document.querySelectorAll("img"); img[0].src = "https://picsum.photos/200/301"; // image 1 img[1].src = "https://picsum.photos/200/302"; // image 2 img[2].src = "https://picsum.photos/200/303"; // image 3 This works fine, but there is a one problem with this approach. Let’s say you no longer need the first image element and remove it from the HTML code. Guess what? The second and third image elements will end up having the first and second images.
Create Image Element in JavaScript
Create an image element using the createElement() method on the document object. Then, set an image URL to its src attribute.
const img = document.createElement("img"); img.src = "https://picsum.photos/200/301"; document.body.appendChild(img); Finally, add the image element to the DOM hierarchy by appending it to the body element. Alternatively, you can use the Image() constructor which creates a new HTMLImageElement instance and it’s functionally is equivalent to document.createElement(“img”). Optionally, you can pass width and height parameters to it.
const img = new Image(100, 200); // width, height img.src = "https://picsum.photos/200/301"; document.body.appendChild(img); width="100" height="200" src="https://picsum.photos/200/301"> Add Inline Style to the Image in JavaScript
Using the style property, we can apply style to the image element directly in JavaScript. As you can see in the example below, I’ve applied a border as well as border radius styles to it.
let img = document.createElement("img"); img.src = "https://picsum.photos/200/301"; img.style.border = "10px solid orange"; img.style.borderRadius = "10px"; document.body.appendChild(img); 
Add ID Attribute to the Image in JavaScript
Adding multiple styles to the image element individually would be tedious. Instead, let’s create a new CSS rule inside the style tags or an external CSS file with an ID selector like below.
#img-rounded-border border:10px solid red; border-radius:10px; > As you know, it’s pretty straight forward as the value of the ID attribute should not be duplicated in a single page.
Alternatively, you can invoke the setAttribute() method on the img object with two arguments: the attribute name and the value.
img.setAttribute("id", "img-rounded-border"); Add Class Attribute to the Image in JavaScript
Unlike ID attribute, you can add multiple class names in a single image element or the same class name in multiple image elements or combinations of both. Let’s say we have a CSS rule with a class name called .img-rounded-border.
.img-rounded-border border:10px solid red; border-radius:10px; > Then, we can add this class to the image element using the add() method on the classList property passing the class name as an argument. Continue Reading.
Html image element javascript
Last updated: Jan 12, 2023
Reading time · 3 min

# Create an Image Element using JavaScript
To create an image element:
- Use the document.createElement() method to create the img element.
- Use the setAttribute() method to set the src attribute on the element.
- Add the element to the page using the appendChild() method.
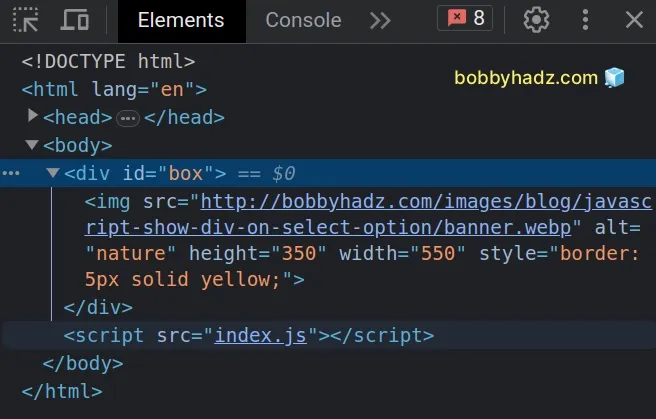
Here is the HTML for the examples.
Copied!DOCTYPE html> html lang="en"> head> title>bobbyhadz.comtitle> meta charset="UTF-8" /> head> body> div id="box">div> script src="index.js"> script> body> html>
And here is the related JavaScript code.
Copied!const image = document.createElement('img'); // 👇️ Local image // image.setAttribute('src', 'my-img.png'); // 👇️ Remote image image.setAttribute( 'src', 'http://bobbyhadz.com/images/blog/javascript-show-div-on-select-option/banner.webp', ); image.setAttribute('alt', 'nature'); image.setAttribute('height', 350); // 👈️ height in px image.setAttribute('width', 550); // 👈️ width in px // 👇️ optionally style the image image.style.border = '5px solid yellow'; image.onerror = function handleError() console.log('Image could not be loaded'); // 👇️ Can set image.src to a backup image here // image.src = 'backup-image.png' // 👇️ Or hide image // image.style.display = 'none'; >; image.onload = function handleImageLoaded() console.log('image loaded successfully'); >; const box = document.getElementById('box'); box.appendChild(image);
We used the document.createElement method to create the img element.
Copied!const image = document.createElement('img');
How can I select an ![]() element programmatically using JavaScript?
element programmatically using JavaScript?
I have an in an HTML document that I would like to highlight as though the user had highlighted it using the mouse. Is there a way to do that using JavaScript? I only need it to work in Mozilla, but any and all information is welcome. EDIT: The reason I want to select the image is actually not so that it appears highlighted, but so that I can then copy the selected image to the clipboard using XPCOM. So the img actually has to be selected for this to work.
7 Answers 7
Here’s an example which selects the first image on the page (which will be the Stack Overflow logo if you test it out on this page in Firebug):
var s = window.getSelection() var r = document.createRange(); r.selectNode(document.images[0]); s.addRange(r) You might also want to call s.removeAllRanges() before s.addRange(r).
What, exactly, are you trying to do? If you’re using XPCOM, you’re presumably writing an application or an extension for one; can’t you just get the image data and put it on the clipboard directly?
I’m trying to copy an image to the clipboard, but it’s surprisingly hard to do from XUL/JS/XPCOM. Please see stackoverflow.com/questions/68103/… if you know how!
My personal choice for selecting elements is jquery:
Then to get the element of your choice is:
You can swap the source of the image, as in img.src = «otherimage.png»;
I actually did this at one point, and there are things you can do to pre-load the images.
I even set up special attributes on the image elements such as swap-image=»otherimage.png», then searched for any elements that had it, and set up handlers to automatically swap the images. you can do some fun stuff.
Sorry I misunderstood the question! but anyways, for those of you interested in doing what I am talking about, here is an example of what I mean (crude implementation, I would suggest using frameworks like jQuery to improve it, but just something to get you going):