- Как создать HTML кнопку, которая действует как ссылка
- Добавьте строчный onclick event
- Пример
- Пример
- Используйте атрибут action или formaction внутри элемента .
- Пример
- Пример
- Пример
- Добавьте ссылку в стиле HTML кнопки (используя CSS)
- Пример
- How to Get the Href of a Clicked Link in JavaScript
- Creating an Event Listener
- Retrieving the Href Attribute
- In Conclusion
- 1 comment
- Leave a comment Cancel reply
- Linking pages using buttons click event
- Another way of linking button
- Demo of two types of buttons with code
- Using hyper link
- Opening in a new window
- Managing from a child window
- Button with Style
- Using bootstrap style
- Using image to link
- target=new
Как создать HTML кнопку, которая действует как ссылка
Есть много способов создания HTML кнопки, которая действует как ссылка, т.е., когда вы нажимаете на эту кнопку, она перенаправляется на указанный URL-адрес.
Вы можете выбрать один из следующих методов добавления ссылки на HTML кнопку.
Добавьте строчный onclick event
Пример
html> html> head> title>Заголовок документа title> head> body> button onclick="window.location.href = 'https://w3docs.com';">Click Here button> body> html>Пример
html> html> head> title>Заголовок документа title> head> body> form> input type="button" onclick="window.location.href = 'https://www.w3docs.com';" value="w3docs"/> form> body> html>Ссылки не будут работать, если JavaScript не используется, а поисковая система может проигнорировать такие ссылки.
Используйте атрибут action или formaction внутри элемента .
Пример
html> html> head> title>Заголовок документа title> head> body> form action="https://www.w3docs.com/"> button type="submit">Click me button> form> body> html>Для того, чтобы открыть ссылку в новой вкладке, добавьте атрибут target=»_blank» .
Пример
html> html> head> title>Заголовок документа title> head> body> form action="https://www.w3docs.com/" method="get" target="_blank"> button type="submit">Click me button> form> body> html>Так как нет форм и данных, этот пример семантически не будет иметь смысла. Но данная разметка допустима.
Пример
html> html> head> title>Заголовок документа title> head> body> form> button type="submit" formaction="https://www.w3docs.com">Click me button> form> body> html>Атрибут formaction используется только для кнопок с type=”submit”. Так как этот атрибут является HTML5-specific, он может слабо поддерживаться в старых браузерах.
Добавьте ссылку в стиле HTML кнопки (используя CSS)
Пример
html> html> head> title>Заголовок документа title> style> .button < background-color: #FF4500; border: none; color: white; padding: 20px 34px; text-align: center; text-decoration: none; display: inline-block; font-size: 20px; margin: 4px 2px; cursor: pointer; > style> head> body> a href="https://www.w3docs.com/" class="button">Click Here a> body> html>How to Get the Href of a Clicked Link in JavaScript
Learn how to get the href attribute of any, or specific, clicked links in JavaScript.
When the user clicks on a link in your HTML document, you want to retrieve the target URL, meaning the value of the href attribute, with JavaScript.
What is the best way to accomplish this?
To get the value of the href attribute of a clicked link, create an event listener using AddEventListener() and retrieve the value of the href attribute using Element.target() .
This tutorial will show you exactly how to do this in two steps.
First, you will learn how to create an event listener for all links or for specific links. Second, you will learn how to retrieve the value of the href attribute of a link when the user clicks it.
Creating an Event Listener
The EventTarget.AddEventListener() method of the EventTarget() Web API in JavaScript lets you create event listeners for when the user clicks on a DOM element in your HTML document.
This method lets you declare a function that gets called every time the event is fired. From the event, you can read the properties of the DOM element that it was attached to, allowing you to parse the value of the href attribute and store it in a variable.
The syntax for the AddEventListener() method is as follows:
// Event listener syntax EventTarget.AddEventListener(type, listener);Both the type and the listener arguments are mandatory.
Type is a string that specifies the event type that you want the event listener to listen for.
Listener can be an object within the scope of the EventListener Web API, or a function that gets called every time the event is fired.
In this case, we need to create an event listener for clicks on link elements, meaning elements.
One of the best ways to do this is to use the Document.querySelectorAll() method. This method lets you create a loop that targets all instances of specific DOM elements using CSS selectors.
So you can do a simple selection for all links on your HTML page—or a narrowed-down selection of links with a specific id, class, or other.
Here’s how an event listener for all link clicks looks like:
// Create event listener for all link clicks document.querySelectorAll('a').forEach(link => link.addEventListener('click', (e) => console.log('A link was clicked'); >); >);If you need to narrow down your event listener’s scope to clicks on specific links, for example links with a given id or className , all you need to do is modify your CSS selector:
// Event listener only for document.querySelectorAll('a.nav-item').forEach(link => link.addEventListener('click', (e) => console.log('A link was clicked'); >); >); // Event listener only for document.querySelectorAll('a#nav-item-01').forEach(link => link.addEventListener('click', (e) => console.log('A link was clicked'); >); >);Depending on your implementation requirements, a CSS selector can be as simple as targeting elements or as complex as targeting an n-th element within a parent element or a group of elements.
Mastering CSS selectors can take your query selection skills to the next level. If you’re a frontend developer, this skill will give you an upper hand in your daily work.
Retrieving the Href Attribute
Now that you know how to create event listeners that listen to clicks on links, whether all links or specific links, let’s look at how to retrieve the value of the href attribute from them.
This can be done by passing on the e parameter to the function,short for “event,” that gets called on click.
Then, you can use the Event.target() Web API to retrieve the className attribute of the DOM object to which the event in your event listener was attached:
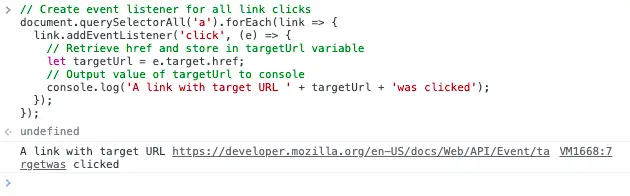
// Create event listener for all link clicks document.querySelectorAll('a').forEach(link => link.addEventListener('click', (e) => // Retrieve href and store in targetUrl variable let targetUrl = e.target.href; // Output value of targetUrl to console console.log('A link with target URL ' + targetUrl + 'was clicked'); >); >);If you opened up your browser’s console right now, copy/pasted and ran this code, then clicked on a link or two, you’d observe the following results:
In Conclusion
I hope you found this tutorial useful.
I recently had to tackle this challenge myself as I implemented a data layer for analytics purposes on one of my websites. It took me a few tries (and a couple of hours) to get to the best solution, and I believe this is it.
If you have any questions, or you want to share other ways to achieve this with the rest of this post’s readers, be sure to leave a reply below.
1 comment
Greetings.
Just what I needed after several hours of trying with a multilevel menu. Excellent tutorial. Thank you very much, very grateful.
Leave a comment Cancel reply
- How to Wait for an Element to Exist in JavaScript July 13, 2023
- How to Check If a Function Exists in JavaScript July 13, 2023
- How to Remove Numbers From a String With RegEx July 13, 2023
- How to Check If a String Is a Number in JavaScript July 13, 2023
- How to Insert a Variable Into a String in PHP July 12, 2023
We publish growth advice, technology how-to’s, and reviews of the best products for entrepreneurs, creators, and creatives who want to write their own story.
Maker’s Aid is a participant in the Amazon Associates, Impact.com, and ShareASale affiliate advertising programs.
These programs provide means for websites to earn commissions by linking to products. As a member, we earn commissions on qualified purchases made through our links.
To provide the best experiences, we and our partners use technologies like cookies to store and/or access device information. Consenting to these technologies will allow us and our partners to process personal data such as browsing behavior or unique IDs on this site and show (non-) personalized ads. Not consenting or withdrawing consent, may adversely affect certain features and functions.
Click below to consent to the above or make granular choices. Your choices will be applied to this site only. You can change your settings at any time, including withdrawing your consent, by using the toggles on the Cookie Policy, or by clicking on the manage consent button at the bottom of the screen.
The technical storage or access is strictly necessary for the legitimate purpose of enabling the use of a specific service explicitly requested by the subscriber or user, or for the sole purpose of carrying out the transmission of a communication over an electronic communications network.
The technical storage or access is necessary for the legitimate purpose of storing preferences that are not requested by the subscriber or user.
The technical storage or access that is used exclusively for statistical purposes. The technical storage or access that is used exclusively for anonymous statistical purposes. Without a subpoena, voluntary compliance on the part of your Internet Service Provider, or additional records from a third party, information stored or retrieved for this purpose alone cannot usually be used to identify you.
The technical storage or access is required to create user profiles to send advertising, or to track the user on a website or across several websites for similar marketing purposes.
Linking pages using buttons click event
Hyper links are used to link different pages within a site and outside a site to each other. Same thing can be achieved by using a button. We can use a button to link different pages. We will connect the url of the new page to the onclick event of the button. We can do this by using a form and a submit button but there is no point in using a form for a hyper linking of pages. So here are some examples of using buttons to link different pages.
HTML button with onClick event with location to link between web pages using address or URLs
Another way of linking button
Demo of two types of buttons with code
Using hyper link
Some time from SEO angle linking using a button is not a good idea as we loose the anchored text advantage of hyper linking. Read the article on search engine friendly page design to know more on this.
Opening in a new window
Managing from a child window
We can open a child window of different height and width by using JavaScript window.open command. We can pass any variable to child window and receive data from child window to main window.
We can display buttons in Child window and manage the main ( parent ) window by using buttons. We can make the main window navigate to different page from the child window.
Check this demo on using buttons to manage main window.
To display above button , source is here
Button with Style
We can create attractive buttons by using style property. We can manage shape, size, font , background colour, shadow, hover and many other properties of the button.
DEMO of Buttons with CSS properties →
Using bootstrap style
Bootstrap is opensource front end framework to manage look and feel of your website.
We can add attractive buttons using bootstrap classes.
Primary secondary success info warning danger link
Using image to link
Click this logo ( image ) to visit home page
target=new
We can open the page in a new tab by using target=new . This can be used in text links and buttons also.

plus2net.com
Click for more tutorial on Button Links & CSS