- How to send emails in Javascript (NodeJS)
- JavaScript email transmission
- Why you would want to use JS to send emails
- Mailto: for delivering form data,
- HTML example
- MailSlurp true email sending
- Sending without code
- mailslurp.send
- To conclude
- How to send an email using JavaScript?
- Prequiresites
- Sending Email using JavaScript
- Conclusion
- About the author
- Shehroz Azam
How to send emails in Javascript (NodeJS)
Learn how to send emails directly from the client-side with JavaScript and Node.js using step-by-step examples & practical solutions.
A programming language called JavaScript is utilized for both front-end and back-end development. This post will offer a shift in viewpoint from the server-side to the client-side by utilizing JS to send emails from an application with no back-end.
JavaScript email transmission
JavaScript code cannot send emails by itself since server sockets are not supported. A server-side language that communicates with the SMTP server is needed for this. For the server script to send emails from the browser in response to queries, JavaScript is also used.
Why you would want to use JS to send emails
Emails are often sent through the server-side of a standard app. A server setup utilizing back-end technology is required. The server side receives a request from the client-side and responds by creating an email and sending it to the SMTP server. Why then use JavaScript to send emails directly from the client side. Such a method is quite helpful for developing contact forms and other user interfaces for web apps since it enables email sending without requiring the user to reload the page they are currently viewing. Additionally, you don’t need to play around with server programming. If your web application solely sends emails in response to contact forms, this is a compelling argument. You can choose from a few options below to enable client-side email sending in your app.
Mailto: for delivering form data,
You can program the browser to launch the default mail client to send an email directly through JS. Although it is not technically possible to send an email straight from a browser, the mailto: method can be used.
HTML example
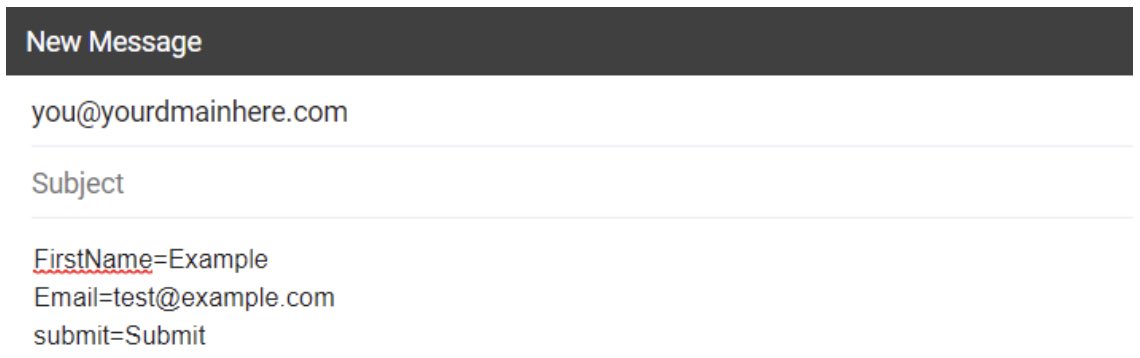
See how the following piece of code functions:
form action="mailto:you@yourdmainhere.com" method="post" enctype="text/plain" > FirstName:input type="text" name="FirstName"> Email:input type="text" name="Email"> input type="submit" name="submit" value="Submit"> form> You’ll see the following when you open it in the browser:

Following the data submission, the browser launches the default mail client.
Although the mailto: method is a fairly simple implementation, it has the following specific drawbacks:
- Given that the data is supplied in the form that the browser sends, you do not influence how the data is laid out.
- Mailto: doesn’t guard against spambots gathering your email address. A link might be built-in JS in the past to help with this. Nowadays, a growing number of bots use JS and do not solely rely on HTML produced by the server.
MailSlurp true email sending
A free package called SmtpJS can be used to send emails from JavaScript. To complete the task, an SMTP server and a few adjustments are required. Since mailslurp is a practical email testing solution, it serves as the server in this example. The procedure to follow is outlined below: Create an HTML file with the following script in it (for instance, test.html):
script src="https://smtpjs.com/v3/smtp.js"> script> A button that will activate the JavaScript function should be created.
input type="button" value="Send Email" onclick="sendEmail()"> Create the JS function to use SmtpJS.com to send emails.
function sendEmail( ) < Email.send(< Host : "smtp.mailslurp.com", Username : "", Password : "", To : 'recipient@example.com', From : "sender@example.com", Subject : "Test email", Body : "Header
Bold text Italic" >).then(message => alert(message) ); > You can include an array of email addresses in the To: attribute if you have numerous recipients. Send emails by running “test.html” in the browser.
The problem with the code example above is that the client-side script makes your login and password visible. If you use the SmtpJS encryption option, you can resolve this. After completing the necessary fields, click the box that says «Encrypt your SMTP credentials.» Following that, select Generate security token, and use it in your JS function in place of the following SMTP server settings:
An HTML email sample and an email with an attachment are shown below. This is how the email will appear in the recipient’s inbox, thanks to mailslurp’s GUI.
An example of HTML email coding:
script src="https://smtpjs.com/v3/smtp.js"> script> input type="button" value="Send Email" onclick="sendEmail()"> script> function sendEmail() < Email.send(< SecureToken : "your generated token>", To : 'recipient@example.com', From : "sender@example.com", Subject : "Test Email", Body : "html>h2>Header h2>strong>Bold text strong>br> br>em>Italic em> html>" >).then( message => alert("mail sent successfully") ); > script> Sample of the code needed to send an email with attachments Use the Attachments property to send an email with an attachment as shown:
script src="https://smtpjs.com/v3/smtp.js"> script> input type="button" value="Send Email" onclick="sendEmail()"> script> function sendEmail() < Email.send(< SecureToken : "your generated token>", To : 'recipient@example.com', From : "sender@example.com", Subject : "Test Email", Body : "html>h2>Header h2>strong>Bold text strong>br> br>em>Italic em> html>", Attachments : [ < name : "smtp.png", path : "https://…/smtp.png" >] >).then(message => alert(message) ); > script> Sending without code
Without using any server code, mailslurp.com enables connecting email providers, creating email templates, and sending them from JavaScript. Choose a service to connect with and create an account. Both personal services like Gmail or Outlook and well-known transactional service choices like Amazon SES or Mailgun are offered. mailslurp is used in this illustration.
The built-in editor can be used to create email templates. There are many possibilities for creating material in the editor, along with additional helpful tools like auto-reply, reCAPTCHA verification, and others. Additionally, you must be familiar with the fundamentals of writing your HTML email template. Click Save after you’re done. The fact that the standard email characteristics are concealed is one of mailslurp.com’s key advantages. Since the recipient field is included in the template and cannot be changed using JS, you transmit the template that was previously set up. You must now install the mailslurp SDK. Npm can be used for this:
npm install mailslurp-com --save bower install mailslurp-com --save You should insert the following code before the closing tag if you need to use mailslurp on your website:
script type="text/javascript"> (function( )< mailslurp.init("YOUR_USER_ID"); //use your USER ID >)(); script> Two techniques can be used to send the email itself:
mailslurp.send
var templateParams = < name: 'James', notes: 'Check this out!' >; mailslurp.send('YOUR_SERVICE_ID', 'YOUR_TEMPLATE_ID', templateParams) //use your Service ID and Template ID .then(function(response) < console.log('SUCCESS!', response.status, response.text); >, function(error) < console.log('FAILED. ', error); >); mailslurp.sendForm var templateParams = < name: 'James', notes: 'Check this out!' >; mailslurp.sendForm('YOUR_SERVICE_ID', 'YOUR_TEMPLATE_ID', templateParams) //use your Service ID and Template ID .then(function(response) < console.log('SUCCESS!', response.status, response.text); >, function(error) < console.log('FAILED. ', error); >); Let’s send an email directly from the browser to see if mailslurp.com functions as expected. We have created a straightforward template and set up the mailslurp email service. Now, we must write the following code into an HTML file:
script type="text/javascript" src="https://cdn.jsdelivr.net/npm/mailslurp-com@2.4.0/dist/email.min.js"> script> script type="text/javascript"> (function( )< mailslurp.init(""); //Insert your User ID >)(); script> script> var templateParams = < name: 'Sender', notes: 'Test email' >; mailslurp.send('', '', templateParams) //Insert your email service ID and email template ID .then(function(response) < console.log('SUCCESS!', response.status, response.text); >, function(error) < console.log('FAILED. ', error); >); script> Try it out in your browser by opening the mailslurp Demo Inbox. It works!
However, there is a way to send emails without ever using a browser that is simpler and faster. After testing them, “mailslurp Email Delivery” enables you to rapidly authenticate your domain and send emails using SMTP or API.
To conclude
You can avoid dealing with server-side coding even if sending emails is a server-side function. Two practical options for streamlining your front-end and enabling email sending are:
MailSlurp is superior since it conceals common email properties and lets you send any templates you’ve previously set up. While the mailto: approach is different, it too has its uses.
How to send an email using JavaScript?
![]()
JavaScript is a web programming language that makes our web pages and web applications interactive by giving them the ability to think and act. SMTP.JS (Simple Mail Transfer Protocol) is a JavaScript library that helps us send data or in our case email to a specific server. However, it should be kept in mind that it will only be used to send emails so it will only work with outgoing emails. In this post, we will see how to send an email using JavaScript and with the help of SMTP we will achieve our goal.
Prequiresites
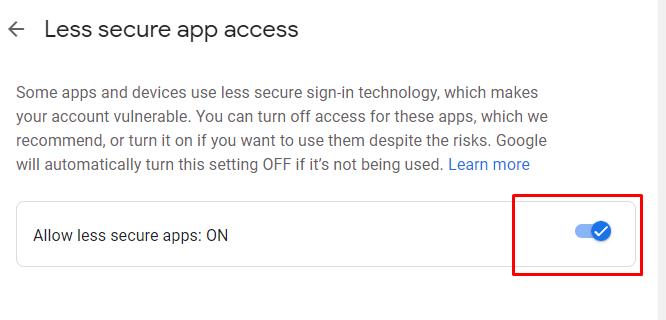
There are two things you need before we start coding. First, you have to change the Gmail account settings that you will use to send an email such as if 2 step authentication is set up on your Gmail account then revoke it and then allow less secure apps to access Gmail which we can achieve by visiting the Gmail Settings page.
Sending Email using JavaScript
HTML: We will first design the structure of our web application. For that copy or type the HTML code in your favorite editor.
In the above code, we used the input tags of HTML to define input boxes for sender email and password and receiver email. Apart from that we also defined a button that says Send Email and initiated an event listener that will continuously listen for the click event which means every time a user clicks on the Send Email button the sendMail() function will start executing. All of the input fields are then placed in a form tag which has a method of post and the name of Form. We will use this name to get the values of input fields of this Form.

In the end, we used the script tag to include SMTP protocol and then another script tag to reference the JavaScript file(code.js) that has the function sendMail().
JavaScript: In JavaScript, we initiated the sendMail() function and then stored all the values of the input fields defined in HTML. We achieve this task by referencing the input fields with the name they were given earlier in HTML.
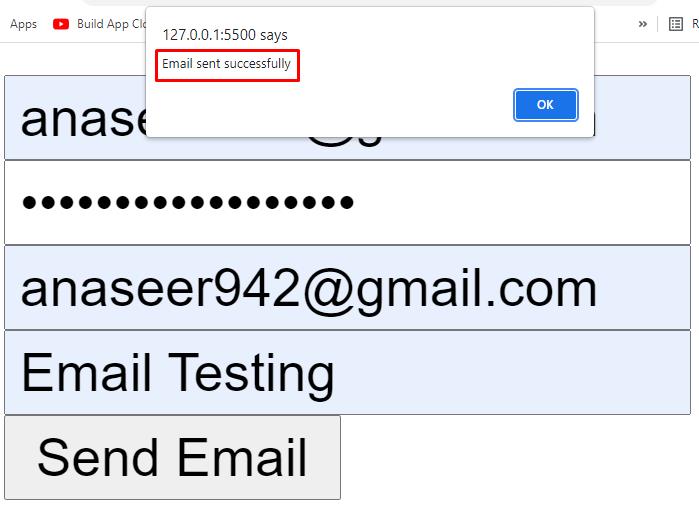
After getting all the values, we will send the email using these values. If the process of sending an email is successful we will see an alert of Email Sent Successfully.
//getting values from input fields
var sender = Form. sender . value ;
var password = Form. password . value ;
var receiver = Form. reciever . value ;
var content = Form. content . value ;
Subject : «Check Email Sending» ,
alert ( «Email sent successfully» )
Fill all the required credentials and then click on the Send Email button:
Now go to your Gmail account and you will see that you have received an Email:

Conclusion
JavaScript is a programming language in which we can develop and design web pages. The SMTP library in JavaScript is a simple mail transfer mechanism that is used to send emails. In this post, we answered the question of how to send email using JavaScript by first defining our web application structure using HTML, and then we went on to JavaScript to implement the proper functionality.
About the author
Shehroz Azam
A Javascript Developer & Linux enthusiast with 4 years of industrial experience and proven know-how to combine creative and usability viewpoints resulting in world-class web applications. I have experience working with Vue, React & Node.js & currently working on article writing and video creation.