- Html div border background color
- Синтаксис применения свойства border
- Результат:
- Результат:
- Бордюр снизу — border bottom css
- Бордюр слева — css border left
- Бордюр справа — css border right
- Бордюр сверху — css border top
- Цвет бордюра — border color css
- Радиус бордюра border radius css
- свойства border градиент border
- Тень для бордюра css
- Внутренний доступ бордюра css
- Отступы снаружи бордюра border margin css
- HTML Background Color Tutorial – How to Change a Div Background Color, Explained with Code Examples
- Default Background Color of an Element
- Changing the Background Color of a Div
- Background Color and the CSS Box Model
- Background-color Values
- Extra Note
- Conclusion
- border
- Пример
- Рамки блоков с градиентом
- Белый фон блока
- Результат:
- Пример:
- Еще один пример:
- Прозрачный фон блока
- Результат:
- Анимированный градиент
- Результат:
- Комментарии
- Другие публикации
Html div border background color
«BORDER» — может быть свойством.
Но и «BORDER» — может быть атрибутом атрибут border(устаревшее).
Синтаксис применения свойства border
Результат:
Результат:
Через файл file css, например : Аналогичный способ, что и во втором пункте, только класс размещается в файле css.
Перечисленные способы создания бордюра элемента, применяются в зависимости от необходимых задач, это :
Локально в одном элементе.
Локально на одной странице, для повторяющихся элементов.
Бордюр снизу — border bottom css
Поставим Бордюр снизу это у нас свойство — border bottom, чтобы увидеть его мы поставим толщину бордюра 2px
Стили для border bottom css:
Расположение бордюра снизу .
Бордюр слева — css border left
Далее сделаем Бордюр слева — это свойство бордюра border left
Стили для border left css:
Расположение бордюра слева.
Бордюр справа — css border right
Следующий бордюр на очереди это Бордюр справа — это свойство border right
Стили для border right css:
Расположение бордюра справа .
Бордюр сверху — css border top
Не знаю зачем, но есть еще и Бордюр сверху — если он существует, то значит -это кому то нужно!
Расположение бордюра сверху:
Цвет бордюра — border color css
Сделаем наш border цветом, ну например красным и пусть он будет снизу!
Цвет для border можно задать прямо в свойствах border выделено красным red red ;
Стили для border-color css + bottom :
Радиус бордюра border radius css
Если требуется закруглить углы, то делаем «border-radius» к примеру в 15px «border-radius: 15px;»
Кстати, тут мы как-то делали о кругах и там как раз мы использовали это свойство.
Результат применения радиуса к див:
свойства border градиент border
Мы уже рассматривали свойства линии, которые также можно применить и к border, что собственно мы делали выше!
Данное свойство было solid — все остальные свойства не хочу повторять, потому, что вот здесь мы все один раз разжевывали!
Тень для бордюра css
Добавим тень нашему бордюру, это приведет к эффекту парения элемента.
Вообще то. border shadow не бывает. бывает box-shadow:
background: #fc0; /* Цвет фона */
box-shadow: 0 0 10px rgba(0,0,0,0.5); /* Параметры тени */
Обращаю ваше внимание, что текст прилипает к бордюру элемента, и снаружи и внутри!
Поэтому следующим пунктом добавим отступ для бордюра
background: #fc0; /* Цвет фона */
box-shadow: 0 0 10px rgba(0,0,0,0.5); /* Параметры тени */
Внутренний доступ бордюра css
Нам нужно, чтобы текст немного отступал от бордюра.
Возьмем свойства из выше идущего пункта и добавим ему свойство padding — это будет внутренний доступ бордюра.
background: #fc0; /* Цвет фона */
box-shadow: 0 0 10px rgba(0,0,0,0.5); /* Параметры тени */
Но опять же, наш текст снаружи все равно прилипает к бордюру! В следующем пункте изменим и это!
background: #fc0; /* Цвет фона */
box-shadow: 0 0 10px rgba(0,0,0,0.5); /* Параметры тени */
Отступы снаружи бордюра border margin css
Опять возьмем выше идущий весь код и добавим в него свойство margin.
Это будет наружный отступ от бордюра элемента :
background: #fc0; /* Цвет фона */
box-shadow: 0 0 10px rgba(0,0,0,0.5); /* Параметры тени */
background: #fc0; /* Цвет фона */
box-shadow: 0 0 10px rgba(0,0,0,0.5); /* Параметры тени */
HTML Background Color Tutorial – How to Change a Div Background Color, Explained with Code Examples
One of the most common things you may have to do as a web developer is to change the background-color of an HTML element. But it may be confusing to do if you do not understand how to use the CSS background-color property.
In the article, we discuss
- the default background color value of an HTML element
- how to change the background color of a div, which is a very common element
- which parts of the CSS box model are affected by the background-color property, and
- the different values this property can take.
Default Background Color of an Element
The default background color of a div is transparent . So if you do not specify the background-color of a div, it will display that of its parent element.
Changing the Background Color of a Div
In this example, we will change the background colors of the following divs.
I love HTML I love CSS I love JavaScript Without any styling, this will translate to the following visually.

Let’s change the background color of the divs by adding styles to the classes. You can follow along by trying the examples in an HTML file.
.div-1 < background-color: #EBEBEB; >.div-2 < background-color: #ABBAEA; >.div-3 I love HTML I love CSS I love JavaScript This will result in the following:

Cool! We have successfully changed the background color of this div. Next, let’s get to know more about this property. Let’s see how the background-color property affects parts of the CSS-box model.
Background Color and the CSS Box Model
According to the CSS box model, all HTML elements can be modeled as rectangular boxes. Every box is composed of 4 parts as shown in the diagram below.
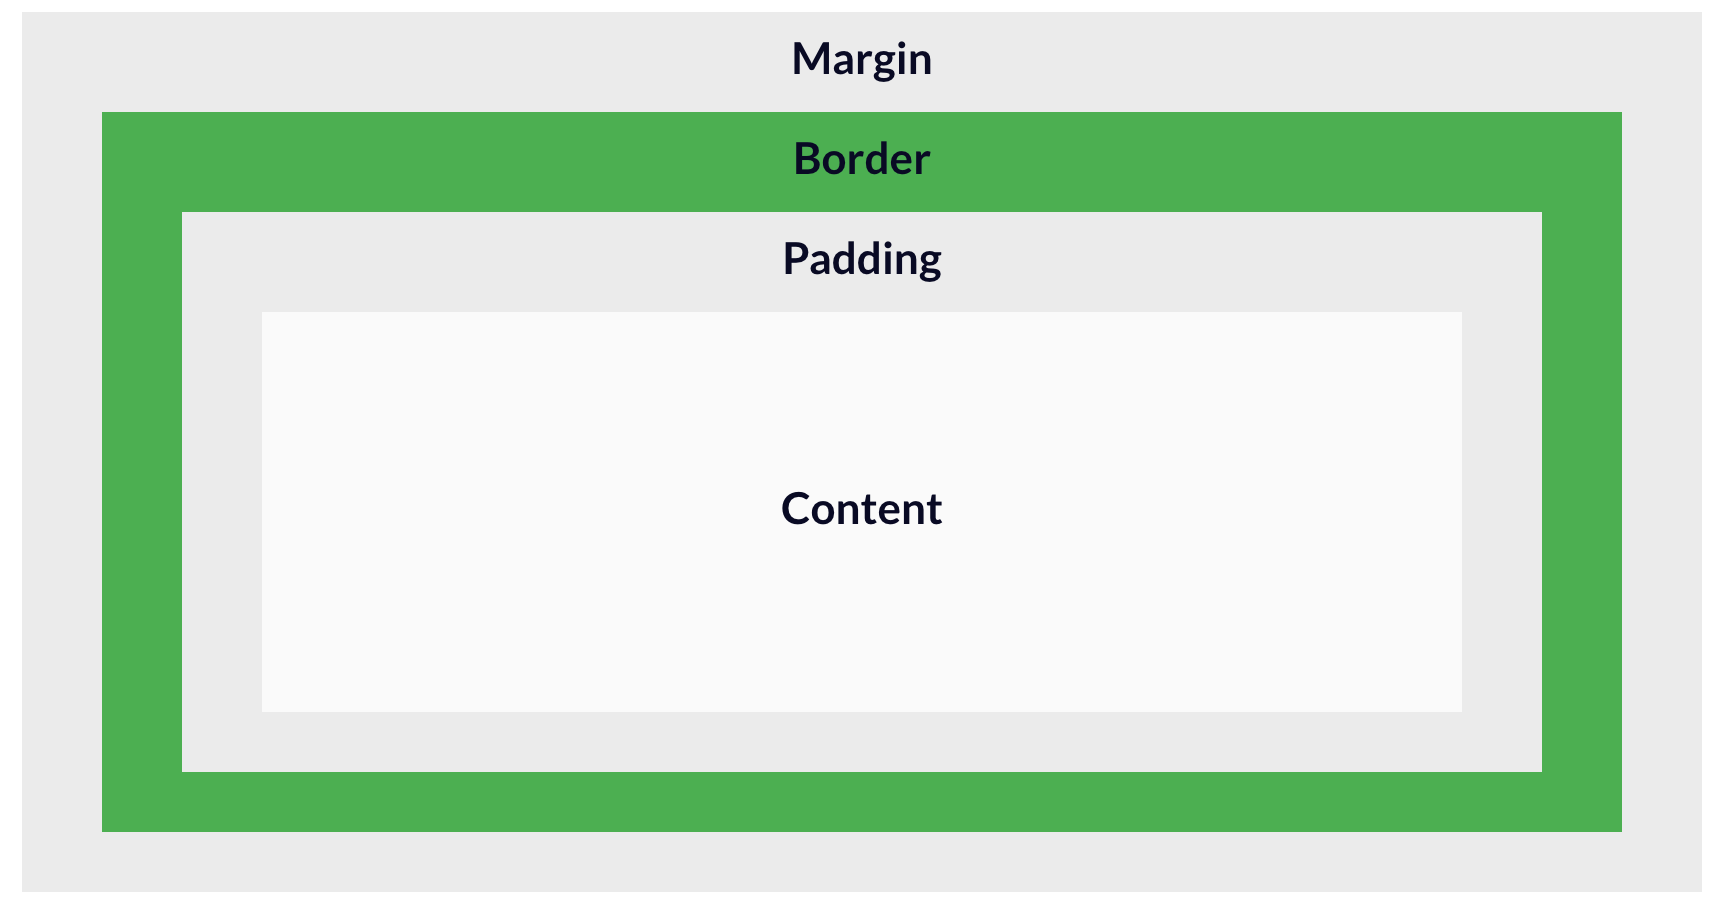
You can read up on the box model if you are not familiar with it. The question is, which part of the box model is affected when you change the background color of a div? The simple answer is the padding area and the content area. Let’s confirm this by using an example.
body < background-color: #ABBAEA; >.child This is the parent div which contains the div we are testing
This example shows that changing the background color of a div does not affect the border and margin of the div.
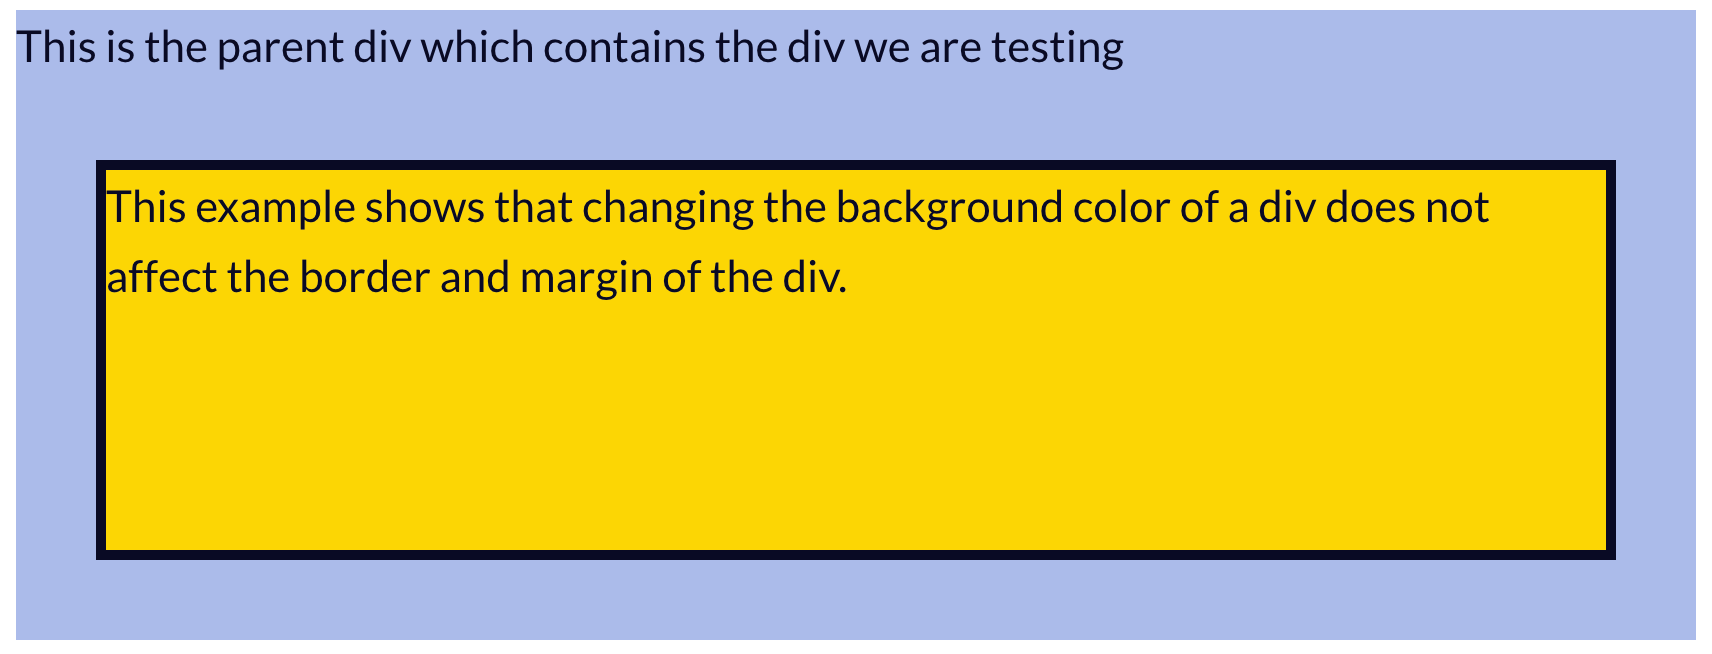
From the example above, we can see that the margin area and the border area are not affected by the change in background color. We can change the color of the border using the border-color property. The margin area remains transparent and reflects the background color of the parent container.
Finally, let’s discuss the values the background-color property can take.
Background-color Values
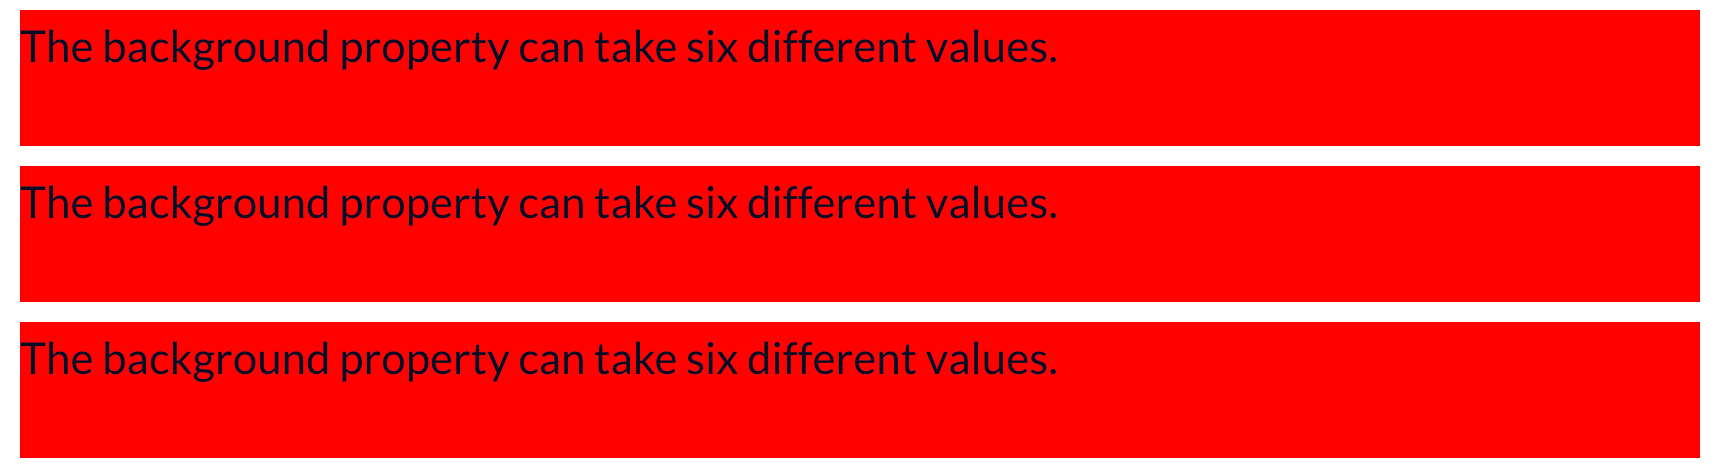
Just like the color property, the background-color property can take six different values. Let’s consider the three most common values with an example. In the example, we set the background-color of the div to red with different values.
/* Keyword value/name of color */ .div-1 < background-color: red; >/* Hexadecimal value */ .div-2 < background-color: #FF0000; >/* RGB value */ .div-3 The background property can take six different values.
The background property can take six different values.
The background property can take six different values.
Notice that they all result with the same background color.
Other values the background-color property can take include HSL value, special keyword values and global values. Here are examples of each of them.
/* HSL value */ background-color: hsl(0, 100%, 25%; /* Special keyword values */ background-color: currentcolor; background-color: transparent; /* Global values */ background-color: inherit; background-color: initial; background-color: unset; You can read more on each of these values here.
Extra Note
When setting the background color of an element, it is important to ensure that the contrast ratio of the background color and the color of the text it contains is high enough. This is to ensure that people with low vision can easily read the text.

The contrast between the background color of the first div and the color of the text is not high enough for everyone to see. So unless you are the only one using the website you are building and you have very good eyesight, you should avoid such color combinations.
The second div has a much better contrast ratio between the background color and the color of the text . Thus, it is more accessible and clearer for people to read.
Conclusion
In this article, we saw how you can change the background-color of a div. We also discussed which parts of the CSS box model are affected by the change in background-color. Finally, we discussed the values the background-color property can take.
I hope you found this article useful. Thanks for reading.
border
Свойство border отвечает за отрисовку видимой границы блока. Часто видимую границу блока называют рамкой.
Само свойство border является шорткатом (короткой записью) и объединяет в себе значение для нескольких полных свойств:
Пример
Скопировать ссылку «Пример» Скопировано
Украсим текстовую карточку цветной сплошной рамкой.
Повседневная практика показывает, .
div class="element"> p>Повседневная практика показывает, . p> div>
Зададим рамку толщиной 5 пикселей, сплошную, цвета #ED6742:
.element border: 5px solid #ed6742;>.element border: 5px solid #ed6742; >

🛠 Ещё немного про треугольники. А точнее, стрелки. Их тоже можно создать при помощи border , но тут понадобится подключить свойство transform , чтобы повернуть элемент с рамками на 45 градусов в нужную сторону:
div class="arrows"> div class="arrow _prev">div> div class="arrow _next">div> div> .arrows max-width: 1200px; height: 250px; margin: 0 auto; background-color: #f1f1f1;> .arrow /* Рисуем квадрат */ width: 50px; height: 50px; /* Задаём левую рамку */ border-left: 5px solid #ff0001; /* Задаём нижнюю рамку */ border-bottom: 5px solid #ff0001;> .arrow._prev /* Поворачиваем квадрат нижним левым углом влево */ transform: rotate(45deg);> .arrow._next /* Поворачиваем квадрат нижним левым углом вправо */ transform: rotate( -135deg );>.arrows max-width: 1200px; height: 250px; margin: 0 auto; background-color: #f1f1f1; > .arrow /* Рисуем квадрат */ width: 50px; height: 50px; /* Задаём левую рамку */ border-left: 5px solid #ff0001; /* Задаём нижнюю рамку */ border-bottom: 5px solid #ff0001; > .arrow._prev /* Поворачиваем квадрат нижним левым углом влево */ transform: rotate(45deg); > .arrow._next /* Поворачиваем квадрат нижним левым углом вправо */ transform: rotate( -135deg ); >
Чем не стрелки для слайдера? 🤗
🛠 Часто встречающийся дизайнерский приём — появление рамки вокруг элемента при наведении на него курсора мыши.
Если просто добавлять рамку по селектору :hover , то элемент будет дёргаться. Причина в том, что размер элемента увеличивается на ширину рамки. Чтобы подобных подёргиваний не происходило, изначально задайте рамку нужной толщины, но установите ей прозрачный цвет ( transparent ). А по наведению курсора просто меняйте цвет на нужный. Profit! Вы прекрасны 😄
Рамки блоков с градиентом
Примеры, как сделать рамку блока с градиентом и анимировать её.
Белый фон блока
.block < position: relative; >.block:before < content: ""; position: absolute; top: 3px; left: 3px; bottom: 3px; right: 3px; background-color: #fff; z-index: 1; border-radius: 4px; >.block:after < content: ''; position: absolute; top: 0; left: 0; height: 100%; width: 100%; background: linear-gradient(45deg, #F17C58, #E94584, #24AADB, #27DBB1, #FFDC18, #FF3706); z-index: -1; border-radius: 4px; >.block-content
Результат:
Используя различные градиенты можно добиться следующих узоров:
.block < position: relative; >.block:before < content: ""; position: absolute; top: 10px; left: 10px; bottom: 10px; right: 10px; background-color: #fff; z-index: 1; >.block:after < content: ''; position: absolute; top: 0; left: 0; height: 100%; width: 100%; background: repeating-linear-gradient(45deg, yellow 0, yellow 10px, #000 10px, #000 20px); z-index: -1; >.block-content
Пример:
Еще один пример:
.block < position: relative; margin: 0 auto; width: 500px; >.block:before < content: ""; position: absolute; top: 10px; left: 10px; bottom: 10px; right: 10px; background-color: #fff; z-index: 1; >.block:after < content: ''; position: absolute; top: 0; left: 0; height: 100%; width: 100%; background: repeating-linear-gradient(45deg, #fff, #fff 10px, #3C7AB8 0, #3C7AB8 20px, #fff 0, #fff 30px, #CB2C4B 0, #CB2C4B 40px); z-index: -1; >.block-content
Прозрачный фон блока
Для прозрачного фона потребуется CSS-свойство clip-path , которое задаст прозрачную область блока.
Результат:
Анимированный градиент
Анимировать градиент можно с помощью animation keyframes изменяя значения background-position .
.block < color: #ffffff; padding: 10px 30px; font-size: 16px; border-radius: 4px; position: relative; >.block:after < content: ''; position: absolute; top: 0; left: 0; right: 0; bottom: 0; border-radius: 4px; background: linear-gradient(60deg, #f79533, #f37055, #ef4e7b, #a166ab, #5073b8, #1098ad, #07b39b, #6fba82); z-index: -1; animation: blockanimate 3s ease alternate infinite; background-size: 300% 300%; clip-path: polygon(0% 100%, 3px 100%, 3px 3px, calc(100% - 3px) 3px, calc(100% - 3px) calc(100% - 3px), 3px calc(100% - 3px), 3px 100%, 100% 100%, 100% 0%, 0% 0%); >@keyframes blockanimate < 0% < background-position: 0% 50%; >50% < background-position: 100% 50%; >100% < background-position: 0% 50%; >>Результат:
Комментарии
Другие публикации
Еще один способ сделать эффект смешивания градиента и изображения, основан на свойстве background-blend-mode. Минус.

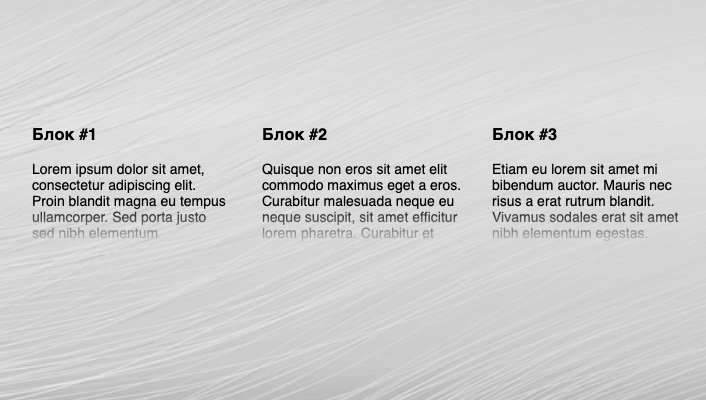
Имеем несколько колонок с разным по длине текстом, нужно сделать их одинаковой высоты и скрыть лишнее.

В CSS3 появилась возможность указать в свойстве background несколько изображений (Multiple Backgrounds), при этом они.