- HTML Template to Drupal Theme
- 5 Answers 5
- Подключение css и js файлов в шаблон темы.
- Drupal → 5 способов подключить свой CSS стиль
- 1. В .info файле активной темы или модуля
- 2. В файле template.php
- 3. В файле модуля
- 4. В параметре #attached рендер массива
- Drupal → Подключение своих js и css файлов в Drupal 8+
- Создание файла *.libraries.yml
- Подключение библиотек
- В своей теме
- В своём модуле
- Изменение файлов библиотек
- 7 ways to add custom JS and CSS to a page in Drupal
- 1. drupal_add_css(), drupal_add_js()
- 2. including in .info file
- 3. [‘#attached’]
- 4. drupal_add_library()
- 5. hook_css_alter(&$css), hook_js_alter(&$js)
- 6. drupal_add_html_head()
- 7. Including as html in .tpl.php or printing it
HTML Template to Drupal Theme
hi, just am exploring theme,i saw in garland , there is a variable called #left. $right,when i echo the $left , it print the menu, i just searched entire drupal files, am not find any where , that is this $left variable declared as global, i want to debug this $left step by step, how to debug
am not sure, i thing there is file called theme.inc, there $left,$right variables are generating from that place only, but there are used the $variable[‘layout’], i am not understand what is this, can some one explain these
It sounds like you lack the fundamental understanding of how theming works in Drupal. You can read a guide: drupal.org/theme-guide . If you have a concrete question you can ask it here, but if you need a multi step guide, this is not the place to get it. There much good documentation written already on drupal.org for questions like, how do I make a theme, how do I make a module etc.
5 Answers 5
Create a copy of a theme you want to modify — usually a blank theme like zen works well. You’ll need to rename the files and fix the .info file.
Then you can edit the .tpl.php files. node.tpl.php is the main skeleton one. Start copying content from your html template into that file, replacing dummy content with placeholders (which you can find here.
Make sure caching is off, and you can refresh to see the changes.
If you provide me image if your theme, I could tell you some common plan for that. Thanks for image.
my advices are I suggest not realy zen theme implementation, because it suggest just to change css. and you already have html and css that was done not in drupal way.
- Install any theme to your sites/all/themes. I will use for example zen theme. So path will be sites/all/themes/zen
- Copy files from sites/all/themes/zen/zen sub-theme to sites/all/themes/zen/mytheme
- Rename sites/all/themes/zen/mytheme/zen.info to sites/all/themes/zen/mytheme/mytheme.info
- Change theme name in mytheme.info
- Copy all your css and js files to sites/all/themes/zen/mytheme (better to create subdirs for css and js)
- Remove zen default zen css files
stylesheets[all][] = html-elements.css stylesheets[all][] = tabs.css stylesheets[all][] = messages.css stylesheets[all][] = block-editing.css stylesheets[all][] = wireframes.css stylesheets[all][] = zen.css stylesheets[print][] = print.css More info about theme.info file look here http://drupal.org/node/171205

- Look at this image
This is how I think better to split page.
Menu under header looks like primary menu. To theme them add
function mytheme_menu_links ($items, $type = 'free') < if (!empty($items)) < foreach ($items as $index =>$link) < $output = l($link['title'], $link['href'], $link['attributes'], $link['query'], $link['fragment']); /* insert your html*/ >return $output; > Подключение css и js файлов в шаблон темы.
Многие веб мастера, которые работают с Друпал 7, не умеют грамотно подключать в свой шаблон стили и скрипты. Большинство использует не правильный вариант подключения — через испльзование style в файле страниц темы page.tpl.php. Но в Друпал специально для подключения в шаблон стилей и скриптов есть файл под названием «имяТемы.info». Используя этот файл можно ускорить работу вашего сайта, поскольку друпалу не придется сканировать все фалы темы в поисках подключенных файлов.
Для подключения юзаем код:
scripts[] = ваш_файл.js stylesheets[all][] = ваш_файл.css
В самом файле .info это выглядит примерно так:
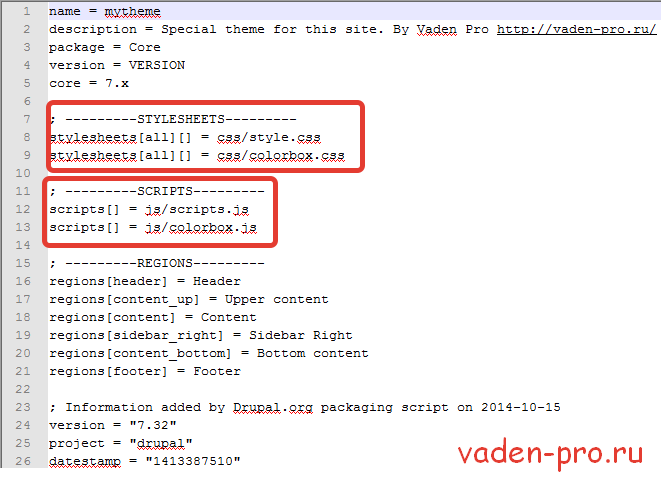
При подключении стилей и скриптов посредством использования данного файла, все они будут не только собраны в одном месте, но и кэшированы. Если подключать эти файлы как указано выше, через page.tpl.php, то кэшироваться они не будут.
Подключить файлы в инфо файл не составляет особого труда. Но в случае, если требуется подключить стиль только к одной странице сайта, то в этом случае подключение надо выполнять посредством использования в фале страницы php-кода.
drupal_add_js(drupal_get_path('theme', 'имяТемы') . '/script.js'); ?> drupal_add_css(drupal_get_path('theme', 'имяТемы') . '/style.css'); ?> Drupal → 5 способов подключить свой CSS стиль
Важно — нужно сбрасывать кэш после подключения стиля любым способом.
1. В .info файле активной темы или модуля
Добавить в .info файл активной темы или модуля строчку:
stylesheets[all][] = styles.cssСтиль styles.css будет подключаться на всех страницах.
Путь к файлу указывается относительно директории .info файла. Например если стиль расположен в поддиректории css , то путь будет — css/styles.css .
Вместо all можно указать любой валидный медиа тип или выражение в виде screen and (max-width: 600px) .
2. В файле template.php
Реализовать в template.php активной темы любую preprocess или process ф-ю, в которой вызвать drupal_add_css() . Единственное условие — ф-я должна выполняться до template_process_html() . Например:
function THEMENAME_preprocess_html(&$variables) < drupal_add_css(path_to_theme() . '/styles.css'); >Вместо THEMENAME прописать системное имя темы.
Пример подключения css файла только на страницах нод:
function THEMENAME_preprocess_html(&$variables) < if (arg(0) == 'node' && is_numeric(arg(1)) && !arg(2)) < drupal_add_css(path_to_theme() . '/styles.css'); >>В drupal_add_css() , во втором параметре можно указывать тип подключаемого стиля (локальный файл, внешний файл, инлайн стиль), указать вес стиля относительно других подключаемых файлов, запретить стилю участвовать в агрегации и прописать conditional comments для Internet Explorer-а. Подробности в манах.
3. В файле модуля
Всё что написано во втором способе актуально и для модулей:
function MODULENAME_preprocess_html(&$variables) < drupal_add_css(drupal_get_path('module', 'MODULENAME') . '/styles.css'); >Плюс можно подключить файл в любом хуке, который вызывается до рендеринга страницы:
4. В параметре #attached рендер массива
Например подключить стиль для формы:
$form['#attached']['css'][] = drupal_get_path('module', 'MODULENAME') . '/styles.css';Drupal → Подключение своих js и css файлов в Drupal 8+
В Drupal 8 немного усложнился процесс подключения своих стилей и скриптов. Теперь все js и css файлы должны быть объединены в так называемые libraries (библиотеки), описаны в файле *.libraries.yml и подключены одним из нескольких способов. Начнём по порядку.
Создание файла *.libraries.yml
В файле *.libraries.yml содержится описание всех библиотек модуля или темы, а так же зависимости этих библиотек.
Библиотека (library) это набор js и css файлов, выполняющих определённую функцию. Примеры встроенных в drupal библиотек — core/jquery , core/jquery.ui.dialog , ckeditor/drupal.ckeditor . Библиотека может состоять всего из одного js или css файла и не иметь никаких зависимостей. Подключать отдельные файлы минуя их описание в *.libraries.yml нельзя.
Пример файла *.libraries.yml с описанием библиотеки jquery.ui.dialog :
jquery.ui.dialog: js: jquery.ui.dialog.js: <> css: theme: jquery.ui.dialog.css: <> dependencies: - core/jquery.uiКак понятно из описания, библиотека jquery.ui.dialog содержит один js файл jquery.ui.dialog.js , один css файл jquery.ui.dialog.css и зависит от другой библиотеки core/jquery.ui , которая подключится автоматически.
Если какие-то стили нужно подключать на каждой странице и их никак не сгруппировать в отдельную библиотеку, то можно описать их под именем global-styling (актуально для тем):
global-styling: css: theme: css/layout.css: <> css/style.css: <> css/colors.css: <>Так же в *.libraries.yml можно указать дополнительные параметры, такие как версия библиотеки, место подключения (шапка/подвал), порядок подключения и т.д. Пример:
mylibrary: version: 1.0 header: true js: mylibrary-min.js: < minified: true >mylibrary-second.js < preprocess: false, attributes: < async: true >> css: theme: https://example.com/externalcss.css: < type: external >mylibrary.css: < weight: 1 >mylibrary-print.css:
Подключение библиотек
В своей теме
Чтобы добавить библиотеку на все страницы сайта, нужно в файле темы *.info.yml прописать параметр libraries с именем библиотеки в формате extension_name/library_name :
libraries: - mytheme/global-styling - mytheme/mylibraryЧтобы добавить библиотеку только на определённую страницу/страницы, можно воспользоваться препроцессом:
/** * Preprocess function for page.twig.html. */ function THEMENAME_preprocess_page(array &$vars): void < if ($vars['is_front']) < $vars['#attached']['library'][] = 'core/drupal.ajax'; >>Как видно, подключать библиотеки можно простым добавлением в любой рендер-массив параметра #attached . Отдельной функции для подключения, как это было в Drupal 7, больше нет.
Так же подключать библиотеки можно прямо из *.html.twig файла с помощью функции attach_library() :
В своём модуле
Для модулей есть отдельный хук hook_page_attachments() :
/** * Implements hook_page_attachments(). */ function MODULENAME_page_attachments(array &$page): void < $page['#attached']['library'][] = 'modulename/libraryname'; >Хотя способ с препроцессом и twig функцией тоже будет работать.
Изменение файлов библиотек
Модули и темы могут добавлять/подменять/удалять файлы чужих библиотек.
Темы это могут сделать из своего *.info.yml файла:
libraries-override: modulename/libraryname: js: # Подмена файла библиотеки filename.js: myfilename.js # Удаление файла библиотеки filename.js: false # Добавление зависимости к чужой библиотеке libraries-extend: modulename/libraryname: - mytheme/mylibraryМодулям доступен вариант с хуком hook_library_info_alter() :
/** * Implements hook_library_info_alter(). */ function MODULENAME_library_info_alter(array &$libraries, string $extension): void < if ($extension == 'other_modulename') < // Удаление файла библиотеки unset($libraries['libraryname']['js']['filename.js']); // Добавление файла в библиотеку $filepath = '/' . drupal_get_path('module', 'modulename') . '/filename.js'; $libraries['libraryname']['js'][$filepath] = []; // Подмена файла библиотеки unset($libraries['libraryname']['js']['filename.js']); $filepath = '/' . drupal_get_path('module', 'modulename') . '/myfilename.js'; $libraries['libraryname']['js'][$filepath] = []; // Добавление зависимости $libraries['libraryname']['dependencies'][] = 'modulename/libraryname'; >>7 ways to add custom JS and CSS to a page in Drupal
Adding custom JS and CSS to a page is easy in Drupal, but can be a little bit messy when you need to choose what approach to use.
There are 7(wow!) ways of including and managing CSS/JS inside your theme/module. Let’s take a look at all of them provided by one of FFW Drupal developers.
1. drupal_add_css(), drupal_add_js()
This is the most common method used by most developers.
- Easy to use, can be inserted wherever you want;
- Can inset inline css/js;
- Easy to find documentation;
- Added files are cached;
- Supports conditions (browser, media etc.).
- Can be found anywhere in the code where you’re not expecting it;
- Including multiple files is messy;
- If css/js file name changed you have to replace the name everywhere in the code.
2. including in .info file
- Quickly understand what files are used in module/theme;
- Allows better aggregation;
- Will be used on every page without having to insert in preprocess(etc.) functions;
- Standard technique for themes;
- Unused css/js could be included where you don’t need it;
- Almost no control when the files will be included;
- Can’t remove or set weight to files in .info file.
3. [‘#attached’]
- Best way to make sure you files will always be included;
- Works great with css, js and libraries;
- Can use any kind of attached data;
- Easy to include multiple files;
- Best choice for forms.
- Including the cs styles/scripts will need multiple attaches;
- Depends on file path and name.
4. drupal_add_library()
- Great when you need to reuse styles/scripts on different pages;
- Path and file names are stored in one function;
- You can take libraries to other projects;
- Easy to include multiple files;
- Libraries can use other libraries;
5. hook_css_alter(&$css), hook_js_alter(&$js)
- Allows to rearrange elements by weight;
- You can delete files you don’t need before aggregation;
- Easy to replace path to file (ex.: using jQuery from CDN);
- Possible to reconfigure the aggregation;
- Adding files here is possible but a bad choice;
- You can easily mess up with files here.
6. drupal_add_html_head()
- Allows to include scripts/styles with different type;
- Can be used for js templating engines.
7. Including as html in .tpl.php or printing it
Hope those methods come in handy for you. Make sure to use them in dependence of conditions you meet.
We personally like to use drupal_add_library and [‘#attached’]. The form attached is really great — we describe the attached files in the beginning of the form and it’s very easy to understand what’s going on without scrolling through all the code.
If you want to find out more, leave a comment and I will share some cool links to resources that explain how to add custom JS and CSS to a page in Drupal.