- CSS Height, Width and Max-width
- CSS Setting height and width
- CSS height and width Values
- CSS height and width Examples
- Example
- Example
- Setting max-width
- Example
- Try it Yourself — Examples
- All CSS Dimension Properties
- CSS width and height
- Define the size of an element, set minimum and maximum width and height values, and hide content that overflows element boundaries.
- Percentages
- Ems
- Rems
- Viewport-based units
- Fractional units
- Character units
- Minimum & maximum dimensions
- Overflow
- Object fit
- How to create a website with fullscreen sections using CSS and HTML
- Defining our sections in HTML
- Making sections become full-screen
- Using viewport units
- Using percentage units
- Centering content vertically and horizontally
- Styling sections individually
- Conclusion
- Related articles
CSS Height, Width and Max-width
The CSS height and width properties are used to set the height and width of an element.
The CSS max-width property is used to set the maximum width of an element.
CSS Setting height and width
The height and width properties are used to set the height and width of an element.
The height and width properties do not include padding, borders, or margins. It sets the height/width of the area inside the padding, border, and margin of the element.
CSS height and width Values
The height and width properties may have the following values:
- auto — This is default. The browser calculates the height and width
- length — Defines the height/width in px, cm, etc.
- % — Defines the height/width in percent of the containing block
- initial — Sets the height/width to its default value
- inherit — The height/width will be inherited from its parent value
CSS height and width Examples
Example
Set the height and width of a element:
Example
Set the height and width of another element:
Note: Remember that the height and width properties do not include padding, borders, or margins! They set the height/width of the area inside the padding, border, and margin of the element!
Setting max-width
The max-width property is used to set the maximum width of an element.
The max-width can be specified in length values, like px, cm, etc., or in percent (%) of the containing block, or set to none (this is default. Means that there is no maximum width).
The problem with the above occurs when the browser window is smaller than the width of the element (500px). The browser then adds a horizontal scrollbar to the page.
Using max-width instead, in this situation, will improve the browser’s handling of small windows.
Tip: Drag the browser window to smaller than 500px wide, to see the difference between the two divs!
Note: If you for some reason use both the width property and the max-width property on the same element, and the value of the width property is larger than the max-width property; the max-width property will be used (and the width property will be ignored).
Example
This element has a height of 100 pixels and a max-width of 500 pixels:
Try it Yourself — Examples
Set the height and width of elements
This example demonstrates how to set the height and width of different elements.
Set the height and width of an image using percent
This example demonstrates how to set the height and width of an image using a percent value.
Set min-width and max-width of an element
This example demonstrates how to set a minimum width and a maximum width of an element using a pixel value.
Set min-height and max-height of an element
This example demonstrates how to set a minimum height and a maximum height of an element using a pixel value.
All CSS Dimension Properties
| Property | Description |
|---|---|
| height | Sets the height of an element |
| max-height | Sets the maximum height of an element |
| max-width | Sets the maximum width of an element |
| min-height | Sets the minimum height of an element |
| min-width | Sets the minimum width of an element |
| width | Sets the width of an element |
CSS width and height
Define the size of an element, set minimum and maximum width and height values, and hide content that overflows element boundaries.

To use the default pixel value:
Percentages
Like ems, percentage refers to the parent element’s font size. If you have padding on a section and set your width to 25%, it will take up 25% of the space inside the element.
Ems
Ems are practical when you want to set proportional padding on an element with text. Every browser has a default font size, which is usually 16px. Ems look to their parent element and scale the font size proportionally.
You can also set the font size on a paragraph’s parent element, like a Div block:
- Select the parent element
- Change the font size (e.g. to 20 pixels) in the Style panel under Typography
When the parent element is 20 pixels:
Rems
Rems are relative to the HTML font size.
A rem is calculated by taking your rem value and multiplying it by the HTML font size (which respects the browser’s font size unless you manually change it in the code). This has the benefit of respecting a user’s browser preferences (if custom text size is set on the browser).
Rems look to the root (root ems) — they look to the HTML tag, which respects the browser’s default font size unless you change it. (Rems ignore font set on the element, or the element’s parent, and scale based on the font size of a browser.)
Viewport-based units
VW is a measurement of the width of the browser’s viewport that scales proportionally based on the width of the viewport.
Fractional units
Fractional units (fr) work inside anything that’s set to the grid display property, including the Quick Stack element.
If you have a 4-column grid, each column defaults to 1fr — 1 fr is equal to 1/4th of the grid. If you add a column, each fr is equal to 1/5th. You can change these values (e.g., set the first column to 2fr). Fractional units automatically scale things — everything is automatically calculated, including column gaps.
Character units
CH is great for sizing something like a paragraph or a heading to limit the number of characters someone has to read per line.
For example, If a paragraph has a maximum width of 60ch, it takes the selected font (the paragraph’s typeface), and sets the paragraph’s boundary (its box) to equal the width of 60 zeros.
CH lets you set the width on a text element when you’re trying to limit the number of characters (based on the width of the font’s zero character.)
Minimum & maximum dimensions
If you set the width of an element to be 50%, it takes up 50% of the space inside its parent element (the Section). As you resize the viewport, the element scales accordingly.
If you set a minimum (e.g., 200px) and a maximum (e.g., 500px) width on an element, it remains 50% wide and stays within the minimum (200 pixels) and maximum (500px) width the viewport shrinks and expands.
A common design pattern is to set up a full-height section (e.g., a height of 100vh). This isn’t a problem until a browser gets shorter and elements begin to overflow or clip off at the bottom (which doesn’t look too great).
Pro tip: Use minimums to remove any explicit height from a section, and instead set the minimum height to 100vh. Now your section won’t get shorter than 100% of the viewport height.
If you want to set a section height at 800 pixels, setting it as minimum height means it’ll be 800 pixels tall while respecting the width of its content (it can get taller if it needs to).
Say you never want a paragraph to go more than 60-ish characters wide, you can select any paragraph, click into the All Paragraphs tag and set a maximum width (e.g., 60ch). Now your default, unless you override it, will self-limit paragraphs at 60 characters (60 zeroes in whatever the typeface is).
Overflow
Overflow happens automatically when there’s a width and height set on an element and not enough room for the content inside. By default, text that overflows is visible. If you select your element, click into the Style panel > Size > Overflow, you’ll see the first icon, the visible (eye) icon, is selected by default, which means that the text that overflows defaults to visible.
Other options for overflow are:
- Hide clips (hides) content outside the boundary of an element.
- Scroll, depending on someone’s operating system and browser, it can display a scroll bar so people can scroll through the contents of a Div block.
- Auto allows people to scroll (only do this if there’s enough content to overflow in the first place)
Object fit
To use object fit, head to the Size section in the Style panel:
- Set a width and a height on the parent element (e.g., the Div block)
- Set a width and a height of 100% on the on the child element (e.g., your image inside the Div block)
- Test the fit properties: fill, contain, cover, none, and scale down — choose the best option for your project
Note: Make sure parent elements have a width and a height when working with object fit. This is because all object fit options fit content inside a parent element, but object fit is set on the child of a parent.
How to create a website with fullscreen sections using CSS and HTML
Large full-screen sections are quite a common element on nowadays websites, especially on landing pages acting as a hero slider. They take the full height and full width of the viewport with the intent of bringing the focus in a single portion of the page. Here we will be explaining how to achieve just that.
Defining our sections in HTML
Let’s start by adding a couple of section elements inside a the wrapper:
 main>
section>
h1>Hello!h1>
section>
section>
h1>Toodles~h1>
section>
main>
Making sections become full-screen
Making sections full-height and full-width can be done in two ways:
- Using viewport units ( vh and vw ) — May feel the most intuitive out of the two. In fact, the viewport units were introduced to do just these kinds of things.
- Using implicit units like percentages. ( % ). They used to be used more in the past when viewport units were not a thing or were not widely supported.
Using viewport units
First, we will style our sections so that they scale to the height of the viewable area. We will use the vh unit, which stands for «viewport height». The vh unit is roughly 1% of the viewport’s height. And what is the «viewport»? It is the visible area of your website in the browser. To make it take 100% of the vertical space, we will set min-height to 100vh , meaning, the section will take a minimum height of 100% of the viewport height.
We set min-height instead of height because this way each section can, if required, have a bigger height, while if you used just height any content that scales beyond the viewport height would be overflowing the container.
body
margin: 0;
>
section
font-family: sans-serif;
min-height: 100vh;
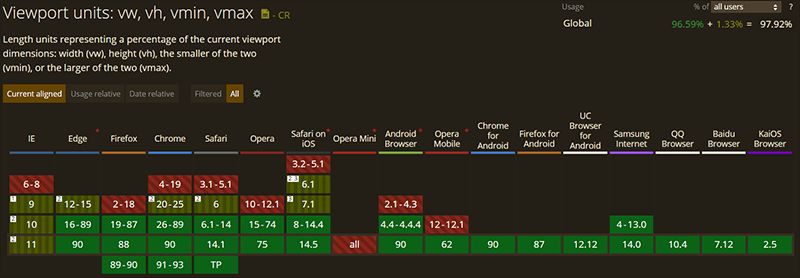
>It is important to note that if you intend to support legacy browsers, then you might want to use percentage units instead. Take a look at the following chart to verify if the browsers you intend to support are listed in green:
Using percentage units
The main difference between the percentage unit and the viewport units is that the percentage units rely on the height and width values of the parent. This means that all the parent elements must also scale to the full height and width if the children underneath wish to. This is why the html , body and main tags have height and width set to 100% . This will force each parent in the hierarchy to take up the full available height and width of the viewport.
html,
body
margin: 0;
height: 100%;
width: 100%;
>

main
height: 100%;
width: 100%;
>

section
font-family: sans-serif;
height: 100%;
width: 100%;
>
Centering content vertically and horizontally
You will very probably want to have some centered content on your section. If not text or images, probably a container element.
We will be using the align-items property to vertically center whatever content we have. Then, to center them horizontally we’ll be using justify-content: center .
And to make those two properties work, we’ll display: flex in order to turn each section into a flex container.
section
font-size: 120px;
display: flex;
justify-content: center;
align-items: center;
>
Styling sections individually
To make each section distinguishable from the other, we will use the nth-child selector to set a background and a color. You can achieve the same thing by using a class for each section too if you prefer so.
section:nth-child(1)
background: orange;
color: white;
>

section:nth-child(2)
background: cyan;
color: white;
>
With that, you should now be able to confidently create fullscreen sections with HTML and CSS. If you want to see how it looks like, take a look at the following CodePen and while you’re at it play around with it:
And here we have the same but using a percentage instead of vh units.
Conclusion
If you’re interested in creating fullscreen websites, then you can take a look at fullPage.js. As the name suggests, fullPage.js revolves around the idea of using full-screen sections, but on top of that, it allows you to add some nifty effects like snap scrolling or horizontal scrolling with little to no effort on your part. Easy to configure and with tends of options that will make your page look quite unique.
And if you want to keep on improving your fullscreen website, adding a sticky or fixed navbar is definetely the way to go. And if you want to consider adding videos, check out how to create a fullscreen video with CSS and HTML or how to add Youtube videos as a background with CSS.