- HTML DOM Button Object
- Access a Button Object
- Example
- Create a Button Object
- Example
- Button Object Properties
- Standard Properties and Events
- Related Pages
- COLOR PICKER
- Report Error
- Thank You For Helping Us!
- Html button javascript value
- Button without a value
- Using buttons
- A simple button
- Adding keyboard shortcuts to buttons
- Disabling and enabling a button
- Setting the disabled attribute
- Inheriting the disabled state
- Validation
- Examples
- Technical summary
- Specifications
- How to get value of clicked button in JavaScript
- Conclusion
- Html button javascript value
HTML DOM Button Object
The Button object represents an HTML element.
Access a Button Object
You can access a element by using getElementById():
Example
Create a Button Object
You can create a element by using the document.createElement() method:
Example
Button Object Properties
| Property | Description |
|---|---|
| autofocus | Sets or returns whether a button should automatically get focus when the page loads, or not |
| disabled | Sets or returns whether a button is disabled, or not |
| form | Returns a reference to the form that contains a button |
| formAction | Sets or returns the value of the formaction attribute of a button |
| formEnctype | Sets or returns the value of the formenctype attribute of a button |
| formMethod | Sets or returns the value of the formmethod attribute of a button |
| formNoValidate | Sets or returns whether the form-data should be validated or not, on submission |
| formTarget | Sets or returns the value of the formtarget attribute of a button |
| name | Sets or returns the value of the name attribute of a button |
| type | Sets or returns the type of a button |
| value | Sets or returns the value of the value attribute of a button |
Standard Properties and Events
The Button object also supports the standard properties and events.
Related Pages

COLOR PICKER


Report Error
If you want to report an error, or if you want to make a suggestion, do not hesitate to send us an e-mail:
Thank You For Helping Us!
Your message has been sent to W3Schools.
Top Tutorials
Top References
Top Examples
Get Certified
W3Schools is optimized for learning and training. Examples might be simplified to improve reading and learning. Tutorials, references, and examples are constantly reviewed to avoid errors, but we cannot warrant full correctness of all content. While using W3Schools, you agree to have read and accepted our terms of use, cookie and privacy policy.
Html button javascript value
An elements’ value attribute contains a string that is used as the button’s label.
input type="button" value="Click Me" /> Button without a value
If you don’t specify a value , you get an empty button:
Using buttons
A simple button
We’ll begin by creating a simple button with a click event handler that starts our machine (well, it toggles the value of the button and the text content of the following paragraph):
form> input type="button" value="Start machine" /> form> p>The machine is stopped.p>
const button = document.querySelector("input"); const paragraph = document.querySelector("p"); button.addEventListener("click", updateButton); function updateButton() if (button.value === "Start machine") button.value = "Stop machine"; paragraph.textContent = "The machine has started!"; > else button.value = "Start machine"; paragraph.textContent = "The machine is stopped."; > >
The script gets a reference to the HTMLInputElement object representing the in the DOM, saving this reference in the variable button . addEventListener() is then used to establish a function that will be run when click events occur on the button.
Adding keyboard shortcuts to buttons
Keyboard shortcuts, also known as access keys and keyboard equivalents, let the user trigger a button using a key or combination of keys on the keyboard. To add a keyboard shortcut to a button — just as you would with any for which it makes sense — you use the accesskey global attribute.
In this example, s is specified as the access key (you’ll need to press s plus the particular modifier keys for your browser/OS combination; see accesskey for a useful list of those).
form> input type="button" value="Start machine" accesskey="s" /> form> p>The machine is stopped.p>
const button = document.querySelector("input"); const paragraph = document.querySelector("p"); button.addEventListener("click", updateButton); function updateButton() if (button.value === "Start machine") button.value = "Stop machine"; paragraph.textContent = "The machine has started!"; > else button.value = "Start machine"; paragraph.textContent = "The machine is stopped."; > >
Note: The problem with the above example of course is that the user will not know what the access key is! In a real site, you’d have to provide this information in a way that doesn’t interfere with the site design (for example by providing an easily accessible link that points to information on what the site accesskeys are).
Disabling and enabling a button
To disable a button, specify the disabled global attribute on it, like so:
input type="button" value="Disable me" disabled /> Setting the disabled attribute
You can enable and disable buttons at run time by setting disabled to true or false . In this example our button starts off enabled, but if you press it, it is disabled using button.disabled = true . A setTimeout() function is then used to reset the button back to its enabled state after two seconds.
input type="button" value="Enabled" /> const button = document.querySelector("input"); button.addEventListener("click", disableButton); function disableButton() button.disabled = true; button.value = "Disabled"; setTimeout(() => button.disabled = false; button.value = "Enabled"; >, 2000); >
Inheriting the disabled state
If the disabled attribute isn’t specified, the button inherits its disabled state from its parent element. This makes it possible to enable and disable groups of elements all at once by enclosing them in a container such as a element, and then setting disabled on the container.
The example below shows this in action. This is very similar to the previous example, except that the disabled attribute is set on the when the first button is pressed — this causes all three buttons to be disabled until the two second timeout has passed.
fieldset> legend>Button grouplegend> input type="button" value="Button 1" /> input type="button" value="Button 2" /> input type="button" value="Button 3" /> fieldset>
const button = document.querySelector("input"); const fieldset = document.querySelector("fieldset"); button.addEventListener("click", disableButton); function disableButton() fieldset.disabled = true; setTimeout(() => fieldset.disabled = false; >, 2000); >
Note: Firefox will, unlike other browsers, by default, persist the dynamic disabled state of a across page loads. Use the autocomplete attribute to control this feature.
Validation
Buttons don’t participate in constraint validation; they have no real value to be constrained.
Examples
div class="toolbar"> input type="color" aria-label="select pen color" /> input type="range" min="2" max="50" value="30" aria-label="select pen size" />span class="output">30span> input type="button" value="Clear canvas" /> div> canvas class="myCanvas"> p>Add suitable fallback here.p> canvas>
body background: #ccc; margin: 0; overflow: hidden; > .toolbar background: #ccc; width: 150px; height: 75px; padding: 5px; > input[type="color"], input[type="button"] width: 90%; margin: 0 auto; display: block; > input[type="range"] width: 70%; > span position: relative; bottom: 5px; > const canvas = document.querySelector(".myCanvas"); const width = (canvas.width = window.innerWidth); const height = (canvas.height = window.innerHeight - 85); const ctx = canvas.getContext("2d"); ctx.fillStyle = "rgb(0,0,0)"; ctx.fillRect(0, 0, width, height); const colorPicker = document.querySelector('input[type="color"]'); const sizePicker = document.querySelector('input[type="range"]'); const output = document.querySelector(".output"); const clearBtn = document.querySelector('input[type="button"]'); // covert degrees to radians function degToRad(degrees) return (degrees * Math.PI) / 180; > // update sizepicker output value sizePicker.oninput = () => output.textContent = sizePicker.value; >; // store mouse pointer coordinates, and whether the button is pressed let curX; let curY; let pressed = false; // update mouse pointer coordinates document.onmousemove = (e) => curX = e.pageX; curY = e.pageY; >; canvas.onmousedown = () => pressed = true; >; canvas.onmouseup = () => pressed = false; >; clearBtn.onclick = () => ctx.fillStyle = "rgb(0,0,0)"; ctx.fillRect(0, 0, width, height); >; function draw() if (pressed) ctx.fillStyle = colorPicker.value; ctx.beginPath(); ctx.arc( curX, curY - 85, sizePicker.value, degToRad(0), degToRad(360), false, ); ctx.fill(); > requestAnimationFrame(draw); > draw();
Technical summary
Specifications
How to get value of clicked button in JavaScript
If you are thinking about how to get the value of a button clicked by one person in JavaScript, then in this article you will learn how to get the value of a clicked button.
If you have a couple of button, then you can add the onclick event for each button.
Demo — Get the value of clicked button
button onclick="alert(this.innerText)" > button 1 /button> button onclick="alert(this.innerText)"> button 2 /button> button onclick="myFun(this)"> button 3 /button>
- I have created three button elements with onclick() event attribute.
- Inside the onclick() event, I have called alert() method to alert the button value.
If you have a lot of buttons, then the above approach is not elegant. So, in this case we need to create a forEach() method.
Get button value dynamically using forEach() method
let buttonList = document.querySelectorAll("button"); buttonList.forEach(function(i)< i.addEventListener("click", function(e)< alert(e.target.innerHTML); >) >) button>Button 1/button> button>Button 2/button> button>Button 3/button> button>Button 4/button> button>Button 5/button>
let buttonList = document.querySelectorAll("button"); buttonList.forEach(function(i)< >)
We passed an anonymous function to the forEach() method and included a parameter i that will represent each button.
buttonList.forEach(function(i)< i.addEventListener("click", function(e)< alert(e.target.innerHTML); >) >) Conclusion
In this article, you have learned how to get value of clicked button using javascript.
Html button javascript value

Для отправки введенных данных на форме используются кнопки. Для создания кнопки используется либо элемент button :
С точки зрения функциональности в html эти элементы не совсем равноценны, но в данном случае они нас интересуют с точки зрения взаимодействия с кодом javascript.
При нажатии на любой из этих двух вариантов кнопки происходит отправка формы по адресу, который указан у формы в атрибуте action , либо по адресу веб-страницы, если атрибут action не указан. Однако в коде javascript мы можем перехватить отправку, обрабатывая событие click
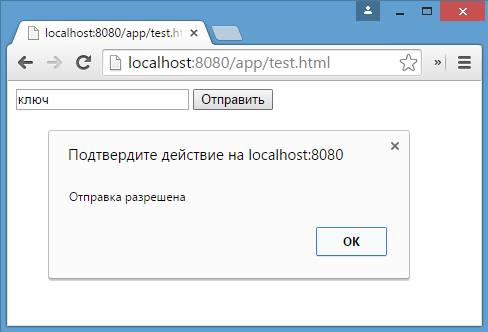
При нажатии на кнопку происходит событие click , и для его обработки к кнопке прикрепляем обработчик sendForm . В этом обработчике проверяем введенный в текстовое поле текст. Если его длина больше 5 символов, то выводим сообщение о недостимой длине и прерываем обычный ход события с помощью вызова e.preventDefault() . В итоге форма не отправляется.
Если же длина текста меньше шести символов, то также выводится сообщение, и затем форма отправляется.
Также мы можем при необходимости при отправке изменить адрес, на который отправляются данные:
function sendForm(e)< // получаем значение поля key var keyBox = document.search.key; var val = keyBox.value; if(val.length>5) < alert("Недопустимая длина строки"); document.search.action="PostForm"; >else alert("Отправка разрешена"); > В данном случае, если длина текста больше пяти символов, то текст отправляется, только теперь он отправляется по адресу PostForm , поскольку задано свойство action:
document.search.action="PostForm";
Для очистки формы предназначены следующие равноценные по функциональности кнопки:
При нажатию на кнопки произойдет очистка форм. Но также функциональность по очистке полей формы можно реализовать с помощью метода reset() :
function sendForm(e)< // получаем значение поля key var keyBox = document.search.key; var val = keyBox.value; if(val.length>5) < alert("Недопустимая длина строки"); document.search.reset(); e.preventDefault(); >else alert("Отправка разрешена"); > Кроме специальных кнопок отправки и очистки на форме также может использоваться обычная кнопка:
При нажатии на подобную кнопку отправки данных не происходит, хотя также генерируется событие click:
При нажатии на кнопку получаем введенный в текстовое поле текст, создаем новый элемент параграфа для этого текста и добавляем параграф в элемент printBlock.