Making Charts with CSS
There are many ways to make visual representations of data: bar charts, line graphs, scatter diagrams, sparklines… not to mention the many ways in which you can implement them on the web. In this post I’ll be looking at plain CSS methods for styling data. But before we take a look at some examples, I think it’s worth briefly going over our design goals first.
Guidelines for Chart Making
- Accessibility: everyone should be able to view some format of the data we present, even if it’s a boring table (boring is better than nothing).
- Ease of development: graph-making shouldn’t be unnecessarily complex, and we’ll certainly want to avoid technical debt for the future.
- Performance: we need to make sure that users don’t spend a lot of time waiting for assets to download or for elements to be painted to the screen.
These goals are likely to change depending on the type of chart that make, as performance is going to be less of a concern for a static bar chart than a crazy interactive map. With these guidelines in mind, let’s look at a few examples.
There are a couple of ways to make a simple bar chart in CSS. For starters we’ll use a definition list for our data:
- A title of the graph
- Data 1: 20%
- Data 2: 50%
- Data 3: 30%
We’ll absolutely position the text content of each dd to the left with that span.
To make the “bars” that visually represent the data, we’ll use pseudo elements. To do that we could update the markup with classes like .percentage-20 , and set a width on its pseudo element:
.percentage:after < content: ""; display: block; background-color: #3d9970; >.percentage-20:after < width: 20%; >.percentage-30:after
But we don’t want to have to write out every single one of these classes by hand because the data is likely to change in the future. We could write a Sass loop to make all those classes for us:
@for $i from 1 through 100 < .percentage-#:after < $value: ($i * 1%); width: $value; >>That’s a little icky as it’ll create a whole bunch of classes that we probably won’t be using in the final implementation, but there are lots of tools to tidy this up for us in production.
Next, we can add those classes we’ve automatically generated to each .percentage element, like so:
- A title of the graph
- IE 11: 7%
- Chrome: 20%
- Android 4.4: 2%
Finally we can add rules to the background of each .percentage element to aid legibility in comparing these values with a repeating-linear-gradient :
This technique is relatively simple, but I can’t help but think that this information should always be set in a table by default. Although I’m a little wary of styling tables in this way, that certainly doesn’t mean it’s impossible. For instance, Eric Meyer wrote about this technique and described how to position finicky table elements to behave like a bar chart. This is his original markup for the table:
Quarterly Results Invoiced Collected Q1 $18,450.00
$16,500.00
Q2 $34,340.72
$32,340.72
Q3 $43,145.52
$32,225.52
Q4 $18,415.96
$32,425.00
Unlike the example I used earlier, where I implemented a number of automatically generated helper classes in Sass to define the width of the bar charts, Eric used inline styles on the td element with those values being calculated server side or with JavaScript, rather than added by hand.
The example below is my copy of Eric’s original example where I’ve updated the styling a little bit:
I really like that each row in the table has a header such as Q1, Q2, etc. — that feels really neat and tidy rather than depending on a definition list to describe the content. They’re easy to position and will fall back nicely to a standard table if the CSS fails to load for whatever reason.
However, one of the problems with this approach is that it requires absolutely positioning each table row side by side, which means that if we want to add more data then we’ll need to do a lot more work than simply updating the markup. This means it could be a pain to work with in the future.
We don’t always have to use table s when representing information like this. That’s probably the case when we make a series of sparklines, tiny graphs that sit next to a line of text and help readers get a quick overview of the information. Wilson Miner outlined this method and made sure to focus on the accessibility of the information beforehand:
I’ve updated the original markup from what Wilson used since to me this feels like it should fit into a figure , as the docs on MDN state that:
Usually [a figure]… is an image, an illustration, a diagram, a code snippet, or a schema that is referenced in the main text, but that can be moved to another page or to an appendix without affecting the main flow.
That makes a lot more sense to me than a plain ul element. But anyway, here’s what that looks like without any CSS:
Very accessible! Next up we can add styles to that sparkline element and position it to the right of the link with inline-block. And again, we could use that Sass class generator we used earlier to set the height of each bar. But, let’s keep those styles inline just for now:
Make sure to hover over each entry in the list to see an expanded version of the diagram that I’ve added. Although it’s not particularly helpful in terms of breaking down the data, it shows that we aren’t stuck with charts in one single representation; manipulating these visualisations with such ease is a great advantage when using simple markup and CSS.
Lea Verou recently wrote a great piece about making pie charts. One possibility she suggests is using pseudo elements that cover a circle and nudging them around with transform: rotate() .
Another possibility is SVG, which has a number of advantages, some of which we’ll list in the next section.
If browsers supported conic-gradient() , that would be a very compelling way to create them. They don’t quite yet, but Lea has a polyfill for it that works wonderfully. Here’s a pie chart demo using it that we made for one of the last polls we did here on CSS-Tricks:
Problems with making charts with CSS
- If you’re using background to style an element then it (probably) won’t be visible if the web page is printed. The only exception is if you use -webkit-print-color-adjust: exact; in a WebKit browser.
- Finicky control over design: absolutely positioning table rows, for instance, is likely to be pain for developers at some point in the future.
- Browser support is a laborious process in some instances, and ensuring that all devices support every CSS property might be difficult to test.
- It’s not possible to use inline styles on pseudo elements, so if you want to style a pseudo element with JavaScript then this makes things a bit more complicated.
- It’s possible to do anything with CSS, but when we’re making pure CSS line graphs we should probably take a little while to reconsider the implications that this might have on the rest of the codebase.
Plain CSS and markup solutions for charts and graphs work to a certain extent, and in many situations they’re probably the safest bet. But I think it’s worth exploring alternative solutions to representing data.
In the next post in this series I’ll be looking at SVG and JavaScript solutions to making charts.
Html bar chart css
Bar charts display raw data as horizontal bars.
# Usage
To visualize your data with bar chart, the main .charts-css class should be followed by the .bar class.
table class="charts-css bar"> . table> # Dimensions
To control the chart dimensions you can use regular CSS. You can use media queries to set different dimensions for smaller devices.
#my-chart.bar height: 200px; max-width: 300px; margin: 0 auto; > table class="charts-css bar" id="my-chart"> . table> # Orientation
You can control the chart orientation, or direction. The initial orientation depends on your language writing direction. Using the .reverse class you can reverse the orientation.
table class="charts-css bar reverse"> . table> # Heading
You can add a heading to your chart using the tag. By default the heading is hidden. To display the heading use the .show-heading class.
table class="charts-css bar show-heading"> caption> Descriptive Chart Heading caption> . table> Creating a Bar chart using HTML, CSS and Javascript – Part 1
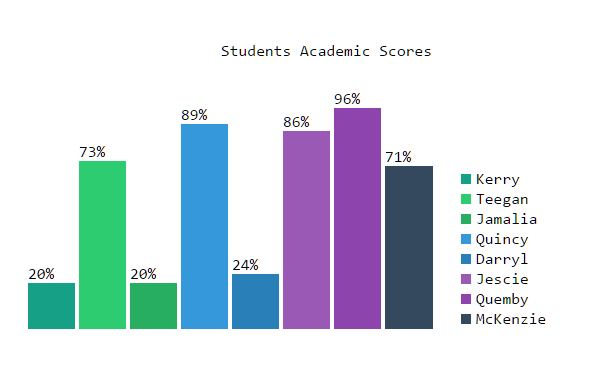
Third party libraries like d3js, highcharts, flotcharts, morris, raphael are all amazing no doubt but sometimes you just need something dead simple and minimal without too much fanciness. And if all you want is just a bar chart to show some data without having to include a library with a dozen charts then you better figure out something on your own. To help you get started I made a small sample of a bar chart using only HTML, CSS and Javascript. The final chart looks like this
Some notes about the chart to keep its design minimal
- There are no x-axis or y-axis lines. I intentionally removed them as they don’t really add much value to the chart. The data values are already available for the user above the bars and x-axis does nothing more than being a line with a tick, so I removed them both.
- There are no labels for the bars on the x-axis like we see in most bar charts. The problem with the labels in x-axis is that they are usually too long in real world use cases, and end up overlapping the next label. The hack we usually use is to rotate them so they don’t overlap but they end up making them look ugly and also take up extra space below. A better design is to just let the legend take care of it and not show any x-axis labels at all.
Making a bar chart is the simplest of all and doesn’t need expert level knowledge of CSS, HTML or Javascript. The full source code is here:
CSS: Contains colors taken from flatuicolors.
html, body < font-family: Consolas, monaco, monospace; >#chart < padding: 20px; >table < width: 100%; height: 400px; >.charttitle < text-align: center; >.bars td < vertical-align: bottom; >.bars div:hover < opacity: 0.6; >.legend < vertical-align: bottom; padding-left: 20px; text-align: left; >.legbox < display: block; clear: both; >.xaxisname < margin: 5px; color: #fff; font-size: 77%; padding: 5px; float: left; >/*Flat UI colors*/ .one < background: #16A085; >.two < background: #2ECC71; >.three < background: #27AE60; >.four < background: #3498DB; >.five < background: #2980B9; >.six < background: #9B59B6; >.seven < background: #8E44AD; >.eight < background: #34495E; >.nine < background: #2C3E50; >.ten < background: #22313f; >.eleven < background: #F1C40F; >.twelve < background: #F39C12; >.thirteen < background: #E67E22; >.fourteen < background: #D35400; >.fifteen < background: #E74C3C; >.sixteen < background: #C0392B; >.seventeen < background: #ECF0F1; >.seventeen.clouds < color: #BDC3C7; >.eighteen < background: #BDC3C7; >.nineteen < background: #95A5A6; >.twenty
Javascript: With sample data
//chart data var chartjson = < "title": "Students Academic Scores", "data": [< "name": "Kerry", "score": 20 >, < "name": "Teegan", "score": 73 >, < "name": "Jamalia", "score": 20 >, < "name": "Quincy", "score": 89 >, < "name": "Darryl", "score": 24 >, < "name": "Jescie", "score": 86 >, < "name": "Quemby", "score": 96 >, < "name": "McKenzie", "score": 71 >], "xtitle": "Secured Marks", "ytitle": "Marks", "ymax": 100, "ykey": 'score', "xkey": "name", "prefix": "%" > //chart colors var colors = ['one', 'two', 'three', 'four', 'five', 'six', 'seven', 'eight', 'nine', 'ten', 'eleven', 'twelve', 'thirteen','fourteen']; //constants var TROW = 'tr', TDATA = 'td'; var chart = document.createElement('div'); //create the chart canvas var barchart = document.createElement('table'); //create the title row var titlerow = document.createElement(TROW); //create the title data var titledata = document.createElement(TDATA); //make the colspan to number of records titledata.setAttribute('colspan', chartjson.data.length+1); titledata.setAttribute('class', 'charttitle'); titledata.innerText = chartjson.title; titlerow.appendChild(titledata); barchart.appendChild(titlerow); chart.appendChild(barchart); //create the bar row var barrow = document.createElement(TROW); //lets add data to the chart for (var i = 0; i < chartjson.data.length; i++) < barrow.setAttribute('class', 'bars'); var prefix = chartjson.prefix || ''; //create the bar data var bardata = document.createElement(TDATA); var bar = document.createElement('div'); bar.setAttribute('class', colors[i]); bar.style.height = chartjson.data[i][chartjson.ykey] + prefix; bardata.innerText = chartjson.data[i][chartjson.ykey] + prefix; bardata.appendChild(bar); barrow.appendChild(bardata); >//create legends var legendrow = document.createElement(TROW); var legend = document.createElement(TDATA); legend.setAttribute('class','legend'); legend.setAttribute('colspan', chartjson.data.length); //add legend data for (var i = 0; i < chartjson.data.length; i++) < var legbox = document.createElement('span'); legbox.setAttribute('class','legbox'); var barname = document.createElement('span'); barname.setAttribute('class',colors[i] + ' xaxisname'); var bartext = document.createElement('span'); bartext.innerText = chartjson.data[i][chartjson.xkey]; legbox.appendChild(barname); legbox.appendChild(bartext); legend.appendChild(legbox); >barrow.appendChild(legend); barchart.appendChild(barrow); barchart.appendChild(legendrow); chart.appendChild(barchart); document.getElementById('chart').innerHTML = chart.outerHTML; This code is just a proof of concept of what is possible and is not production ready. You can use this idea to build your own chart.
Retrieved June 23, 2021 at 1:36 am (website time).
Available at: 192.168.31.181/muthu/?p=221