- How to Run a PHP File Using XAMPP: A Step By Step Guide
- What Is PHP?
- Advantages Of PHP
- How to Set Up and Install PHP for Your Project?
- What is XAMPP?
- Why Do You Need XAMPP?
- Basics to Advanced — Learn It All!
- How to Install XAMPP?
- How to Start a New PHP Project in XAMPP?
- Designing a Social Media App Like Instagram
- How to Run a PHP Code Using XAMPP?
- Conclusion
- FAQs
- 1. How to run a PHP file in localhost XAMPP?
- 2. Can we run PHP in XAMPP?
- 3. How do I run my PHP file?
- 4. How to run PHP files in phpMyAdmin?
- Find our Full Stack Java Developer Online Bootcamp in top cities:
- About the Author
- Recommended Programs
- Install PHP
- Download XAMPP
- Install XAMPP on Windows
- Step 1. Start the installation
- Step 2. Select components to install
- Step 3. Specifying the installation folder
- Step 4. Selecting a language
- Step 5. Bitnami for XAMPP
- Step 6. Begin installing XAMPP
- Step 7. Completing the XAMPP setup
- Step 8. Completing the XAMPP setup
- Step 9. Launch the XAMPP
- Troubleshooting
How to Run a PHP File Using XAMPP: A Step By Step Guide

PHP is the most popular and widely-used server-side scripting language for web development. However, it requires a webserver to run even a locally developed webpage. There are various web server software for setting up our local webserver. Amongst them, PHP XAMPP and WampServer are the most popular. While WampServer is only available for the Windows platform, XAMPP is a cross-platform application that can run on Windows, Linux, and macOS. Hence, in this tutorial, you will learn PHP using XAMPP.
What Is PHP?
PHP (Hypertext Protocol) is Open Source Programming Language used to make web pages. PHP language can run on various platforms and is compatible with almost all servers. PHP files use .php as their extension. PHP can perform functions, like from files on a system it can create, open, read, write, and close them. You can add, delete, and modify elements within your database with the help of PHP. You can restrict users from accessing some pages of your website using PHP. PHP can encrypt data too.
Advantages Of PHP
Web-Developers use many other languages, but most prefer using PHP because of its advantages. Some advantages of PHP are:
- Simple and easy to learn — PHP is known as the easiest Scripting language as it doesn’t have intensive studying. Commands are very easy to understand for new learners and developers too.
- Compatible — PHP language is compatible because it can run on many operating systems. It can easily run on platforms like Windows, LINUX, and UNIX.
- Flexibility — PHP language is very flexible for developers because it allows you to change the existing or completed project.
- Less Costly — As PHP is an open-source language, you can download it for free. You don’t have to purchase any license or software.
- MVC Pattern — Model-View-Controller Pattern in PHP helps you organize codes.
- Loading Time — PHP is faster than other programming languages. It can be loaded when your network connection is slow.
- Library Support — PHP also has a collection of many, many advanced written codes that you can use repeatedly. And also use it whenever you want to run a program.
How to Set Up and Install PHP for Your Project?
Step 1: Find a web server that supports PHP and MYSQL.
Step 2: Then install PHP from its website.
Step 3: Then install MYSQL DB on your PC.
What is XAMPP?
XAMPP is an open-source web server solution package. It is mainly used for web application testing on a local host webserver.
Now that you have a better understanding of the XAMPP software, let us move on to its installation.
Why Do You Need XAMPP?
To run any PHP program, you will need Apache or MYSQL databases, both supported by XAMPP. XAMPP helps you to run your program smoothly.
Basics to Advanced — Learn It All!
How to Install XAMPP?
Apache friends developed XAMPP, and it is available for everyone free of cost.
You can download XAMPP through the official website, https://www.apachefriends.org/download.html.
On completing the download of the setup file, begin the installation process and, in the “Select Components” section, select all the required components.
Next, select the directory where you want the software to be installed. It is recommended that you keep the default directory “C:\xampp” and click on “next” to complete the installation.
Now that the installation is complete, let’s move ahead to see how to run a PHP script using the same.
How to Start a New PHP Project in XAMPP?
- Before you run or start writing any program in PHP, you should start Apache and MYSQL.
- After starting both servers, you have to write a program in Notepad.
- After writing it, save that file as «program.php».
- Then copy that file program.php to C:/Program Files/XAMPP/htdocs.
- Open the browser and type http://localhost.
- Now run your code in that browser.
Designing a Social Media App Like Instagram
How to Run a PHP Code Using XAMPP?
Before running a PHP script, you must know where to write it.
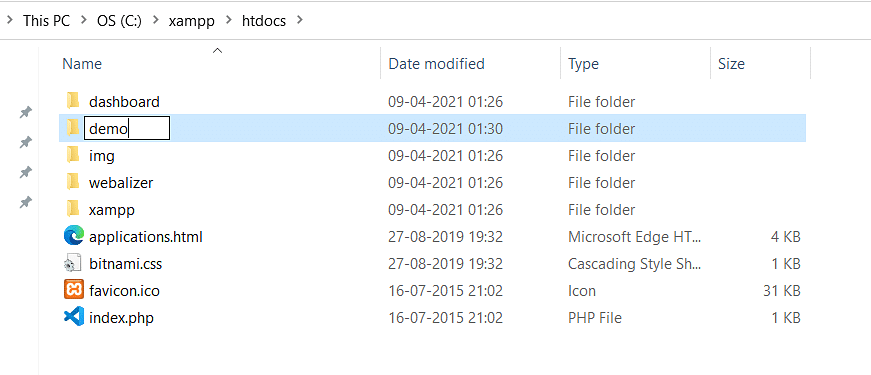
In the XAMPP directory, there exists a folder called “htdocs”. This is where all the programs for the web pages will be stored.
1. Go to “C:\xampp\htdocs” and inside it, create a folder. Let’s call it “demo”. It’s considered good practice to create a new folder for every project you work on.
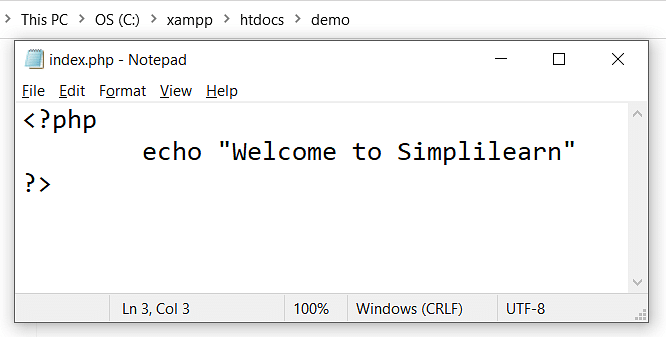
2. Inside the demo folder, create a new text file and name it “index.php” and write the following script.
3. Now, to see the script output, open the XAMPP control panel and start Apache to host the local webserver, where our script will be running.
4. Now navigate to your browser and type in “localhost/demo/” in the address bar to view the output.
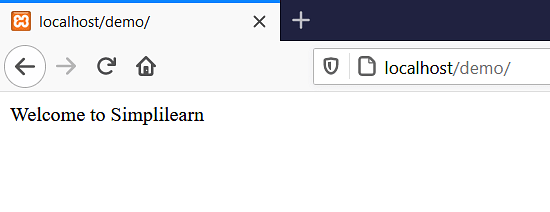
Congratulations, with this, you have created a PHP file and also executed the program successfully.
Conclusion
This concludes the tutorial. In this “PHP using XAMPP” tutorial, you looked into why you need XAMPP, what XAMPP is, how to install XAMPP, and finally, how to run your first PHP script on it.
Are you planning to take the plunge and do a course on PHP? In that case, Simplilearn’s PHP course would be an excellent choice. The Post Graduate Program in Full Stack Web Development covers all the fundamental and advanced concepts, making your journey towards learning PHP an easy one.
If you have any questions regarding the “PHP using XAMPP” tutorial, please ask away in the comments section of this article, and we’ll have our experts answer them for you.
FAQs
1. How to run a PHP file in localhost XAMPP?
Create any project, for e.g.,
2. Can we run PHP in XAMPP?
Yes, you can run PHP in XAMPP. First, start the XAMPP server, create a program you want to and run it at http://localhost.
3. How do I run my PHP file?
PHP files are saved in C:/Program Files/XAMPP/htdocs. You have to open it, click on the program, and it will automatically run on localhost.
4. How to run PHP files in phpMyAdmin?
- Login into PHPMyAdmin, then click on the import tab.
- Browse the file with a .sql extension.
- Keep in mind to check and uncheck some options.
- Choose SQL format and click on Go.
Find our Full Stack Java Developer Online Bootcamp in top cities:
| Name | Date | Place | |
|---|---|---|---|
| Full Stack Java Developer | Cohort starts on 4th Aug 2023, Weekend batch | Your City | View Details |
| Full Stack Java Developer | Cohort starts on 25th Aug 2023, Weekend batch | Your City | View Details |
About the Author
Ravikiran A S
Ravikiran A S works with Simplilearn as a Research Analyst. He an enthusiastic geek always in the hunt to learn the latest technologies. He is proficient with Java Programming Language, Big Data, and powerful Big Data Frameworks like Apache Hadoop and Apache Spark.
Recommended Programs
Full Stack Java Developer Career Bootcamp
Install PHP
Summary: in this tutorial, you’ll learn how to install PHP on your computer locally to start learning PHP.
Installing PHP on your computer allows you to safely develop and test a web application without affecting the live system.
To work with PHP locally, you need to have the following software:
- PHP
- A web server that supports PHP. We’ll use the Apache webserver.
- A database server. We’ll use the MySQL database server.
Typically, you won’t install all this software separately because connecting them is tricky and not intended for beginners.
Therefore, it’s easier to find an all-in-one software package that includes PHP, a web server, and a database server. One of the most popular PHP development environments is XAMPP.
XAMPP is an easy install Apache distribution that contains PHP, MariaDB, and Apache webserver. XAMPP supports Windows, Linux, and macOS.
Note that MariaDB is a fork of the most popular relational database management system, MySQL.
Download XAMPP
To install XAMPP on windows, you can go to the XAMPP official website and download the suitable version for your platform.
Install XAMPP on Windows
To install XAMPP on Windows, you can follow these steps:
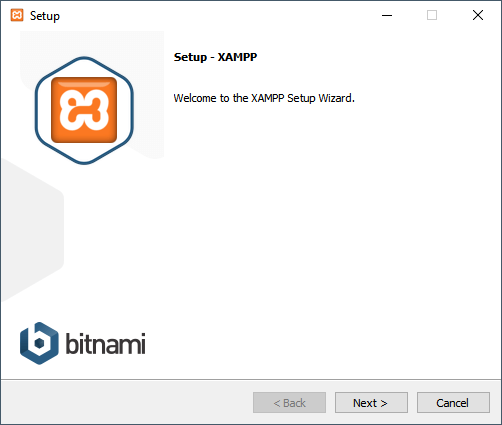
Step 1. Start the installation
Double-click the downloaded file to start setting up XAMPP:
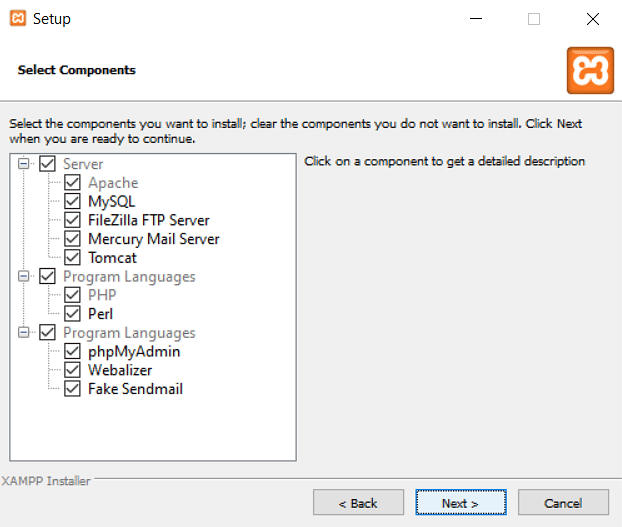
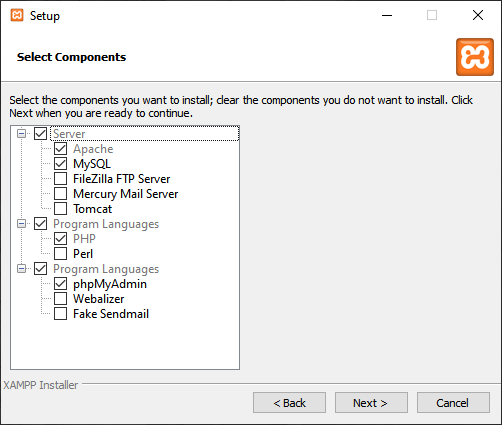
Step 2. Select components to install
Select the components that you want to install. In this step, you can select Apache, MySQL, PHP, and phpMyAdmin, deselect other components like the following, and click the Next button to go to the next step.
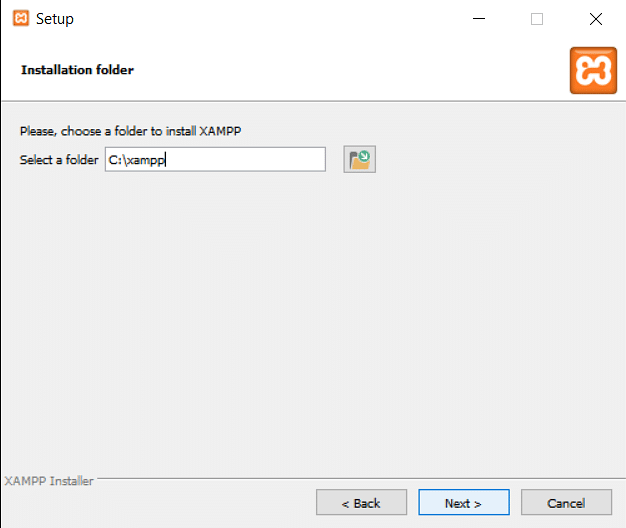
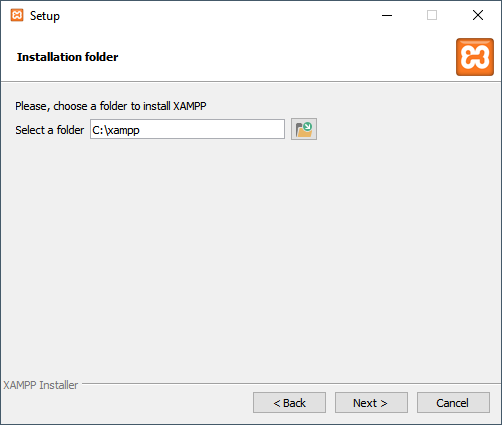
Step 3. Specifying the installation folder
Select a folder to install XAMPP. It’s recommended to install XAMPP in the c:\xampp folder. Click the Next button to go to the next step.
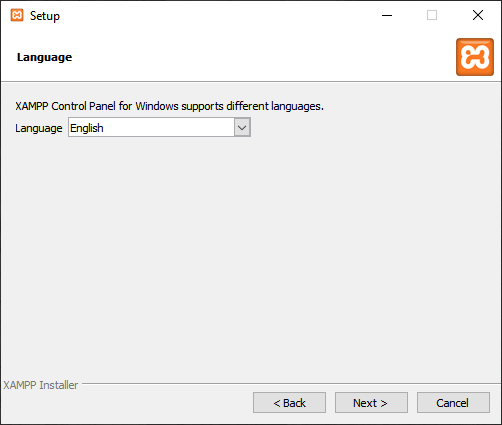
Step 4. Selecting a language
Select a language for XAMPP Control Panel. By default, it’s English. And you can select your preferred language and click the Next button to go to the next step.
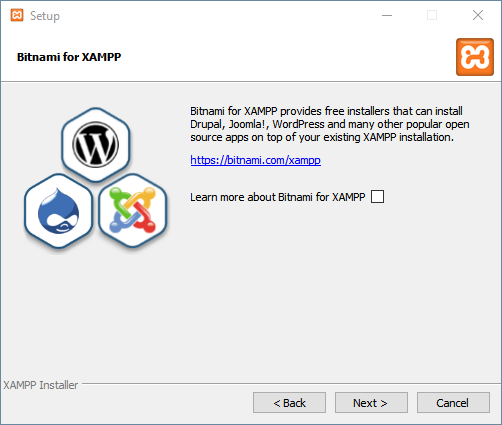
Step 5. Bitnami for XAMPP
Feel free to skip this step because you don’t need Bitnami for learning PHP. Just click the Next button to go to the next step.
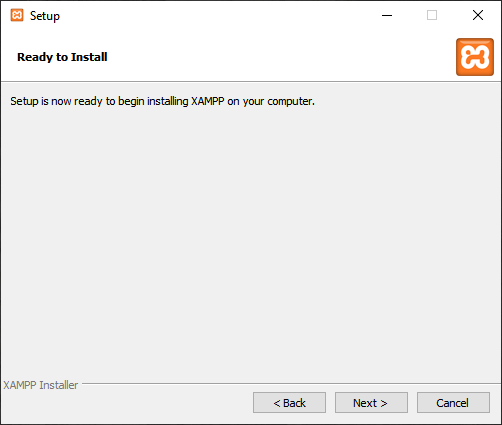
Step 6. Begin installing XAMPP
And you’re now ready to install XAMPP. Click the Next button to start the installation. It’ll take a few minutes to complete.
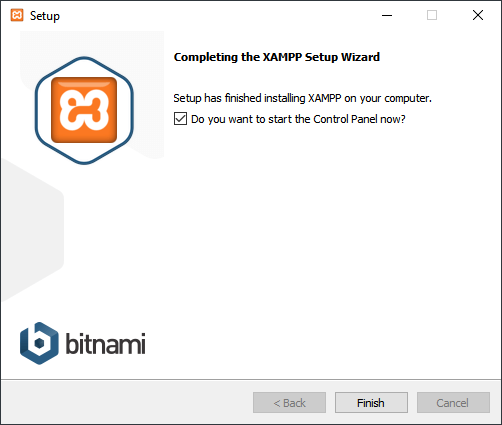
Step 7. Completing the XAMPP setup
Once completed, the XAMPP setup wizard shows the following screen. You can click the Finish button to launch the XAMPP Control Panel:
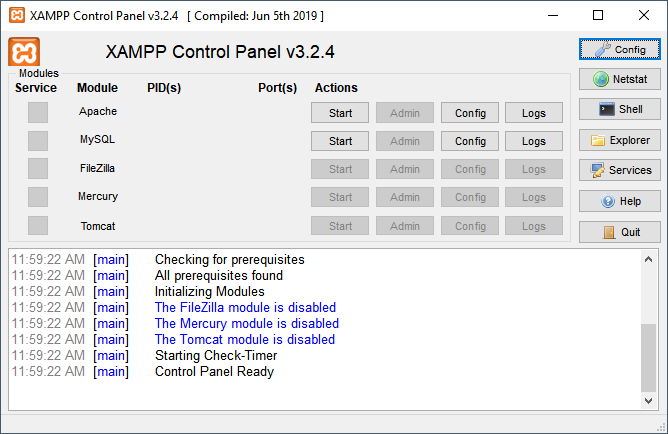
Step 8. Completing the XAMPP setup
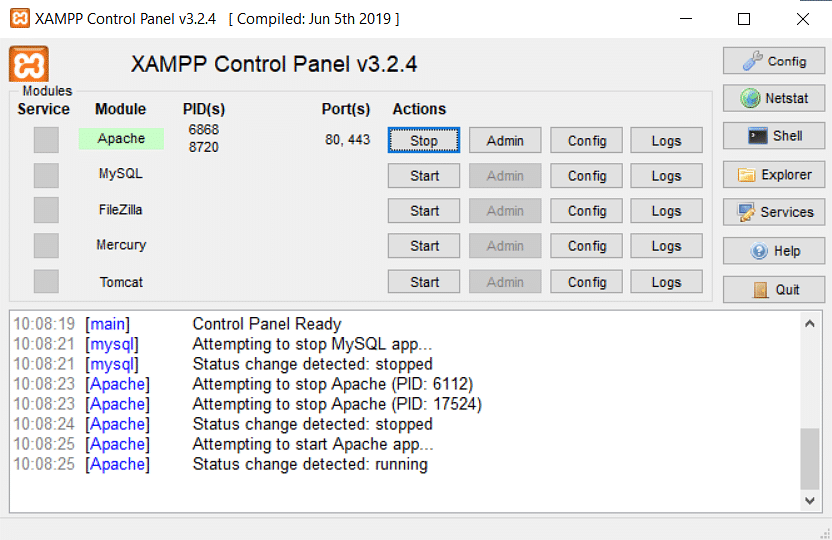
The XAMPP Control Panel lists installed services. To start a service, you click the corresponding Start button:
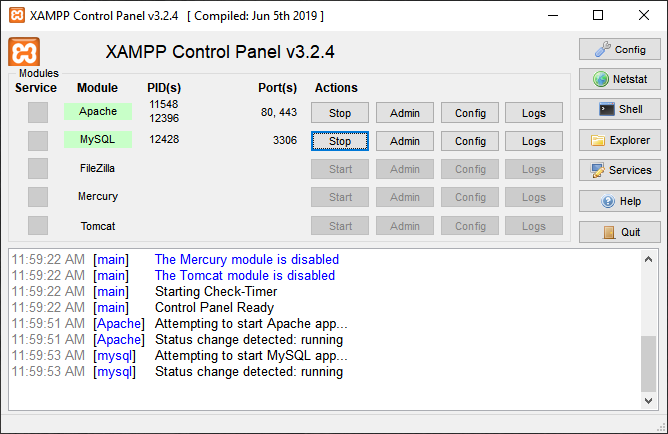
The following shows the Apache web server and MySQL are up and running. The Apache web server listens on the ports 80 and 443 while the MySQL listens on port 3306:
Step 9. Launch the XAMPP
Open the web browser and navigate to the following URL: http://localhost/. If the installation is completed successfully, you’ll see the welcome screen of the XAMPP.
Troubleshooting
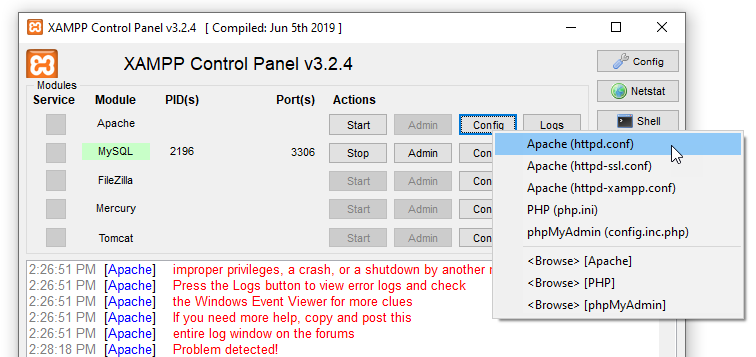
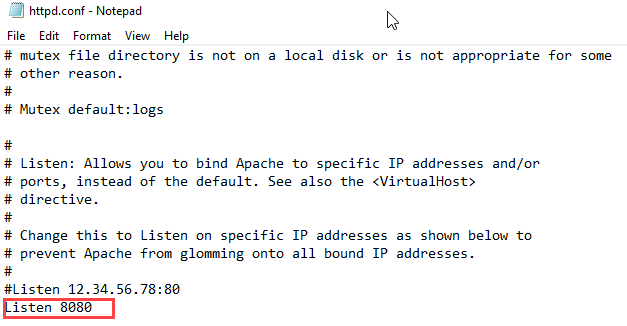
By default, Apache uses port 80. However, if port 80 is used by another service, you’ll get an error like this:
Problem detected! Port 80 in use by "Unable to open process" with PID 4! Apache WILL NOT start without the configured ports free! You need to uninstall/disable/reconfigure the blocking application or reconfigure Apache and the Control Panel to listen on a different portCode language: plaintext (plaintext)In this case, you need to change the port from 80 to a free one, e.g., 8080. To do that, you follow these steps:
First, click the Config button that aligns with the Apache module:
Second, find the line that has the text Listen 80 and change the port from 80 to 8080 like this:
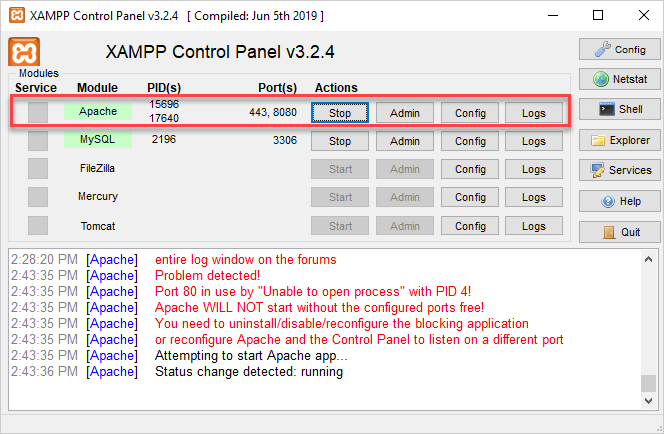
Third, click the Start button to start the Apache service. If the port is free, Apache should start properly, as shown in the following picture:
In this tutorial, you’ve learned step by step how to install the XAMPP PHP development environment on your computer.