- Canvas tutorial
- Before you start
- In this tutorial
- See also
- A note to contributors
- Found a content problem with this page?
- Основные приемы работы с Canvas [Part 1]
- Подготовительные аспекты
- Arc
- fillRect
- Анимация
- Fibonacci flower
- How to draw any regular shape with just one JavaScript function
- Drawing a hexagon with JavaScript
- Drawing a shape with any number of sides
- Summary
- Previous Post New reference pages on MDN for JavaScript regular expressions
- Next Post MDN doc updates: CSS selectors & media queries, WebGPU & WebTransport APIs, Progressive web apps
- Stay Informed with MDN
Canvas tutorial
is an HTML element which can be used to draw graphics via scripting (usually JavaScript). This can, for instance, be used to draw graphs, combine photos, or create simple animations.
First introduced in WebKit by Apple for the macOS Dashboard, has since been implemented in browsers. Today, all major browsers support it.
Before you start
Using the element is not very difficult, but you do need a basic understanding of HTML and JavaScript. The element is not supported in some older browsers, but is supported in recent versions of all major browsers. The default size of the canvas is 300 pixels × 150 pixels (width × height). But custom sizes can be defined using the HTML height and width property. In order to draw graphics on the canvas we use a JavaScript context object, which creates graphics on the fly.
In this tutorial
- Basic usage
- Drawing shapes
- Applying styles and colors
- Drawing text
- Using images
- Transformations
- Compositing and clipping
- Basic animations
- Advanced animations
- Pixel manipulation
- Optimizing the canvas
- Finale
See also
A note to contributors
Due to an unfortunate technical error that occurred the week of June 17, 2013, we lost the history of this tutorial, including attributions to all past contributors to its content. We apologize for this, and hope you’ll forgive this unfortunate mishap.
Found a content problem with this page?
This page was last modified on Feb 19, 2023 by MDN contributors.
Your blueprint for a better internet.
Основные приемы работы с Canvas [Part 1]

Привет! Сегодня я хотел бы начать цикл статей на тему того, как работать с canvas в HTML5 и как применять знания в области матанализа для реализации необычных и интересных эффектов.
Все навыки и умения, которые мы получим здесь, являются фундаментальными принципами и могут быть использованы для создания различных эффектов в играх и приложениях.
Сегодня мы рассмотрим, как рисовать различные фигуры, и реализуем алгоритм fibonacci flower, также известный как golden ratio или phyllotaxis.
Подготовительные аспекты
Для начала создадим пустой html документ, добавим в него canvas с и пропишем немного стилей:
Далее получим ссылку на созданый элемент:
const canvas = document.getElementById("canvas");Для начала мы будем рассматривать принципы canvas api, webgl api рассмотрим в рамках других статей. Для того, чтобы использовать canvas api, необходимо обратиться к интерфейсу CanvasRenderingContext2D, для этого создадим новую переменную context:
const ctx = canvas.getContext('2d');А также установим высоту и ширину canvas, равную высоте и ширине окна браузера:
canvas.width = window.innerWidth; canvas.height = window.innerHeight;На этом подготовительные аспекты закончены, и можно приступать к непосредственно работе с графикой.
Arc
Arc метод — один из самых базовых методов canvas api и используется для рисования окружностей, а также кривых линий. Метод принимает следующие аргументы:
x
Горизонтальная координата центра дуги
y
Вертикальная координата центра дуги
radius
Радиус дуги
startAngle
Угол начала дуги в радианах
endAngle
Угол конца дуги в радианах
Сначала давайте нарисуем окружность. Для этого вызовем метод beginPath(), а после — метод arc следующим образом:
ctx.beginPath(); ctx.arc(100, 100, 50, 0, Math.PI * 2); ctx.closePath(); ctx.stroke();Таким образом можно получить окружность.
fillRect
Также мы можем нарисовать прямоугольник используя метод fillRect, который принимает следующие параметры:
x
Координата начальной точки прямоугольника по оси X
y
Координата начальной точки прямоугольника по оси Y
width
Ширина прямоугольника
height
Высота прямоуголника
Анимация
Анимация в мире canvas — всего-навсего цикличная перерисовка, которая создает иллюзию движения. А как же можно создать цикличную перерисовку? Для этого создадим функцию animate и внутри данной функции вызовем метод requestAnimationFrame, передав в него ссылку на созданную функцию. Таким образом функция animate будет перевызываться вновь и вновь до тех пор, пока мы не остановим анимацию:
Поместим код для рисования окружности во внутрь функции animate и вызовем ее:
Как мы видим, анимация статична. Для того, чтобы проверить, что все работает корректно, создадим переменную radius и будем использовать ее в качестве аргумента метода arc:
Также мы можем заставить двигаться нашу окружность, изменяя, например, параметр x метода arc:
Однако, как можно заметить, мы будем видеть шлейф, идущий за окружностью. Это происходит потому, что мы видим элементы предыдущих фреймов. Для того, чтобы избавиться от данного поведения, можно использовать метод clearRect, который принимает такие же аргументы, как и метод fillRect. В данном случае мы хотим полностью обновить canvas, поэтому вызовем метод следующим образом:
ctx.clearRect(0, 0, canvas.width, canvas.height);Fibonacci flower
Перед тем, как мы рассмотрим принцип реализации данного алгоритма, давайте немного отрефакторим методы анимации. Для этого весь код, который отвечает за рисование на canvas, вынесем в функцию draw. Далее определимся с основными терминами. В основе алгоритма fibonacci flower лежит приницип движения окружности по круговой траектории. Исходя из определения кругового движения, нам необходимо будет считать X как , а Y как
Это работает потому, что sin и cos математически связаны с единичной окружностью. Таким образом получим следующий код:
function draw() < let positionX = 0; let positionY = 0; let angle = 0; let radius = 0; ctx.beginPath(); ctx.arc(positionX, positionY, 20, 0, Math.PI * 2); ctx.closePath(); ctx.stroke(); >function animate() < draw(); window.requestAnimationFrame(animate); >animate();Далее заведем переменный count и scale, в которых будем хранить количество окружностей (частиц) и коэффициент для расчета радиуса соответственно. Таким образом, код примет вид:
let count = 0; let scale = 10; function draw() < let angle = count; let radius = scale * Math.sqrt(count); let positionX = radius * Math.sin(angle); let positionY = radius * Math.cos(angle); // . count++; >Здесь мы на каждой итерации изменяем переменную count, которая увеличивает значение radius, а также positionX и positionY, но чтобы это не происходило слишком быстро, будем использовать квадратный корень от count. Дело за малым, расположить fibonacci flower по центру экрана. Для этого прибавим к positionX и positionY canvas.width / 2 и canvas.height / 2 соответственно.
Меняя коэффициент перед count можно добиться различных результатов, таких как ниже:


Чтобы изменить поведение отрисовки, можно изменить параметр globalCompositeOperation на значение destination-over, тогда новые фреймы будут рисоваться под уже отрисованными, что даст вполне интересный эффект:


Финальный листинг будет выглядеть так:
const canvas = document.getElementById("canvas"); const ctx = canvas.getContext("2d"); canvas.width = window.innerWidth; canvas.height = window.innerHeight; ctx.globalCompositeOperation = "destination-over"; let count = 0; let scale = 10; function draw() < let angle = count * 0.1; let radius = scale * Math.sqrt(count); let positionX = radius * Math.sin(angle) + canvas.width / 2; let positionY = radius * Math.cos(angle) + canvas.height / 2; ctx.fillStyle = "#F24949"; ctx.strokeStyle = "#8B428C"; ctx.beginPath(); ctx.arc(positionX, positionY, 20, 0, Math.PI * 2); ctx.closePath(); ctx.fill(); ctx.stroke(); count++; >function animate() < draw(); if (count >1000) return; window.requestAnimationFrame(animate); > animate();В дальнейших статьях мы рассмотрим другие, не менее интересные приемы работы с canvas api и webgl. До скорых встреч!
How to draw any regular shape with just one JavaScript function
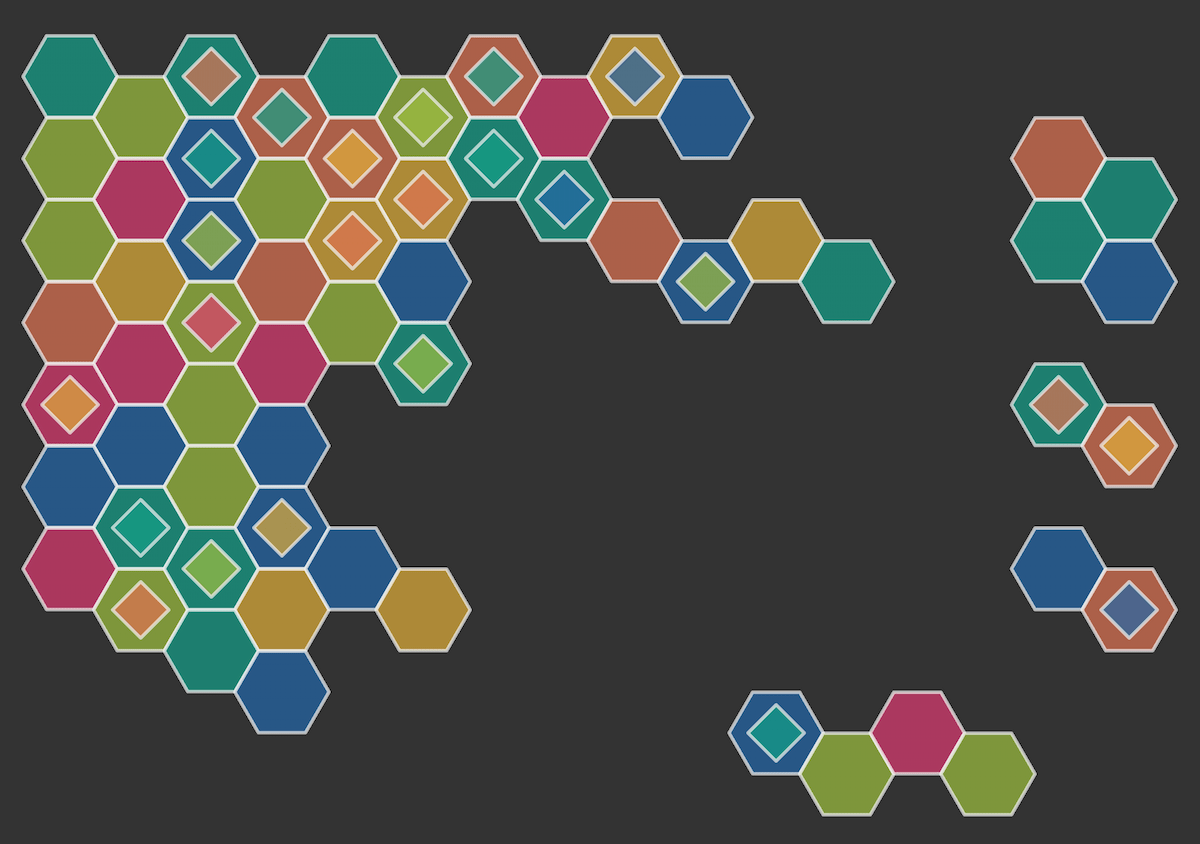
Ok alright, I know I used a clickbait title, but bear with me. I want to share a function I’ve been using for ages. I originally wrote it to draw a hexagon – hexagons are cool, lots of hexagons are better, and tessellated hexagons are the best. So I wrote a function to draw one, which I could then repeat.
As I was doing so, I started modifying the hexagon to enable drawing a number of shapes that are based on just a couple of parameters. Let’s begin with what I did with the hexagon and we’ll take it from there.
Drawing a hexagon with JavaScript
Hexagons have six equal sides. If we imagine our starting point as the center of the hexagon, we can move around this point six times, joining each point as we go to make the sides.
Let’s start off by creating a with a 2d drawing context. We’ll fix the size of the canvas to 400 x 200 pixels for this example and set the center point as (200, 100) .
const canvas = document.querySelector("canvas"); canvas.width = 400; canvas.height = 200; const ctx = canvas.getContext("2d"); const cx = 200; const cy = 100;
Now we need to figure out the x (horizontal) and y (vertical) position of points around the center, which when joined with a line, will make six equal sides. For this, we use the measurement from the center to the point (we’ll call this the radius) and the angle of direction from the center.
As there are 360 degrees in a full rotation and six points we want to create, we can divide 360/6 and know we’ll make a point every 60 degrees. However, there’s a tiny caveat to this – JavaScript works with radians rather than degrees . One thing I always remember is that the value pi in radians is 180 degrees, or half a circle. So (Math.PI*2)/6 would give us each rotation in radians or even simpler Math.PI/3 .
Next we need to add a bit of trigonometry to find the x and y position of each point. For the x position, we can use the sum radius multiplied by cos(angle) and for the y position radius multiplied by sin(angle). Let’s put it all together, adding to our JavaScript code above:
// set the radius of the hexagon const radius = 50; // move the canvas to the center position ctx.translate(cx, cy); for (let i = 0; i 6; i++) // calculate the rotation const rotation = (Math.PI / 3) * i; // for the first point move to if (i === 0) ctx.moveTo(radius * Math.cos(rotation), radius * Math.sin(rotation)); > else // for the rest draw a line ctx.lineTo(radius * Math.cos(rotation), radius * Math.sin(rotation)); > > // close path and stroke it ctx.closePath(); ctx.stroke();
Drawing a shape with any number of sides
Let’s say we wanted to draw a triangle, a square, or an octagon. All we would need to modify in the above function, used to draw the hexagon, is the number of times we draw lines in our for loop and the angle for each point.
Let’s turn this into a function that takes the center point, the radius, and number of sides as parameters:
const canvas = document.querySelector("canvas"); canvas.width = 400; canvas.height = 200; const ctx = canvas.getContext("2d");
function drawShape(x, y, r, sides) // move the canvas to the center position ctx.translate(x, y); for (let i = 0; i sides; i++) // calculate the rotation const rotation = ((Math.PI * 2) / sides) * i; // for the first point move to if (i === 0) ctx.moveTo(r * Math.cos(rotation), r * Math.sin(rotation)); > else // for the rest draw a line ctx.lineTo(r * Math.cos(rotation), r * Math.sin(rotation)); > > // close path and stroke it ctx.closePath(); ctx.stroke(); // reset the translate position ctx.resetTransform(); >
Now we can draw different shapes by adjusting the sides parameter:
drawShape(100, 100, 50, 3); drawShape(225, 100, 50, 7); drawShape(350, 100, 50, 4);
Summary
This was a little introduction to the element for drawing on a web page and a few of the methods you can use to draw shapes. If you want to dive deeper into how all the pieces work, here’s a recap of what we used:
- , the element on which we can display graphics
- CanvasRenderingContext2D to draw 2D shapes to the canvas
- translate() to move the origin to a new position
- lineTo() to draw a line from one point to another
- closePath() to join the first point to the last point
- stroke() to stroke the path with a stroke style
To calculate the position of each point, we used a little bit of maths and trigonometry:
- Math.cos() to calculate the x position of a point
- Math.sin() to calculate the y position of a point
- Math.PI to calculate the angle of rotation in radians
To get some more inspiration for what you can do with the element, check out the Canvas tutorial that starts off with the basics and then covers more advanced topics like animation and pixel manipulation.
There are plenty of ways you can expand on this basic shape function. I like to include an inner radius, so you can create diamonds and stars. I’ve also experimented a little with curves instead of straight lines — feel free to experiment for yourself. Or try some tessellation, which is always fun!
Let me know if you try out this function and if you like it as much as I do. As always, feel free to leave any feedback on the GitHub discussion or join us for a chat in the MDN Web Docs Discord server.
Previous Post New reference pages on MDN for JavaScript regular expressions
Next Post MDN doc updates: CSS selectors & media queries, WebGPU & WebTransport APIs, Progressive web apps
Stay Informed with MDN
Get the MDN newsletter and never miss an update on the latest web development trends, tips, and best practices.
Your blueprint for a better internet.