- Displaying Images in HTML
- Link To External Image
- width and height Image Attributes
- Simulating Slower Internet Connection For Testing in Chrome
- Let’s Test Without width and height Present
- Broken Image Link Without width and height Present
- Blocking Domains In Chrome For Testing
- Summary
- Resources
- Questions?
- How to Add Image in HTML From a Folder?
- How do we Add an Image From a Folder in HTML?
- Conclusion
Displaying Images in HTML

This article is part of the Beginner Web Developer Series. The series is targeted to people who’d like to start serious web development, as well as people who are already web developers and want to solidify their knowledge of fundamentals while possibly filling in some holes. If you find yourself tinkering with HTML, CSS, or Javascript until you sort of get it to work, this series is for you. The material in this series is closely tied to my top-rated Coursera course.
Perhaps nothing enhances a website better than strategically placed images.
If you’ve been following my previous posts in this series, this one should feel super easy. However, there are some small gotchas when it comes to images in HTML.
To start, let’s jump straight into an example.
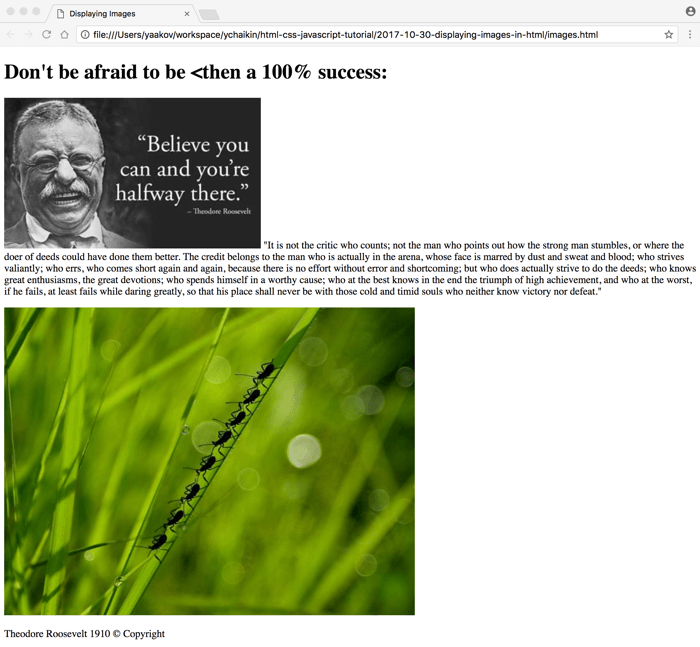
You may recognize the code from the article on HTML Character Entity References. The content is one of my favorite quotes from Theodore Roosevelt. However, this time, I’ll also include an picture (i.e., an image) of Theodore Roosevelt right before the quote.
1 2 3 4 5 6 7 8 9 10 11 12 13 14 15 16 17 18 19 20 21 22 23 24 25 26 27 28 29 30 31 32 33 34 35 36 37 38 39 40 41 42 43 44charset="utf-8"> Displaying Images Don't be afraid to be <then a 100% success: src="picture-with-quote.jpg" width="400" height="235" alt="Picture of Theodore Roosevelt"> "It is not the critic who counts; not the man who points out how the strong man stumbles, or where the doer of deeds could have done them better. The credit belongs to the man who is actually in the arena, whose face is marred by dust and sweat and blood; who strives valiantly; who errs, who comes short again and again, because there is no effort without error and shortcoming; but who does actually strive to do the deeds; who knows great enthusiasms, the great devotions; who spends himself in a worthy cause; who at the best knows in the end the triumph of high achievement, and who at the worst, if he fails, at least fails while daring greatly, so that his place shall never be with those cold and timid souls who neither know victory nor defeat." --> Theodore Roosevelt 1910 © CopyrightFirst, notice that some of the HTML code is commented out. I explained what this means and how it affects what the browser loads in the article on Creating Internal and External HTML Links. (Reminder: the browser doesn’t render the commented out part.)
Lines 12 through 15 show an
tag, which stands for… an image (how did you guess? 😀)
The src attribute (which stands for source) is no different than the href attribute that you’ve seen when I discussed how to create links in HTML. The value of the src attribute should be a URL that points to some image file.
The value of the src attribute is expressed as a relative path (i.e., not http://… present). The value picture-with-quote.jpg means that the browser will look for the file named picture-with-quote.jpg in the same directory the images.html file is located. In other words, this is an internal link to an image file.
The alt attribute value should contain text that can be read by screen readers to describe to visually impaired people what is pictured in the image.
There are 2 more attributes ( width and height ). We’ll discuss those in a minute.
Let’s take a look at this HTML page in the browser:
As you can see, the image appears inline as if it’s just another text character in the sentence.
That should tell us right away that an
tag is an inline element. If it weren’t, the image would be on its own line, pushing everything following the
tag onto a new line.
Link To External Image
The images you display on your page can also be hosted externally to your site.
Let’s uncomment (i.e., remove the comment tags) around the
tag at the end of our HTML code and reload the page in the browser:
width and height Image Attributes
While not absolutely required, it’s a really good idea to always specify the width and the height of the image.
It’s very often the case that you use images as visual anchors in the layout of your page. In other words, the layout of your page relies on the image being a certain size.
For example, your design may dictate that the top 200 pixels are taken up by some header image, followed by some text below the image.
As I discussed previously, browsers read and interpret HTML sequentially, starting at the top of the HTML document.
The browser will read the header image tag and start loading the image, pointed to by the src attribute. However, the browser does not wait for the image to load before it continues to read and render the rest of the HTML code. The image loading happens in parallel as the browser proceeds to interpret and render the rest of the HTML onto the screen.
Usually, images take longer to download than the text-based HTML code. Therefore, the browser will be ready to display the text that was supposed to follow the header image before the header image is downloaded and displayed.
However, without the fully downloaded image file, there is no way to find out its size, i.e., the width and height. The browser will not allocate any space for the image.
To the user, the visual affect will be that the text, which was supposed to appear below the image, will appear at the top at first, then jump down as the image is shown.
To solve this problem, HTML allows us to inform the browser upfront about the image size, even before it’s downloaded, by specifying the width and height attributes on the
tag.
If we don’t specify the width and height of the image, the browser will still figure out the size, but after it downloads the image, potentially causing layout jumpiness.
If the image file is small in size and the user has a really fast Internet connection, this may just appear as a momentary flicker. With larger image sizes and a slower Internet connection, this will translate into a bit more of jarring experience.
Simulating Slower Internet Connection For Testing in Chrome
It’s always good to test what your site looks like as it loads on a slower Internet connection. That type of testing gives you a great front row seat to the experience that a user of your site might end up having.
You can simulate such an experience with Chrome Developer Tools (CDT) without any additional plugins. The Chrome browser comes with Chrome Developer tools, which include connection throttling as one of the options.
Open up CDT by using a keyboard shortcut Ctrl-Alt-I (on Windows) or Option-Command-I (on a Mac) and click on the Network tab. Then, click the arrow next to the word Online and choose a slower connection you want to test. (You can also configure a custom connection speed by choosing Custom.)
Let’s Test Without width and height Present
First, let’s prepare for our test.
Since the first image in our HTML is internal, and I am loading the page directly from my hard drive, slowing down the Internet speed won’t show us much. We’ll need to test this on the second image in the code (the one showing ants on a blade of green grass).
Let’s remove the width and height attributes from the 2nd image, save the file, and reload our browser.
Browsers try to save (i.e., cache) most things they download locally on your computer so they don’t have to re-download it again when you reload. To ensure our test works correctly, we’ll need to force the browser to clear its cache and load the image as if it were downloading it for the first time.
To accomplish that, with the Chrome Developer Tools open, click and hold down the reload button in the browser until a menu drops down. From that menu, choose Empty Cache and Hard Reload.
Notice that when the page starts reloading, the text Theodore Roosevelt 1910 © Copyright shows up right after the quote. However, when the image finally loads, the text jumps below the image.
If we place the width and height attributes back in and then repeat this procedure, you can see that the browser allocates the right amount of space for the image upfront, so no jumping occurs.
Broken Image Link Without width and height Present
Another scenario in which width and height attributes are very useful is when the image link is broken. If you were relying on the image size for part of your layout and the image doesn’t load, the layout will be broken.
For example, let’s take out width and height attributes from the 2nd
tag again, but this time, let’s also type some characters in the middle of the URL, making it point to nowhere, i.e., breaking the link.
Now, the text Theodore Roosevelt 1910 © Copyright will no longer show up much lower than the quote. Obviously, in this case, that’s not really an issue, but you can imagine a different page layout scenario where everything would be misaligned because of this.
Blocking Domains In Chrome For Testing
Let’s demonstrate what happens when a link is broken when width and height attributes are present.
Let’s put the width and height attributes back into the 2nd
tag and make sure that the link actually works and points to the image, as before.
Instead of breaking links manually, let’s be a bit more clever about it and use Chrome Developer Tools to block the URL that the image is served from.
To accomplish that, open up Chrome Developer Tools (Ctrl-Alt-I on Windows, Option-Command-I on Mac) and click on the Network tab. Then, click reload to reload the page. Right-click on the image URL nature-q-c-640-480-1.jpg and choose Block request domain option.
Now, reload the page again:
As you can see, the browser still allocated the same size for the image even though it never loaded it.
The simplest way to undo this is to close and open CDT again. The domain will no longer be blocked. Another way is to right-click on the nature-q-c-640-480-1.jpg marked in red and choose Unblock lorempixel.com.
** Note that while this article assumes that the layout of your page relies on the image being a certain size, this is not the best approach. A better practice is to apply CSS sizing rules either to the img tag itself or to the tag which contains of the img tag.
Summary
Let’s give a quick summary of what we’ve covered in this article:
Resources
Questions?
If something is not clear about what I wrote in this article, please ask away in the comments below!
How to Add Image in HTML From a Folder?
In HTML, images play a vital role as it makes a webpage more expressive and understandable. Images are a visual treat to the eyes of the user as it attracts the user and keeps him engaged in surfing the web page more. You can add the image from your machine to an HTML document. In this post, we will guide you, how you can add an image from a folder to an HTML document.
How do we Add an Image From a Folder in HTML?
In HTML, the purpose of
tag is to add an image in a webpage. The src attribute of this tag specifies the path of the image. The image path has two cases. In case of absolute path, you need to give the complete path where the relative path represents the location of the image with respect to the HTML file where it is being embedded.
The syntax of the
tag is described below:
The primary component is the src attribute where the path of the file will be provided. As discussed earlier, the path could be relative or absolute.
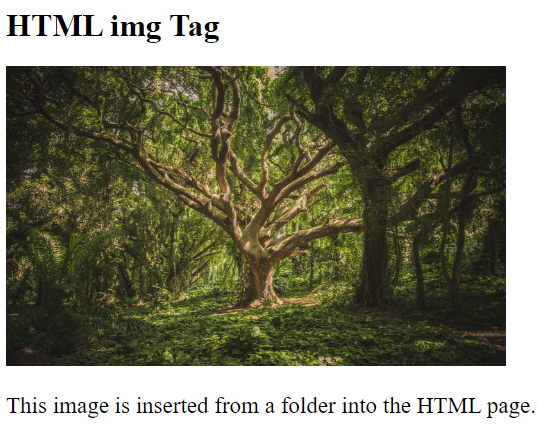
Let’s add an image to HTML document from the folder:
In this code, we use tag to insert an image in the HTML page and use src attribute to specify the path of the image.
Output
The output shows that the image is successfully inserted into the HTML page from a folder.
That’s it! You have learned to add an image from a folder to the HTML document.
Conclusion
In HTML, the tag is used to add an image from the folder to the HTML document. The image path is specified by the src attribute of
tag. To specify the path, firstly write the folder name, then a backslash “/” and lastly, write the image name with its extension. In this article, we have provided the information regarding the process of adding an image in HTML from a folder.