- How To Create Dynamic And Responsive Image Slider In PHP
- How To Create Dynamic And Responsive Image Slider In PHP
- Config.php:
- PHP Code:
- StyleSheet:
- Как создать слайдер из изображений, загруженных в пост?
- Создание слайдера в 4 шага
- Шаг 1. Подключение необходимых файлов
- Шаг 2. Определяемся с размерами слайдера
- Шаг 3. Выводим изображения в слайдер
- Шаг 4. Активируем слайдер.
- Миша
- How to create dynamic, responsive image slider with PHP, mysqli, bootstrap and jQuery ?
- Description :- In this lesson I’m gonna provide the code from which you guys can easily make fully Dynamic Carousel Silder from which you’ll fetch image name from database and images from your img folder.
- 1. config.php (the connection file)
- 2. index.php (the file where your silder code lives with some jquery lines)
- 3. app.css (lives in css folder)
- *Note:- My final product screenshot is this except the images in the slider you will get the same result.
- How to Create Dynamic Image Slider Using PHP and Bootstrap
- How to upload images using PHP and HTML Form
- How to show the images slider using PHP and Bootstrap
How To Create Dynamic And Responsive Image Slider In PHP
How To Create Dynamic And Responsive Image Slider In PHP
In this tutorial i will teach You How To Create Dynamic And Responsive Image Slider In PHP.We are using MySQL as back-end.For this we are using FlexSlider and CSS3.To start with it we have to create a table in MySQL.In this example we have one column for storing image name, you can also use slider sequence to display the slides according to sequence.
Config.php:
PHP Code:
?>
HighTechnology.in | Hosting Partner Grootstech Solutions
 ?>
?>StyleSheet:
body < margin:0px auto; font-family:Candara; font-size:14px; width:100%; >.h2 < text-align:center; >.footer < width: 100%; text-align: center; padding-top: 40px; font-size: 16px; >.container < width:80%; min-width: 150px; max-width: 960px; margin:0px auto; text-align:center; >.container a:active, .flexslider a:active, .container a:focus, .flexslider a:focus < outline: none; >.slides, .flex-control-nav, .flex-direction-nav < margin: 0; padding: 0; list-style: none; >.flexslider a img < outline: none; border: none; >.flexslider < margin: 0; padding: 0; position: relative; zoom: 1; padding: 10px; background: #ffffff; >.flexslider .slides > li < display: none; backface-visibility:hidden; -webkit-backface-visibility: hidden; >.flexslider .slides img < width: 100%; display: block; -webkit-border-radius: 2px; -moz-border-radius: 2px; border-radius: 2px; >.slides:after < content: "."; display: block; clear: both; visibility: hidden; line-height: 0; height: 0; >html[xmlns] .slides < display: block; >* html .slides < height: 1%; >.flexslider .slides < zoom: 1; >.flex-direction-nav a < display: block; position: absolute; margin: -17px 0 0 0; width: 35px; height: 35px; top: 50%; cursor: pointer; text-indent: -9999px; background-color: #ff6a00; >.flex-direction-nav a:before < display: block; position: absolute; content: ''; width: 9px; height: 13px; top: 11px; left: 11px; background: url(image/arrows.png) no-repeat; >.flex-direction-nav a:after < display: block; position: absolute; content: ''; width: 0; height: 0; top: 35px; >.flex-direction-nav .flex-next < right: -5px; -webkit-border-radius: 3px 0 0 3px; -moz-border-radius: 3px 0 0 3px; border-radius: 3px 0 0 3px; >.flex-direction-nav .flex-prev < left: -5px; -webkit-border-radius: 0 3px 3px 0; -moz-border-radius: 0 3px 3px 0; border-radius: 0 3px 3px 0; >.flex-direction-nav .flex-next:before < background-position: -9px 0; left: 15px; >.flex-direction-nav .flex-prev:before < background-position: 0 0; >.flex-direction-nav .flex-next:after < left: 20px; border-bottom: 5px solid transparent; border-left: 12px solid #ff6a00; >.flex-direction-nav .flex-prev:after < left: 0; border-bottom: 5px solid transparent; border-right: 16px solid #ff6a00; >.flexslider .flex-control-nav < position: absolute; width: 100%; bottom: -40px; text-align: center; margin: 0 0 0 -10px; >.flex-control-nav li < display: inline-block; zoom: 1; >.flex-control-paging li a < display: block; cursor: pointer; text-indent: -9999px; width: 12px; height: 12px; margin: 0 3px; background-color: #b6b6b6 \9; -webkit-border-radius: 12px; -moz-border-radius: 12px; border-radius: 12px; -webkit-box-shadow: inset 0 0 0 2px #b6b6b6; -moz-box-shadow: inset 0 0 0 2px #b6b6b6; box-shadow: inset 0 0 0 2px #b6b6b6; >.flex-control-paging li a.flex-active

Как создать слайдер из изображений, загруженных в пост?
После того, как в WordPress изменился загрузчик изображений, его стало удобнее использовать для других различных целей, то есть не только для загрузки изображений в пост .
Например для создания галерей или слайдеров. Слайдер мне кажется наиболее интересным, поэтому давайте попробуем реализовать его на стандартной вордпрессовской теме, например TwentyEleven.
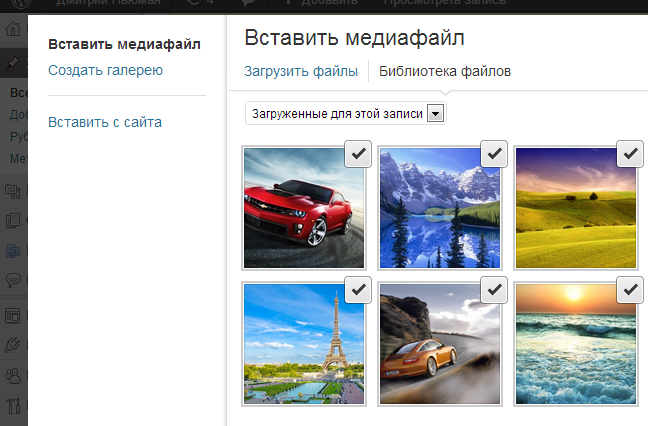
Основная суть в том, что все изображения, добавленные в пост (но не вставленные в редакторе), можно прокрутить в слайдере или вывести как галерею.
Создание слайдера в 4 шага
Слайдер довольно удобная вещь, особенно если у вас на сайте есть несколько продуктов, и на страницу каждого из них вам хотелось бы добавить по несколько изображений.
Ниже пример такого слайдера с одного из созданных мной сайтов:
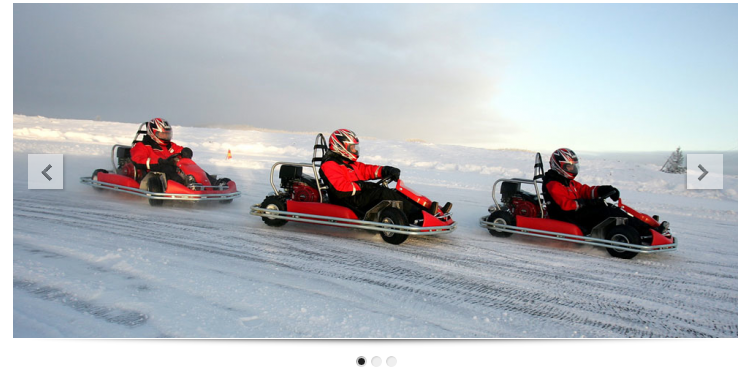
Можете кликнуть по изображению и посмотреть на него в действии.
Итак, для создания слайдера нам само собой понадобится какой-нибудь jQuery-плагин, я буду использовать бесплатный Nivo Slider, вы же можете взять что-нибудь другое.
Чтобы облегчить задачу, выкладываю необходимые файлы из плагина, можете скачать их прямо с моего сайта.
- nivo-slider.css — CSS стили, необходимые для корректного отображения слайдера,
- jquery.nivo.slider.pack.js — собственно сам jQuery-плагин.
Шаг 1. Подключение необходимых файлов
Прежду всего вы должны убедиться в том, что в шапке сайта задействована функция wp_head(), а в футере wp_footer(). Если этих функций там нет, то добавьте, иначе не рассчитывайте, что всё будет работать, как надо.
Итак, помещаем скачанные файлы в папку с темой (например), после этого воспользуемся функциями wp_enqueue_script() и wp_enqueue_style().
Вставляем следующий код в functions.php , который находится в папке с темой:
add_action( 'wp_enqueue_scripts', 'true_scripts_and_styles_for_slider' ); function true_scripts_and_styles_for_slider() { wp_enqueue_style( 'nivocss', get_stylesheet_directory_uri() . '/nivo-slider.css' ); wp_enqueue_script( 'jquery' ); wp_enqueue_script( 'nivojs', get_stylesheet_directory_uri() . '/jquery.nivo.slider.pack.js', array('jquery'), null, true ); }
Содержимое файла nivo-slider.css можно засунуть внутрь стандартного style.css, в этом случае 4-ю строчку из предыдущего листинга можно удалить или закомментировать.
Шаг 2. Определяемся с размерами слайдера
Откройте ту самую страницу сайта, где вы хотите задействовать слайдер и определите, какая у него будет высота и ширина.
После этого открываем functions.php и вписываем туда следующую строку:
add_image_size( 'trueslider', 640, 480, true ); // где 640 это ширина, а 480 - высота слайдера
Это нужно для того, чтобы при загрузке изображения, WordPress автоматически генерировал копию соответствующих размеров непосредственно для слайдера.
Шаг 3. Выводим изображения в слайдер
Открываем необходимый нам PHP-файл, в котором будет выводиться слайдер, например у меня это шаблон обычного поста single.php .
// массив параметров вывода изображений $args = array( 'post_parent' => $post->ID, 'post_type' => 'attachment', 'orderby' => 'menu_order', // сортировка, menu_order - по выставленному в админке порядку, можно также сортировать по имени или дате добавления 'order' => 'ASC', 'numberposts' => 5, // количество выводимых изображений 'post_mime_type' => 'image' ); if ( $images = get_children( $args ) ) { // если никаких изображений в пост не добавлено, то не выводим вообще ничего echo ''; }// не забудьте указать свои значения ширины (640) и высоты (480) foreach( $images as $image ) { echo wp_get_attachment_image( $image->ID, 'trueslider' ); } echo '
Читайте подробнее про функцию get_children().
После добавления этого кода зайдите на страницу редактирования какого-нибудь поста и загрузите туда несколько изображений (вставлять в редактор поста их ни к чему, просто загружаем через загрузчик).
Шаг 4. Активируем слайдер.
Тут нужно обязательно выполнить следующее условие — код надо вставлять непосредственно перед закрывающим тегом