How to use ‘hover’ in CSS
If you want the underline to be present while the mouse hovers over the link, then:
is sufficient, however you can also use a class-name of ‘hover’ if you wish, and the following would be equally applicable:
Incidentally it may be worth pointing out that the class name of ‘hover’ doesn’t really add anything to the element, as the psuedo-element of a:hover does the same thing as that of a.hover:hover . Unless it’s just a demonstration of using a class-name.
I’m afraid not, IE (certainly as IE6, and maybe IE7 -I can’t remember) is limited in its use of :hover, so that only tags are able to use it. IE8 may have improved this, but I’m not entirely sure.
There are many ways of doing that. If you really want to have a ‘hover’ class in your A element, then you’d have to do:
Then again, it’s uncommon to have such a className there, this is how you do a regular hover:
Here are a few more examples:
:hover is one of the many pseudo-classes.
For example you can change, you can control the styling of an element when the mouse hovers over it, when it is clicked and when it was previously clicked.
.home < color: red; >.home:hover < color: green; >.home:active < color: blue; >.home:visited
Aside the awkward colors I’ve given as examples, the link with the ‘home’ class will be red by default, green when the mouse hovers them, blue when they are clicked and black after they were clicked.
Not an answer, but explanation of why your css is not matching HTML.
In css space is used as a separator to tell browser to look in children, so your css
means «look for a element, then look for any descendants of it that have hover class and look of any descendants of those descendants that have hover state» and would match this markup
If you want to match < a >I will become underlined when you hover on me you should use a.hover:hover , which means «look for any a element with class hover and with hover state»
You need to concatenate the selector and pseudo selector. You’ll also need a style element to contain your styles. Most people use an external stylesheet, for lots of benefits (caching for one).
Just a note: the hover class is not necessary, unless you are defining only certain links to have this behavior (which may be the case)
hyphens (-) are fine in class names in CSS. For your selector above to work, your element must look like
Because if href is added,underline will come out even when cursor not on,I don’t know the reason yet..
The href is a required attribute of an anchor element, so without it, you cannot expect all browsers to handle it equally. Anyway, I read somewhere in a comment that you only want the link to be underlined when hovering, and not otherwise. You can use the following to achieve this, and it will only apply to links with the hover-class:
hover is a pseudo class in CSS. No need to assign a class.
I was working on a nice defect last time and was wondering more about how to use properly hover property for A tag link and for IE browser. A strange thing for me was that IE was not able to capture A tag link element based on a simple A selector. So, I found out how to even force capturing A tag element and I spotted that we must use more specifc CSS selector. Here is an example below — It works perfect:
:hover
Псевдокласс :hover срабатывает, когда пользователь наводит на элемент мышью, но не обязательно активирует его.
Демо
Этот стиль может переопределяться другими относящимися к ссылкам псевдоклассами, такими как :link , :visited и :active , появляющимися в соответствующем порядке. Чтобы стилизировать ссылки должным образом, вам нужно вставлять правило :hover до правил :link и :visited , но после :active , как определено в LVHA-порядке: :link — :visited — :hover — :active .
Псевдокласс :hover может применяться к любому псевдоэлементу.
Браузеры, такие как Firefox, Internet Explorer, Safari, Opera или Chrome, применяют соответствующий стиль, когда курсор (указатель мыши) наводится на элемент.
Замечания по использованию
На сенсорных экранах :hover проблемный или не работает. В зависимости от браузера, псевдокласс :hover может никогда не сработать, или сработать на некоторое время после нажатия на элемента, или может продолжать действовать даже остаться после того, как пользователь коснулся элемента до нажатия на другой элемент. Так как сенсорные устройства очень распространены, то веб-разработчикам очень важно не иметь контент, доступный только при наведении, так как такой контент неудобно или невозможно использовать на таких устройствах.
Синтаксис
Спецификации
Описание и примеры
Пример 1. Выпадающее меню
С псевдоклассом :hover вы можете создавать сложные каскадные алгоритмы. Эта техника часто используется, например, чтобы создать выпадающие меню на чистом CSS (только на CSS, без использования JavaScript). Сущность этой техники — создание правил, типа следуюшего:
div.menu-bar ul ul display: none; > div.menu-bar li:hover > ul display: block; > 1 2 3 4 5 6 7 8 9 10 11 12 13 14 15 16 17 18 19 20 21 22 23 24 25 26 27 28 29 30 31
div class="menu-bar"> ul> li> a href="example.html">Менюa> ul> li> a href="example.html">Ссылкаa> li> li> a class="menu-nav" href="example.html" >Подменюa > ul> li> a class="menu-nav" href="example.html" >Подменюa > ul> li>a href="example.html">Ссылкаa>li> li>a href="example.html">Ссылкаa>li> li>a href="example.html">Ссылкаa>li> li>a href="example.html">Ссылкаa>li> ul> li> li>a href="example.html">Ссылкаa>li> ul> li> ul> li> ul> div> Смотрите полный пример выпадающего меню, основанный на CSS.
Пример 2. Галерея полноразмерных изображений и превью
Вы можете использовать псевдокласс :hover , чтобы создать галерею изображений с полноразмерными картинками, показываемыми при наведении на них мыши. Посмотрите это демо.
Пример 3
1 2 3 4 5 6 7 8 9 10 11 12 13 14 15 16 17 18 19 20 21 22
html> head> meta charset="utf-8" /> title>hovertitle> style> a:link color: #0000d0; /* Цвет ссылок */ padding: 2px; /* Поля вокруг текста */ > a:hover background: #786b59; /* Цвет фона под ссылкой */ color: #ffe; /* Цвет ссылки */ > style> head> body> p>a href="1.html">Ссылка 1a>p> p>a href="2.html">Ссылка 2a>p> p>a href="3.html">Ссылка 3a>p> body> html> В данном примере псевдокласс :hover применяется к ссылке (тегу ), при этом меняется цвет ссылки и фона под ней. Результат:

Пример 4
1 2 3 4 5 6 7 8 9 10 11 12 13 14 15 16 17 18 19 20 21 22 23 24 25 26 27 28 29 30 31 32 33 34 35 36 37 38 39 40 41 42 43 44 45 46 47 48 49 50 51 52 53 54 55 56 57 58 59 60 61 62 63 64 65 66 67 68 69 70 71 72 73 74 75 76 77 78 79 80 81 82 83 84 85 86 87 88 89 90 91 92 93 94 95
html> head> meta charset="utf-8" /> title>hovertitle> style> ul width: 180px; /* Ширина меню */ list-style: none; /* Для списка убираем маркеры */ margin: 0; /* Нет отступов вокруг */ padding: 0; /* Убираем поля вокруг текста */ font-family: Arial, sans-serif; /* Рубленый шрифт для текста меню */ font-size: 10pt; /* Размер названий в пункте меню */ > li ul position: absolute; /* Подменю позиционируются абсолютно */ display: none; /* Скрываем подменю */ margin-left: 165px; /* Сдвигаем подменю вправо */ margin-top: -2em; /* Сдвигаем подменю вверх */ > li a display: block; /* Ссылка как блочный элемент */ padding: 5px; /* Поля вокруг надписи */ text-decoration: none; /* Подчеркивание у ссылок убираем */ color: #666; /* Цвет текста */ border: 1px solid #ccc; /* Рамка вокруг пунктов меню */ background-color: #f0f0f0; /* Цвет фона */ border-bottom: none; /* Границу снизу не проводим */ > li a:hover color: #ffe; /* Цвет текста активного пункта */ background-color: #5488af; /* Цвет фона активного пункта */ > li:hover ul /* При выделении пункта курсором мыши отображается подменю */ display: block; > .brd border-bottom: 1px solid #ccc; /* Линия снизу */ > style> head> body> ul class="menu"> li> a href="russian.html">Русская кухняa> ul> li>a href="linkr1.html">Бефстрогановa>li> li>a href="linkr2.html">Гусь с яблокамиa>li> li> a href="linkr3.html">Крупеник новгородскийa> li> li> a href="linkr4.html" class="brd" >Раки по-русскиa > li> ul> li> li> a href="ukrainian.html">Украинская кухняa> ul> li>a href="linku1.html">Вареникиa>li> li> a href="linku2.html">Жаркое по-харьковскиa> li> li> a href="linku3.html">Капустняк черниговскийa> li> li> a href="linku4.html" class="brd" >Потапцы с помидорамиa > li> ul> li> li> a href="caucasus.html">Кавказская кухняa> ul> li>a href="linkc1.html">Суп-харчоa>li> li>a href="linkc2.html">Лилибджa>li> li>a href="linkc3.html">Чихиртмаa>li> li> a href="linkc4.html" class="brd">Шашлыкa> li> ul> li> li> a href="asia.html" class="brd" >Кухня Средней Азииa > li> ul> body> html> Hover in CSS
Dynamic pages are the requirement of time. The more user-friendly and specific a web page, the more likely it will be used or viewed by end-users. Cascading Style Sheet offers many features when providing dynamic properties to a web page. The hover feature is one of them. Using this property in styling any element, we can ensure we get the desired effect when we hover over that part of the page. It is simple to use while providing the page with a decorative and animated touch, which can always be treated as a plus point. Let us explore this property and its uses. We will study about Hover in CSS in this topic.
Web development, programming languages, Software testing & others
Syntax and Uses of Hover in CSS
For creating any hover effect in CSS, we create a pseudo-class for that element, describing what effect must be hovering over that element. The syntax for the hover property is:
This pseudo-class can have properties similar to a normal class. These properties will come into effect when that element has hovered over. This way, we can create various kinds of hover effects as required by the overall design or requirement of the page.
Examples of Hover in CSS
Let us take a look at some of the examples of the hover feature in CSS.
Example #1
Demonstrating over-effect on one HTML element using external CSS
- We will use external CSS in this example, so we will create the CSS page first as the process goes on.
- We will first define the styling for the paragraph element
in the CSS page. Next, we will create a pseudo-class and define the hovering effect for the same element.
- The CSS code for this example should look like this as given below:
- Next, we will create an HTML page. In the header section, we will first call for the external Style Sheet. Then, in the body section, we will use paragraph element
to demonstrate the hover effect.
- The HTML code for the page can be similar to the below code snippet:
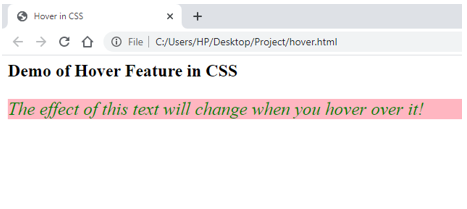
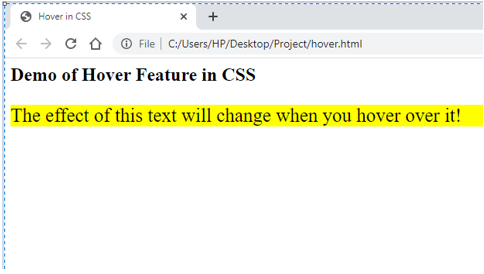
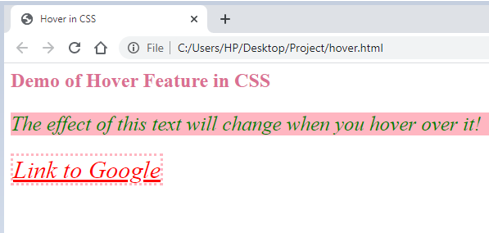
Demo of Hover Feature in CSS
The effect of this text will change when you hover over it!
Example #2
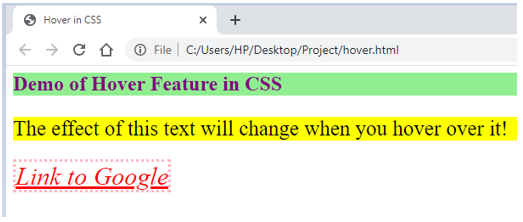
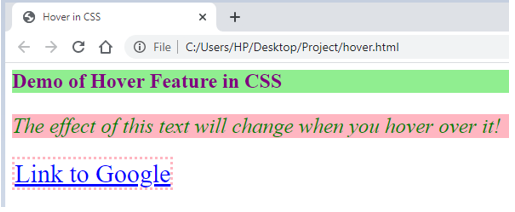
Demonstrating over-effect on multiple HTML elements using external CSS
- Like the previous example, we will create an external style sheet first.
- We will define styling for several elements and pseudo-classes to define each element’s hover behavior.
- The CSS code should look similar to the code snippet below:
p < font-size: 25px; font-style: italic; text-decoration: double; background-color: lightpink; color: green; >P:hover < background-color: yellow; font-style: normal; color: black; >a < color: red; font-style: italic; font-size: 30px; font-weight: 14px; border: lightpink dotted; >a:hover < color: blue; font-style: normal; font-weight: unset; >h2 < color: purple; background-color: lightgreen; font-weight: 16px; >h2:hover
- Next, we will code for the HTML page, where the header section will call the external style sheet being used.
- In the body section, we will use all three elements that we styled on the CSS page.
- The HTML code should be similar to the code shared below:
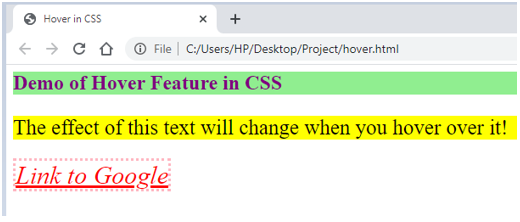
Demo of Hover Feature in CSS
The effect of this text will change when you hover over it!
Link to Google 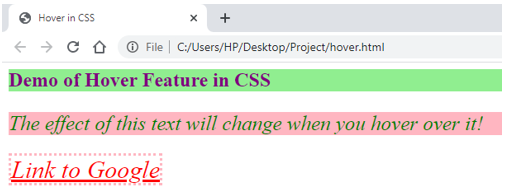
Example #3
Demonstration of hover feature using internal CSS
- Since we are using internal CSS in this example, we will directly code the styling in the header section of the HTML page.
- The header section of the HTML page should be as follows:
p < font-size: 25px; font-style: italic; text-decoration: double; background-color: lightpink; color: green; >P:hover < background-color: yellow; font-style: normal; color: black; >a < color: red; font-style: italic; font-size: 30px; font-weight: 14px; border: lightpink dotted; >a:hover < color: blue; font-style: normal; font-weight: unset; >h2 < color: purple; background-color: lightgreen; font-weight: 16px; >h2:hover First, we will code for the body, such that all three elements are used, for which the style has been defined in the header.
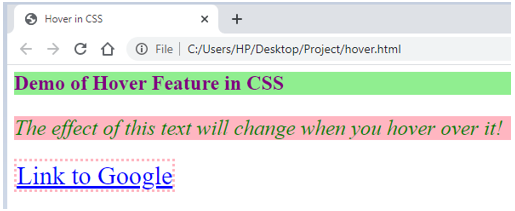
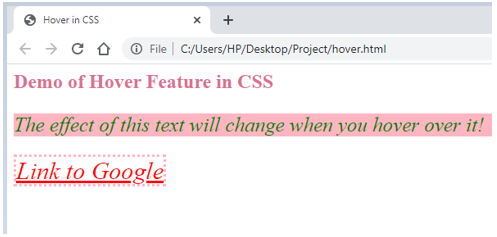
p < font-size: 25px; font-style: italic; text-decoration: double; background-color: lightpink; color: green; >P:hover < background-color: yellow; font-style: normal; color: black; >a < color: red; font-style: italic; font-size: 30px; font-weight: 14px; border: lightpink dotted; >a:hover < color: blue; font-style: normal; font-weight: unset; >h2 < color: purple; background-color: lightgreen; font-weight: 16px; >h2:hover Demo of Hover Feature in CSS
The effect of this text will change when you hover over it!
Link to Google 
- The examples above explain how the Hover property can be used in CSS. One can experiment with different features for the hover pseudo-class and design according to the design scheme.
Recommended Articles
We hope that this EDUCBA information on “Hover in CSS” was beneficial to you. You can view EDUCBA’s recommended articles for more information.
38+ Hours of HD Videos
9 Courses
5 Mock Tests & Quizzes
Verifiable Certificate of Completion
Lifetime Access
4.5
149+ Hours of HD Videos
28 Courses
5 Mock Tests & Quizzes
Verifiable Certificate of Completion
Lifetime Access
4.5
253+ Hours of HD Videos
51 Courses
6 Mock Tests & Quizzes
Verifiable Certificate of Completion
Lifetime Access
4.5
CSS Course Bundle — 19 Courses in 1 | 3 Mock Tests
82+ Hours of HD Videos
19 Courses
3 Mock Tests & Quizzes
Verifiable Certificate of Completion
Lifetime Access
4.5