- How to create Expanding Cards using HTML, CSS, and JavaScript
- What are Expanding Cards?
- How to create Expanding Cards using HTML, CSS and JavaScript?
- The CSS
- The JavaScript
- Additional CSS
- Image click on to expand html
- Click on Image to Expand
- How to enlarge pictures when clicked in HTML
- Image Modal or Expand when click in html and css
- How should I expand a div using jquery when clicked on image?
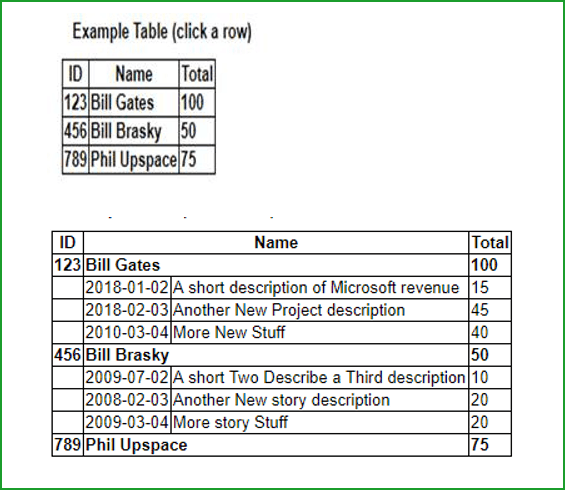
- How to implement expand/collapse in HTML table rows using jQuery
- Implement expand/collapse in HTML table rows using jQuery
- Implement expand/collapse in HTML table rows using jQuery
How to create Expanding Cards using HTML, CSS, and JavaScript
In this tutorial, we will learn how to create Expanding Cards using HTML, CSS and JavaScript. We will also learn how to use some additional CSS properties to make our expanding cards more attractive.
What are Expanding Cards?
Expanding cards are a type of card that can be expanded to reveal more content. They are commonly used to display additional
How to create Expanding Cards using HTML, CSS and JavaScript?
To create expanding cards, we will need to use the following HTML elements−
- The card container element: This will be the element that will contain all of our cards. We will give this element an id of «expanding−cards».
- The card element: This will be the element that contains the content for each individual card. We will give this element a class of «card».
- The card header element: This will be the element that contains the header for each card. We will give this element a class of «card−header».
- The card body element: This will be the element that contains the body content for each card. We will give this element a class of «card−body».
- The card footer element: This will be the element that contains the footer for each card. We will give this element a class of «card−footer».
The CSS
Now that we have our HTML set up, let’s style our cards using CSS.
First, we will set some basic styles for our card container−
#expanding-cards width: 100%; max-width: 960px; margin: 0 auto; >
Next, we will style our individual cards−
.card width: 100%; border: 1px solid #ccc; border-radius: 4px; overflow: hidden; >
Now, let’s style our card headers−
.card-header padding: 15px; background-color: #f5f5f5; border-bottom: 1px solid #ccc; > .card-header h3 margin: 0; font-size: 16px; >
Our card bodies will have a bit more going on−
.card-body padding: 15px; > .card-body p margin: 0; font-size: 14px; line-height: 1.5; >
And finally, our card footers−
.card-footer padding: 15px; background-color: #f5f5f5; border-top: 1px solid #ccc; >
The JavaScript
Now that our HTML and CSS are set up, let’s write some JavaScript to make our cards expand and collapse on click.
First, we will need to select our card elements−
var cards = document.querySelectorAll('.card');
Next, we will create a function that will toggle the expanded class on our cards−
function toggleExpanded() this.classList.toggle('expanded'); >
Finally, we will loop through our card elements and add an event listener for the click event−
for(var i = 0; i cards.length; i++) cards[i].addEventListener('click', toggleExpanded); >
And that’s it! Now when you click on a card, it will expand to reveal more content.
Additional CSS
If you want to take your expanding cards to the next level, you can try adding some additional CSS
First, let’s add some transitions to make our cards expand and collapse smoothly−
.card transition: all 0.3s ease-out; > .card.expanded transform: scale(1.1); >
Next, let’s add a hover state to our cards
.card:hover box-shadow: 0px 0px 10px rgba(0,0,0,0.3); cursor: pointer; >
And finally, let’s add some media queries so our cards look good on mobile devices−
@media (max-width: 768px) .card width: 100%; > >
!DOCTYPE html> html> head> meta name="viewport" content="width=device-width, initial-scale=1"> style> #expanding-cards width: 100%; max-width: 960px; margin: 0 auto; > .card width: 100%; border: 1px solid #ccc; border-radius: 4px; overflow: hidden; transition: all 0.3s ease-out; > .card.expanded transform: scale(1.1); > .card:hover box-shadow: 0px 0px 10px rgba(0,0,0,0.3); cursor: pointer; > .card-header padding: 15px; background-color: #f5f5f5; border-bottom: 1px solid #ccc; > .card-header h3 margin: 0; font-size: 16px; > .card-body padding: 15px; > .card-body p margin: 0; font-size: 14px; line-height: 1.5; > .card-footer padding: 15px; background-color: #f5f5f5; border-top: 1px solid #ccc; > @media (max-width: 768px) .card width: 100%; > > /style> /head> body> div>h3> Click anywherer on the cart to see the expanding effect/h3>/div> div id="expanding-cards"> div class="card"> div class="card-header"> h3>Card 1/h3> /div> div class="card-body"> p>Lorem ipsum dolor sit amet, consectetur adipiscing elit. Phasellus imperdiet, nulla et dictum interdum./p> /div> div class="card-footer"> a href="#">Read More/a> /div> /div> div class="card"> div class="card-header"> h3>Card 2/h3> /div> div class="card-body"> p>Lorem ipsum dolor sit amet, consectetur adipiscing elit. Phasellus imperdiet, nulla et dictum interdum./p> /div> div class="card-footer"> a href="#">Read More/a> /div> /div> div class="card"> div class="card-header"> h3>Card 3/h3> /div> div class="card-body"> p>Lorem ipsum dolor sit amet, consectetur adipiscing elit. Phasellus imperdiet, nulla et dictum interdum./p> /div> div class="card-footer"> a href="#">Read More/a> /div> /div> /div> script> var cards = document.querySelectorAll('.card'); function toggleExpanded() this.classList.toggle('expanded'); > for(var i = 0; i cards.length; i++) cards[i].addEventListener('click', toggleExpanded); > /script> /body> /html>
Image click on to expand html
It is a very simple project where we have 5 images in a row, and when you click on any image it will expand and other images squeeze to small size. What I’m trying to achieve is whenever I click on an image: a div should expand just like similar to Google image.
Click on Image to Expand
How are you all doing today?
Am back again with yet another cool project using HTML CSS and JavaScript.
It is a very simple project where we have 5 images in a row, and when you click on any image it will expand and other images squeeze to small size.
Inspired from how to make image gallery using captions by easytutorials on youtube . This is a minified version of it.
Here is a codepen link to the project. Please like it and comment if you fell it was worth your time.
Let me know in the comment section, if you would be interested to see more cool stuff like this.
How to enlarge pictures when clicked in HTML
In this video I will show you how to enlarge pictures when clicked in a very simple way Duration: 1:11
Image Modal or Expand when click in html and css
So i am trying to put a code for modal or in order to expand my images. I already checked every sector or every codes and still didn’t find why it’s not working. I don’t want nothing to change in it except the modal, it my get mess up if i change things. I got the codes from a website. In the site their result are working but when i put the codes in the notepad nothing happened. It will be really helpful if you can find what is wrong with it. Thank you in advance for those who will help me.
body < display: grid; grid-template-columns: 100%; grid-template-rows: 8vw 130vw 7vw; grid-gap: 0em; margin: 0; padding: 0; background-color: #ffffff; width: 100%; >header, footer < grid-column: 1 / span 2; >main < grid-column: 1 / span 2; >body < margin: 0 auto; max-width: 89em; margin-left: 0; margin-right:0; padding: 0em 0; >header, main, aside, footer < display: flex; >footer < background: #eaeaea; >.main1 #body_1 h2 < margin-left: 50px; font-size: 30px; color: black; margin-top: 95px; margin-bottom:3px; font-family: courier new; float: left;>#body_1 h6 < margin-left: 10px;color: blue; margin-top: 220px; margin-bottom:3px; font-family: courier new; float: left;>#body_1 h4 < margin-left: 230px; font-size: 30px; color: black; margin-top: 260px; margin-bottom:3px; position: left; float: left;>.text4 < position: absolute; float: left; top: 870px; >.background_wrap < position: absolute; background-color: rgba(19, 13, 6,0.5); z-index: -1000; width: 100%; height: 100% ; overflow:hidden; background: url("Pics&Video/laoang6.jpg") no-repeat center; background-size: cover;>.background_wrap::before< background-color: rgba(0, 0, 0, 0.37); content: ''; display: block; height: 100%; position: absolute; width: 100%; >.content < position: absolute; width: 100%; min-height: 20%; z-index: 1000;>.sub-content < position: fixed; width: 1000px; height: 120px; margin: 0 auto; transition: 0.5s;>.sub-content.active < background-color: rgba(0, 26, 26,0.7); width: 100%>.sub-content.active ul li a < background-color: rgba(0, 26, 26,0.7);>#list < margin-right: 5px; position:fixed; margin-left: 780px; margin-top: 20px;>ul < margin-top:1px; padding: 0px; list-style: none; color: white; margin-right: 0px; font-family: calibri; font-weight: bold;>ul li < float: right; width: 130px; font-family: courier new; border-bottom: 1px solid #ffffff; border-right: 1px solid #ffffff ; border-left: 1px solid #ffffff ; border-top: 1px solid #ffffff ; line-height: 25px; text-align: center; font-size: 13px; font-weight: bolder; margin-top: 35px; margin-right: 3px;>ul li a < color: white; display: block; margin-top: 2px; font-weight: bolder; text-decoration: none;>ul li a:hover < background-color: green; font-weight:bolder; cursor: pointer; color: white>ul li ul li < display: none; font-weight: bolder;>ul li:hover ul li < display:block; cursor: pointer; color: white; margin-top:1px; margin-right: 0px; position: center; background-size: cover; font-weight: bolder;>h1 < font-family: comic sans ms, sans-serif; text-align: center; font-size: 60px; text-transform: uppercase; font-weight: bolder; color: white;margin-bottom: 6px; >h2 < font-family: comic sans ms, sans-serif; text-align: center; font-size: 30px; text-transform: uppercase; font-weight: 300; color: white; padding-top: 14%; >.wrapper < position: center; width: 750px; height: 100px;margin-left:auto; margin-right:auto; margin-top: 150px;font-size: 17px; >.image_wrap < margin-top:20px;height: 70px; margin-left:55px;>.fl_image < float: left; margin-right:5px; margin-bottom: 10px;>.content h6 < font-family: courier new; font-size: 13px; text-transform: uppercase; font-weight: 300; color: green; margin-bottom: 10px; margin-left: 25px; margin-top: 100px;>.content p < font-family: courier new; text-align: center; font-size: 20px; letter-spacing: 3px; color: #ffffff; >div.gallery < margin: 10px; border: 0px solid #ccc; float: left; width: 250px; height:250px; >div.gallery:hover < border: 1px solid #777; >div.gallery img < width: 100%; height: 100%; >.gallery1 < float: left; position: absolute; margin-top: 320px; margin-left: 10px; >div.gallery < margin: 10px; border: 0px solid #ccc; float: left; width: 300px; height:250px; >div.gallery:hover < border: 1px solid #777; >div.gallery img < width: 100%; height: 100%; >.gallery2 < float: left; position: absolute; margin-top: 840px; margin-left: 10px; >.text4 < margin-left: 360px; font-size: 30px; color: black; margin-top: 220px; margin-bottom:3px; position: left; float: left;>#myImg < border-radius: 5px; cursor: pointer; transition: 0.3s; >#myImg:hover /* The Modal (background) */ .modal < display: none; /* Hidden by default */ position: fixed; /* Stay in place */ z-index: 10000 ; /* Sit on top */ padding-top: 100px; /* Location of the box */ left: 0; top: 0; width: 100%; /* Full width */ height: 100%; /* Full height */ overflow: auto; /* Enable scroll if needed */ background-color: rgb(0,0,0); /* Fallback color */ background-color: rgba(0,0,0,0.9); /* Black w/ opacity */ >/* Modal Content (Image) */ .modal-content < margin: auto; display: block; width: 80%; max-width: 600px; max-height: 450px; >/* Caption of Modal Image (Image Text) - Same Width as the Image */ #caption < margin: auto; display: block; width: 80%; max-width: 700px; text-align: center; color: #ccc; padding: 10px 0; height: 150px; >/* Add Animation - Zoom in the Modal */ .modal-content, #caption < animation-name: zoom; animation-duration: 0.6s; >@keyframes zoom < from to >/* The Close Button */ .close < position: absolute; top: 15px; right: 35px; color: #f1f1f1; font-size: 40px; font-weight: bold; transition: 0.3s; >.close:hover, .close:focus < color: #bbb; text-decoration: none; cursor: pointer; >/* 100% Image Width on Smaller Screens */ @media only screen and (max-width: 700px) < .modal-content < width: 100%; >>.transparent_btn .transparent_btn:hover < color: #fff; background-color: rgba(245, 183, 177,0.8);>.btn < position: absolute; z-index: 1; margin-left: 640px; >.btn2
- Contact
- About
- History
- Activities
- Hotels
- Festival
Calbayog Tourism