- Use CSS to hide the scrollbar
- CSS Layout — Overflow
- CSS Overflow
- overflow: visible
- Example
- overflow: hidden
- Example
- overflow: scroll
- Example
- overflow: auto
- Example
- overflow-x and overflow-y
- Example
- All CSS Overflow Properties
- Как стилизовать или убрать полосу прокрутки — CSS скроллбар
- 1 Как убрать полосу прокрутки CSS
- 2 Как изменить скроллбар CSS
- 3 CSS стили
Use CSS to hide the scrollbar
There are times when we need to hide the scrollbar from the HTMl elements. The uses can vary from person to person. It is opinionated topic to keep the scrollbar or not based on User Interactions(UI)/User Experience(UX). Most of the time, I don’t like to show the scrollbar to the user because of design practices I follow. To achieve this, you just need to tickle with CSS to add some pseudo selectors for hiding it based on Browser’s stylings Let’s see the default UI for scroll elements which will show the scrollbar. We will declare a div which will contain a list of items and then we will apply some CSS to provide max-width and max-height to see the scroll behaviour.
class="scroll-show"> Some Value Some Value Some Value Some Value Some Value Some Value Some Value Some Value Some Value Some Value Some Value Some Value Some Value Some Value Some Value Some Value Some Value .scroll-show ul max-height: 100px; max-width: 200px; overflow: auto; border: 2px solid #f3f3f3; padding-left: 16px; > Let’s see how it look in the screen You see, browser automatically adds the scrollbar by default, but If we want to hide, we can do it. Now, we will add some css to the element to hide the scrollbar: We will declare a div with some other class name which will contain same number of items and then we will use the same CSS but with some extra rules to see the scroll behaviour but not see the scrollbar.
class="scroll-hide"> Some Value Some Value Some Value Some Value Some Value Some Value Some Value Some Value Some Value Some Value Some Value Some Value Some Value Some Value Some Value Some Value Some Value .scroll-hide ul max-height: 100px; max-width: 200px; border: 2px solid #f3f3f3; padding-left: 16px; overflow: auto; /* this will hide the scrollbar in mozilla based browsers */ overflow: -moz-scrollbars-none; scrollbar-width: none; /* this will hide the scrollbar in internet explorers */ -ms-overflow-style: none; > /* this will hide the scrollbar in webkit based browsers - safari, chrome, etc */ .scroll-hide ul::-webkit-scrollbar width: 0 !important; display: none; > Let’s see, whether we achieved what we wanted or not Here, you can see that, the scrollbar is no longer can be seen, but the functionality for scrolling remain intact. Hope this helps you someway. Do comment your thoughts on anything, you would like to change or add.
CSS Layout — Overflow
The CSS overflow property controls what happens to content that is too big to fit into an area.
This text is really long and the height of its container is only 100 pixels. Therefore, a scrollbar is added to help the reader to scroll the content. Lorem ipsum dolor sit amet, consectetuer adipiscing elit, sed diam nonummy nibh euismod tincidunt ut laoreet dolore magna aliquam erat volutpat. Ut wisi enim ad minim veniam, quis nostrud exerci tation ullamcorper suscipit lobortis nisl ut aliquip ex ea commodo consequat. Duis autem vel eum iriure dolor in hendrerit in vulputate velit esse molestie consequat, vel illum dolore eu feugiat nulla facilisis at vero eros et accumsan et iusto odio dignissim qui blandit praesent luptatum zzril delenit augue duis dolore te feugait nulla facilisi. Nam liber tempor cum soluta nobis eleifend option congue nihil imperdiet doming id quod mazim placerat facer possim assum. Typi non habent claritatem insitam; est usus legentis in iis qui facit eorum claritatem.
CSS Overflow
The overflow property specifies whether to clip the content or to add scrollbars when the content of an element is too big to fit in the specified area.
The overflow property has the following values:
- visible — Default. The overflow is not clipped. The content renders outside the element’s box
- hidden — The overflow is clipped, and the rest of the content will be invisible
- scroll — The overflow is clipped, and a scrollbar is added to see the rest of the content
- auto — Similar to scroll , but it adds scrollbars only when necessary
Note: The overflow property only works for block elements with a specified height.
Note: In OS X Lion (on Mac), scrollbars are hidden by default and only shown when being used (even though «overflow:scroll» is set).
overflow: visible
By default, the overflow is visible , meaning that it is not clipped and it renders outside the element’s box:
You can use the overflow property when you want to have better control of the layout. The overflow property specifies what happens if content overflows an element’s box.
Example
overflow: hidden
With the hidden value, the overflow is clipped, and the rest of the content is hidden:
You can use the overflow property when you want to have better control of the layout. The overflow property specifies what happens if content overflows an element’s box.
Example
overflow: scroll
Setting the value to scroll , the overflow is clipped and a scrollbar is added to scroll inside the box. Note that this will add a scrollbar both horizontally and vertically (even if you do not need it):
You can use the overflow property when you want to have better control of the layout. The overflow property specifies what happens if content overflows an element’s box.
Example
overflow: auto
The auto value is similar to scroll , but it adds scrollbars only when necessary:
You can use the overflow property when you want to have better control of the layout. The overflow property specifies what happens if content overflows an element’s box.
Example
overflow-x and overflow-y
The overflow-x and overflow-y properties specifies whether to change the overflow of content just horizontally or vertically (or both):
overflow-x specifies what to do with the left/right edges of the content.
overflow-y specifies what to do with the top/bottom edges of the content.
You can use the overflow property when you want to have better control of the layout. The overflow property specifies what happens if content overflows an element’s box.
Example
div <
overflow-x: hidden; /* Hide horizontal scrollbar */
overflow-y: scroll; /* Add vertical scrollbar */
>
All CSS Overflow Properties
| Property | Description |
|---|---|
| overflow | Specifies what happens if content overflows an element’s box |
| overflow-wrap | Specifies whether or not the browser can break lines with long words, if they overflow its container |
| overflow-x | Specifies what to do with the left/right edges of the content if it overflows the element’s content area |
| overflow-y | Specifies what to do with the top/bottom edges of the content if it overflows the element’s content area |
Как стилизовать или убрать полосу прокрутки — CSS скроллбар

Стилизованные полосы прокрутки становятся популярными, думаю, вы уже сталкивались с такими сайтами, которые имеют уникальный скроллбар (к примеру, наш сайт). Есть два способа реализации этой задачи: с помощью CSS3 или используя jQuery плагин. Мы будем использовать наиболее простой — напишем CSS стили.

Примечание: стилизовать полосу прокрутки через -webkit префикс возможно только в браузерах, использующих механизм рендеринга Webkit (и Blink). То есть в Firefox и IE этот способ не сработает.
Часто бывает необходимо убрать или скрыть скроллбар css совсем. Для начала, давайте рассмотрим как это сделать.
1 Как убрать полосу прокрутки CSS
Скрыть полосу прокрутки можно как у отдельного элемента на странице, так и у всей страницы целиком. Сделать это не сложно, достаточно написать следующее свойство:
CSS /*Убрать полосу прокрутки у элемента*/ .element::-webkit-scrollbar { width: 0; } /*Убрать полосу прокрутки для всей страницы*/ ::-webkit-scrollbar { width: 0; } 2 Как изменить скроллбар CSS
Теперь давайте рассмотрим базовую структуру полосы прокрутки:
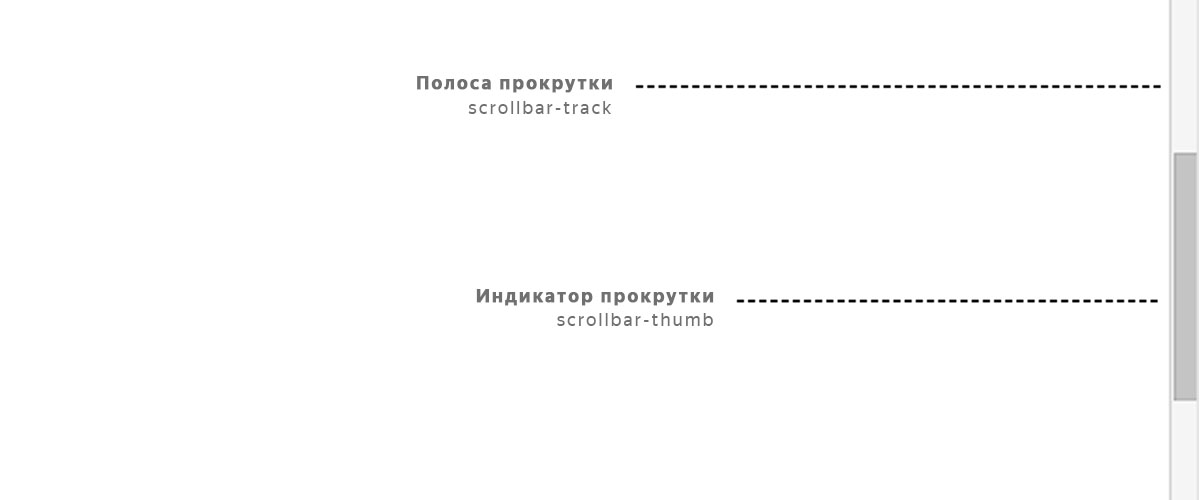
-webkit-scrollbar состоит различных псевдо-элементов.
- ::-webkit-scrollbar — это фон самого скроллбара.
- ::-webkit-scrollbar-button — кнопки направления на полосе прокрутки.
- ::-webkit-scrollbar-track — пустое пространство под индикатором прокрутки.
- ::-webkit-scrollbar-thumb — индикатор прокрутки, перетаскиваемый элемент.
Проверим как все это работает. Чтобы попробовать изменить скроллбар css, создадим пустой HTML документ. Вам необходимо добавить style.css ваш HTML файл. В разметку добавим div с id element, имеющий полосу прокрутки, чтобы применить на него наши стили.
3 CSS стили
Для того, чтобы у элемента div появилась полоса прокрутки, добавим следующие свойства.
CSS #element { overflow-y: scroll; background-color: #ffffff; width: 200px; height: 200px; } .overflow { min-height: 400px; } Теперь давайте используем псевдоэлемент для создания пользовательского скроллбара. Заменим ширину по умолчанию на новую — в 7 пикселей. Затем, добавим цвет полосы через свойство background-color: #f9f9fd .
Если вы хотите изменить ширину скролла всей страницы, а не отдельного элемента, то используйте ::-webkit-scrollbar без дополнительных селекторов.
CSS #element::-webkit-scrollbar { width: 7px; background-color: #f9f9fd; } Мы уже знаем, что скроллбар состоит из полосы, кнопки и индикатора прокрутки. Используем псевдо элемент ::-webkit-scrollbar-thumb , для того чтобы стилизовать индикатор.
CSS #element::-webkit-scrollbar-thumb { background-color: #223c50; } Добавим свойство box-shadow полосе, чтобы добавить скроллбару контрастность. Подобрать подходящую тень можно в нашем box-shadow генераторе.
CSS #element::-webkit-scrollbar-track { -webkit-box-shadow: 5px 5px 5px -5px rgba(34, 60, 80, 0.2) inset; background-color: #f9f9fd; } В заключении: вот еще несколько вариантов, которые вы можете использовать на своем сайте.
Пример 1 #element::-webkit-scrollbar { width: 10px; background-color: #f9f9fd; } #element::-webkit-scrollbar-thumb { border-radius: 10px; background-color: #18aaaa; } #element::-webkit-scrollbar-track { -webkit-box-shadow: inset 0 0 6px rgba(0,0,0,0.2); border-radius: 10px; background-color: #f9f9fd; } Пример 2 #element::-webkit-scrollbar { width: 10px; } #element::-webkit-scrollbar-track { -webkit-box-shadow: 5px 5px 5px -5px rgba(34, 60, 80, 0.2) inset; background-color: #f9f9fd; } #element::-webkit-scrollbar-thumb { background-color: #f2bf93; background-image: -webkit-linear-gradient(45deg,rgba(255, 255, 255, .25) 25%, transparent 25%, transparent 50%, rgba(255, 255, 255, .25) 50%, rgba(255, 255, 255, .25) 75%, transparent 75%, transparent); } Пример 3 #element::-webkit-scrollbar { width: 10px; } #element::-webkit-scrollbar-track { -webkit-box-shadow: 5px 5px 5px -5px rgba(34, 60, 80, 0.2) inset; background-color: #f9f9fd; } #element::-webkit-scrollbar-thumb { background-color: #356184; background-image: -webkit-gradient(linear, 0 0, 0 100%, color-stop(.5, rgba(255, 255, 255, .25)), color-stop(.5, transparent), to(transparent)); } В четвертом примере мы используем градиент. Настроить его можно в CSS генераторе градиента.
Пример 4 #element::-webkit-scrollbar { width: 10px; } #element::-webkit-scrollbar-track { -webkit-box-shadow: 5px 5px 5px -5px rgba(34, 60, 80, 0.2) inset; background-color: #f9f9fd; border-radius: 10px; } #element::-webkit-scrollbar-thumb { border-radius: 10px; background: linear-gradient(180deg, #00c6fb, #005bea); }