How to Create GUI in JAVA
There are two sets of Java APIs for graphics programming: AWT (Abstract Windowing Toolkit) and Swing.
1. AWT API was introduced in JDK 1.0. Most of the AWT components have become obsolete and should be replaced by newer Swing components.
2. Swing API, a much more comprehensive set of graphics libraries that enhances the AWT, was introduced as part of Java Foundation Classes (JFC) after the release of JDK 1.1. JFC consists of Swing, Java2D, Accessibility, Internationalization, and Pluggable Look-and-Feel Support APIs. JFC was an add-on to JDK 1.1 but has been integrated into core Java since JDK 1.2. Other than AWT/Swing Graphics APIs provided in JDK, others have also provided Graphics APIs that work with Java, such as Eclipse’s Standard Widget Toolkit (SWT) (used in Eclipse), Google Web Toolkit (GWT) (used in Android), 3D Graphics API such as Java bindings for OpenGL (JOGL) and Java3D.
2 GUI Creation
2.1 Setup
Prerequisite:
This example is developed on Eclipse therefore a compatible Eclipse IDE is required to be installed on the system. We also need WindowBuilder tool to be installed on Eclipse IDE for the easiness of the work.
Following Steps are required to install the WindowBuilder tool.
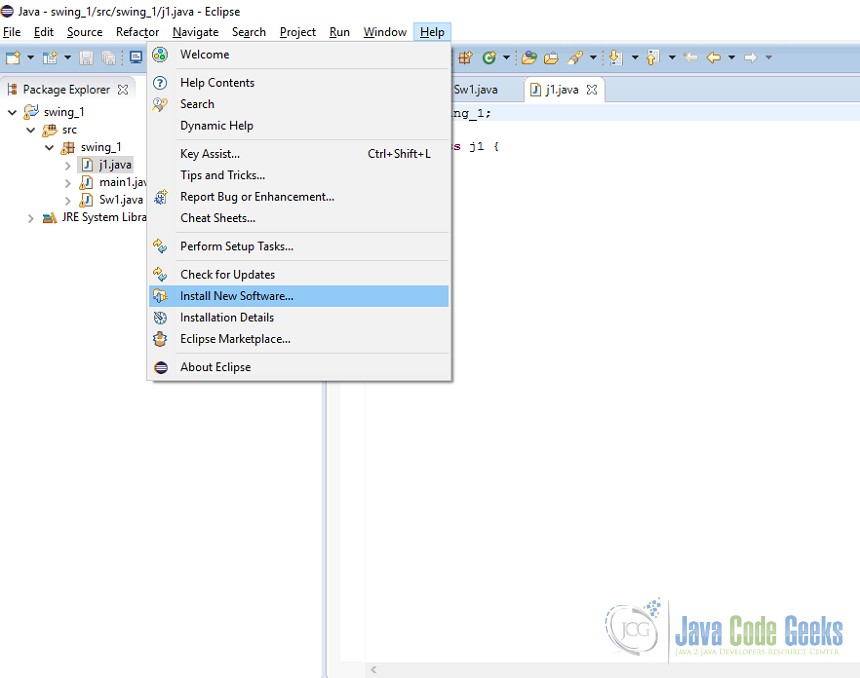
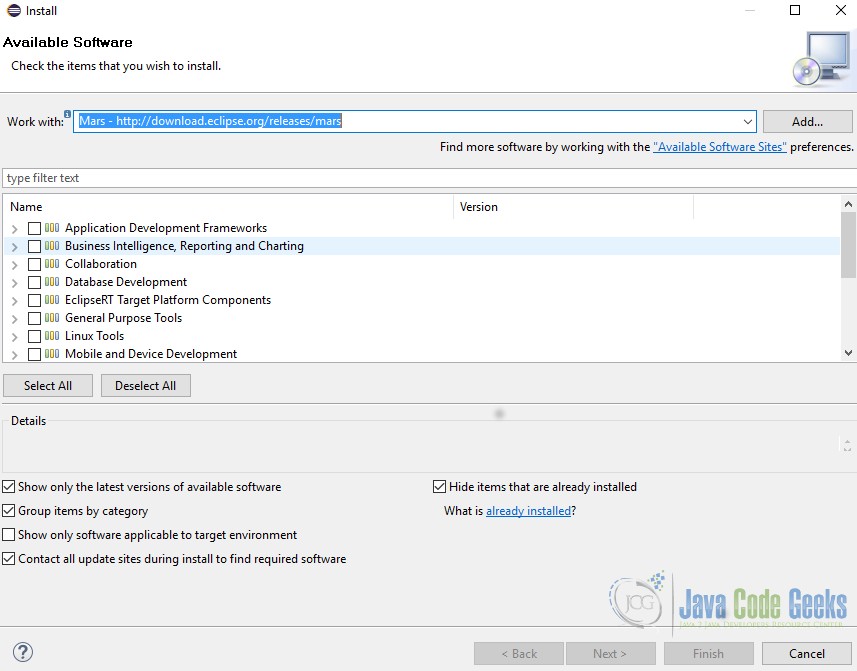
- Go to Eclipse →Help→ Install New Software

- Select your version of eclipse version/download/eclipse.org/release/eclipse version, For example, Mars – http://download.eclipse.org/releases/mars
- Select General purpose tools from the dropdown and click next.

This will take some time to install the software, so you have to restart eclipse in order to see the changes.
2.2 Programming GUI with AWT
Java Graphics APIs – AWT and Swing – provide a huge set of reusable GUI components, such as button, text field, label, choice, panel and frame for building GUI applications. You can simply reuse these classes rather than re-invent the wheels. I shall start with the AWT classes before moving into Swing to give you a complete picture. I have to stress that AWT component classes are now obsoleted by Swing’s counterparts.
2.2.1 AWT Packages
- GUI Component classes (such as Button, TextField, and Label),
- GUI Container classes (such as Frame, Panel, Dialog and ScrollPane),
- Layout managers (such as FlowLayout, BorderLayout and GridLayout),
- Custom graphics classes (such as Graphics, Color and Font).
- Event classes (such as ActionEvent, MouseEvent, KeyEvent and WindowEvent),
- Event Listener Interfaces (such as ActionListener, MouseListener, KeyListener and WindowListener),
- Event Listener Adapter classes (such as MouseAdapter, KeyAdapter, and WindowAdapter).
AWT provides a platform-independent and device-independent interface to develop graphic programs that runs on all platforms, such as Windows, Mac, and Linux.
2.2.2 Containers and Components
There are two types of GUI elements:
1. Component: Components are elementary GUI entities (such as Button, Label, and TextField.)
2. Container: Containers (such as Frame and Panel) are used to hold components in a specific layout (such as flow or grid). A container can also hold sub-containers.
GUI components are also called controls (Microsoft ActiveX Control), widgets (Eclipse’s Standard Widget Toolkit, Google Web Toolkit), which allow users to interact with (or control) the application through these components (such as button-click and text-entry).
A Frame is the top-level container of an AWT program. A Frame has a title bar (containing an icon, a title, and the minimize/maximize/close buttons), an optional menu bar and the content display area. A Panel is a rectangular area used to group related GUI components in a certain layout. In the above figure, the top-level Frame contains two Panels. There are five components: a Label (providing description), a TextField (for users to enter text), and three Buttons (for user to trigger certain programmed actions).
In a GUI program, a component must be kept in a container. You need to identify a container to hold the components. Every container has a method called add(Component c). A container (say aContainer) can invoke aContainer.add(aComponent) to add aComponent into itself. For example,
MyGUIProgram.java
Panel panel = new Panel(); // Panel is a Container Button btn = new Button("Press"); // Button is a Component panel.add(btn); // The Panel Container adds a Button Component 2.2.2 AWT Container Classes
- A Frame provides the “main window” for the GUI application, which has a title bar (containing an icon, a title, the minimize, maximize/restore-down and close buttons), an optional menu bar, and the content display area. To write a GUI program, we typically start with a subclass extending from java.awt.Frame to inherit the main window as follows:
import java.awt.Frame; // Using Frame class in package java.awt // A GUI program is written as a subclass of Frame - the top-level container // This subclass inherits all properties from Frame, e.g., title, icon, buttons, content-pane public class MyGUIProgram extends Frame < // Constructor to setup the GUI components public MyGUIProgram() < . >// Other methods . . // The entry main() method public static void main(String[] args) < // Invoke the constructor (to setup the GUI) by allocating an instance new MyGUIProgram(); >>
- An AWT Dialog is a “pop-up window” used for interacting with the users. A Dialog has a title-bar (containing an icon, a title and a close button) and a content display area, as illustrated.
- An AWT Applet (in package java.applet) is the top-level container for an applet, which is a Java program running inside a browser. Applet will be discussed in the later chapter.
- Panel: a rectangular box under a higher-level container, used to layout a set of related GUI components in pattern such as grid or flow.
- ScrollPane: provides automatic horizontal and/or vertical scrolling for a single child component.
- public Label(String strLabel, int alignment); // Construct a Label with the given text String, of the text alignment
- public Label(String strLabel); // Construct a Label with the given text String
- public Label(); // Construct an initially empty Label
2.2.2 AWT Component Classes
AWT provides many ready-made and reusable GUI components. The frequently-used are: Button, TextField, Label, Checkbox, CheckboxGroup (radio buttons), List, and Choice, as illustrated below.
AWT GUI Component:java.awt.Label
A java.awt.Label provides a text description message. Take note that System.out.println() prints to the system console, not to the graphics screen. You could use a Label to label another component (such as text field) or provide a text description.
Check the JDK API specification for java.awt.Label.
Below is how a label will look like:
The Label class has three constructors:
1.The first constructor constructs a Label object with the given text string in the given alignment. Note that three static constants Label.LEFT , Label.RIGHT , and Label.CENTER are defined in the class for you to specify the alignment (rather than asking you to memorize arbitrary integer values).
2.The second constructor constructs a Label object with the given text string in default of left-aligned.
3.The third constructor constructs a Label object with an initially empty string. You could set the label text via the setText() method later.
Constructing a Component and Adding the Component into a Container
Three steps are necessary to create and place a GUI component:
1.Declare the component with an identifier (name);
2.Construct the component by invoking an appropriate constructor via the new operator;
3.Identify the container (such as Frame or Panel) designed to hold this component. The container can then add this component onto itself via aContainer.add(aComponent) method. Every container has an add(Component) method. Take note that it is the container that actively and explicitly adds a component onto itself, instead of the other way.
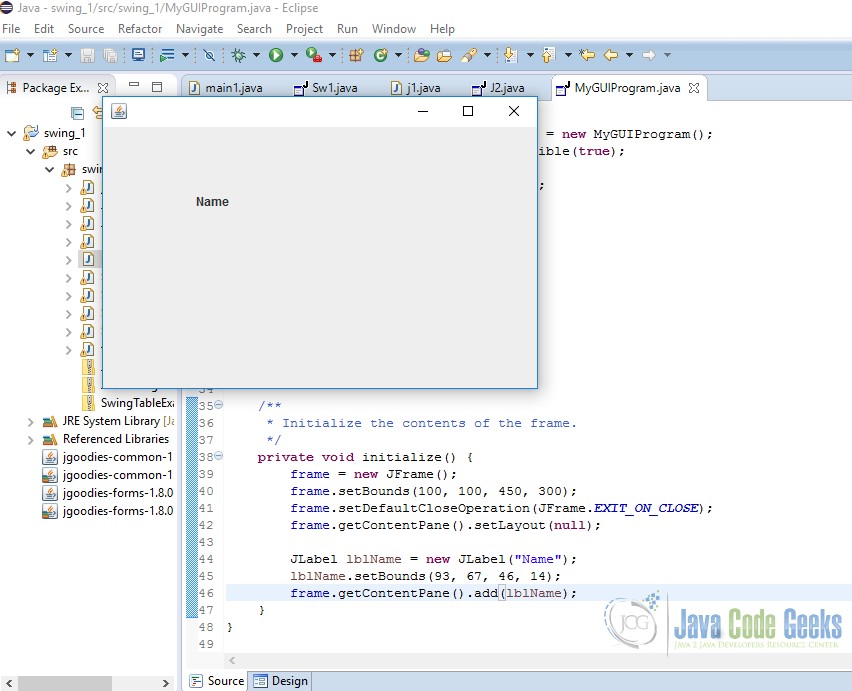
Below is the code to add a label(component) to a frame(container)
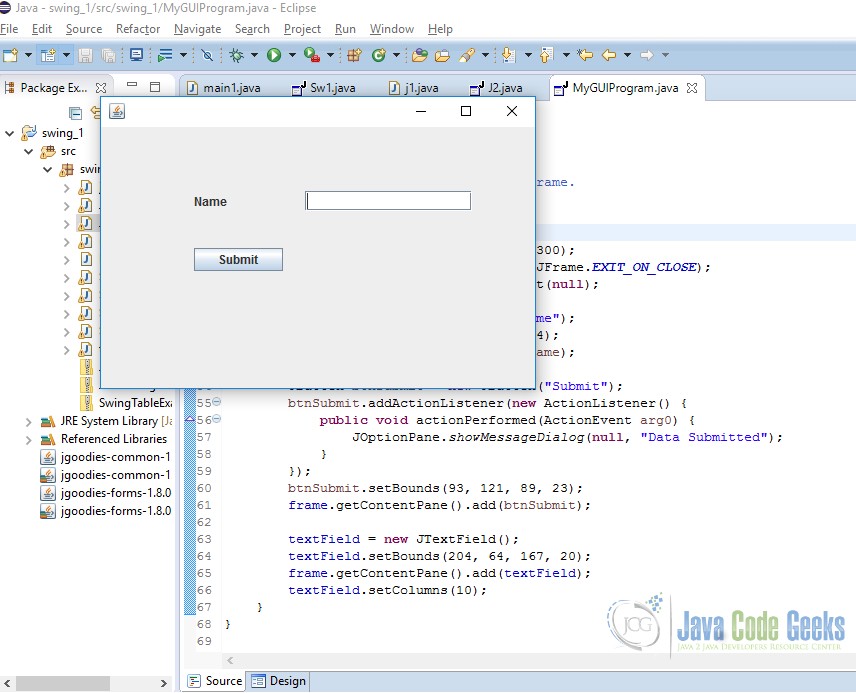
JLabel lblName = new JLabel("Name"); lblName.setBounds(93, 67, 46, 14); frame.getContentPane().add(lblName); AWT GUI Component: java.awt.Button
A java.awt.Button is a GUI component that triggers a certain programmed action upon clicking.
Constructors
public Button(String buttonLabel);
// Construct a Button with the given label
public Button();
// Construct a Button with empty label
The Button class has two constructors. The first constructor creates a Button object with the given label painted over the button. The second constructor creates a Button object with no label.
Here is how button will look like:
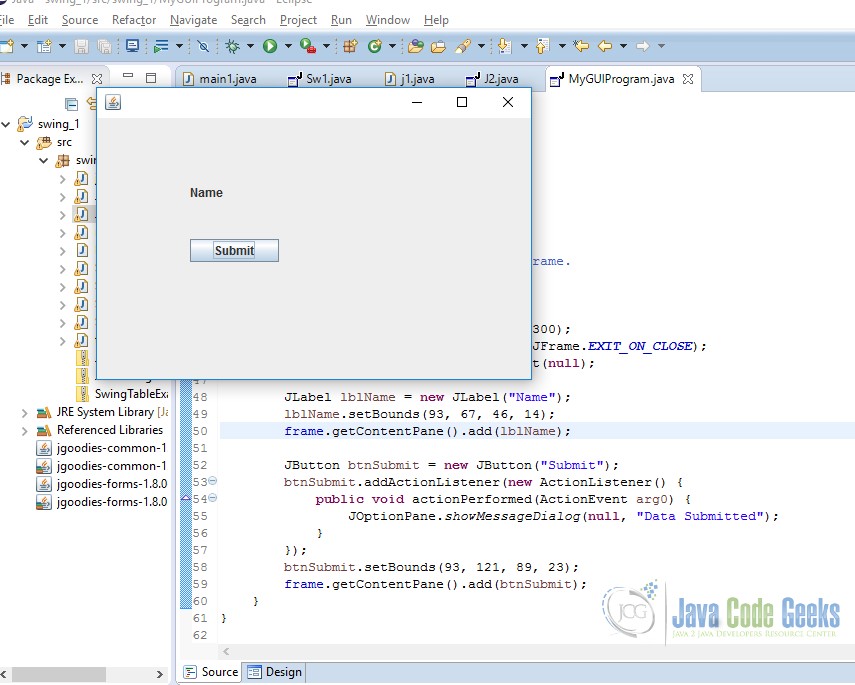
clicking of a button generates an event. code for adding a button is described below :
MyGUIProgram.java
JButton btnSubmit = new JButton("Submit"); btnSubmit.addActionListener(new ActionListener() < public void actionPerformed(ActionEvent arg0) < JOptionPane.showMessageDialog(null, "Data Submitted"); >>); btnSubmit.setBounds(93, 121, 89, 23); frame.getContentPane().add(btnSubmit); AWT GUI Component: java.awt.TextField
A java.awt.TextField is single-line text box for users to enter texts. (There is a multiple-line text box called TextArea.) Hitting the “ENTER” key on a TextField object triggers an action-event.
Constructors
public TextField(String strInitialText, int columns);
// Construct a TextField instance with the given initial text string with the number of columns.
public TextField(String strInitialText);
// Construct a TextField instance with the given initial text string.
public TextField(int columns);
// Construct a TextField instance with the number of columns.
Below is how a TextField will look like :
3. AWT Event-Handling
Java adopts the so-called “Event-Driven” (or “Event-Delegation”) programming model for event-handling, similar to most of the visual programming languages (such as Visual Basic and Delphi).
In event-driven programming, a piece of event-handling codes is executed (or called back by the graphics subsystem) when an event has been fired in response to an user input (such as clicking a mouse button or hitting the ENTER key). This is unlike the procedural model, where codes are executed in a sequential manner.
The AWT’s event-handling classes are kept in package java.awt.event .
Three objects are involved in the event-handling: a source, listener(s) and an event object.
The source object (such as Button and Textfield) interacts with the user. Upon triggered, it creates an event object. This event object will be messaged to all the registered listener object(s), and an appropriate event-handler method of the listener(s) is called-back to provide the response. In other words, triggering a source fires an event to all its listener(s), and invoke an appropriate handler of the listener(s).
- The source object registers its listener(s) for a certain type of event.
Source object fires event event upon triggered. For example, clicking an Button fires an ActionEvent, mouse-click fires MouseEvent, key-type fires KeyEvent, etc.
How the source and listener understand each other? The answer is via an agreed-upon interface. For example, if a source is capable of firing an event called XxxEvent (e.g., MouseEvent) involving various operational modes (e.g., mouse-clicked, mouse-entered, mouse-exited, mouse-pressed, and mouse-released). Firstly, we need to declare an interface called XxxListener (e.g., MouseListener) containing the names of the handler methods. Recall that an interface contains only abstract methods without implementation
Secondly, all the listeners interested in the XxxEvent must implement the XxxListener interface. That is, the listeners must provide their own implementations (i.e., programmed responses) to all the abstract methods declared in the XxxListener interface. In this way, the listenser(s) can response to these events appropriately.
Thirdly, in the source, we need to maintain a list of listener object(s), and define two methods: addXxxListener() and removeXxxListener() to add and remove a listener from this list.
Take note that all the listener(s) interested in the XxxEvent must implement the XxxListener interface. That is, they are sub-type of the XxxListener. Hence, they can be upcasted to XxxListener and passed as the argument of the above methods.
- The source is triggered by a user.
- The source create an XxxEvent object, which encapsulates the necessary information about the activation. For example, the (x, y) position of the mouse pointer, the text entered, etc.
- Finally, for each of the listeners in the listener list, the source invokes the appropriate handler on the listener(s), which provides the programmed response.
4. Download
This was an example of How to create a GUI in JAVA.