- Калькулятор с графическим интерфейсом с помощью tkinter
- Python Calculator – Create A Simple GUI Calculator Using Tkinter
- Python Calculator Tutorial – Getting Started With Tkinter
- What is Tkinter
- Prerequisite For Python Calculator
- Look Of A Simple GUI Python Calculator
- Creating Window For Calculator
- Adding Display Widget
- Adding Clear Button Widget
- Adding Numbers And Symbols Widget
- Adding Equal Button
- Complete Code For Python Calculator
- Recommended Articles
Калькулятор с графическим интерфейсом с помощью tkinter
Сначало всё по стандарту. Импортируем библиотеки. Использовать мы будем сам tkinter и библиотеку математических функций math.
from tkinter import * from tkinter import messagebox import mathДалее задаем функции кнопок.(Я пару шагов пропустил, точнее написал после, но калькулятор от этого не сломается.):
def add_digit(digit): value = calc.get() if value[0]=='0' and len(value)==1: value = value[1:] calc.delete(0, END) calc.insert(0, value + digit) def add_operation(operation): value = calc.get() if value[-1] in '-+/*': value = value[:-1] elif '+' in value or '-' in value or'*' in value or'/' in value: calculate() value = calc.get() calc.delete(0, END) calc.insert(0, value + operation) def calculate(): value = calc.get() if value[-1] in '-+/*': value = value+value[:-1] calc.delete(0, END) try: calc.insert(0, eval(value)) except (NameError, SyntaxError): messagebox.showerror('Внимание!', 'Нужно вводить только числа и цифры!') calc.insert(0, 0) except ZeroDivisionError: messagebox.showerror('Внимание!', 'На ноль делить нельзя!') calc.insert(0, 0) def add_sqrt(): value = calc.get() value = float(value) value = math.sqrt(value) calc.delete(0, END) calc.insert(0, value) def add_fabs(): value = calc.get() value = eval(value) value = math.fabs(value) calc.delete(0, END) calc.insert(0, value) def clear(): calc.delete(0, END) calc.insert(0, 0) def make_calc_button(operation): return Button(text=operation, bd=5, font=('Times New Roman', 13), command=calculate) def make_clear_button(operation): return Button(text=operation, bd=5, font=('Times New Roman', 13), command=clear) def make_operation_button(operation): return Button(text=operation, bd=5, font=('Times New Roman', 13), command=lambda : add_operation(operation)) def make_sqrt_button(operation): return Button(text=operation, image=img, bd=5, font=('Times New Roman', 13), command=add_sqrt) def make_fabs_button(operation): return Button(text=operation, bd=5, font=('Times New Roman', 13), command=add_fabs) def make_digit_button(digit): return Button(text=digit, bd=5, font=('Times New Roman', 13), command=lambda : add_digit(digit))Теперь создаём окно, в котором будет наш пример и ответ.
tk=Tk() tk.geometry('260x360+100+200') tk.resizable(0,0) tk.title("Калькулятор") tk['bg']='#FFC0CB' #Цвет фона - чёрный. Его можно поменять на любой другой.Если посмотреть на оригинальный калькулятор Виндовс мы увидим, что текст располагается с правой стороны, сделаем также. Для этого в ткинтер используется функция justify :
calc = Entry(tk, justify=RIGHT, font=('Times New Roman', 15), width=15) calc.insert(0, '0') calc.place(x=15, y=20, width=220, height=30)Следующий шаг прост. Располагаем кнопки.
make_digit_button('1').place(x=20, y=250, width=40, height=40) make_digit_button('2').place(x=80, y=250, width=40, height=40) make_digit_button('3').place(x=140, y=250, width=40, height=40) make_digit_button('4').place(x=20, y=190, width=40, height=40) make_digit_button('5').place(x=80, y=190, width=40, height=40) make_digit_button('6').place(x=140, y=190, width=40, height=40) make_digit_button('7').place(x=20, y=130, width=40, height=40) make_digit_button('8').place(x=80, y=130, width=40, height=40) make_digit_button('9').place(x=140, y=130, width=40, height=40) make_digit_button('0').place(x=20, y=310, width=100, height=40) make_digit_button('.').place(x=140, y=310, width=40, height=40) make_operation_button('+').place(x=200, y=310, width=40, height=40) make_operation_button('-').place(x=200, y=250, width=40, height=40) make_operation_button('*').place(x=200, y=190, width=40, height=40) make_operation_button('/').place(x=200, y=130, width=40, height=40)В моей задаче было использование картинки в качестве корня, поэтому используем PhotoImage для импортировки фотографии(фотография должна быть в одной папке с кодом)
img=PhotoImage(file='radical.png') make_sqrt_button('').place(x=80, y=70, width=40, height=40)Последние шаги по мелочам. В качестве дополнительной функции добавим модуль. Кнопку очистки всего и равно добавляем обязательно!
#Модуль числа make_fabs_button('|x|').place(x=140, y=70, width=40, height=40) #Очистка make_clear_button('C').place(x=20, y=70, width=40, height=40) #Равно make_calc_button('=').place(x=200, y=70, width=40, height=40) tk.mainloop()Полный код выглядит как-то так:
#Бібліотека модулів from tkinter import * from tkinter import messagebox import math def add_digit(digit): value = calc.get() if value[0]=='0' and len(value)==1: value = value[1:] calc.delete(0, END) calc.insert(0, value + digit) def add_operation(operation): value = calc.get() if value[-1] in '-+/*': value = value[:-1] elif '+' in value or '-' in value or'*' in value or'/' in value: calculate() value = calc.get() calc.delete(0, END) calc.insert(0, value + operation) def calculate(): value = calc.get() if value[-1] in '-+/*': value = value+value[:-1] calc.delete(0, END) try: calc.insert(0, eval(value)) except (NameError, SyntaxError): messagebox.showinfo('Внимание!', 'Нужно вводить только числа!') calc.insert(0, 0) except ZeroDivisionError: messagebox.showinfo('Внимание!', 'На ноль делить нельзя!') calc.insert(0, 0) def add_sqrt(): value = calc.get() value = float(value) value = math.sqrt(value) calc.delete(0, END) calc.insert(0, value) def add_fabs(): value = calc.get() value = eval(value) value = math.fabs(value) calc.delete(0, END) calc.insert(0, value) def clear(): calc.delete(0, END) calc.insert(0, 0) def make_calc_button(operation): return Button(text=operation, bd=5, font=('Times New Roman', 13), command=calculate) def make_clear_button(operation): return Button(text=operation, bd=5, font=('Times New Roman', 13), command=clear) def make_operation_button(operation): return Button(text=operation, bd=5, font=('Times New Roman', 13), command=lambda : add_operation(operation)) def make_sqrt_button(operation): return Button(text=operation, image=img, bd=5, font=('Times New Roman', 13), command=add_sqrt) def make_fabs_button(operation): return Button(text=operation, bd=5, font=('Times New Roman', 13), command=add_fabs) def make_digit_button(digit): return Button(text=digit, bd=5, font=('Times New Roman', 13), command=lambda : add_digit(digit)) tk=Tk() tk.geometry('260x360+100+200') tk.resizable(0,0) tk.title("Калькулятор") tk['bg']='#FFC0CB' calc = Entry(tk, justify=RIGHT, font=('Times New Roman', 15), width=15) calc.insert(0, '0') calc.place(x=15, y=20, width=220, height=30) #Числа от 1 до 9 и точка make_digit_button('1').place(x=20, y=250, width=40, height=40) make_digit_button('2').place(x=80, y=250, width=40, height=40) make_digit_button('3').place(x=140, y=250, width=40, height=40) make_digit_button('4').place(x=20, y=190, width=40, height=40) make_digit_button('5').place(x=80, y=190, width=40, height=40) make_digit_button('6').place(x=140, y=190, width=40, height=40) make_digit_button('7').place(x=20, y=130, width=40, height=40) make_digit_button('8').place(x=80, y=130, width=40, height=40) make_digit_button('9').place(x=140, y=130, width=40, height=40) make_digit_button('0').place(x=20, y=310, width=100, height=40) make_digit_button('.').place(x=140, y=310, width=40, height=40) #Основные математические действия make_operation_button('+').place(x=200, y=310, width=40, height=40) make_operation_button('-').place(x=200, y=250, width=40, height=40) make_operation_button('*').place(x=200, y=190, width=40, height=40) make_operation_button('/').place(x=200, y=130, width=40, height=40) #Корень img=PhotoImage(file='radical.png') make_sqrt_button('').place(x=80, y=70, width=40, height=40) #Модуль make_fabs_button('|x|').place(x=140, y=70, width=40, height=40) #Кнопка очистки make_clear_button('C').place(x=20, y=70, width=40, height=40) #Равно make_calc_button('=').place(x=200, y=70, width=40, height=40) tk.mainloop()Python Calculator – Create A Simple GUI Calculator Using Tkinter

Hey python developers, in Python Calculator tutorial you will learn to create a simple GUI calculator. In this post i will show you how to develop a simple calculator using tkinter module in python. So let’s move further to create a simple python calculator.
Python offers a lot of options to develop GUI applications, but Tkinter is the most usable module for developing GUI(Graphical User Interface). Since Tkinter is cross-platform so it works on both windows and Linux. So here i am using Tkinter module to create a simple python calculator.
Python Calculator Tutorial – Getting Started With Tkinter
The fastest and easiest way of developing GUI applications in python is working with Tkinter. So let’s took a quick look on Tkinter.
What is Tkinter
- The Tkinter module (“Tk interface”) is the standard Python interface to the Tk GUI toolkit.
- Both Tk and Tkinter are available on most Unix platforms, as well as on Windows systems.
- If you work on Linux/Ubuntu then you have to install Tkinter module on your machine for running programs, but on windows you don’t need to install it because it comes with the default python installation.
Prerequisite For Python Calculator
For developing a simple GUI calculator in python you must have to prior knowledge of following –
Look Of A Simple GUI Python Calculator
Look at this calculator. Yup this is looking very cool. So now we have to create this calculator in python.

On this calculator we can perform following simple mathematical calculations –
And now we will start writing codes for making this. To create this we have to do four things –
- Importing Tkinter module
- Creating the main interface(window for calculator)
- Adding any number of widgets to the main interface
- Applying the event trigger on widgets
Creating Window For Calculator
First of all we will create a window of calculator. So write the following code.
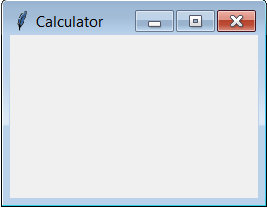
We have created this frame successfully, now lets move on ahead.
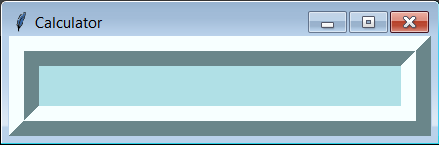
Adding Display Widget
For creating display widget write the following code inside the class app.
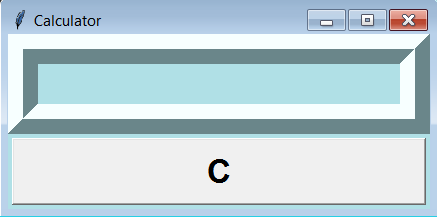
Adding Clear Button Widget
Now we will create a clear button. Whenever this button will be pressed all the stuffs from display will be erased. So write the following code for this.
And now you can see the output.
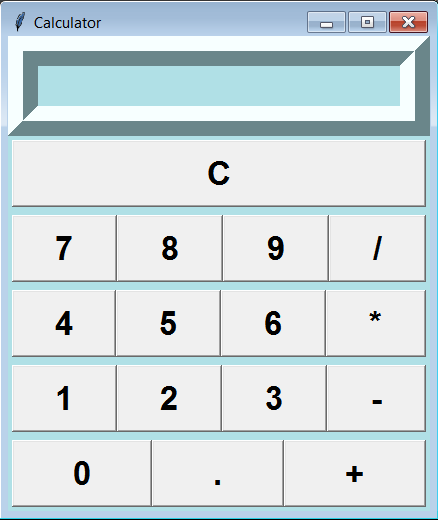
Adding Numbers And Symbols Widget
To add numbers and symbols inside the frame, you have to write the following code.
And now you can see the output. It’s looking cool.
Adding Equal Button
For implementing Equal button write the following code.
Complete Code For Python Calculator
So now i am collecting and keeping all the above codes in one place. So our entire code for making a simple calculator in python is below.
So now its time to see the calculator and you can perform any operation on it. So let’s start your calculation.
Congratulations, We have created python calculator successfully, that’s pretty cool, and i hope you have really enjoyed while making this. So surely comment your feelings about this.
Recommended Articles
So Guys this was all about the Python Calculator Tutorial. I hope, you liked it and if it is helpful for you then please share it with others and help them in learning python. And if you have any question regarding this post then leave your queries in comment section. In upcoming posts i will come with some interesting python applications, and if you want to learn making any particular application then suggest me your idea, i will try to fulfill your need. Thanks All of you.