- grid-auto-flow
- Try it
- Syntax
- Values
- Formal definition
- Formal syntax
- Examples
- Setting grid auto-placement
- HTML
- CSS
- Result
- Specifications
- Browser compatibility
- See also
- Found a content problem with this page?
- MDN
- Support
- Our communities
- Developers
- Направление и порядок элементов
- Свойство order
- Css grid direction column
- Свойство grid-auto-flow
- Свойство order
grid-auto-flow
Baseline is determined by this web feature being supported on the current and the previous major versions of major browsers.
The grid-auto-flow CSS property controls how the auto-placement algorithm works, specifying exactly how auto-placed items get flowed into the grid.
Try it
Syntax
/* Keyword values */ grid-auto-flow: row; grid-auto-flow: column; grid-auto-flow: dense; grid-auto-flow: row dense; grid-auto-flow: column dense; /* Global values */ grid-auto-flow: inherit; grid-auto-flow: initial; grid-auto-flow: revert; grid-auto-flow: revert-layer; grid-auto-flow: unset;
This property may take one of two forms:
- a single keyword: one of row , column , or dense .
- two keywords: row dense or column dense .
Values
Items are placed by filling each row in turn, adding new rows as necessary. If neither row nor column is provided, row is assumed.
Items are placed by filling each column in turn, adding new columns as necessary.
«dense» packing algorithm attempts to fill in holes earlier in the grid, if smaller items come up later. This may cause items to appear out-of-order, when doing so would fill in holes left by larger items.
If it is omitted, a «sparse» algorithm is used, where the placement algorithm only ever moves «forward» in the grid when placing items, never backtracking to fill holes. This ensures that all of the auto-placed items appear «in order», even if this leaves holes that could have been filled by later items.
Formal definition
Formal syntax
Examples
Setting grid auto-placement
HTML
div id="grid"> div id="item1">div> div id="item2">div> div id="item3">div> div id="item4">div> div id="item5">div> div> select id="direction"> option value="column">columnoption> option value="row">rowoption> select> input id="dense" type="checkbox" /> label for="dense">denselabel>
CSS
#grid height: 200px; width: 200px; display: grid; gap: 10px; grid-template: repeat(4, 1fr) / repeat(2, 1fr); grid-auto-flow: column; /* or 'row', 'row dense', 'column dense' */ > #item1 background-color: lime; grid-row-start: 3; > #item2 background-color: yellow; > #item3 background-color: blue; > #item4 grid-column-start: 2; background-color: red; > #item5 background-color: aqua; > function changeGridAutoFlow() const grid = document.getElementById("grid"); const direction = document.getElementById("direction"); const dense = document.getElementById("dense"); let gridAutoFlow = direction.value === "row" ? "row" : "column"; if (dense.checked) gridAutoFlow += " dense"; > grid.style.gridAutoFlow = gridAutoFlow; > const selectElem = document.querySelector("select"); const inputElem = document.querySelector("input"); selectElem.addEventListener("change", changeGridAutoFlow); inputElem.addEventListener("change", changeGridAutoFlow);
Result
Specifications
Browser compatibility
BCD tables only load in the browser
See also
Found a content problem with this page?
This page was last modified on Jul 18, 2023 by MDN contributors.
Your blueprint for a better internet.
MDN
Support
Our communities
Developers
Visit Mozilla Corporation’s not-for-profit parent, the Mozilla Foundation.
Portions of this content are ©1998– 2023 by individual mozilla.org contributors. Content available under a Creative Commons license.
Направление и порядок элементов
По умолчанию все элементы располагаются по порядку горизонтально, если места в строке больше нет, то элементы переносятся на следующую строку. Но с помощью свойства grid-auto-flow можно изменить направление элементов. Это свойство принимает два значения:
- row : значение по умолчанию, элементы располагаются в строку друг за другом, если места в строке не хватает, элементы переносятся на следующую строку
- column : элементы располагаются в столбик, если места в столбце не хватает, то элементы переходят в следующий столбец
1 2 3 4 5 6 7 8 9 10 11 12 13 14 15 16 17 18 19 20 21 22 23 24 25 26 27 28 29 30 31 32 33 34 35 36 37 38 39 40 41 42 43 44 45 46 47 48 49 50 51 52 53 54 55 56 57
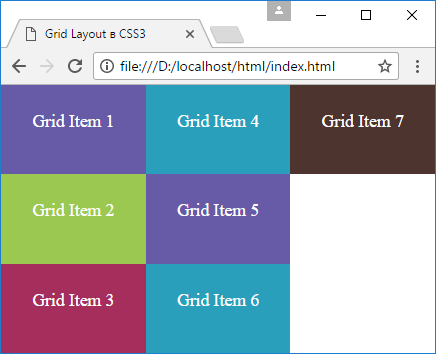
html> head> meta charset="utf-8" /> meta name="viewport" content="width=device-width" /> title>Grid Layout в CSS3title> style> * box-sizing: border-box; > html, body margin: 0; padding: 0; > .grid-container height: 100vh; display: grid; grid-template-columns: repeat(3, 1fr); grid-template-rows: repeat(3, 1fr); grid-auto-flow: row; > .grid-item text-align: center; font-size: 1.1em; padding: 1.5em; color: white; > .color1 background-color: #675ba7; > .color2 background-color: #9bc850; > .color3 background-color: #a62e5c; > .color4 background-color: #2a9fbc; > .color5 background-color: #4e342e; > style> head> body> div class="grid-container"> div class="grid-item color1">Grid Item 1div> div class="grid-item color2">Grid Item 2div> div class="grid-item color3">Grid Item 3div> div class="grid-item color4">Grid Item 4div> div class="grid-item color1">Grid Item 5div> div class="grid-item color4">Grid Item 6div> div class="grid-item color5">Grid Item 7div> div> body> html> Свойство grid-auto-flow имеет значение row , поэтому элементы будут располагаться в строку.

Теперь изменим стиль grid-контейнера:
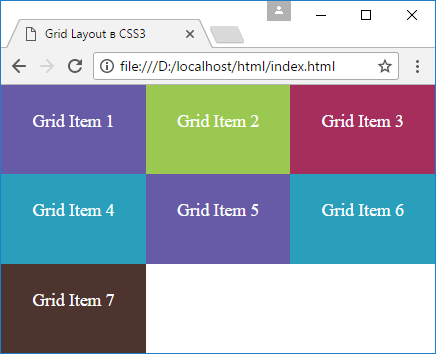
.grid-container height: 100vh; display: grid; grid-template-columns: repeat(3, 1fr); grid-template-rows: repeat(3, 1fr); grid-auto-flow: column; > После этого элементы будут располагаться в столбец
Свойство order
Свойство order позволяет задать порядок элементов. По умолчанию для каждого элемента в гриде это свойство имеет значение 0 . Поэтому элементы располагаются друг за другом как они определены в разметке html. Но мы можем переопределить этот порядок:
1 2 3 4 5 6 7 8 9 10 11 12 13 14 15 16 17 18 19 20 21 22 23 24 25 26 27 28 29 30 31 32 33 34 35 36 37 38 39 40 41 42 43 44 45 46 47 48 49 50 51 52 53 54 55 56 57 58 59 60 61 62 63 64 65 66 67 68
html> head> meta charset="utf-8" /> meta name="viewport" content="width=device-width" /> title>Grid Layout в CSS3title> style> * box-sizing: border-box; > html, body margin: 0; padding: 0; > .grid-container height: 100vh; display: grid; grid-template-columns: repeat(3, 1fr); grid-template-rows: repeat(3, 1fr); > .grid-item text-align: center; font-size: 1.1em; padding: 1.5em; color: white; > .last-item order: 1; > .first-item order: -1; > .color1 background-color: #675ba7; > .color2 background-color: #9bc850; > .color3 background-color: #a62e5c; > .color4 background-color: #2a9fbc; > .color5 background-color: #4e342e; > style> head> body> div class="grid-container"> div class="grid-item color1">Grid Item 1div> div class="grid-item color2 last-item"> Grid Item 2 div> div class="grid-item color3 last-item"> Grid Item 3 div> div class="grid-item color4">Grid Item 4div> div class="grid-item color1">Grid Item 5div> div class="grid-item color4">Grid Item 6div> div class="grid-item color5 first-item"> Grid Item 7 div> div> body> html> 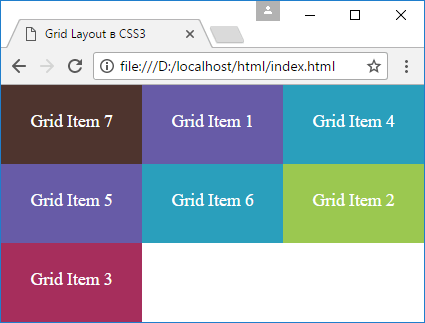
Элементы с классом last-item имеет порядок 1 , поэтому они будут располагаться после других элементов, у которых порядок равен 0 или меньше.
Если же необходимо поставить одни элементы перед другими, то можно использовать отрицательное значение для свойства order . Так, у седьмого элемента порядок равен -1 , что меньше, чем у других элементов. Поэтому последний в разметке элемент по факту будет располагаться перед всеми элементами.
Css grid direction column

Свойство grid-auto-flow
По умолчанию все элементы располагаются по порядку горизонтально, если места в строке больше нет, то элементы переносятся на следующую строку. Но с помощью свойства grid-auto-flow можно изменить направление элементов. Это свойство принимает два значения:
- row : значение по умолчанию, элементы располагаются в строку друг за другом, если места в строке не хватает, элементы переносятся на следующую строку
- column : элементы располагаются в столбик, если места в столбце не хватает, то элементы переходят в следующий столбец
* < box-sizing: border-box; >html, body < margin:0; padding:0; >.grid-container < height: 100vh; display: grid; grid-template-columns: repeat(3, 1fr); grid-template-rows: repeat(3, 1fr); grid-auto-flow: row; >.grid-item < text-align:center; font-size: 1.1em; padding: 1.5em; color: white; >.color1 .color2 .color3 .color4 .color5Grid Item 1Grid Item 2Grid Item 3Grid Item 4Grid Item 5Grid Item 6Grid Item 7
Свойство grid-auto-flow имеет значение row , поэтому элементы будут располагаться в строку.
Теперь изменим стиль grid-контейнера:
После этого элементы будут располагаться в столбец

Свойство order
Свойство order позволяет задать порядок элементов. По умолчанию для каждого элемента в гриде это свойство имеет значение 0. Поэтому элементы располагаются друг за другом как они определены в разметке html. Но мы можем переопределить этот порядок:
* < box-sizing: border-box; >html, body < margin:0; padding:0; >.grid-container < height: 100vh; display: grid; grid-template-columns: repeat(3, 1fr); grid-template-rows: repeat(3, 1fr); >.grid-item < text-align:center; font-size: 1.1em; padding: 1.5em; color: white; >.last-item < order: 1; >.first-item < order: -1; >.color1 .color2 .color3 .color4 .color5Grid Item 1Grid Item 2Grid Item 3Grid Item 4Grid Item 5Grid Item 6Grid Item 7

Элементы с классом last-item имеет порядок 1, поэтому они будут располагаться после других элементов, у которых порядок равен 0 или меньше.
Если же необходимо поставить одни элементы перед другими, то можно использовать отрицательное значение для свойства order. Так, у седьмого элемента порядок равен -1, что меньше, чем у других элементов. Поэтому последний в разметке элемент по факту будет располагаться перед всеми элементами.