- Kotlin Android – Draw Shape (Rect, Oval) to Canvas – Example
- Steps to Draw Shapes on Canvas in Android
- Example – Draw Rectangle, Oval shapes on Canvas
- Conclusion
- Работаем с графикой. Основы
- Исходный код класса
- Kotlin Android – Draw Shape (Rect, Oval) to Canvas – Example
- Steps to Draw Shapes on Canvas in Android
- Example – Draw Rectangle, Oval shapes on Canvas
- Conclusion
Kotlin Android – Draw Shape (Rect, Oval) to Canvas – Example
Drawing to a Canvas gives you full control of drawing shapes or bitmaps than drawing on to a View object in a layout.
In this tutorial, we shall learn how to draw shapes like rectangle and oval on Android screen.
Steps to Draw Shapes on Canvas in Android
To draw shape onto Canvas, follow these steps.
- Create a ShapeDrawable object with required shape.
- ShapeDrawable(OvalShape()) to draw Oval Shape
- ShapeDrawable(RectShape()) to draw Rectangle Shape
- Set bounds to the ShapeDrawable object. shapeDrawable.setBounds( left, top, right, bottom)
- You may set the color to the Paint Object of ShapeDrawable. shapeDrawable.getPaint().setColor(color)
- Pass the Canvas object to the draw() method of ShapeDrawable. shapeDrawable.draw(canvas)
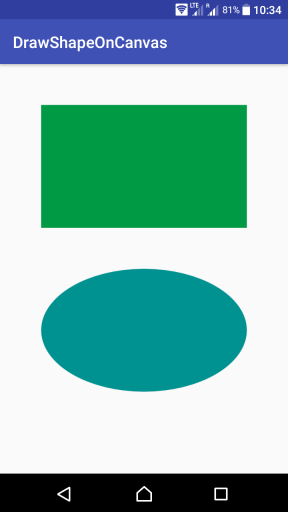
Following is an example Android Screen, where we have drawn rectangle and oval shapes.
Note : If you would like to dynamically draw onto Canvas like in 2D Games, you may create a thread that redraws onto canvas at a frequency set by FPS parameter and create the illusion of object movement. Find an example for the same at Android Game Example.
Example – Draw Rectangle, Oval shapes on Canvas
In this example, we shall initialize a bitmap with some width and height, and assign it to a Canvas. Then we draw a Rectangle and a Oval to the Canvas object. Now the Bitmap object holds the pixels with rectangle and oval drawn. We shall assign the bitmap as a background of ImageView mentioned in the layout xml file.
Complete layout xml file and MainActivity class files are as shown in the following.
activity_main.xml
MainActivity.kt
package com.tutorialkart.drawshapeoncanvas import android.graphics.Canvas import android.graphics.Color import android.graphics.drawable.ShapeDrawable import android.graphics.drawable.shapes.RectShape import android.support.v7.app.AppCompatActivity import android.os.Bundle import kotlinx.android.synthetic.main.activity_main.* import android.graphics.Bitmap import android.graphics.drawable.BitmapDrawable import android.graphics.drawable.shapes.OvalShape class MainActivity : AppCompatActivity() < override fun onCreate(savedInstanceState: Bundle?) < super.onCreate(savedInstanceState) setContentView(R.layout.activity_main) val bitmap: Bitmap = Bitmap.createBitmap(700, 1000, Bitmap.Config.ARGB_8888) val canvas: Canvas = Canvas(bitmap) var shapeDrawable: ShapeDrawable // rectangle positions var left = 100 var top = 100 var right = 600 var bottom = 400 // draw rectangle shape to canvas shapeDrawable = ShapeDrawable(RectShape()) shapeDrawable.setBounds( left, top, right, bottom) shapeDrawable.getPaint().setColor(Color.parseColor("#009944")) shapeDrawable.draw(canvas) // oval positions left = 100 top = 500 right = 600 bottom = 800 // draw oval shape to canvas shapeDrawable = ShapeDrawable(OvalShape()) shapeDrawable.setBounds( left, top, right, bottom) shapeDrawable.getPaint().setColor(Color.parseColor("#009191")) shapeDrawable.draw(canvas) // now bitmap holds the updated pixels // set bitmap as background to ImageView imageV.background = BitmapDrawable(getResources(), bitmap) >> 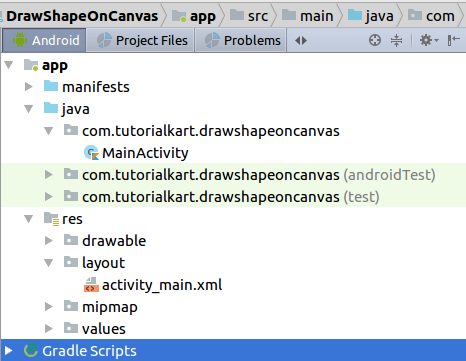
Conclusion
In this Kotlin Android Tutorial – Draw Shapes to Canvas, we have learnt to draw Rectangle and Oval shapes onto canvas using ShapeDrawable Class.
Работаем с графикой. Основы
Цель нашего урока — понять основы графики. Мы напишем простую рисовалку — хотя это слишком громко сказано. Пока мы сами рисовать ничего не будем — за нас это будет делать глупая машина, т.е. Android. Но тем не менее некоторые полезные вещи мы узнаем, а значит повысим свой профессиональный уровень. Продолжить своё обучение можно в разделе Котошоп.
Создадим новый проект SimplePaint. Создадим новый класс Draw2D, который будет наследоваться от View. Именно в этом классе мы и будем проводить графические опыты. Щёлкаем правой кнопкой мыши на имени пакета и выбираем в меню New | Kotlin Class/File или New | Java Class. В открывшемся диалоговом окне устанавливаем имя для класса Draw2D.
// Kotlin package ru.alexanderklimov.simplepaint import android.content.Context import android.graphics.Canvas import android.view.View class Draw2D(context: Context?) : View(context) < override fun onDraw(canvas: Canvas?) < super.onDraw(canvas) >>
// Java package ru.alexanderklimov.simplepaint; public class Draw2D extends View < public Draw2D(Context context) < super(context); >@Override protected void onDraw(Canvas canvas) < super.onDraw(canvas); >> В данном коде мы наследуемся от класса android.view.View и переопределяем метод класса onDraw().
Далее необходимо загрузить созданный класс при старте программы. Открываем основной файл активности MainActivity и заменяем строчку после super.onCreate(savedInstanceState):
// Kotlin setContentView(R.layout.activity_main) val draw2D = Draw2D(this) setContentView(draw2D)
// Java // эта строчка нам не нужна setContentView(R.layout.activity_main); Draw2D draw2D = new Draw2D(this); setContentView(draw2D); В нашем случае мы говорим системе, что не нужно загружать разметку в экран активности. Вместо неё мы загрузим свой класс, у которого есть свой холст для рисования.
Подготовительные работы закончены. Перейдём к графике. Весь дальнейший код мы будем писать в классе Draw2D. Совсем коротко о теории рисования. Для графики используется холст Canvas — некая графическая поверхность для рисования. Прежде чем что-то рисовать, нужно определить некоторые параметры — цвет, толщина, фигура. Представьте себе, что вы рисуете на бумаге и в вашем распоряжении есть цветные карандаши, фломастеры, кисть, циркуль, ластик и т.п. Например, вы берёте толстый красный фломастер и рисуете жирную линию, затем берёте циркуль с жёлтым карандашом и рисуете окружность. Улавливаете аналогию? Теория закончена.
Вся работа с графикой происходит в методе onDraw() класса Draw2D. Создадим виртуальную кисть в классе. В методе укажем, что будем закрашивать всю поверхность белым цветом:
// Kotlin private val paint: Paint = Paint() override fun onDraw(canvas: Canvas?) < super.onDraw(canvas) paint.apply < style = Paint.Style.FILL // стиль Заливка color = Color.WHITE // закрашиваем холст белым цветом >canvas?.drawPaint(paint) >
// Java private Paint mPaint = new Paint(); @Override protected void onDraw(Canvas canvas) < super.onDraw(canvas); // стиль Заливка mPaint.setStyle(Paint.Style.FILL); // закрашиваем холст белым цветом mPaint.setColor(Color.WHITE); canvas.drawPaint(mPaint); > Итак, холст готов. Далее начинается собственно рисование. Следуя описанному выше принципу мы задаём перед каждым рисованием свои настройки и вызываем нужный метод. Например, для того, чтобы нарисовать жёлтый, круг мы включаем режим сглаживания, устанавливаем жёлтый цвет и вызываем метод drawCircle() с нужными координатами и заливаем окружность выбранным цветом. Получилось симпатичное солнышко.
// Kotlin paint.apply < isAntiAlias = true color = Color.YELLOW >canvas?.drawCircle(950F, 30F, 25F, paint)
// Java // Рисуем жёлтый круг mPaint.setAntiAlias(true); mPaint.setColor(Color.YELLOW); canvas.drawCircle(950, 30, 25, mPaint); Всегда соблюдайте очерёдность рисования. Если вы поместите данный код до заливки холста белым цветом, то ничего не увидите. У вас получится, что вы сначала нарисовали на стене солнце, а потом заклеили рисунок обоями.
Для рисования зелёного прямоугольника мы также задаём координаты и цвет. У нас получится красивая лужайка.
// Kotlin paint.color = Color.GREEN canvas?.drawRect(20F, 650F, 950F, 680F, paint)
// Java mPaint.setColor(Color.GREEN); canvas.drawRect(20, 650, 950, 680, mPaint); Далее выведем текст поверх лужайки, чтобы все видели, что она предназначена только для котов. Устанавливаем синий цвет, стиль заливки, режим сглаживания и размер прямоугольника, в который будет вписан наш текст.
// Kotlin paint.apply < color = Color.BLUE style = Paint.Style.FILL isAntiAlias = true textSize = 32F >canvas?.drawText("Лужайка только для котов", 30F, 648F, paint)
// Рисуем текст mPaint.setColor(Color.BLUE); mPaint.setStyle(Paint.Style.FILL); mPaint.setAntiAlias(true); mPaint.setTextSize(32); canvas.drawText("Лужайка только для котов", 30, 648, mPaint); При желании можно вывести текст под углом. Пусть это будет лучик солнца.
// Kotlin private val rect: Rect = Rect() val x = 810F val y = 190F paint.apply < color = Color.GRAY style = Paint.Style.FILL textSize = 27F >val str2rotate = "Лучик солнца!" canvas?.save() canvas?.rotate(-45F, x + rect.exactCenterX(), y + rect.exactCenterY()) canvas?.drawText(str2rotate, x, y, paint) canvas?.restore()
// Java // до метода onDraw() private Rect mRect = new Rect(); // Текст под углом int x = 810; int y = 190; mPaint.setColor(Color.GRAY); mPaint.setTextSize(27); String str2rotate = "Лучик солнца!"; canvas.save(); // Создаём ограничивающий прямоугольник для наклонного текста // поворачиваем холст по центру текста canvas.rotate(-45, x + mRect.exactCenterX(), y + mRect.exactCenterY()); // Рисуем текст mPaint.setStyle(Paint.Style.FILL); canvas.drawText(str2rotate, x, y, mPaint); // восстанавливаем холст canvas.restore(); И завершим нашу композицию выводом рисунка из ресурсов.
// Выводим изображение canvas.drawBitmap(mBitmap, 450, 530, mPaint); В данном примере я вручную подбирал размеры и координаты фигур для экрана свого телефона. В реальных приложениях необходимо сначала вычислить размеры экрана у пользователя, а потом уже выводить фигуры в соответствии с полученными результатами. Иначе получится так, что некоторые элементы композиции просто не попадут на экран при вращении устройства. Допустим, в альбомном режиме вы установите у точки X значение 800, но в портретном режиме ширина экрана будет, скажем, 480, и точка окажется вне поле зрения. Поэтому следует позаботиться о вычислениях размеров экрана и плясать от этой печки. Ниже представлен немного переделанный вариант для общего понимания.
Финальный рисунок выглядит следующим образом в двух ориентациях. Вы можете доработать приложение, уменьшив размеры кота и т.д.


Исходный код класса
// Kotlin package ru.alexanderklimov.simplepaint import android.content.Context import android.content.res.Resources import android.graphics.* import android.view.View import android.graphics.BitmapFactory class Draw2D(context: Context?) : View(context) < private val paint: Paint = Paint() private val rect: Rect = Rect() val res: Resources = this.resources private var bitmap: Bitmap = BitmapFactory.decodeResource(res, R.drawable.cat) override fun onDraw(canvas: Canvas?) < super.onDraw(canvas) paint.apply < style = Paint.Style.FILL // стиль Заливка color = Color.WHITE // закрашиваем холст белым цветом >canvas?.drawPaint(paint) // Солнце paint.apply < isAntiAlias = true color = Color.YELLOW >canvas?.drawCircle(width - 30F, 30F, 25F, paint) // Лужайка paint.color = Color.GREEN canvas?.drawRect(0F, height - 30F, width.toFloat(), height.toFloat(), paint) // Текст над лужайкой paint.apply < color = Color.BLUE style = Paint.Style.FILL isAntiAlias = true textSize = 32F >canvas?.drawText("Лужайка только для котов", 30F, height - 32F, paint) // Лучик солнца val x = width - 170F val y = 190F paint.apply < color = Color.GRAY style = Paint.Style.FILL textSize = 27F >val beam = "Лучик солнца!" canvas?.save() canvas?.rotate(-45F, x + rect.exactCenterX(), y + rect.exactCenterY()) canvas?.drawText(beam, x, y, paint) canvas?.restore() canvas?.drawBitmap( bitmap, (width - bitmap.width).toFloat(), (height - bitmap.height - 10).toFloat(), paint ) > >
//Java // Если этот код работает, его написал Александр Климов, // а если нет, то не знаю, кто его писал. package ru.alexanderklimov.simplepaint; import android.content.Context; import android.content.res.Resources; import android.graphics.Bitmap; import android.graphics.BitmapFactory; import android.graphics.Canvas; import android.graphics.Color; import android.graphics.Paint; import android.graphics.Rect; import android.view.View; public class Draw2D extends View < private Paint mPaint = new Paint(); private Rect mRect = new Rect(); private Bitmap mBitmap; public Draw2D(Context context) < super(context); // Выводим значок из ресурсов Resources res = this.getResources(); mBitmap = BitmapFactory.decodeResource(res, R.drawable.cat_bottom); >@Override protected void onDraw(Canvas canvas) < super.onDraw(canvas); int width = canvas.getWidth(); int height = canvas.getHeight(); // стиль Заливка mPaint.setStyle(Paint.Style.FILL); // закрашиваем холст белым цветом mPaint.setColor(Color.WHITE); canvas.drawPaint(mPaint); // Рисуем жёлтый круг mPaint.setAntiAlias(true); mPaint.setColor(Color.YELLOW); // canvas.drawCircle(950, 30, 25, mPaint); canvas.drawCircle(width - 30, 30, 25, mPaint); // Рисуем зелёный прямоугольник mPaint.setColor(Color.GREEN); // canvas.drawRect(20, 650, 950, 680, mPaint); canvas.drawRect(0, canvas.getHeight() - 30, width, height, mPaint); // Рисуем текст mPaint.setColor(Color.BLUE); mPaint.setStyle(Paint.Style.FILL); mPaint.setAntiAlias(true); mPaint.setTextSize(32); // canvas.drawText("Лужайка только для котов", 30, 648, mPaint); canvas.drawText("Лужайка только для котов", 30, height - 32, mPaint); // Текст под углом // int x = 810; int x = width - 170; int y = 190; mPaint.setColor(Color.GRAY); mPaint.setTextSize(27); String beam = "Лучик солнца!"; canvas.save(); // Создаём ограничивающий прямоугольник для наклонного текста // поворачиваем холст по центру текста canvas.rotate(-45, x + mRect.exactCenterX(), y + mRect.exactCenterY()); // Рисуем текст mPaint.setStyle(Paint.Style.FILL); canvas.drawText(beam, x, y, mPaint); // восстанавливаем холст canvas.restore(); // Выводим изображение // canvas.drawBitmap(mBitmap, 450, 530, mPaint); canvas.drawBitmap(mBitmap, width - mBitmap.getWidth(), height - mBitmap.getHeight() - 10, mPaint); >> Kotlin Android – Draw Shape (Rect, Oval) to Canvas – Example
Drawing to a Canvas gives you full control of drawing shapes or bitmaps than drawing on to a View object in a layout.
In this tutorial, we shall learn how to draw shapes like rectangle and oval on Android screen.
Steps to Draw Shapes on Canvas in Android
To draw shape onto Canvas, follow these steps.
- Create a ShapeDrawable object with required shape.
- ShapeDrawable(OvalShape()) to draw Oval Shape
- ShapeDrawable(RectShape()) to draw Rectangle Shape
- Set bounds to the ShapeDrawable object. shapeDrawable.setBounds( left, top, right, bottom)
- You may set the color to the Paint Object of ShapeDrawable. shapeDrawable.getPaint().setColor(color)
- Pass the Canvas object to the draw() method of ShapeDrawable. shapeDrawable.draw(canvas)
Following is an example Android Screen, where we have drawn rectangle and oval shapes.
Note : If you would like to dynamically draw onto Canvas like in 2D Games, you may create a thread that redraws onto canvas at a frequency set by FPS parameter and create the illusion of object movement. Find an example for the same at Android Game Example.
Example – Draw Rectangle, Oval shapes on Canvas
In this example, we shall initialize a bitmap with some width and height, and assign it to a Canvas. Then we draw a Rectangle and a Oval to the Canvas object. Now the Bitmap object holds the pixels with rectangle and oval drawn. We shall assign the bitmap as a background of ImageView mentioned in the layout xml file.
Complete layout xml file and MainActivity class files are as shown in the following.
activity_main.xml
MainActivity.kt
package com.tutorialkart.drawshapeoncanvas import android.graphics.Canvas import android.graphics.Color import android.graphics.drawable.ShapeDrawable import android.graphics.drawable.shapes.RectShape import android.support.v7.app.AppCompatActivity import android.os.Bundle import kotlinx.android.synthetic.main.activity_main.* import android.graphics.Bitmap import android.graphics.drawable.BitmapDrawable import android.graphics.drawable.shapes.OvalShape class MainActivity : AppCompatActivity() < override fun onCreate(savedInstanceState: Bundle?) < super.onCreate(savedInstanceState) setContentView(R.layout.activity_main) val bitmap: Bitmap = Bitmap.createBitmap(700, 1000, Bitmap.Config.ARGB_8888) val canvas: Canvas = Canvas(bitmap) var shapeDrawable: ShapeDrawable // rectangle positions var left = 100 var top = 100 var right = 600 var bottom = 400 // draw rectangle shape to canvas shapeDrawable = ShapeDrawable(RectShape()) shapeDrawable.setBounds( left, top, right, bottom) shapeDrawable.getPaint().setColor(Color.parseColor("#009944")) shapeDrawable.draw(canvas) // oval positions left = 100 top = 500 right = 600 bottom = 800 // draw oval shape to canvas shapeDrawable = ShapeDrawable(OvalShape()) shapeDrawable.setBounds( left, top, right, bottom) shapeDrawable.getPaint().setColor(Color.parseColor("#009191")) shapeDrawable.draw(canvas) // now bitmap holds the updated pixels // set bitmap as background to ImageView imageV.background = BitmapDrawable(getResources(), bitmap) >> Conclusion
In this Kotlin Android Tutorial – Draw Shapes to Canvas, we have learnt to draw Rectangle and Oval shapes onto canvas using ShapeDrawable Class.