- Saved searches
- Use saved searches to filter your results more quickly
- License
- geopy/geopy
- Name already in use
- Sign In Required
- Launching GitHub Desktop
- Launching GitHub Desktop
- Launching Xcode
- Launching Visual Studio Code
- Latest commit
- Git stats
- Files
- README.rst
- Geocoding in Python Using Google Maps API
- Introduction
- Geocoding addresses and locations in Python
- Step 1: Create a Google Maps API
- Step 2: Choose locations
- Step 3: Create a Google geocoder
- Step 4: Geocoding a location in Python
- Calculate geodesic distance in Python
- Calculate driving distance using Google Distance Matrix API in Python
- Step 1: Create a Google Maps client
- Step 2: Create a dictionary with all the data between two points
- Conclusion
Saved searches
Use saved searches to filter your results more quickly
You signed in with another tab or window. Reload to refresh your session. You signed out in another tab or window. Reload to refresh your session. You switched accounts on another tab or window. Reload to refresh your session.
Geocoding library for Python.
License
geopy/geopy
This commit does not belong to any branch on this repository, and may belong to a fork outside of the repository.
Name already in use
A tag already exists with the provided branch name. Many Git commands accept both tag and branch names, so creating this branch may cause unexpected behavior. Are you sure you want to create this branch?
Sign In Required
Please sign in to use Codespaces.
Launching GitHub Desktop
If nothing happens, download GitHub Desktop and try again.
Launching GitHub Desktop
If nothing happens, download GitHub Desktop and try again.
Launching Xcode
If nothing happens, download Xcode and try again.
Launching Visual Studio Code
Your codespace will open once ready.
There was a problem preparing your codespace, please try again.
Latest commit
Git stats
Files
Failed to load latest commit information.
README.rst
geopy is a Python client for several popular geocoding web services.
geopy makes it easy for Python developers to locate the coordinates of addresses, cities, countries, and landmarks across the globe using third-party geocoders and other data sources.
geopy includes geocoder classes for the OpenStreetMap Nominatim, Google Geocoding API (V3), and many other geocoding services. The full list is available on the Geocoders doc section. Geocoder classes are located in geopy.geocoders.
geopy is tested against CPython (versions 3.7, 3.8, 3.9, 3.10, 3.11) and PyPy3. geopy 1.x line also supported CPython 2.7, 3.4 and PyPy2.
© geopy contributors 2006-2018 (see AUTHORS) under the MIT License.
To geolocate a query to an address and coordinates:
>>> from geopy.geocoders import Nominatim >>> geolocator = Nominatim(user_agent=«specify_your_app_name_here«) >>> location = geolocator.geocode(«175 5th Avenue NYC«) >>> print(location.address) Flatiron Building, 175, 5th Avenue, Flatiron, New York, NYC, New York, . >>> print((location.latitude, location.longitude)) (40.7410861, -73.9896297241625) >>> print(location.raw)
To find the address corresponding to a set of coordinates:
>>> from geopy.geocoders import Nominatim >>> geolocator = Nominatim(user_agent=«specify_your_app_name_here«) >>> location = geolocator.reverse(«52.509669, 13.376294«) >>> print(location.address) Potsdamer Platz, Mitte, Berlin, 10117, Deutschland, European Union >>> print((location.latitude, location.longitude)) (52.5094982, 13.3765983) >>> print(location.raw)
Geopy can calculate geodesic distance between two points using the geodesic distance or the great-circle distance, with a default of the geodesic distance available as the function geopy.distance.distance.
Here’s an example usage of the geodesic distance, taking pair of (lat, lon) tuples:
>>> from geopy.distance import geodesic >>> newport_ri = (41.49008, -71.312796) >>> cleveland_oh = (41.499498, -81.695391) >>> print(geodesic(newport_ri, cleveland_oh).miles) 538.390445368
Using great-circle distance, also taking pair of (lat, lon) tuples:
>>> from geopy.distance import great_circle >>> newport_ri = (41.49008, -71.312796) >>> cleveland_oh = (41.499498, -81.695391) >>> print(great_circle(newport_ri, cleveland_oh).miles) 536.997990696
More documentation and examples can be found at Read the Docs.
Geocoding in Python Using Google Maps API

This article will focus on geocoding in Python which is getting coordinates for an address or any place around the world and calculating distances and routes between two locations.
Table of contents:
Introduction
Today businesses are analyzing their data like never before. The concept of data driven decisions has proven its track and becomes more and more popular across all types of enterprises. The corporate product, that being a service or a physical good, is sold, installed, maintained all around the globe.
The companies have access to a lot of location-based data, such as customer addresses, sales addresses, office locations, store locations, and much more. There are a lot of insights that can be drawn from such information that can be very useful in decision making. So the desire to invest into even preliminary geospatial analysis grows more and more.
This is where the space for data science becomes open. Helping the business analyze it’s metrics tied to some locations, regions, or addresses. And they turn to data scientists for some technical help.
In this article, I will explain the basics of geocoding in Python with geopy and googlemaps libraries using Google Maps API. Then I will demonstrate the basic distance calculation between two points on a map given their coordinates.
In a nutshell, geocoding as a process is having an address or a location as an input, and generate it’s coordinates (latitude and longitude) as an output. Later, this data can be used to create different maps or heatmaps to plot routes or display location based metrics.
Geocoding addresses and locations in Python
To continue following this tutorial we will need three Python libraries: pandas , geopy , and googlemaps .
If you don’t have them installed, please open “Command Prompt” (on Windows) and install them using the following code:
Import the required libraries:
Once the libraries are downloaded, installed, and imported, we can proceed with Python code implementation.
Step 1: Create a Google Maps API
As a first step, you will need to create a Google Maps API and enable its services. It’s not free but you get $200 free monthly credit which in most cases is enough, unless you are trying to geocode a very large dataset.
Once you have created your API, you should store it as a string in Python:
Step 2: Choose locations
Using the code I provide you will be able to find the locations’ coordinates using either their address or location name. Both will produce the same result.
Step 3: Create a Google geocoder
class 'geopy.geocoders.googlev3.GoogleV3'Now we have a geocoder that will use our Google API code in order to connect to Google Maps and provide us the location data we need.
Step 4: Geocoding a location in Python
The preliminary work and setup are completed. The exciting part starts here. Using just the place’s name, we will be able to find its address and coordinates:
20 W 34th St, New York, NY 10001, USA 40.7484405 -73.98566439999999So what exactly did our code produce? First, we created a name string and assigned our place name to it. Then we used the geolocator from Step 3 which creates a location class which we store as location. It has multiple data points in it, but we only take print the ones we are interested in: address, latitude, and longitude.
As a last step, we will need to store our results, and I’ll save it as a pandas data frame:
name address Empire State Building 20 W 34th St, New York, NY 10001, USA lat lon 40.748441 -73.985664Following the same steps, we will now find the coordinates of the second location and merge it all together into one dataframe:
name address lat lon Empire State Building 20 W 34th St, New York, NY 10001, USA 40.748441 -73.985664 Marea Restaurant New York 240 Central Park S, New York, NY 10019, USA 40.767448 -73.981133Calculate geodesic distance in Python
A feature that I find particularly useful in geopy is its ability to calculate distances between coordinates. By default, the geodesic distance is used for distance calculations.
What is geodesic distance and how it’s calculated? Geodesic distance is the shortest distance between two coordinates, assuming the ellipsoidal shape of the Earth.
Below I plot the locations on a map:
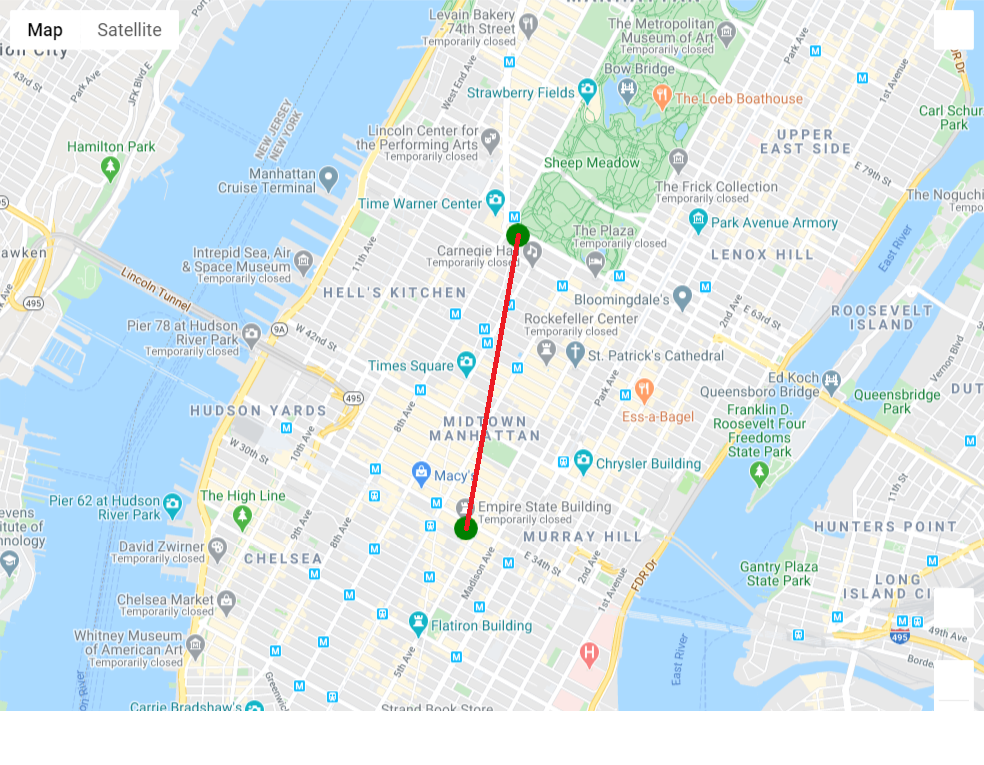
As you notice, the two green point are our locations. The geodesic distance in this case is the length of a straight line connecting two green points.
Use the following code to calculate the geodesic distance between the two locations:
The geodesic distance between two locations is approximately 2.15 km. But do we see anything wrong with it? Well if you look at the map, and your goal was to find the distance, in this particular case you are probably interested in road distance. You won’t be able to achieve your destination from point A to point B with just walking according to a straight line due to the landscape and building positions in Manhattan, New York.
What’s the solution? In the next section, we will explore how to calculate actual road distance (in our case walking distance) from Empire State Building to Marea restaurant.
Calculate driving distance using Google Distance Matrix API in Python
In this section we will use the googlemaps libary and Google’s Distance Matrix API in order to calculate the “road” distance from Empire State Building to Marea restaurant.
How is it different from the previous section? In this case we are restricted to get from point A to point B by only using the road that are suitable for driving. In case of business performance analytics this often comes in handy to measure average commute time between locations and more instead of just considering a straight line distance.
Step 1: Create a Google Maps client
Since we are using Google’s geolocation services, we will create a Google Maps Client class and then check its type:
class 'googlemaps.client.Client'Step 2: Create a dictionary with all the data between two points
Using the locations’ coordinates from Step 4, we will now create a dictionary with all the information available through Google Distance Matrix API between two coordinates:
, 'duration': , 'status': 'OK'>]>], 'status': 'OK'>Let’s break down what the above chunk of code did. It took coordinates of two locations from one of the previous sections where we performed geocoding in Python: p_1 and p_2 and parsed it through the Google Maps client from Step 1. As a result, the function above produced a dictionary with all the “distance” data for these coordinates.
As you see, the dictionary contains a lot of data points. The one we are interested in is in ‘rows’->’elements’->’values’. Let’s access it:
The distance that we see as an output is 3246 metres which is around 3.25 km. It is definitely larger compared to geodesic distance of 2.15 km. Google Maps APIs allow you to find an excat route that ads up to this distance, but this isn’t in the scope of this article. My approximation of the route it shown below:
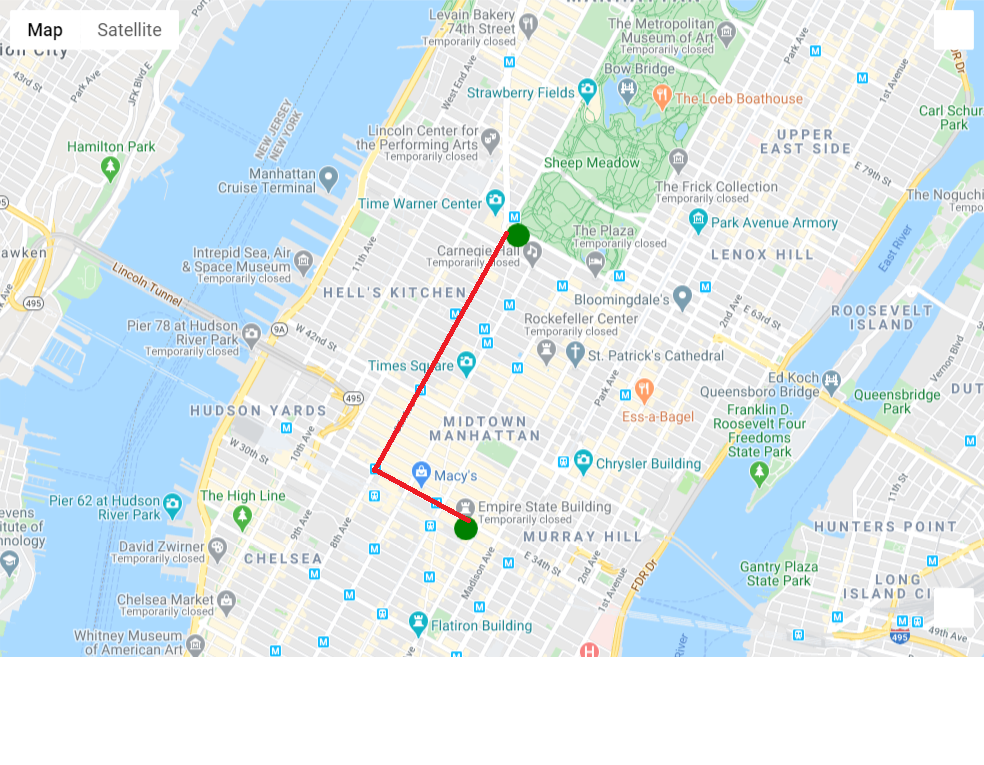
Compared to the geodesic distance that was a straight line between two points, Google distance is following the actual driving route on the roads, and that results in a significantly higher distance between the two points.
Conclusion
In this tutorial we described the tools a data scientist can use to perform geocoding in Python. It should be a good foundation to keep exploring different measures of distances between coordinates and can progress to geospatial data visualization.
Feel free to leave comments below if you have any questions or have suggestions for some edits.