- Getting Child Elements of a Node in JavaScript
- Get the first child element
- Get the last child element
- Get all child elements
- Summary
- Element: children property
- Value
- Examples
- Specifications
- Browser compatibility
- See also
- Found a content problem with this page?
- MDN
- Support
- Our communities
- Developers
- Навигация по DOM-элементам
- Сверху: documentElement и body
- Дети: childNodes, firstChild, lastChild
- DOM-коллекции
- Соседи и родитель
- Навигация только по элементам
Getting Child Elements of a Node in JavaScript
Summary: in this tutorial, you will learn how to get the first child element, last child element, and all children of a specified element.
Suppose that you have the following HTML fragment:
html> html> head> meta charset="utf-8"> title>JS Get Child Elements title> head> body> ul id="menu"> li class="first">Home li> li>Products li> li class="current">Customer Support li> li>Careers li> li>Investors li> li>News li> li class="last">About Us li> ul> body> html>Code language: HTML, XML (xml)Get the first child element
To get the first child element of a specified element, you use the firstChild property of the element:
let firstChild = parentElement.firstChild; Code language: JavaScript (javascript)If the parentElement does not have any child element, the firstChild returns null . The firstChild property returns a child node which can be any node type such as an element node, a text node, or a comment node. The following script shows the first child of the #menu element:
let content = document.getElementById('menu'); let firstChild = content.firstChild.nodeName; console.log(firstChild);Code language: JavaScript (javascript)#textCode language: CSS (css)- and
tags. This whitespace creates a #text node.
Note that any whitespace such as a single space, multiple spaces, returns, and tabs will create a #text node. To remove the #text node, you can remove the whitespaces as follows:
article id="content">h2>Heading h2>p>First paragraph p> article>Code language: HTML, XML (xml)Or to get the first child with the Element node only, you can use the firstElementChild property:
let firstElementChild = parentElement.firstElementChild;Code language: JavaScript (javascript)The following code returns the first list item which is the first child element of the menu:
let content = document.getElementById('menu'); console.log(content.firstElementChild);Code language: JavaScript (javascript)li class="first">Home li>Code language: HTML, XML (xml)- First, select the #menu element by using the getElementById() method.
- Second, get the first child element by using the firstElementChild property.
Get the last child element
To get the last child element of a node, you use the lastChild property:
let lastChild = parentElement.lastChild; Code language: JavaScript (javascript)In case the parentElement does not have any child element, the lastChild returns null . Similar to the the firstChild property, the lastChild property returns the first element node, text node, or comment node. If you want to select only the last child element with the element node type, you use the lastElementChild property:
let lastChild = parentElement.lastElementChild;Code language: JavaScript (javascript)The following code returns the list item which is the last child element of the menu:
let menu = document.getElementById('menu'); console.log(main.lastElementChild); Code language: JavaScript (javascript)li class="last">About Us li>Code language: HTML, XML (xml)Get all child elements
To get a live NodeList of child elements of a specified element, you use the childNodes property:
let children = parentElement.childNodes; Code language: JavaScript (javascript)The childNodes property returns all child elements with any node type. To get the child element with only the element node type, you use the children property:
let children = parentElement.children;Code language: JavaScript (javascript)The following example selects all child elements of the element with the Id main :
let menu = document.getElementById('menu'); let children = menu.children; console.log(children);Code language: JavaScript (javascript)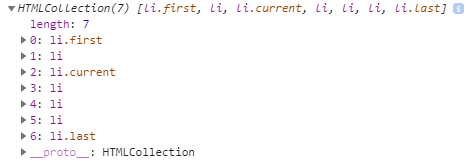
Summary
- The firstChild and lastChild return the first and last child of a node, which can be any node type including text node, comment node, and element node.
- The firstElementChild and lastElementChild return the first and last child Element node.
- The childNodes returns a live NodeList of all child nodes of any node type of a specified node. The children return all child Element nodes of a specified node.
Element: children property
The read-only children property returns a live HTMLCollection which contains all of the child elements of the element upon which it was called.
Element.children includes only element nodes. To get all child nodes, including non-element nodes like text and comment nodes, use Node.childNodes .
Value
An HTMLCollection which is a live, ordered collection of the DOM elements which are children of node . You can access the individual child nodes in the collection by using either the item() method on the collection, or by using JavaScript array-style notation.
If the element has no element children, then children is an empty list with a length of 0 .
Examples
const myElement = document.getElementById("foo"); for (const child of myElement.children) console.log(child.tagName); >
Specifications
Browser compatibility
BCD tables only load in the browser
See also
Found a content problem with this page?
This page was last modified on Apr 7, 2023 by MDN contributors.
Your blueprint for a better internet.
MDN
Support
Our communities
Developers
Visit Mozilla Corporation’s not-for-profit parent, the Mozilla Foundation.
Portions of this content are ©1998– 2023 by individual mozilla.org contributors. Content available under a Creative Commons license.
Навигация по DOM-элементам
DOM позволяет нам делать что угодно с элементами и их содержимым, но для начала нужно получить соответствующий DOM-объект.
Все операции с DOM начинаются с объекта document . Это главная «точка входа» в DOM. Из него мы можем получить доступ к любому узлу.
Так выглядят основные ссылки, по которым можно переходить между узлами DOM:
Поговорим об этом подробнее.
Сверху: documentElement и body
Самые верхние элементы дерева доступны как свойства объекта document :
= document.documentElement Самый верхний узел документа: document.documentElement . В DOM он соответствует тегу . = document.body Другой часто используемый DOM-узел – узел тега : document.body . = document.head Тег доступен как document.head .
Нельзя получить доступ к элементу, которого ещё не существует в момент выполнения скрипта.
В частности, если скрипт находится в , document.body в нём недоступен, потому что браузер его ещё не прочитал.
Поэтому, в примере ниже первый alert выведет null :
В DOM значение null значит «не существует» или «нет такого узла».
Дети: childNodes, firstChild, lastChild
Здесь и далее мы будем использовать два принципиально разных термина:
- Дочерние узлы (или дети) – элементы, которые являются непосредственными детьми узла. Другими словами, элементы, которые лежат непосредственно внутри данного. Например, и являются детьми элемента .
- Потомки – все элементы, которые лежат внутри данного, включая детей, их детей и т.д.
- (и несколько пустых текстовых узлов):
- и вложенные в них:
(ребёнок
- ) и (ребёнок
) – в общем, все элементы поддерева.
Коллекция childNodes содержит список всех детей, включая текстовые узлы.
Пример ниже последовательно выведет детей document.body :
Обратим внимание на маленькую деталь. Если запустить пример выше, то последним будет выведен элемент . На самом деле, в документе есть ещё «какой-то HTML-код», но на момент выполнения скрипта браузер ещё до него не дошёл, поэтому скрипт не видит его.
Свойства firstChild и lastChild обеспечивают быстрый доступ к первому и последнему дочернему элементу.
Они, по сути, являются всего лишь сокращениями. Если у тега есть дочерние узлы, условие ниже всегда верно:
elem.childNodes[0] === elem.firstChild elem.childNodes[elem.childNodes.length - 1] === elem.lastChildДля проверки наличия дочерних узлов существует также специальная функция elem.hasChildNodes() .
DOM-коллекции
Как мы уже видели, childNodes похож на массив. На самом деле это не массив, а коллекция – особый перебираемый объект-псевдомассив.
И есть два важных следствия из этого:
for (let node of document.body.childNodes) < alert(node); // покажет все узлы из коллекции >Это работает, потому что коллекция является перебираемым объектом (есть требуемый для этого метод Symbol.iterator ).
alert(document.body.childNodes.filter); // undefined (у коллекции нет метода filter!)Первый пункт – это хорошо для нас. Второй – бывает неудобен, но можно пережить. Если нам хочется использовать именно методы массива, то мы можем создать настоящий массив из коллекции, используя Array.from :
alert( Array.from(document.body.childNodes).filter ); // сделали массивDOM-коллекции, и даже более – все навигационные свойства, перечисленные в этой главе, доступны только для чтения.
Мы не можем заменить один дочерний узел на другой, просто написав childNodes[i] = . .
Для изменения DOM требуются другие методы. Мы увидим их в следующей главе.
Почти все DOM-коллекции, за небольшим исключением, живые. Другими словами, они отражают текущее состояние DOM.
Если мы сохраним ссылку на elem.childNodes и добавим/удалим узлы в DOM, то они появятся в сохранённой коллекции автоматически.
Коллекции перебираются циклом for..of . Некоторые начинающие разработчики пытаются использовать для этого цикл for..in .
Не делайте так. Цикл for..in перебирает все перечисляемые свойства. А у коллекций есть некоторые «лишние», редко используемые свойства, которые обычно нам не нужны:
Соседи и родитель
Соседи – это узлы, у которых один и тот же родитель.
- говорят, что – «следующий» или «правый» сосед
- также можно сказать, что «предыдущий» или «левый» сосед .
Следующий узел того же родителя (следующий сосед) – в свойстве nextSibling , а предыдущий – в previousSibling .
Родитель доступен через parentNode .
// родителем является alert( document.body.parentNode === document.documentElement ); // выведет true // после идёт alert( document.head.nextSibling ); // HTMLBodyElement // перед находится alert( document.body.previousSibling ); // HTMLHeadElementНавигация только по элементам
Навигационные свойства, описанные выше, относятся ко всем узлам в документе. В частности, в childNodes находятся и текстовые узлы и узлы-элементы и узлы-комментарии, если они есть.
Но для большинства задач текстовые узлы и узлы-комментарии нам не нужны. Мы хотим манипулировать узлами-элементами, которые представляют собой теги и формируют структуру страницы.
Поэтому давайте рассмотрим дополнительный набор ссылок, которые учитывают только узлы-элементы:
Эти ссылки похожи на те, что раньше, только в ряде мест стоит слово Element :
- children – коллекция детей, которые являются элементами.
- firstElementChild , lastElementChild – первый и последний дочерний элемент.
- previousElementSibling , nextElementSibling – соседи-элементы.
- parentElement – родитель-элемент.
Свойство parentElement возвращает родитель-элемент, а parentNode возвращает «любого родителя». Обычно эти свойства одинаковы: они оба получают родителя.
За исключением document.documentElement :
alert( document.documentElement.parentNode ); // выведет document alert( document.documentElement.parentElement ); // выведет nullПричина в том, что родителем корневого узла document.documentElement ( ) является document . Но document – это не узел-элемент, так что parentNode вернёт его, а parentElement нет.
Эта деталь может быть полезна, если мы хотим пройти вверх по цепочке родителей от произвольного элемента elem к , но не до document :
while(elem = elem.parentElement) < // идти наверх до alert( elem ); >Изменим один из примеров выше: заменим childNodes на children . Теперь цикл выводит только элементы: