- Image Generation Tutorial Using Python And The Leaf API
- Coding The Project
- Conclusion
- Обработка и генерация изображений в Python. Библиотека Pillow
- Установка Pillow
- Начало работы с библиотекой
- Обрезка изображений
- Поворот изображений
- Конвертируем из JPG в PNG с помощью Pillow
- Изменение размера изображений
- Пишем текст на изображениях
- Генерация пустого изображения
- Вывод
Image Generation Tutorial Using Python And The Leaf API
We will use opencv to show and save the outputted image and requests to send requests to the Leaf API.
You can use the following command to install the dependencies:
pip install -r requirements.txt All done now we can actually start coding the project. 😆
Coding The Project
Now that’s all that is needed is to actually code the project. Open a file called «main.py» and add the following imports:
import requests import json import time import cv2 import numpy as np import argparse We also need to define some constants the first one being your Leaf API key:
API_KEY = "your_api_key_here" Next we need to defined the headers used with the request:
HEADERS = "accept": "application/json", "content-type": "application/json", "authorization": f"Bearer API_KEY>" > Finally we need to provide some sample images for our model, I have decided to use random pictures of Obama but feel free to provide your own.
IMAGES = [ "https://i.natgeofe.com/k/271050d8-1821-49b8-bf0b-3a4a72b6384a/obama-portrait__3x2.jpg", "https://d3hjzzsa8cr26l.cloudfront.net/516e6836-d278-11ea-a709-979a0378f022.jpg", "https://hips.hearstapps.com/hmg-prod/images/gettyimages-1239961811.jpg" ] Now that we have the imports and constants sorted we can now code the various functions that will be used in this project:
def create_model(title): url = "https://api.tryleap.ai/api/v1/images/models" payload = "title": title, "subjectKeyword": "@me" > response = requests.post(url, json=payload, headers=HEADERS) model_id = json.loads(response.text)["id"] return model_id create_model creates a new image generation model with the provided title.
def upload_image_samples(model_id): url = f"https://api.tryleap.ai/api/v1/images/models/model_id>/samples/url" payload = "images": IMAGES> response = requests.post(url, json=payload, headers=HEADERS) upload_image_samples uploads the sample images to the created model.
def queue_training_job(model_id): url = f"https://api.tryleap.ai/api/v1/images/models/model_id>/queue" response = requests.post(url, headers=HEADERS) data = json.loads(response.text) print(response.text) version_id = data["id"] status = data["status"] print(f"Version ID: version_id>. Status: status>") return version_id, status queue_training_job queues the training job for the model.
def get_model_version(model_id, version_id): url = f"https://api.tryleap.ai/api/v1/images/models/model_id>/versions/version_id>" response = requests.get(url, headers=HEADERS) data = json.loads(response.text) version_id = data["id"] status = data["status"] print(f"Version ID: version_id>. Status: status>") return version_id, status get_model_version retrieves the model’s version and status.
def generate_image(model_id, prompt): url = f"https://api.tryleap.ai/api/v1/images/models/model_id>/inferences" payload = "prompt": prompt, "steps": 50, "width": 512, "height": 512, "numberOfImages": 1, "seed": 4523184 > response = requests.post(url, json=payload, headers=HEADERS) data = json.loads(response.text) inference_id = data["id"] status = data["status"] print(f"Inference ID: inference_id>. Status: status>") return inference_id, status generate_image generates a new image based on the provided prompt which the user provides when running this script. Feel free to play around with the variables.
def get_inference_job(model_id, inference_id): url = f"https://api.tryleap.ai/api/v1/images/models/model_id>/inferences/inference_id>" response = requests.get(url, headers=HEADERS) data = json.loads(response.text) inference_id = data["id"] state = data["state"] image = None if len(data["images"]): image = data["images"][0]["uri"] print(f"Inference ID: inference_id>. State: state>") return inference_id, state, image get_inference_job retrieves the inference job’s state and generated image/s.
def save_and_show_image(image_url, image_name="output.jpg"): arr = np.asarray(bytearray(requests.get(image_url).content), dtype=np.uint8) img = cv2.imdecode(arr, -1) cv2.imwrite(image_name, img) cv2.imshow("Generated Image", img) cv2.waitKey(0) cv2.destroyAllWindows() save_and_show_image saves the generated image and then displays it to the user.
Phew! That’s a lot of functions. 😅
Now we can finish it off by defining a main function:
def main(prompt): model_id = create_model("Sample") upload_image_samples(model_id) version_id, status = queue_training_job(model_id) while status != "finished": time.sleep(10) version_id, status = get_model_version(model_id, version_id) inference_id, status = generate_image( model_id, prompt = prompt ) while status != "finished": time.sleep(10) inference_id, status, image = get_inference_job(model_id, inference_id) save_and_show_image(image) if __name__ == '__main__': ap = argparse.ArgumentParser() ap.add_argument("-p", "--prompt", required = True, help = "Prompt for image generation") args = vars(ap.parse_args()) main(args["prompt"]) The main function parses the command line arguments and then starts the image generating process. The process takes some time to finish so we wait until the status of the image generation is turned to finish.
Finally we can run the script via the following command:
python main -p "A photo of @me with a black hat and sunglasses" Feel free to grab a coffee as this does take some time, but if it goes well you should see something like the following:

Wow! 😯 You will need to upgrade your Leaf account if you want to generate more images.
Conclusion
Here I have shown how to use Python and Leaf API to generate images. I was very impressed with the results and it was a lot of fun trying out this API.
If you know any similar APIs etc. Please let me know in the comments. 😃
Like me work? I post about a variety of topics, if you would like to see more please like and follow me.
Also I love coffee.
![]()
If you are looking to learn Algorithm Patterns to ace the coding interview I recommend the following course
Обработка и генерация изображений в Python. Библиотека Pillow

Нередко нам нужно изменить размер картинки, кропнуть ее, наложить текст и так далее. Все это можно автоматизировать с помощью Python и библиотеки Pillow.
Установка Pillow
Установка производится через pip3. Вводим в консоль:
Начало работы с библиотекой
Для начала нам нужно инициализировать библиотеку в нашем скрипте:
В папку со скриптом поместим произвольное изображение. Файл назовем test.jpg.
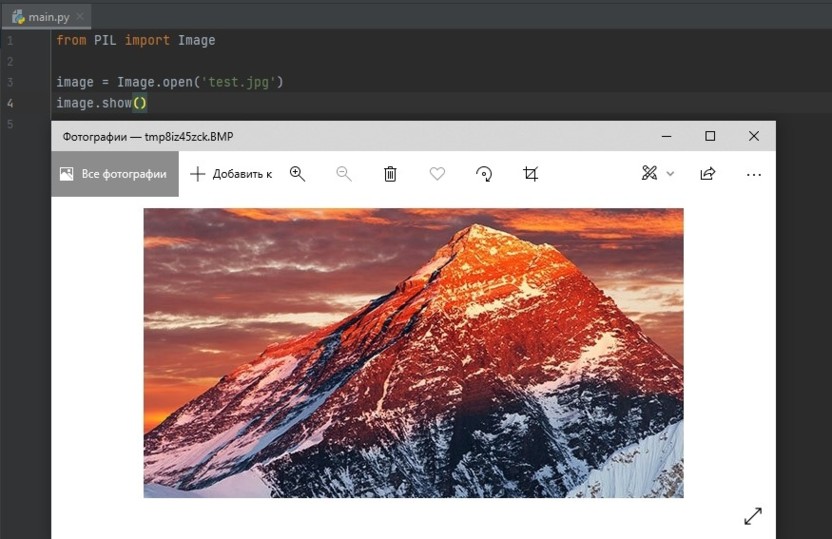
Теперь откроем изображение через метод в библиотеке:
from PIL import Image img = Image.open('test.jpg') img.show() На экране у нас отобразилось изображение, которое мы добавили в папку:
Для просмотра основной информации об изображении с помощью Pillow используем следующие методы:
from PIL import Image img = Image.open('test.jpg') print(img.format) # Просмотр формата изображения. Выведет 'JPEG' print(img.mode) # Просмотр типа цветового пространства. Выведет 'RGB' print(img.size) # Просмотр размера изображения. Выведет (568, 305) print(img.filename) # Просмотр имени файла. Выведет 'test.jpg' r, g, b = img.split() histogram = img.histogram() print(histogram) # Просмотр значений RGB изображения. Выведет 1750, 255, 267, 237, 276, 299… Обрезка изображений
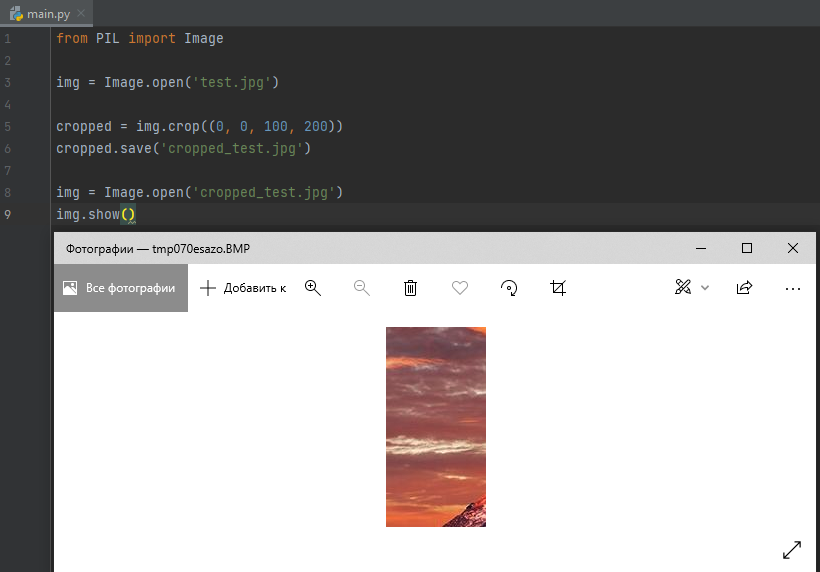
В Pillow есть методы для кропа (обрезки) изображений. Обрежем наше изображение с помощью метода crop(), передав в параметры координаты обрезки:
from PIL import Image img = Image.open('test.jpg') cropped = img.crop((0, 0, 100, 200)) cropped.save('cropped_test.jpg') img = Image.open('cropped_test.jpg') img.show() После выполнения данного кода, получим следующее изображение:
Поворот изображений
С помощью метода Image.rotate() мы можем поворачивать изображение как нам угодно. В скобках указываем количество градусов, на которое нужно повернуть изображение. Рассмотрим на примере:
from PIL import Image img = Image.open('test.jpg') rotated = img.rotate(180) rotated.save('rotated_test.jpg') img = Image.open('rotated_test.jpg') img.show() 
Конвертируем из JPG в PNG с помощью Pillow
Для конвертации нам понадобится открыть изображение и просто сохранить его в другом формате. Рассмотрим на примере:
from PIL import Image img = Image.open('test.jpg') img.save('test_png.png', 'png') Получаем такое же изображение, но в формате PNG.
Изменение размера изображений
Чтобы изменить размер изображения используем метод resize(). Рассмотрим это на примере:
from PIL import Image img = Image.open('test.jpg') img = img.resize((170, 100), Image.ANTIALIAS) img.save('test_text.jpg') img = Image.open('test_text.jpg') img.show() 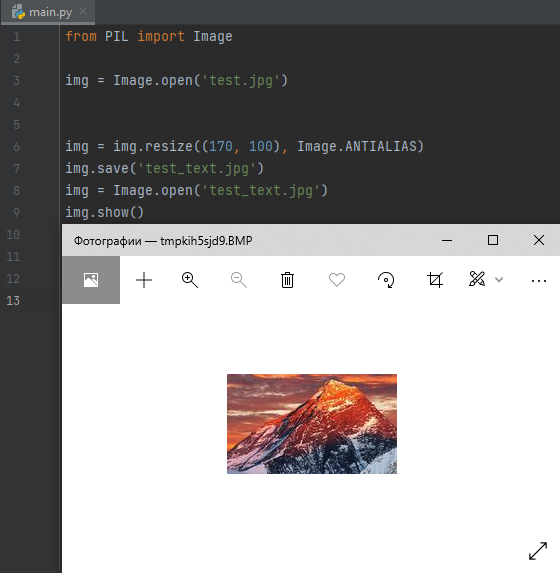
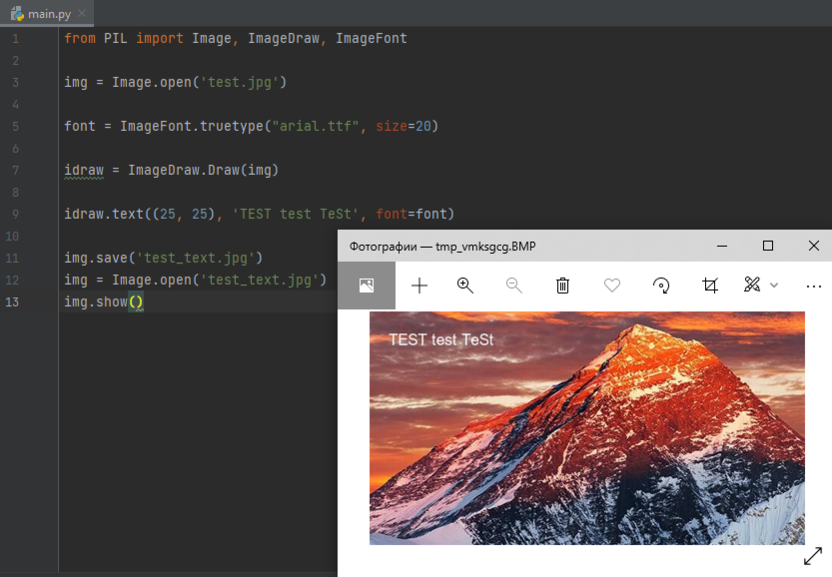
Пишем текст на изображениях
Для наложения текста на изображение в Pillow существует метод text(), но для начала нужно добавить шрифт. Рассмотрим на примере:
from PIL import Image, ImageDraw, ImageFont img = Image.open('test.jpg') font = ImageFont.truetype("arial.ttf", size=20) idraw = ImageDraw.Draw(img) idraw.text((25, 25), 'TEST test TeSt', font=font) img.save('test_text.jpg') img = Image.open('test_text.jpg') img.show() Получим изображение с текстом:
Генерация пустого изображения
Для создания пустого холста (изображения) используем метод Image.new(). Рассмотрим на примере:
from PIL import Image, ImageDraw, ImageFont img = Image.new('RGB', (200, 200), 'black') img.save('test1.jpg') img = Image.open('test1.jpg') img.show() 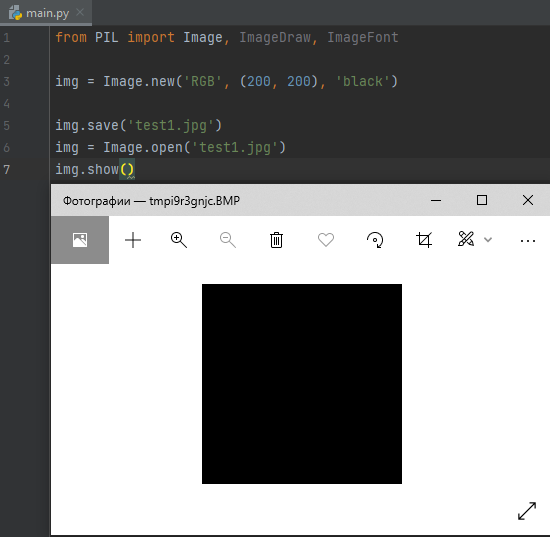
Теперь давайте нарисуем на этом квадрате белый прямоугольник:
from PIL import Image, ImageDraw, ImageFont img = Image.new('RGB', (200, 200), 'black') idraw = ImageDraw.Draw(img) idraw.rectangle((0, 0, 100, 100), fill='white') img.save('test1.jpg') img = Image.open('test1.jpg') img.show() 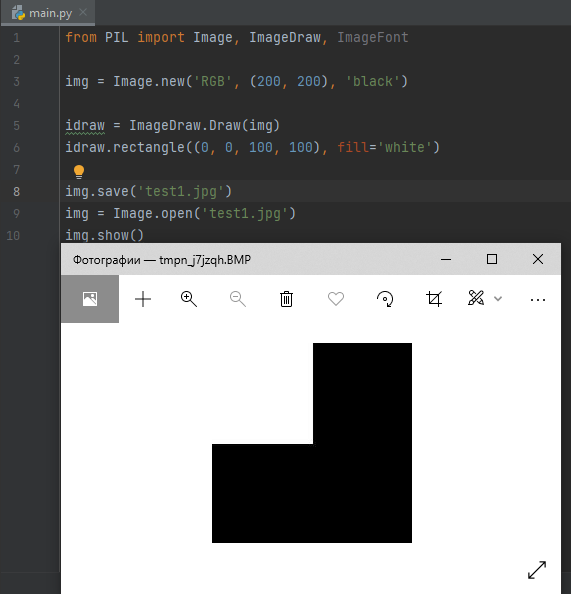
Вывод
Мы разобрали основные методы библиотеки Pillow в Python: научились писать текст на изображениях, изменять размер, поворачивать их и даже обрезать.
Надеюсь, статья была полезна для вас. Удачи!