- CSS for Labels, Buttons and Form Interactions
- Part 4: CSS for Labels, Buttons and Form Interactions
- Styling CSS Labels
- Styling Form Controls
- Aligning Labels to the Left of Inputs
- Styling Buttons in CSS
- Centering Form Elements
- Responding to Focus and Hover Events in CSS
- Going Forward
- Элемент label
- См. также
- A Beginner’s Guide To Styling CSS Forms
- Prerequisites for styling CSS Forms
- Creating the HTML boilerplates
- Creating the necessary HTML tags
- How to style common form elements with CSS?
- Appling universal selector
CSS for Labels, Buttons and Form Interactions
Part 4: CSS for Labels, Buttons and Form Interactions
In the last installment of this series on Web Forms, we explored some of the most commonly employed CSS attributes to style form elements. Today’s article continues from where that one left off to cover how to style labels and buttons, as well as how to alter an element’s appearance based on user interactions.
You can review the previous articles in this series by visiting:
Styling CSS Labels
In addition to adding functionality to your forms, labels can greatly increase readability and play a part in laying out form controls. To illustrate, let’s take a form that accepts user info, with the following HTML markup:
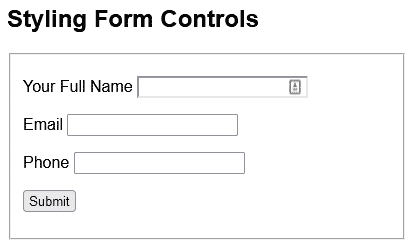
Styling Form Controls
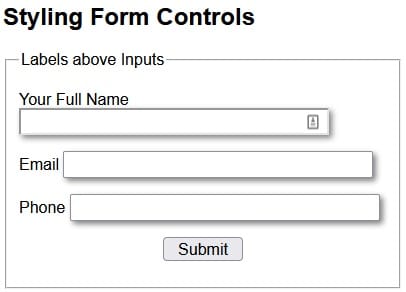
That produces this bare-bones form:
Before we get to the labels, let’s apply a bit of styling to the form and input controls:
That first rule selects everything on the page using the asterisk (*) wildcard character. Hence, it applies the specified font-family to the entire page.
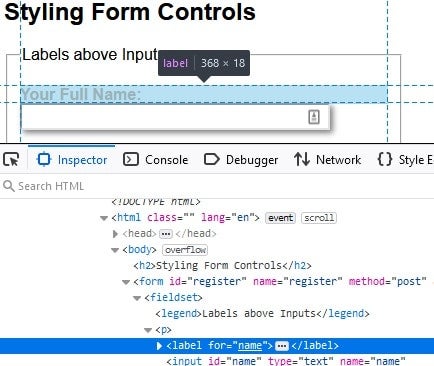
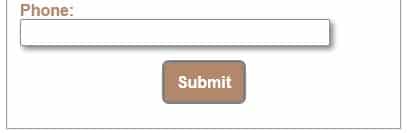
With the above styles in place, you’ll notice that the label positioning becomes haphazard, in that some appear above the input, while others are aligned to the left:
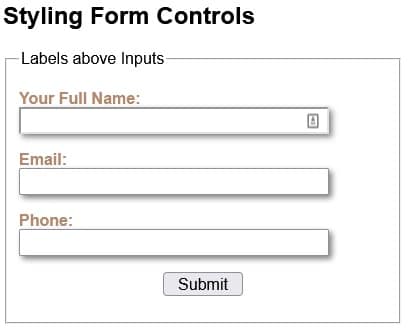
We can position all labels above their associated controls using the following CSS:
The key attribute is “display: block;”. Assigning a value of “block” to the display property makes the element behave as a block element, such as a . Hence, it starts on a new line, and takes up the entire width of the container. We can verify this behavior by inspecting a label with the browser tools:
The “label:after” creates a pseudo-element that is the last child of the selected element. It is often used to add cosmetic content to an element with the content property. In our case, we can use it to append a colon (:) after each label.
Here is the form with all CSS applied:
Aligning Labels to the Left of Inputs
Another common layout is to position labels to the left of their associated controls. To do that, we can replace the “display: block;” with two other attributes, i.e. width and float:
The width determines how much horizontal space the label “column” takes. The more width is allocated, the further from the controls the labels will be.
Assigning a value of “left” to float positions labels to the left-most edge of their container.
There are a couple of other considerations when positioning labels to the left of their associated controls:
- Make sure that the form’s width is great enough to accommodate both the labels and fields on one line. Otherwise, they may wrap.
- You may want to assign a value to the margin-top so that there is a bit of vertical space between form elements. Without that, they can look like a stack of slices in a loaf of bread!
We’ll deal with both those issues by adding the following CSS:
Here is the updated form with labels to the left of input fields:

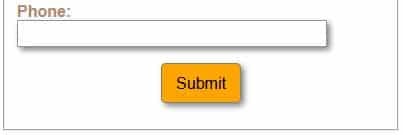
Styling Buttons in CSS
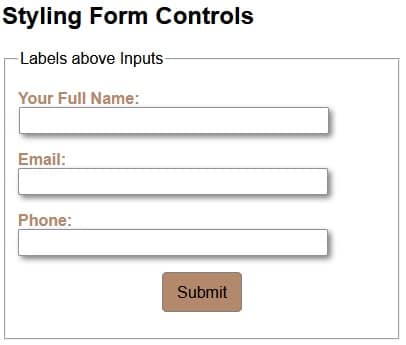
Without additional CSS styling, HTML buttons are rendered as gray rectangular boxes with black text. Not very interesting. The good news is that CSS allows us to change virtually every aspect of a button’s appearance and positioning. Case in point, take a look at the following CSS rule:
Now the button’s appearance matches the color palette of the rest of the form:
Centering Form Elements
One difference between the Submit button and the rest of the form is that it is horizontally centered. There are a number of ways to center an element within its container; one way is to give the element a width (either absolute or relative) and then set the margin-left and margin-right attributes to “auto”. Here is the code that centers the Submit button:
display: block; margin-left: auto; margin-right: auto; width: 80px;
Responding to Focus and Hover Events in CSS
You might be under the impression that you need JavaScript in order to make a form interactive. Not true! Thanks to the CSS :focus and :hover pseudo-classes, you can change an element’s appearance in response to user actions. As you may have guessed, the :focus pseudo-class governs an element’s appearance when it obtains the focus. Likewise, the :hover pseudo-class sets an element’s appearance when the mouse cursor traverses over it.
Here is a rule that alters the Submit button’s appearance on focus:
This rule kicks in when the mouse cursor is traverses over the Submit button:
You’ll find the demo for this tutorial on codepen.io.
Going Forward
In the next article, we’ll cover radio buttons, checkboxes, and selects before moving on to JavaScript and its role in making forms more interactive.
Элемент label
Элемент связывает текст с определённым элементом формы. Обычно применяется в следующих случаях.
- Текст становится активным и при щелчке по нему изменяется значение связанного с текстом переключателя или флажка. Это удобно для пользователя, потому что не приходится целиться курсором в небольшой по размерам элемент.
- Стили для позволяют задать положение текста и другие характеристики оформления.
Простой вариант использования заключается в добавлении полей формы прямо внутрь с желаемым текстом, как показано в примере 1.
Визуально себя никак не проявляет, поэтому понять, задействован он или нет, можно только по тексту. Если щелчок по тексту переносит фокус в текстовое поле, ставит галочку в переключателе или ещё как-то активирует близлежащий элемент формы, значит работает .
Поля формы и текст для них могут визуально находиться рядом, но в коде документа располагаться внутри разных элементов. Чтобы связать их между собой применяется атрибут for , его значением выступает идентификатор у , как показано в примере 2.
Для каждого элемента задаём свой уникальный идентификатор через атрибут id , а внутри элемента указываем этот же идентификатор как значение атрибута for .
Также применяется как один из элементов для вёрстки сложных форм. В примере 3 показана форма авторизации, в которой текст располагается рядом с полями для ввода логина и пароля.
Пример 3. Форма для авторизации
Результат данного примера показан на рис. 1.

Рис. 1. Форма для авторизации пользователя
См. также
- Аккордеон меню
- Вкладки на CSS
- Выпадающее меню
- Использование :checked
- Подсказка в поле формы
- Пользовательские формы
- Стилизация переключателей
- Стилизация флажков
- Формы в Bootstrap 4
- Формы в HTML
A Beginner’s Guide To Styling CSS Forms

To put in a simple term, an HTML or web forms are mostly referred to as web elements that are designed to enable users to put in their information, which may include their names, age, gender, or credit card number, etc., which is then sent to a server for processing.
Web forms are very useful and are now a very important aspect of web development. Imagine having to travel to a foreign country just to fill out a form because you want to apply for a course in their university.
Since every modern university has a website with a form, students can sit in the comfort of their homes and apply within their convenient time, saving them the time to visit the school in person. Then the school collects this information to decide if the candidate is qualified to study at their university.
Web forms are not limited to schools only, businesses such as Banks, E-Commerce, to mention a few, use web forms to collect information from their customers. This helps them decide how to serve the needs of their customers better.
This is exactly what web forms are designed to do – to collect information for processing.
In this tutorial on CSS Forms, we will take a closer look at how to style forms with CSS and much more.
TABLE OF CONTENTS
- Prerequisites for styling CSS Forms
- How to style common form elements with CSS?
- Appling universal selector
- Applying viewport width (vw) and viewport height (vh)
- Applying hero image
- Centering the form with Flexbox
- Styling the form element
- Styling form logo
- Styling site caption
- Styling the input tag
- Styling forget password
- Style the form button
- Styling the signup option
Prerequisites for styling CSS Forms
By the end of this tutorial on CSS Forms, you would be in a position to build a form in HTML that is styled using CSS. However, a basic knowledge of HTML and CSS is required to understand this blog on CSS Forms better.
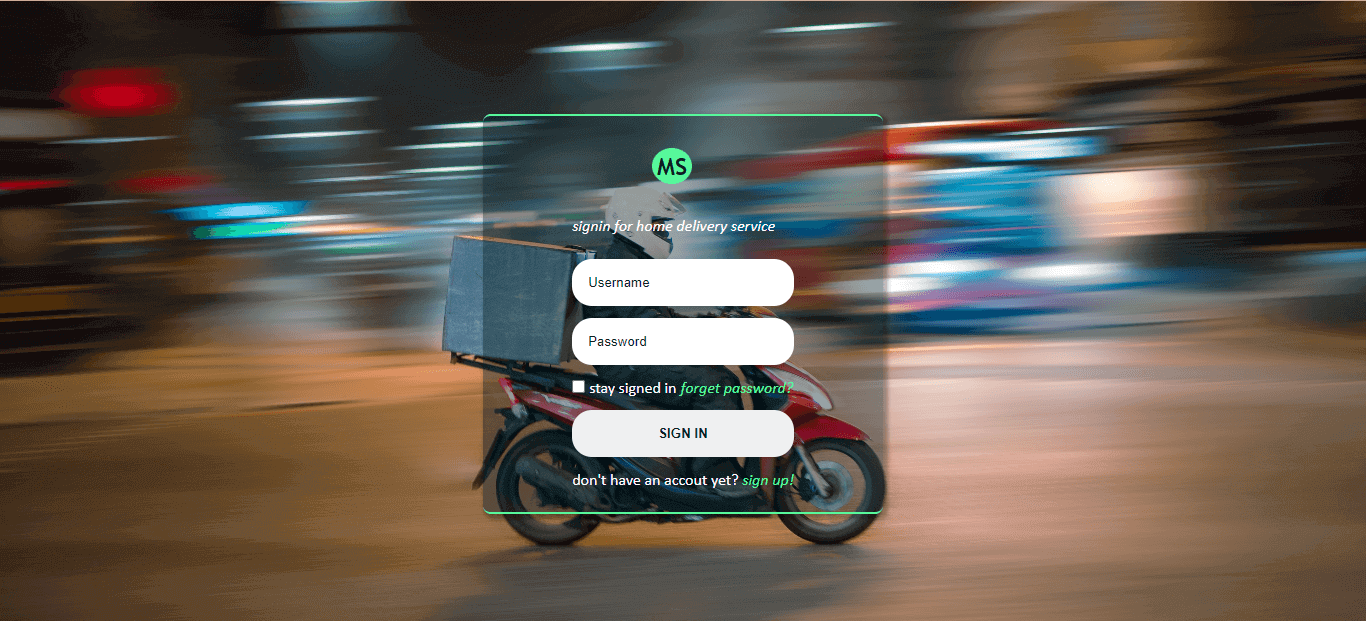
Here is a sample of the finished project of what we’ll be building.

Here is the link to CodePen for this styling CSS Form project’s source code.
Creating the HTML boilerplates
Let’s start by creating the website boilerplates (that is, the HTML code structure for the website). This contains the head and body tags, as seen below.
After creating our HTML boilerplate, now save it as an index.html file, am using VS Code but you can use any IDE of your choice.
Hey here’s a quick free tool called rem-to-px-converter & px-to-rem-converter that will help you convert CSS unit REM values & pixels.
Creating the necessary HTML tags
Now, let’s create the necessary HTML tags for our styling CSS Forms project.
From the code sample above, let’s look at what each tag is supposed to do based on the class names assigned to them.
- site__container: This class is assigned to a div tag that wraps around every other tag within our HTML tags.
- hero__images: This class is assigned to the main tag. This tag is where our hero image will be assigned using CSS.
- card__wrapper: This class is assigned to another main tag nested inside the hero__image tag. This tag wraps around all tags that make up our web form.
- card__forms: This class is assigned to the section tag, which is the main tag for our web form
- Items__wrapper: This tag wraps around the div, input, button, and link tags which are items within the web form.
- site__logo: This is the site logo.
- sign__caption: This tag helps to inform the user why they should sign up/sign in using the web form.
- user_id: This wraps around the input tag where the user has to enter their username and password.
- checkbox__wrapper: This wraps around the input, a (anchor), and labels tag. Here we ask the user if they would like their user id to be saved so that they don’t have to retype them later when they visit the site by clicking the checkbox. We also ask if they have a forgotten password that needs to be recovered.
- btn__wrapper: This wraps around the main button of the form. This is the button the user clicks on that helps them sign in to the site.
- signup__option: This tag wraps around the paragraph tag and a link tag. Here we provide an option for new users who don’t have an account to signup.
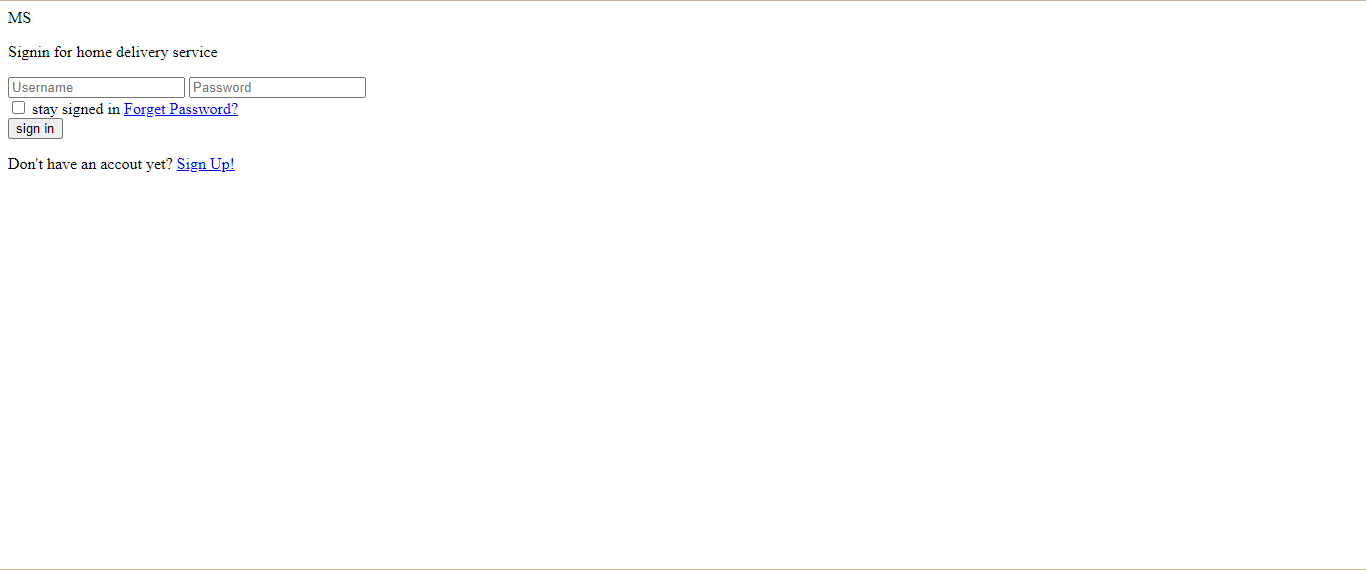
Now that we have the HTML boilerplate setup, save it and run it on your favorite browser. The code in this CSS Forms tutorial is run using Google Chrome.
Brower Output:

Your code should look like this. You will notice how plain and simple the website is from our browser output. This is because we have not added the CSS yet. In the next section of this tutorial on CSS Forms, we’ll talk about this.
How to style common form elements with CSS?
Form elements are some of the most common elements on a website. Every site must have these elements, from login forms to search boxes and buttons, to be functional. These elements are sometimes overlooked in design and styling, which may cause them to blend into each other, making your site’s UI look dull. A good way to avoid this is by using CSS to change the appearance of form elements such as text fields and buttons.
Here’s how you can style common CSS Form elements:
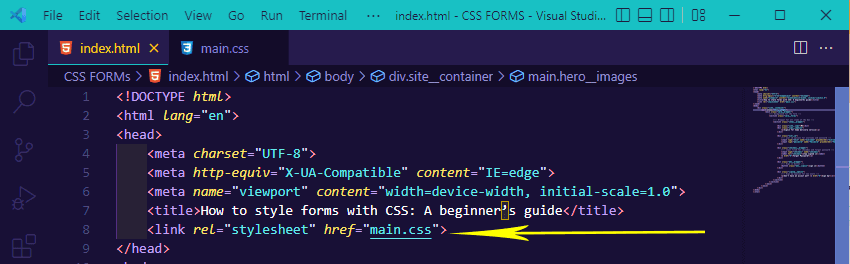
- In your Visual Studio Code, create a new file and name it main.css. This is going to be the CSS file. Notice from our HTML file that in the head tag, we have a link tag that points to main.css. This link tag helps us link together both the HTML and CSS files. Any changes to the HTML will affect the CSS file & vice versa.


Appling universal selector
Universal selector is a CSS concept that lets you define styles once and reuse them across the entire website. It means that you need to define only that “one thing” once, and then you can use it on other pages. This saves us a lot of time and makes the code more maintainable.
Type and run the code below for your CSS Forms project: