- PHP: Receive raw POST data.
- The php://input stream.
- Don’t use $HTTP_RAW_POST_DATA.
- # Reading Request Data
- # Reading POST data
- # Reading GET data
- # Handling file upload errors
- # Uploading files with HTTP PUT
- # Passing arrays by POST
- # Remarks
- # Choosing between GET and POST
- # Request Data Vulnerabilities
- Обрабатываем POST-запросы в PHP
- Как увидеть тело POST-запроса
- Заключение
PHP: Receive raw POST data.
This is a short guide on how to receive raw POST data in PHP. This is useful if you intend on receiving JSON or XML via a POST request.
In most day-to-day cases, we tend to access POST data like so:
//Retrieving a POST field in PHP $name = $_POST['name'];
However, in certain cases, you may need to access the POST request’s body as a whole. In those cases, you will need to access the php://input stream.
The php://input stream.
PHP has a number of I/O streams that you can access. In this case, we are particularly interested in the php://input stream.
Take a look at the following example:
//Get the raw POST data $postBody = file_get_contents("php://input"); In the code above, we used the file_get_contents function to read the php://input stream into a PHP variable called $postBody.
If a POST request is sent to the script above, the entire body of the request will be assigned to the $postBody variable.
For example: When I sent three POST parameters to the script in question, the php://input stream returned the following string:
Note that if no POST data is present, the code above will return a blank string.
Don’t use $HTTP_RAW_POST_DATA.
$HTTP_RAW_POST_DATA is a predefined PHP variable that can be configured to contain raw POST data. However, the variable was officially deprecated in PHP 5.6 and completely removed as of PHP 7.0.
Besides the fact that it is no longer supported, there is also the drawback of having to mess around with .ini directives in order to get it working. This is because the feature is turned off by default on most PHP installations.
The feature relies on the always_populate_raw_post_data directive being set to 1. However, the default value for this directive is 0 (off).
Long story short: You should use the input stream approach instead.
# Reading Request Data
Usually data sent in a POST request is structured key/value pairs with a MIME type of application/x-www-form-urlencoded . However many applications such as web services require raw data, often in XML or JSON format, to be sent instead. This data can be read using one of two methods.
php://input is a stream that provides access to the raw request body.
$rawdata = file_get_contents("php://input"); // Let's say we got JSON $decoded = json_decode($rawdata); $HTTP_RAW_POST_DATA is a global variable that contains the raw POST data. It is only available if the always_populate_raw_post_data directive in php.ini is enabled.
$rawdata = $HTTP_RAW_POST_DATA; // Or maybe we get XML $decoded = simplexml_load_string($rawdata); This variable has been deprecated since PHP version 5.6, and was removed in PHP 7.0.
Note that neither of these methods are available when the content type is set to multipart/form-data , which is used for file uploads.
# Reading POST data
Data from a POST request is stored in the superglobal
(opens new window) $_POST in the form of an associative array.
Note that accessing a non-existent array item generates a notice, so existence should always be checked with the isset() or empty() functions, or the null coalesce operator.
$from = isset($_POST["name"]) ? $_POST["name"] : "NO NAME"; $message = isset($_POST["message"]) ? $_POST["message"] : "NO MESSAGE"; echo "Message from $from: $message"; $from = $_POST["name"] ?? "NO NAME"; $message = $_POST["message"] ?? "NO MESSAGE"; echo "Message from $from: $message"; # Reading GET data
Data from a GET request is stored in the superglobal
(opens new window) $_GET in the form of an associative array.
Note that accessing a non-existent array item generates a notice, so existence should always be checked with the isset() or empty() functions, or the null coalesce operator.
Example: (for URL /topics.php?author=alice&topic=php )
$author = isset($_GET["author"]) ? $_GET["author"] : "NO AUTHOR"; $topic = isset($_GET["topic"]) ? $_GET["topic"] : "NO TOPIC"; echo "Showing posts from $author about $topic"; $author = $_GET["author"] ?? "NO AUTHOR"; $topic = $_GET["topic"] ?? "NO TOPIC"; echo "Showing posts from $author about $topic"; # Handling file upload errors
The $_FILES[«FILE_NAME»][‘error’] (where «FILE_NAME» is the value of the name attribute of the file input, present in your form) might contain one of the following values:
- UPLOAD_ERR_OK — There is no error, the file uploaded with success.
- UPLOAD_ERR_INI_SIZE — The uploaded file exceeds the upload_max_filesize directive in php.ini .
- UPLOAD_ERR_PARTIAL — The uploaded file exceeds the MAX_FILE_SIZE directive that was specified in the HTML form.
- UPLOAD_ERR_NO_FILE — No file was uploaded.
- UPLOAD_ERR_NO_TMP_DIR — Missing a temporary folder. (From PHP 5.0.3).
- UPLOAD_ERR_CANT_WRITE — Failed to write file to disk. (From PHP 5.1.0).
- UPLOAD_ERR_EXTENSION — A PHP extension stopped the file upload. (From PHP 5.2.0).
An basic way to check for the errors, is as follows:
$fileError = $_FILES["FILE_NAME"]["error"]; // where FILE_NAME is the name attribute of the file input in your form switch($fileError) case UPLOAD_ERR_INI_SIZE: // Exceeds max size in php.ini break; case UPLOAD_ERR_PARTIAL: // Exceeds max size in html form break; case UPLOAD_ERR_NO_FILE: // No file was uploaded break; case UPLOAD_ERR_NO_TMP_DIR: // No /tmp dir to write to break; case UPLOAD_ERR_CANT_WRITE: // Error writing to disk break; default: // No error was faced! Phew! break; > # Uploading files with HTTP PUT
(opens new window) for the HTTP PUT method used by some clients to store files on a server. PUT requests are much simpler than a file upload using POST requests and they look something like this:
PUT /path/filename.html HTTP/1.1 Into your PHP code you would then do something like this:
/* PUT data comes in on the stdin stream */ $putdata = fopen("php://input", "r"); /* Open a file for writing */ $fp = fopen("putfile.ext", "w"); /* Read the data 1 KB at a time and write to the file */ while ($data = fread($putdata, 1024)) fwrite($fp, $data); /* Close the streams */ fclose($fp); fclose($putdata); ?> (opens new window) you can read interesting SO question/answers about receiving file via HTTP PUT.
# Passing arrays by POST
Usually, an HTML form element submitted to PHP results in a single value. For example:
pre> print_r($_POST);?> pre> form method="post"> input type="hidden" name="foo" value="bar"/> button type="submit">Submitbutton> form> This results in the following output:
However, there may be cases where you want to pass an array of values. This can be done by adding a PHP-like suffix to the name of the HTML elements:
pre> print_r($_POST);?> pre> form method="post"> input type="hidden" name="foo[]" value="bar"/> input type="hidden" name="foo[]" value="baz"/> button type="submit">Submitbutton> form> This results in the following output:
Array ( [foo] => Array ( [0] => bar [1] => baz ) ) You can also specify the array indices, as either numbers or strings:
pre> print_r($_POST);?> pre> form method="post"> input type="hidden" name="foo[42]" value="bar"/> input type="hidden" name="foo[foo]" value="baz"/> button type="submit">Submitbutton> form> Which returns this output:
Array ( [foo] => Array ( [42] => bar [foo] => baz ) ) This technique can be used to avoid post-processing loops over the $_POST array, making your code leaner and more concise.
# Remarks
# Choosing between GET and POST
GET requests, are best for providing data that’s needed to render the page and may be used multiple times (search queries, data filters. ). They are a part of the URL, meaning that they can be bookmarked and are often reused.
POST requests on the other hand, are meant for submitting data to the server just once (contact forms, login forms. ). Unlike GET, which only accepts ASCII, POST requests also allow binary data, including file uploads
You can find a more detailed explanation of their differences here
# Request Data Vulnerabilities
Retrieving data from the $_GET and $_POST superglobals without any validation is considered bad practice, and opens up methods for users to potentially access or compromise data through code
(opens new window) . Invalid data should be checked for and rejected as to prevent such attacks.
Request data should be escaped depending on how it is being used in code, as noted here
(opens new window) . A few different escape functions for common data use cases can be found in this answer
Обрабатываем POST-запросы в PHP

Итак, в прошлом уроке мы вспоминали о том, как происходит работа пользователя с сайтом. Их общение происходит в форме запрос-ответ. Пользователь отправляет в запросе какие-то данные, а сервер возвращает какой-либо ответ, в зависимости от этих данных.
В предыдущем уроке мы научились работать с GET-запросами. Как мы помним, при этом способе данные передаются на сервер с помощью параметров в адресной строке. Такое бывает удобно, когда нам нужно поделиться ссылкой в которой эти параметры нужны. Например, у нас спрашивают, где в Москве купить шкаф. И мы скидываем человеку ссылку на поиск в Яндексе:
https://yandex.ru/search/?text=шкаф%20в%20москве%20купить
Он переходит по ней и прекрасно себя чувствует, потому что всё уже введено за него.
Однако, параметры в адресной строке – это не всегда уместно. Например, когда в параметрах содержится какая-то конфиденциальная информация: пароль, пин-код. И любой мимо проходящий человек может её увидеть. Как в такой ситуации быть? Использовать POST-запросы!
Что это такое? Да всё тот же запрос от клиента к серверу, только параметры передаются внутри тела запроса, а не в адресной строке. И увидеть их просто так не получится.
Что за тело запроса? Ну, это просто данные, которые передаются на сервер. При этом они скрыты от лишних глаз.
Чтобы отправить POST-запрос нужно в HTML-форме задать для атрибута method значение POST.
      Логин
 Пароль
Данные, отправленные с помощью POST-запроса доступны в PHP в суперглобальном массиве $_POST.
Давайте выведем переданные скриптом выше значения login и password. Для этого в файл login.php положим следующий код:
      Переданный login:
Переданный password:
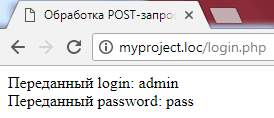
Откройте теперь форму, введите в неё значения и нажмите кнопку «Войти».
Вы увидите введенные вами в форме данные, при этом они будут отсутствовать в адресной строке. Вуаля! Теперь никто не подсмотрит ваш пароль в адресной строке.
Как увидеть тело POST-запроса
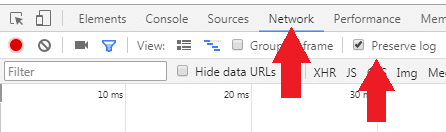
Чтобы увидеть данные POST-запроса в браузере, в Google Chrome нужно перейти в режим разработчика. Нажмите клавишу F12, находясь в окне браузера. После этого вы увидите панель разработчика.
Перейдите во вкладку Network, а затем установите галочку напротив пункта Preserve log.

Теперь вернитесь на форму, и снова введите данные, после чего нажмите на кнопку «Войти».
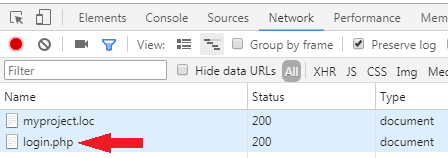
Одновременно с тем, как вы нажмете на кнопку входа, вы увидите в панели разработчика запрос на login.php.
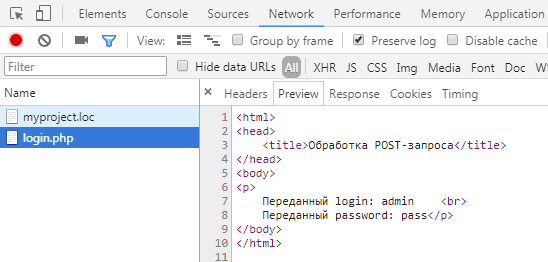
Нажмите на него, и справа откроются детали запроса. По умолчанию открывается исходный код ответа. Здесь можно увидеть то, что было сгенерировано с помощью PHP и отправлено веб-сервером в браузер.
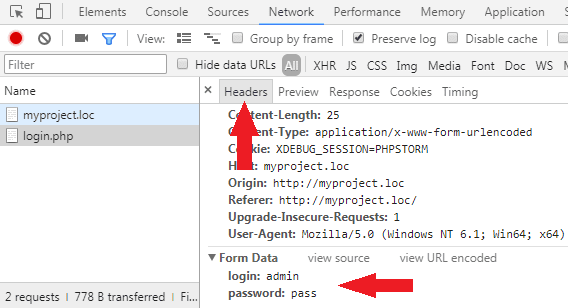
Нас здесь интересует вкладка Headers. Перейдите в неё, и прокрутите содержимое в самый низ. Здесь вы увидите те данные, что браузер отправил на сервер.
Заключение
Вот так и работают POST-запросы под капотом. Используют их всегда, когда не нужно отображать детали запроса в адресной строке. Хорошие примеры: форма авторизации, ввод данных о кредитной карте. Такими данными лучше в адресной строке не светить.
А сейчас — немного нестандартное домашнее задание =)
Если этот урок был вам полезен, расскажите об этом курсе своим знакомым или поделитесь на него ссылкой в социальных сетях.