- Saved searches
- Use saved searches to filter your results more quickly
- Failed to create java virtual machine . #6353
- Failed to create java virtual machine . #6353
- Comments
- System information:
- FIX: Could Not Create the Java Virtual Machine. (Solved)
- How to FIX: Could Not Create the Java Virtual Machine in Windows 10/11.*
- Method 1. Install the Correct version of JAVA version for Java IDE app*
- Method 2. Increase Allocated Memory for JAVA Apps.
- Method 3. Launch java.exe with Admin rights.
- Method 4. Completely Remove and Reinstall JAVA.
Saved searches
Use saved searches to filter your results more quickly
You signed in with another tab or window. Reload to refresh your session. You signed out in another tab or window. Reload to refresh your session. You switched accounts on another tab or window. Reload to refresh your session.
Have a question about this project? Sign up for a free GitHub account to open an issue and contact its maintainers and the community.
By clicking “Sign up for GitHub”, you agree to our terms of service and privacy statement. We’ll occasionally send you account related emails.
Already on GitHub? Sign in to your account
Failed to create java virtual machine . #6353
Failed to create java virtual machine . #6353
Comments
System information:
- Operating system (distribution) and version
OS Name Microsoft Windows 10 Enterprise
Version 10.0.18362 Build 18362 - DBeaver version
6.1.3 - Java version
Recommended Version 8 Update 221 (filesize: 1.97 MB) - Additional extensions
None
Upgrade dbeaver 6.1.0. to 6.1.3 and happens this problem
in cli mode show this error :
/lib/ext exists, extensions mechanism no longer supported; Use -classpath instead.
The text was updated successfully, but these errors were encountered:
Same for me Java 1.8.0_91
Rolled back to 6.1.1 and working ok.
Although this bug is there, it’s the only fast fixing solution
Once you completely remove the software and install it again, the problem will be resolved
Doesn’t the installer perform an uninstall first? What component needs uninstalling to workaround the error?
Doesn’t the installer perform an uninstall first? What component needs uninstalling to workaround the error?

1- First Remove DBeaver
2- install again and with reset setting
Do not forget about this part
Environment variables > system variables > Path
C:\Program Files (x86)\Java\jre1.8.0_221\bin

Why don’t you want to use JDK shipped along with DBeaver (OpenJDK11 in 6.1.+)?
There is no need to install any JRE/JDK anually and bundled JDK is the most tested and well-suitable JDK version for DBeaver.
In my case, to rollback, you don’t need to manually uninstall current version and reset settings while installing older. Just install older version (I also changed install path), and it will save all your connections and settings.
(Saved scripts you can find there: C:\Users\user\.dbeaver4\General\Scripts)
I’m using Windows 10, haven’t messed with the settings as far as using the bundled JDK, and I have Java 1.8.0 installed and in path anyways, but I also had this issue with the latest update and went back to 6.1.0
There seems to be a lot of confusion here. I uninstalled 6.1.1 using the uninstaller and then installed 6.1.3 with ‘reset settings’ and it worked fine. I didn’t do anything to my Java path and I didn’t lose any connections or scripts, they all carried over fine.
There seems to be a lot of confusion here. I uninstalled 6.1.1 using the uninstaller and then installed 6.1.3 with ‘reset settings’ and it worked fine. I didn’t do anything to my Java path and I didn’t lose any connections or scripts, they all carried over fine.
i say in older post for me solve with this way.
@serge-rider please change this labels to bug because many user when upgrade to 6.1.3 have this problem
this is not question this subject is problem with upgrade to new version
@RooyeKhat I still can’t figure out what is actually wrong.
- What the point to install Java manually? It is already included in the DBeaver installer.
- We use Java 11 since 6.1.1.
- Please post some error message/screenshot/stacktrace. At the moment it is not clear what is this ticket about.
- Please post some error message/screenshot/stacktrace. At the moment it is not clear what is this ticket about.
I believe these steps should reproduce the issue (sorry, haven’t tested as I only have one environment available and I’m using that to work in). OS is Windows 10.
- Install DBeaver 6.1.0
- (there may be a step here to create some clutter in the settings etc)
- Run DBeaver 6.1.3 installer without ‘reset settings’ checked
- Start DBeaver
- Observe that application fails to start with error «Failed to create Java Virtual Machine»
EDIT
The OP also provided a CLI error which suggests that for some reason DBeaver is performing a compatibility check on the Java runtime but it is not checking the correct runtime. It is checking the run time at JAVA_HOME, not the supplied supplied java 11 runtime. This is a bit speculative but it seems to add up.
FIX: Could Not Create the Java Virtual Machine. (Solved)

Java is one of the best development tools for creating games and applications and server-side programs. Games or apps written in Java need the Java Virtual Machine environment to run.
Games or applications developed with Java may crash unexpectedly or fail to open for various reasons, displaying the error «Could Not Create the Java Virtual Machine. Error: A fatal exception has occurred. Program will exit».
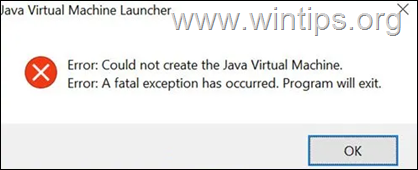
Below you will find several methods to resolve the Java Virtual Machine Launcher error «Could Not Create the Java Virtual Machine», in Windows 10/11 OS.
How to FIX: Could Not Create the Java Virtual Machine in Windows 10/11.*
* Suggestion: Before continuing with the following methods, try the following and see if the problem persists
-
- Install all Windows Updates.
- Press CTRL + SHIFT + ESC to open Task Manager and at Processes tab close all instances of Java Virtual Machine (right-click > End Task)
- 1. Install the Correct version of JAVA version for Java IDE app.
- 2. Increase Allocated Memory for JAVA Apps.
- 3. Launch JAVA with Admin rights.
- 4. Completely Remove and Reinstall JAVA.
Method 1. Install the Correct version of JAVA version for Java IDE app*
* Note: This method only applies to users using a JAVA IDE application for coding.
If you receive the mentioned error on a JAVA IDE application, you must ensure that the installed version of Java is compatible with the Java version (JRE or JDK) is running on JAVA IDE (Java Integrated Development Environment) application. So, proceed as follows:
Step 1. Check the JRE/JDK running version of JAVA IDE.
e.g. In the Eclipse IDE, check which version of the JRE or JDK it is running on by following the steps below:
1. From main menu, click Help > About Eclipse.
2. Click on Installation Details and choose the Configuration tab.
3. In the ‘Eclipse IDE Installation Details’ window, look at the line starting with -vm
4. The value at the line below will show you which JDK or JRE version on which Eclipse is running.- e.g.: If the path contains “jre6”, that means that Eclipse is running JRE version 6
- e.g.:If the path contains «jdk1.8.0_05« means that Eclipse is running JDK version 8.
Step 2. Check which version of JRE or JDK is installed on Windows.
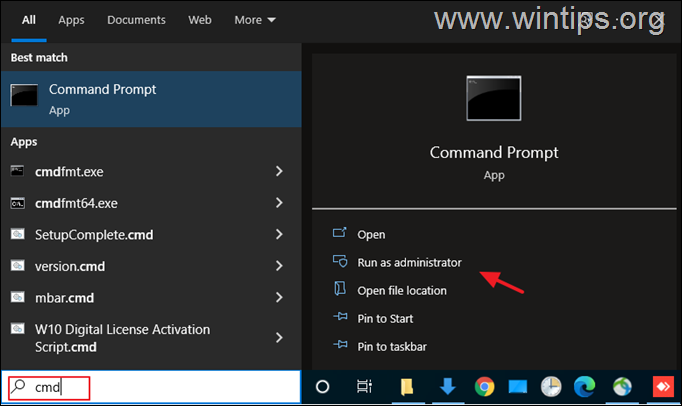
1. In the Search box type: cmd (or command prompt). Then select Run as administrator.

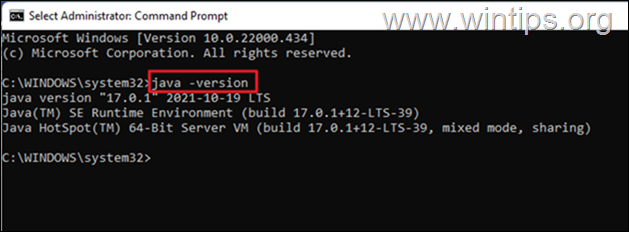
2. To find out the installed JAVA version give the following command and hit Enter:

3. If the IDE does not support the Java version on your device, proceed to install the correct version of Java. *
* Note: In some cases the installed JRE & JDK versions may be different. So, if you JAVA IDE application running on JDK, proceed and check also if the installed JDK matches the running JDK of the JAVA IDE app. To find out the installed JDK version on Windows, give the following command:
Method 2. Increase Allocated Memory for JAVA Apps.
Launching an application that exceeds the maximum memory size of the Java virtual machine could result in the error «Could Not Create the Java Virtual Machine». To work around this problem, go ahead and increase the allocated system memory that JAVA can use as follows:
1. Click on the Start menu and type in search bar: view advanced system settings. Then click Open.
![image_thumb[8]](data:image/svg+xml,%3Csvg%20xmlns='http://www.w3.org/2000/svg'%20viewBox='0%200%20682%20415'%3E%3C/svg%3E)
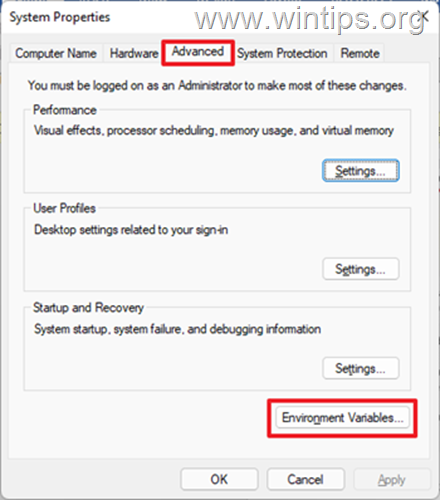
2. In the ‘System Properties’ window, select the Advanced tab and click Environment Variables.

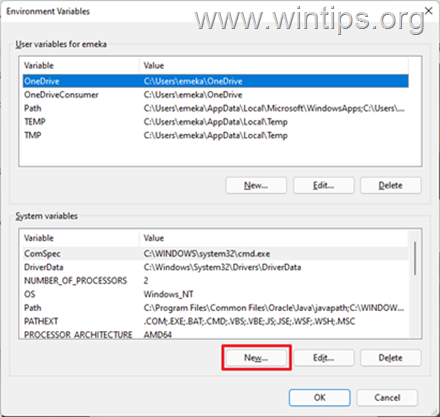
3. Below the System variables pane, select New.

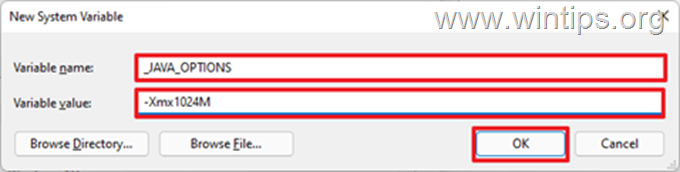
4. Set the Variable name as _JAVA_OPTIONS and the Variable value as -Xmx1024M. Then, click OK twice to save the change and close all open windows. *
* Info: This will adjust the allocated memory for Java to 1GB (1024MB).

5. Restart your machine to apply the change.
6. Finally try to open your game or app on Java Virtual Machine. The problem should be gone.Method 3. Launch java.exe with Admin rights.
The Java error also appears when the user does not have the admin rights or permissions to launch certain executables. Configuring Java to always run as an Administrator could fix the problem.
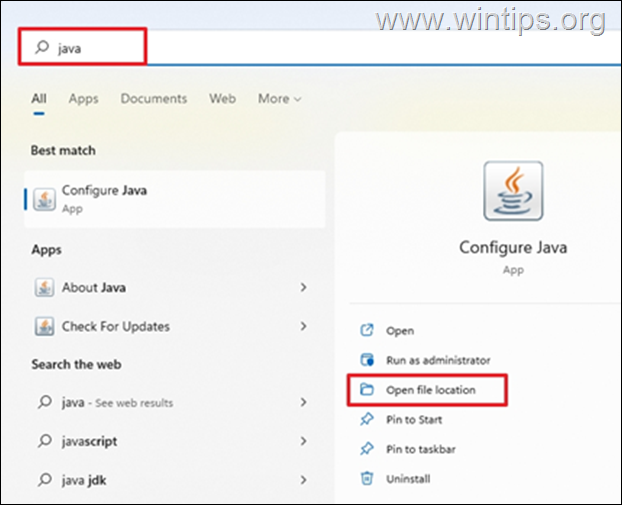
1. Press the Start menu and type Java in the search box.
2. Click Open file location.
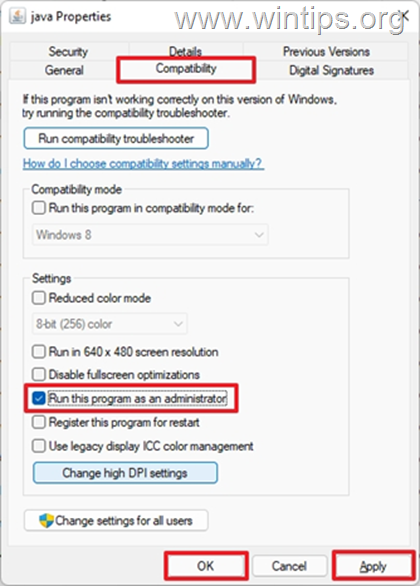
3. In the File Explorer window, right-click the Java executable file and select Properties.

4. At ‘java Properties» window select the Compatibility tab and below the Settings pane, check the box Run this program as an administrator. Then click Apply and OK.

5. Finally, start the program that cannot run because of the «Could Not Create the Java Virtual Machine» error and see if the problem persists.
Method 4. Completely Remove and Reinstall JAVA.
In some cases, Java may be corrupted or missing components, causing games or applications you are trying to run to close. In this case, follow the instructions below to remove all versions of JAVA versions from your computer and reinstall it.
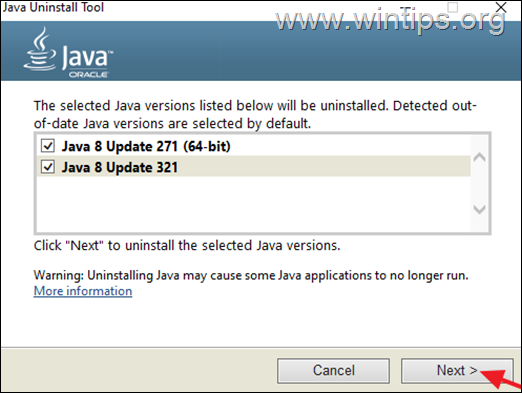
1. Download Java Uninstall tool.
2. Run the tool and select to remove all Java versions.
3. After removal, proceed and delete the Java folder(s) from the following locations on disk (if exist):
4. Restart your computer.
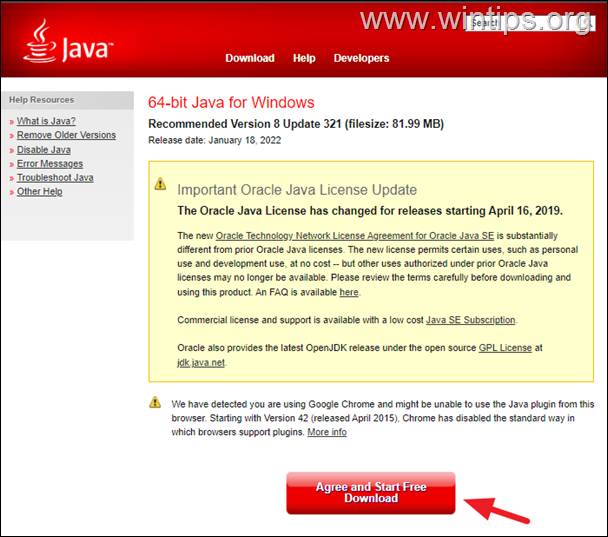
5. After reboot, visit Java official download page to download and install the latest version of Java.

That’s it! Which method worked for you?
Let me know if this guide has helped you by leaving your comment about your experience. Please like and share this guide to help others.
![image_thumb[8]](https://www.wintips.org/wp-content/uploads/2022/02/image_thumb8_thumb.png)