- How to Set JAVA_HOME Variable Path on Ubuntu
- Understanding Java
- Java Programming Language Superiority
- Java’s Main Components
- Java Program Execution
- Installing Java and Javac in Ubuntu
- Set JAVA_HOME Path on Ubuntu
- Temporarily Set JAVA_HOME in Ubuntu
- Permanently Set JAVA_HOME in Ubuntu
- Globally Set JAVA_HOME in Ubuntu
- Установка переменных JAVA_HOME / PATH в Unix/Linux
- Установка переменных JAVA_HOME / PATH в Unix/Linux
- One thought on “ Установка переменных JAVA_HOME / PATH в Unix/Linux ”
- Добавить комментарий Отменить ответ
- Рубрики
- соц сети
- Архив новостей
- Свежие записи
- Свежие комментарии
- Set JAVA_HOME on Windows 7, 8, 10, Mac OS X, Linux
How to Set JAVA_HOME Variable Path on Ubuntu
Basically, the JAVA_HOME Environment path points to the installation location of JDK (Java Development Kit) on your Ubuntu system.
As you develop or run Java-based applications, the associated applications sometimes need to know/reference the JAVA_HOME Environment path to execute/compile without any issues.
Before addressing this Java environment path issue, we need to revise the steps that might/have led us to this article’s objective. We need to start with understanding Java, and its installation, and finally addressing the JAVA_HOME path issue.
Understanding Java
Java has engraved its name in the programming languages’ hall of fame due to its contribution to reputable application footprints and they include:
- Creation of enterprise software.
- Scientific computation.
- Programming of hardware devices.
- Development of several modern Android applications.
- Development of mobile java applications.
- Developer and Big data analytics.
- Server-side technologies like Apache, GlassFish, and JBoss draw inspiration from Java.
Java Programming Language Superiority
Java is associated with several attributes that have contributed to the bold milestones that have made it successfully achieve the above-mentioned strides. The following factors have contributed to the superiority of Java as a programming language:
- It keeps evolving despite being mature.
- It is platform-independent.
- It simplifies real-time software development.
- Facilitates embedded computing.
- Supports IoT (Internet of Things).
- Simplifies and improves custom Big data solutions.
- Curtails project overheads.
- Enriched with library frameworks, IDEs, and development tools.
- Equipped with a rich set of APIs.
- It is recommended by Google for Android App Growth.
Java’s Main Components
Java is made up of three main components:
- Java Virtual Machine (JVM) – It provides a runtime environment for bytecode execution. It entails specification (JVM’s implementations document), implementation (JVM specification’s requirements program), and runtime instance (needed when writing and running the class-associated commands on the system terminal).
- Java Runtime Environment (JRE) – Meets the needed software/program execution requirements like supportive files and class libraries before the associated bytecodes are executed.
- Java Development Kit (JDK) – The tools that make up the JDK are Compile, Document, and Package Java Programs. In summary, JDK is responsible for compiling, documenting, and packaging a Java program.
Java Program Execution
The final milestone of understanding Java is comprehending its program execution steps.
Three steps are involved in Java program execution:
- Using an editor or IDE to write Java code. The final source code is saved in a file with an .java extension e.g sample_file.java.
- Java code compilation via a Java Compiler. Write code is translated from source code to machine code e.g javac sample_file.java.
- Execute/run the compiled machine code via Java Runtime e.g java sample_file.
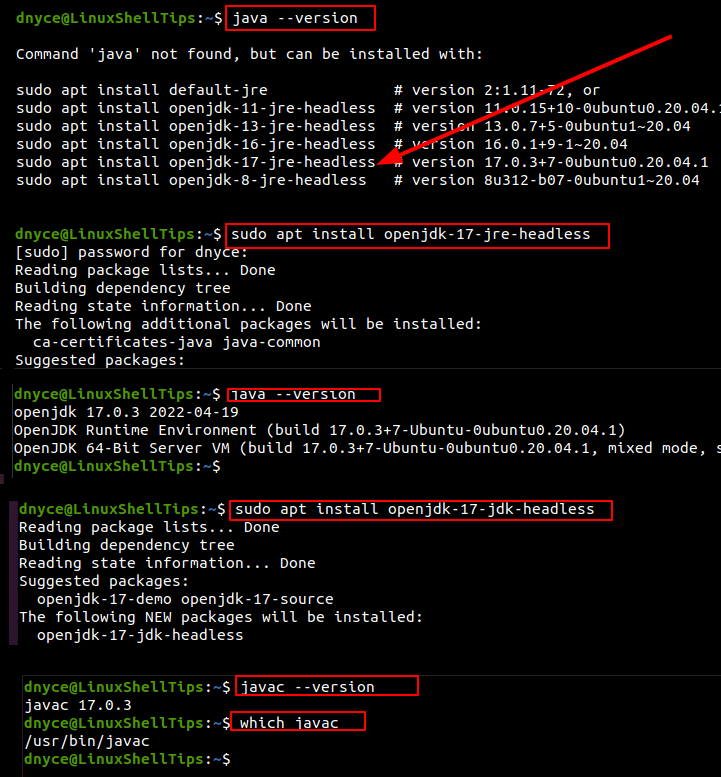
Installing Java and Javac in Ubuntu
A Java Runtime Environment (JRE) like OpenJDK and Java compiler (javac) is needed for you to be able to run Java-based programs.
$ sudo apt install openjdk-17-jre-headless -y $ sudo apt install openjdk-17-jdk-headless $ java --version $ javac --version $ which javac
Set JAVA_HOME Path on Ubuntu
Locate Java’s installation directory:

Temporarily Set JAVA_HOME in Ubuntu
To temporarily set the JAVA_HOME path in Ubuntu.
$ export JAVA_HOME="/usr/lib/jvm/java-17-openjdk-amd64" $ echo $JAVA_HOME

Permanently Set JAVA_HOME in Ubuntu
To permanently set the JAVA_HOME path, add the above line in the /etc/environment file.
JAVA_HOME="/usr/lib/jvm/java-17-openjdk-amd64"
To permanently set the JAVA_HOME path to ~/.bashrc file, which gets executed every time a user starts a new terminal session.
Add the highlighted line at the end of the file:
export JAVA_HOME=/usr/lib/jvm/java-17-openjdk-amd64
Close the file and activate the changes:
Globally Set JAVA_HOME in Ubuntu
To globally set the JAVA_HOME path for all Ubuntu users, edit /etc/bashrc file:
export JAVA_HOME=/usr/lib/jvm/java-17-openjdk-amd64
Close the file and activate the changes:
Confirm that the JAVA_HOME variable is still set:

We have understood how Java works and how easy it is to set the JAVA_HOME path on Ubuntu.
Установка переменных JAVA_HOME / PATH в Unix/Linux
Не знаете как установить переменные JAVA_HOME и PATH для каждого пользователя в соответствии с вашей системой Linux? Тогда эта статья «Установка переменных JAVA_HOME / PATH в Linux» именно для Вас. Я напишу ее в качестве заметки, чтобы потом быстренько вспомнить и прописать Java_Home и Path на ОС для каждого пользователя ( если понадобится).
Установка переменных JAVA_HOME / PATH в Unix/Linux
~ / .bash_profile является сценарий запуска, который обычно выполняется один раз. Это конкретный файл используется для команд, которые выполняются, когда нормальные входе пользователя в систему. Common использует для .bash_profile должны установить переменные окружения, такие как PATH, JAVA_HOME, чтобы создать псевдонимы для команд оболочки, и установить права доступа по умолчанию для вновь создаваемых файлов.
Установка JAVA_HOME / PATH для одного пользователя
Зайдите в свой аккаунт (учетную запись) и откройте файл .bash_profile в любом редакторе:
Установите JAVA_HOME как показано используя синтаксис export JAVA_HOME=. Если ваш путь такой как у меня /usr/lib/jvm/java-1.6.0-openjdk-i386/bin/java, то тогда пропишите:
export JAVA_HOME=/usr/lib/jvm/java-1.6.0-openjdk-i386/bin/java
Чтобы установить PATH пропишите:
export PATH=/usr/lib/jvm/java-1.6.0-openjdk-i386/bin:$PATHЗамените путь /usr/java/jdk1.5.0_07 на свой. Сохраните и закройте файл. Просто выйдите и зайдите обратно (перелогиньетсь), чтобы увидеть изменения или чтобы все изменения вступили в силу, выполните команду:
Чтобы проверить отображение новых настроек, используйте команды:
# echo $JAVA_HOME # echo $PATH
Совет: Используйте следующую команду, чтобы узнать точный путь Java под UNIX / Linux:
Пожалуйста, обратите внимание, что файл ~/.bashrc похож на ~/.bash_profile но работает только для оболочки Bash и .bashrc работает для каждой новой Bash оболочки.
Установка JAVA_HOME / PATH для всех пользователей
Вам нужно добавить строки в глобальный файл конфигурации в /etc/profile ИЛИ /etc/bash.bashrc чтобы внести изменения для всех пользователей:
Добавьте переменные PATH / JAVA_PATH следующим образом:
export JAVA_HOME=$JAVA_HOME:/usr/lib/jvm/java-1.6.0-openjdk-i386/bin/java export PATH=/usr/lib/jvm/java-1.6.0-openjdk-i386/bin:$PATH #если не будет работать, можно попробовать еще такой синтаксис #export PATH=$PATH:/usr/java/jdk1.6.0_26/bin Сохраните и закройте файл. Еще раз вам нужно ввести следующую команду, чтобы немедленно активировать настройки:
Но если не будет работать, есть еще 1 способ прописать все это дело! Сейчас я покажу как это можно сделать.
1. Устанавливаем переменные среды:
# echo 'export JAVA_HOME=usr/lib/jvm/java-1.6.0-openjdk-i386' > /etc/profile.d/jdk.sh # echo 'export PATH=$JAVA_HOME/bin:$PATH' >> /etc/profile.d/jdk.sh
2. Выполните команду чтобы перезапустить все только что прописанные настройки:
3. Тест, если среда Java успешно установлена, введите команду в терминале чтобы проверить работу:
Установка переменных JAVA_HOME / PATH в Unix/Linux завершена.
One thought on “ Установка переменных JAVA_HOME / PATH в Unix/Linux ”
Спасибо за гайд, работает как часы. Первых пунктов до bash_profile включительно хватило. Версия х64. Пути и названия свои. Проверил еще javac -version. Вопрос к автору. Где эту информацию искать на сайте оракла?
Добавить комментарий Отменить ответ
Этот сайт использует Akismet для борьбы со спамом. Узнайте, как обрабатываются ваши данные комментариев.
Рубрики
- Arch Linux (167)
- Commands (36)
- Debian’s (635)
- Administration tools Ubuntu (37)
- Backups Debian’s (7)
- Database в Ubuntu (58)
- Games (игры) (1)
- Monitoring в Debian и Ubuntu (49)
- Virtualization в Ubuntu / Debian/ Linux Mint (41)
- Docker (22)
- Kubernetes (6)
- KVM (4)
- OpenVZ (3)
- Vagrant (5)
- VirtualBox (6)
- ArgoCD (1)
- Concourse (1)
- Gitlab (1)
- Jenkinks (4)
- Spinnaker (1)
- Apache (32)
- Cherokee (1)
- FTP-services (5)
- Lighttpd (1)
- Nginx (26)
- PHP (27)
- Proxy для Debian’s (2)
- Tomcat (4)
- Панели управления в Ubuntu/Debian/Mint (24)
- Установка и настройка почты на Ubuntu/Debian (12)
- Хранилища (clouds) (2)
- Administration tools freeBSD (19)
- Database во FreeBSD (52)
- Monitoring во freeBSD (37)
- Virtualization во FreeBSD (22)
- VoIP (1)
- Установка Web сервисов (91)
- Установка и настройка почты (6)
- Установка из ports (пакетов) (19)
- Установка из sorce code (исходников) (23)
- Непрерывная интеграция (CI) (27)
- Database в MacOS (36)
- Monitoring в Mac OS (31)
- Security (безопасность) (12)
- Virtualization в Mac OS (30)
- Docker (19)
- Kubernetes (6)
- Vagrant (5)
- VirtualBox (5)
- ArgoCD (1)
- CircleCI (1)
- Concourse (1)
- Gitlab (1)
- Jenkinks (4)
- Spinnaker (1)
- Administration tools CentOS (49)
- Backups RPM’s (4)
- Database в CentOS (68)
- Monitoring в CentOS (67)
- Virtualization в CentOS/ Red Hat/ Fedora (42)
- Docker (23)
- Kubernetes (6)
- KVM (5)
- OpenVZ (2)
- Vagrant (5)
- VirtualBox (6)
- VMWare (3)
- ArgoCD (1)
- Concourse (1)
- Gitlab (1)
- Jenkinks (4)
- Spinnaker (1)
- Apache (35)
- Cherokee (1)
- DNS (3)
- FTP (10)
- Nginx (33)
- PHP (34)
- Proxy для RedHat’s (2)
- Tomcat (2)
- Voice (2)
- Панели управления в CentOS/Red Hat/Fedora (27)
- Прокси сервер на CentOS/RHEL/Fedora (4)
- Установка и настройка почты на CentOS/RHEL/Fedora (14)
- Хранилища (clouds) (1)
соц сети

Архив новостей
Свежие записи
Свежие комментарии
- Глеб к записи Установка Adobe Flash Player в Debian/Ubuntu/Mint
- Максим к записи Заблокировать User Agents используя Nginx
- Денис к записи Как включить EPEL репозиторий на CentOS
- Гость к записи Закомментировать/Раскомментировать строки vi/vim в Unix/Linux
- Sergey к записи Установка и настройка OpenVPN сервера на Debian/Ubuntu/Linux Mint
Set JAVA_HOME on Windows 7, 8, 10, Mac OS X, Linux
As always, the writeup is super practical and based on a simple application that can work with documents with a mix of encrypted and unencrypted fields.
We rely on other people’s code in our own work. Every day.
It might be the language you’re writing in, the framework you’re building on, or some esoteric piece of software that does one thing so well you never found the need to implement it yourself.
The problem is, of course, when things fall apart in production — debugging the implementation of a 3rd party library you have no intimate knowledge of is, to say the least, tricky.
Lightrun is a new kind of debugger.
It’s one geared specifically towards real-life production environments. Using Lightrun, you can drill down into running applications, including 3rd party dependencies, with real-time logs, snapshots, and metrics.
Learn more in this quick, 5-minute Lightrun tutorial:
Slow MySQL query performance is all too common. Of course it is. A good way to go is, naturally, a dedicated profiler that actually understands the ins and outs of MySQL.
The Jet Profiler was built for MySQL only, so it can do things like real-time query performance, focus on most used tables or most frequent queries, quickly identify performance issues and basically help you optimize your queries.
Critically, it has very minimal impact on your server’s performance, with most of the profiling work done separately — so it needs no server changes, agents or separate services.
Basically, you install the desktop application, connect to your MySQL server, hit the record button, and you’ll have results within minutes:
DbSchema is a super-flexible database designer, which can take you from designing the DB with your team all the way to safely deploying the schema.
The way it does all of that is by using a design model, a database-independent image of the schema, which can be shared in a team using GIT and compared or deployed on to any database.
And, of course, it can be heavily visual, allowing you to interact with the database using diagrams, visually compose queries, explore the data, generate random data, import data or build HTML5 database reports.