- Could not create the Java Virtual Machine что делать?
- Причины возникновения ошибки Джава
- Устраняем ошибку Java Virtual Machine Launcher
- Способ 2. Освобождаем оперативную память ПК
- Дополнительные методы устранения ошибки
- FIX: Could Not Create the Java Virtual Machine. (Solved)
- How to FIX: Could Not Create the Java Virtual Machine in Windows 10/11.*
- Method 1. Install the Correct version of JAVA version for Java IDE app*
- Method 2. Increase Allocated Memory for JAVA Apps.
- Method 3. Launch java.exe with Admin rights.
- Method 4. Completely Remove and Reinstall JAVA.
Could not create the Java Virtual Machine что делать?
Ошибка «Could not create the Java Virtual Machine» встречается во всех версиях операционной системы Windows. Она появляется как при запуске игр, которые требуют наличие виртуальной машины Java на устройстве, так и при установке самой виртуальной машины на компьютере. Текст ошибки Java Virtual Machine Launcher говорит нам следующее: системе не удалось создать виртуальную машину Java. В этой статье мы с вами рассмотрим причины, по которым возникает эта проблема и, конечно же, устраним саму ошибку.
Причины возникновения ошибки Джава
Чаще всего на появление данной ошибки жалуются игроки Minecraft. При клике на лаунчер и очередной запуск любимой игры, пользователи сталкиваются с окном ошибки. Это происходит из-за того, что в предыдущий раз сессия игры была прекращена некорректно. Возможно вы не дождались полного завершения игры и выключили устройство.
Ошибка JVM при запуске игр и приложений может также возникать по причине недостатка оперативной памяти на вашем устройстве. Для работы виртуальной машины Java требуется определенное количество выделенной памяти компьютером. Для компьютера это очень ценный ресурс, чем этой памяти больше, тем быстрей и лучше процессор справляется с поставленными задачами.
Устраняем ошибку Java Virtual Machine Launcher
Рассмотрим самый распространенный способ исправить ошибку «Could not create the Java Virtual Machine» – создание новой переменной среды.
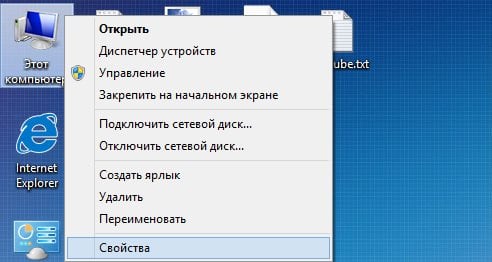
- Нажмите правой кнопкой по иконке «Мой компьютер» и выберите из контекстного меню «Свойства».

- В следующем окне в блоке слева выберите пункт «Дополнительные параметры».

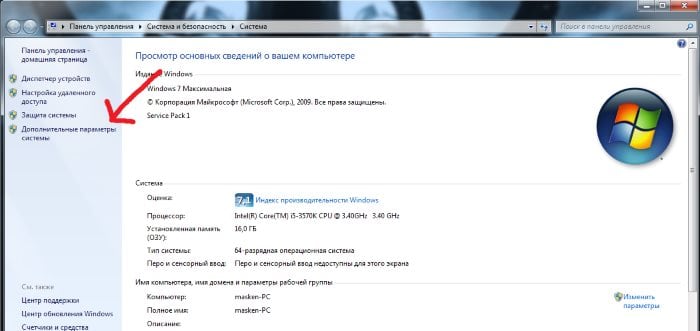
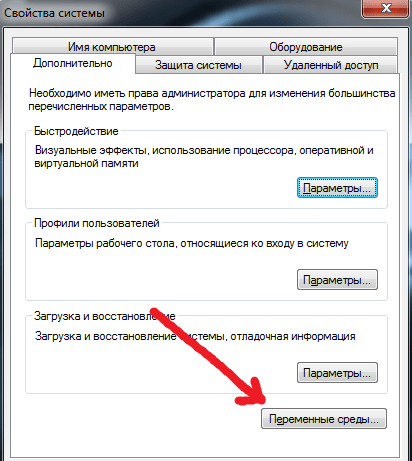
Далее найдите внизу окна кнопку «Переменные среды».
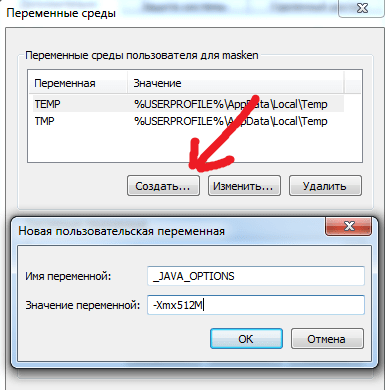
Под списком переменных нажмите кнопку «Создать».
Способ 2. Освобождаем оперативную память ПК
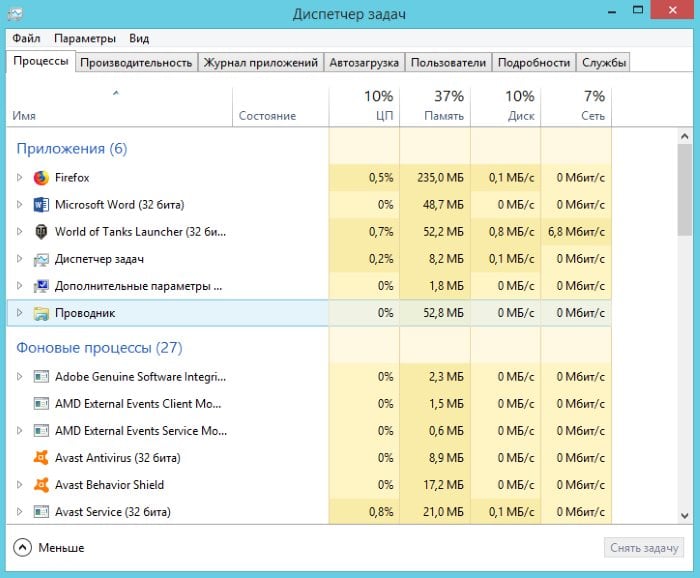
Следующий метод устранения ошибки заключается в освобождении оперативной памяти вашего компьютера. Как уже было сказано, ошибка может возникать по причине недостатка памяти. Чтобы ее освободить, нужно закрыть все ненужные программы, а также «убить» все лишние процессы. Ведь каждая программа нуждается в определенном количестве этого ресурса. На официальном сайте Майкрософт вы можете ознакомиться со всеми важными процессами Windows, прекращение которых повлечет за собой сбои системы. Чтобы остановить лишние процессы:
-
- Нажмите сочетание клавиш CTRL+SHIFT+ESC для Windows 7,8,10. CTRL+ALT+DEL – для Windows XP.
- Откроется окно со списком запущенных программ и процессов на вашем ПК.
Чтобы закрыть программу или остановить процесс, нужно выделить мышью название программы или процесса, затем нажать на кнопку внизу окна «Снять задачу».
Некоторые запущенные фоновые программы не отображаются в списке, но их можно увидеть в списке процессов. Эта разнообразные модули обновлений, они работают в фоновом режиме и следят за выходом новых версий определенных программ. Они также потребляют оперативную память. Вашей задачей будет отыскать такие процессы и остановить для решения текущей проблемы. Когда вы очистите память и остановите все ненужные программы и процессы, попробуйте запустить снова игру, чтобы убедиться, что окно с ошибкой «Could not create the Java Virtual Machine» уже не появляется.
Дополнительные методы устранения ошибки
Если программное обеспечение, при запуске которого появляется ошибка, было скачано со сторонних ресурсов, варезных сайтов, торрент-трекеров, то его действия часто блокируют антивирусы. Чтобы избежать такой преграды при запуске вам необходимо проверить список карантина антивируса и, если в нем имеются игры или программы, вы можете их удалить с этого списка. Но будьте осторожны при этом. Ведь такое ПО может действительно нести угрозу для системы. Если вы полностью уверенны в программе или игре, вы можете добавить ее в список исключений. В таком случае антивирус перестанет «подозревать» такое ПО.
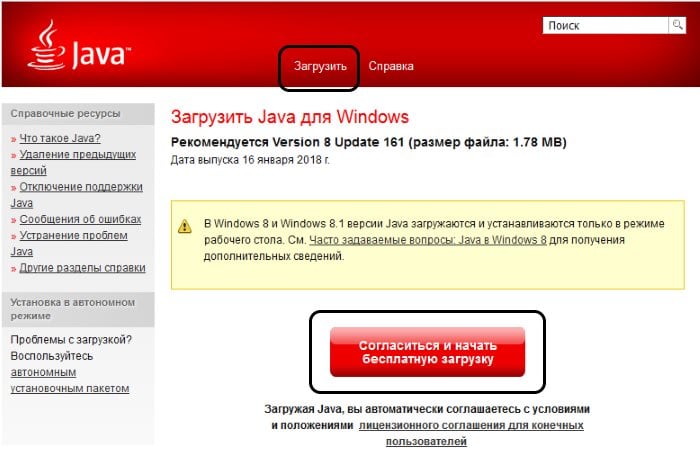
Если у вас не установлено программное обеспечение Java, вы можете загрузить его по ссылке https://www.java.com/ru/download/win8.jsp. Попадая на страницу, нажмите кнопку «Согласиться и начать бесплатную загрузку».

После этого будет загружен пакет данных, который нужно будет установить на свой ПК.
FIX: Could Not Create the Java Virtual Machine. (Solved)

Java is one of the best development tools for creating games and applications and server-side programs. Games or apps written in Java need the Java Virtual Machine environment to run.
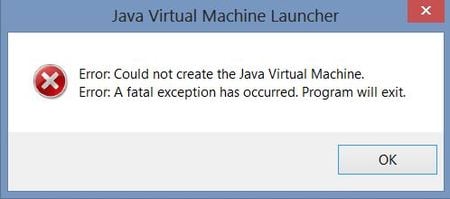
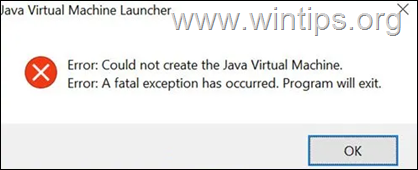
Games or applications developed with Java may crash unexpectedly or fail to open for various reasons, displaying the error «Could Not Create the Java Virtual Machine. Error: A fatal exception has occurred. Program will exit».

Below you will find several methods to resolve the Java Virtual Machine Launcher error «Could Not Create the Java Virtual Machine», in Windows 10/11 OS.
How to FIX: Could Not Create the Java Virtual Machine in Windows 10/11.*
* Suggestion: Before continuing with the following methods, try the following and see if the problem persists
-
- Install all Windows Updates.
- Press CTRL + SHIFT + ESC to open Task Manager and at Processes tab close all instances of Java Virtual Machine (right-click > End Task)
- 1. Install the Correct version of JAVA version for Java IDE app.
- 2. Increase Allocated Memory for JAVA Apps.
- 3. Launch JAVA with Admin rights.
- 4. Completely Remove and Reinstall JAVA.
Method 1. Install the Correct version of JAVA version for Java IDE app*
* Note: This method only applies to users using a JAVA IDE application for coding.
If you receive the mentioned error on a JAVA IDE application, you must ensure that the installed version of Java is compatible with the Java version (JRE or JDK) is running on JAVA IDE (Java Integrated Development Environment) application. So, proceed as follows:
Step 1. Check the JRE/JDK running version of JAVA IDE.
e.g. In the Eclipse IDE, check which version of the JRE or JDK it is running on by following the steps below:
1. From main menu, click Help > About Eclipse.
2. Click on Installation Details and choose the Configuration tab.
3. In the ‘Eclipse IDE Installation Details’ window, look at the line starting with -vm
4. The value at the line below will show you which JDK or JRE version on which Eclipse is running.- e.g.: If the path contains “jre6”, that means that Eclipse is running JRE version 6
- e.g.:If the path contains «jdk1.8.0_05« means that Eclipse is running JDK version 8.
Step 2. Check which version of JRE or JDK is installed on Windows.
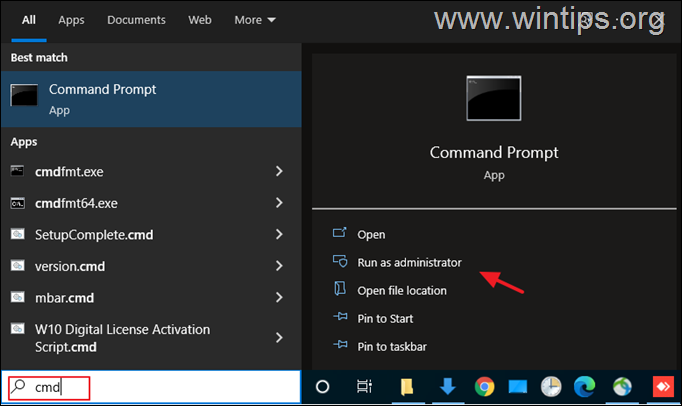
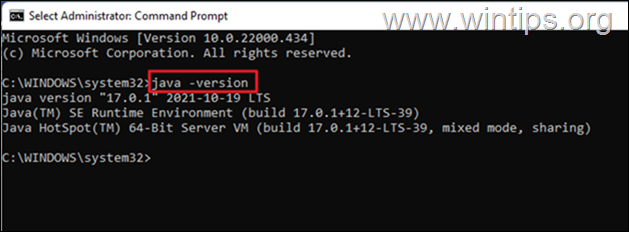
1. In the Search box type: cmd (or command prompt). Then select Run as administrator.

2. To find out the installed JAVA version give the following command and hit Enter:

3. If the IDE does not support the Java version on your device, proceed to install the correct version of Java. *
* Note: In some cases the installed JRE & JDK versions may be different. So, if you JAVA IDE application running on JDK, proceed and check also if the installed JDK matches the running JDK of the JAVA IDE app. To find out the installed JDK version on Windows, give the following command:
Method 2. Increase Allocated Memory for JAVA Apps.
Launching an application that exceeds the maximum memory size of the Java virtual machine could result in the error «Could Not Create the Java Virtual Machine». To work around this problem, go ahead and increase the allocated system memory that JAVA can use as follows:
1. Click on the Start menu and type in search bar: view advanced system settings. Then click Open.
![image_thumb[8]](data:image/svg+xml,%3Csvg%20xmlns='http://www.w3.org/2000/svg'%20viewBox='0%200%20682%20415'%3E%3C/svg%3E)
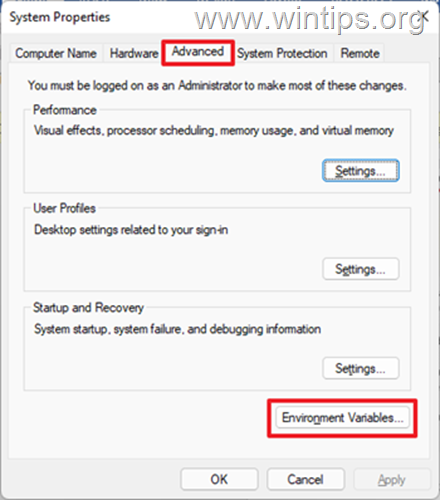
2. In the ‘System Properties’ window, select the Advanced tab and click Environment Variables.

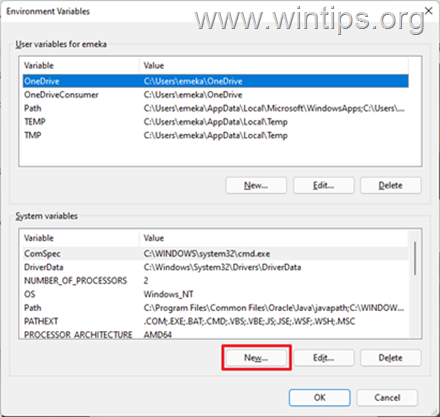
3. Below the System variables pane, select New.

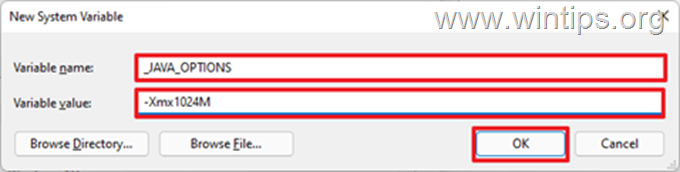
4. Set the Variable name as _JAVA_OPTIONS and the Variable value as -Xmx1024M. Then, click OK twice to save the change and close all open windows. *
* Info: This will adjust the allocated memory for Java to 1GB (1024MB).

5. Restart your machine to apply the change.
6. Finally try to open your game or app on Java Virtual Machine. The problem should be gone.Method 3. Launch java.exe with Admin rights.
The Java error also appears when the user does not have the admin rights or permissions to launch certain executables. Configuring Java to always run as an Administrator could fix the problem.
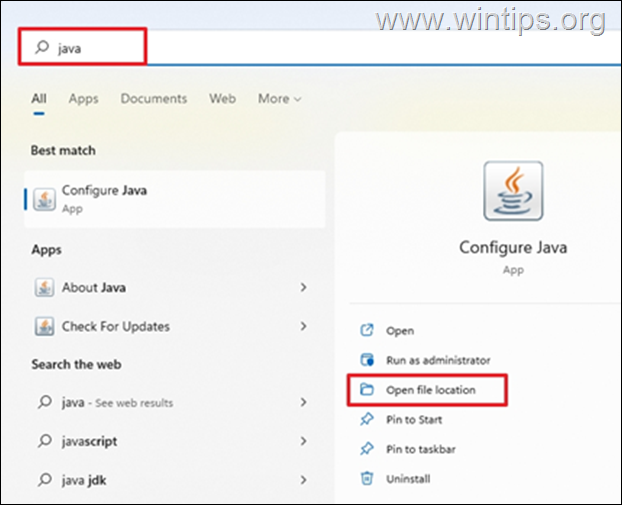
1. Press the Start menu and type Java in the search box.
2. Click Open file location.
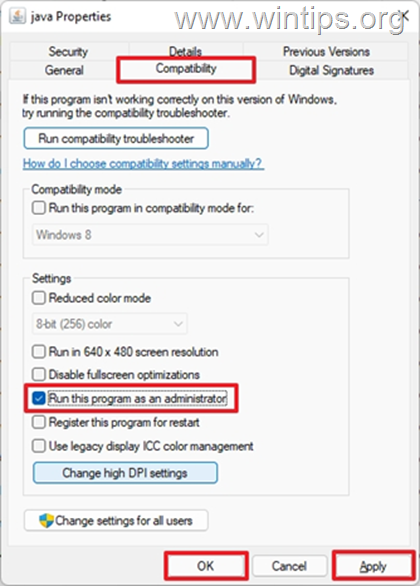
3. In the File Explorer window, right-click the Java executable file and select Properties.

4. At ‘java Properties» window select the Compatibility tab and below the Settings pane, check the box Run this program as an administrator. Then click Apply and OK.

5. Finally, start the program that cannot run because of the «Could Not Create the Java Virtual Machine» error and see if the problem persists.
Method 4. Completely Remove and Reinstall JAVA.
In some cases, Java may be corrupted or missing components, causing games or applications you are trying to run to close. In this case, follow the instructions below to remove all versions of JAVA versions from your computer and reinstall it.
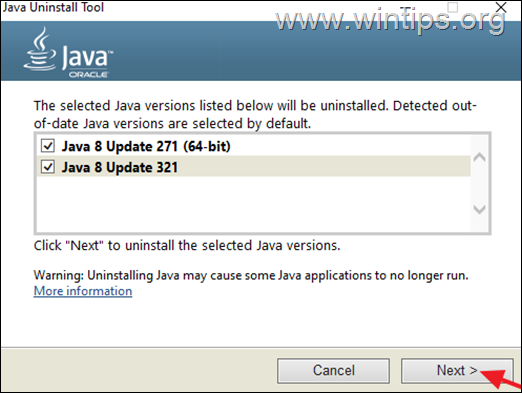
1. Download Java Uninstall tool.
2. Run the tool and select to remove all Java versions.
3. After removal, proceed and delete the Java folder(s) from the following locations on disk (if exist):
4. Restart your computer.
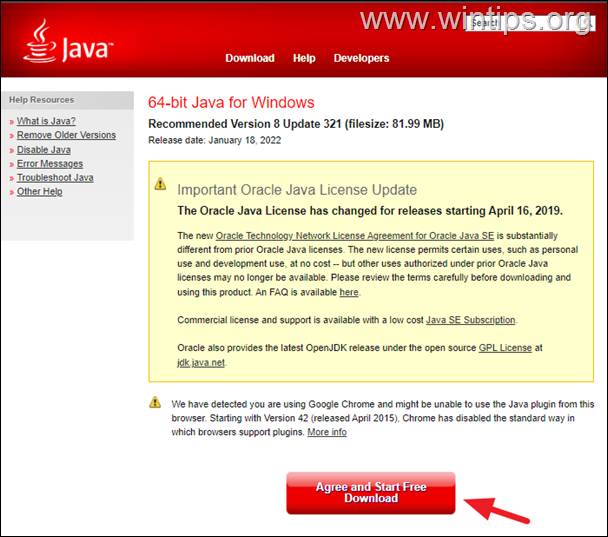
5. After reboot, visit Java official download page to download and install the latest version of Java.

That’s it! Which method worked for you?
Let me know if this guide has helped you by leaving your comment about your experience. Please like and share this guide to help others.

![image_thumb[8]](https://www.wintips.org/wp-content/uploads/2022/02/image_thumb8_thumb.png)