- Java Workspace & First app Tutorial
- Development Workspace
- How to setup a workspace in Eclipse
- How to create a new Java Project in Eclipse
- First Java App
- How to import existing Java projects into Eclipse workspace
- About the Author:
- How to create, build and run a Java Hello World program with Eclipse
- 1. Download and Install Eclipse IDE
- 2. Choose a Workspace Directory
- 3. Change Perspective
- 4. Create a Java Project
- 5. Write Your First Java Program
- 6. Compile, Build and Run Your First Java Program
- Related Java Hello World Tutorials:
- Other Eclipse Tutorials:
- About the Author:
Java Workspace & First app Tutorial
In this Java tutorial we set up a workspace to develop Java apps.
We discuss the concept of a workspace and how to create a new Java project in Eclipse.
Finally, we write our first simple Java app that prints a message to the console.
Development Workspace
Before we write our first Java app, we need to create a workspace, or at least a project.
- Projects are the individual applications we want to create. For example, if we wanted to create a Media Player and a Calculater app, they would be separate projects.
- A workspace is where all our projects are stored, as well as some of the IDE’s settings.
If you’re not following along with Eclipse, you may have to follow a different process to create a workspace or project in your IDE.
Create a project in your IDE and call it ‘LearningJava’.
If you are following along with Eclipse, please see the two sections below on how to setup a workspace, and how to create a new project.
Otherwise, go to the First App Section of this lesson.
How to setup a workspace in Eclipse
When we run Eclipse, the launcher will pop up and ask us to select a directory for our workspace.
A workspace in Eclipse is a directory to store all our separate projects.
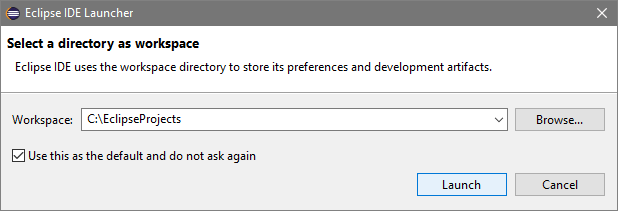
We chose a folder on our C:\ drive called ‘EclipseProjects’.
We also chose to use this workspace as our default, and not ask again. If this checkbox is not selected, the launcher will ask you to select a directory every time you run Eclipse.
If Eclipse doesn’t show the launcher, don’t worry, you can set the workspace by going to File > Switch Workspace > Other.
How to create a new Java Project in Eclipse
Projects are the individual applications we want to create.
For example, if we wanted to create a Media Player and a Calculater app, they would be separate projects, but still be stored in the same workspace.
To create a new project in Eclipse, we choose File > New > Java Project.
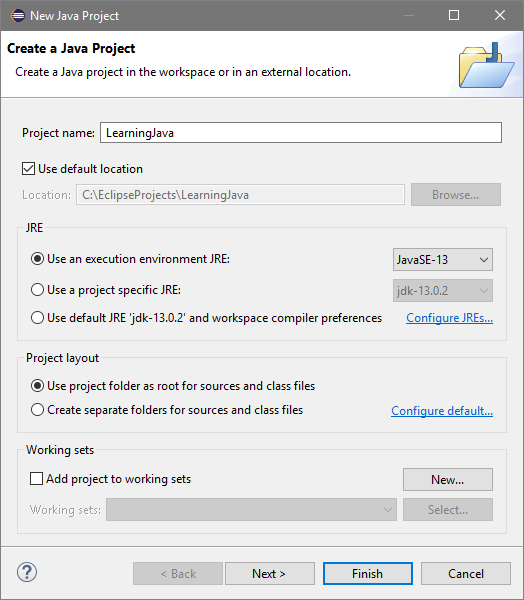
Choose the same parameters for your project.
- Project name: LearningJava
- Use default location: Checked
- Use an execution environment JRE: JavaSE-13
- Use project folder as root for sources and class files: Selected
- Add project to working sets: Unchecked In a production environment we would typically separate source and class files, as well as modify some project specific settings.
Click Finish and wait for the project to load in Eclipse.
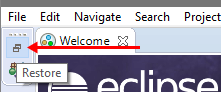
If you only see the Welcome page, find and click on the Restore button in the top left corner, or simply close the Welcome page.
First Java App
We’re finally ready to start programming. We’ll write a simple application that prints a message to the console.
If you’re not using Eclipse:
- Create a new class file called ‘Program.java’.
- Copy and paste the code below into the file.
- Compile/Run the file.
If you are using Eclipse:
- Go to File > New > Class.
- In the New Java Class window, specify the Name as ‘Program’.
- Click Finish.
- Copy and paste the code below into the file.
- To compile and run the application, go to Run > Run or click on the big round green ‘play’ button on the taskbar.
In the terminal/console window you should see the following output.
Congratulations, you’ve just written, compiled and ran your first Java application.
How to import existing Java projects into Eclipse workspace
It’s very often that you have just downloaded or copied an Eclipse project into your computer and can’t wait to check it out with your pen friend Eclipse IDE. For example, you just downloaded an interesting Spring example project from Codejava.net and want to open it in Eclipse. However, you quickly notice that Eclipse doesn’t have something like File > Open Project. Even when you switched the workspace to the project’s directory, Eclipse still doesn’t recognize the project! Oh, what’s the heck? Well, that’s simply because you haven’t selected the right thing. In Eclipse, to open an existing project which is copied from another source, you need to use its Import function.
The Import function can be accessed in three ways:
-
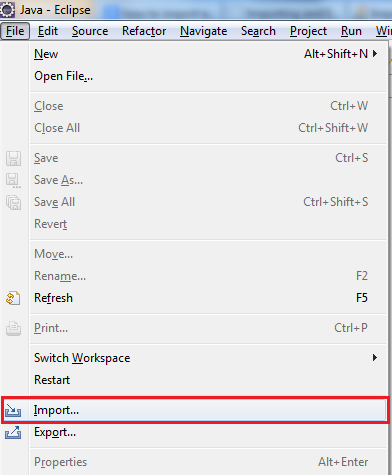
- The most convenient and quickest way: File > Import… (shortcut: Alt + F + I)

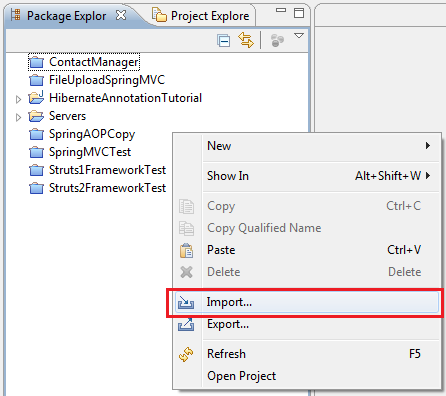
- Or right click on any blank space in Package Explorer view, select Import… from the context menu:

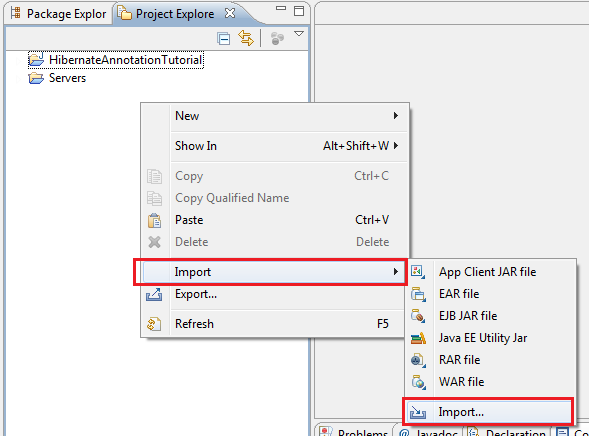
- Or right click on any blank space in Project Explorer view, then select Import > Import… from the context menu:
- The most convenient and quickest way: File > Import… (shortcut: Alt + F + I)
Regardless of the way you took, Eclipse brings the Import wizard as follows:
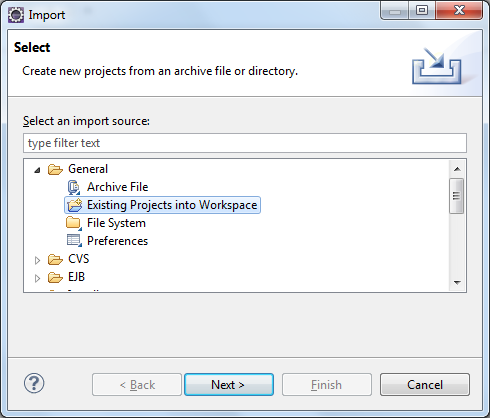
Select Existing Projects into Workspace and click Next. The next screen Import projects appears:

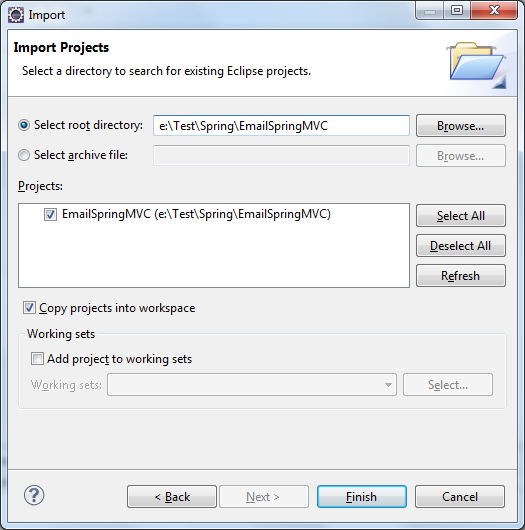
Suppose you downloaded an Eclipse project bundled as a zip file, for example: EmailSpringMVC.zip, then select the radio option Select archive file , and click the Browse button to locate the zip file. Eclipse will inspect the zip file and show available projects in the list box. In this case, the project is EmailSpringMVC.
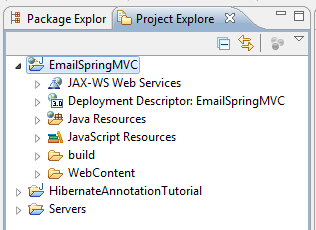
Click Finish, Eclipse will extract the archive and copy the files into current workspace, and finally show up the recently imported project in Project Explorer/Package Explorer view:
-
- In case you don’t have a project zip file, just a project’s directory, you have to select the radio option: Select root directory and specify the project’s directory path:
- The option Copy projects into workspace must be selected (and automatically by Eclipse) when importing projects from a zip archive. If importing from a directory, that option is optional.
Other Eclipse Tutorials:
About the Author:

Nam Ha Minh is certified Java programmer (SCJP and SCWCD). He started programming with Java in the time of Java 1.4 and has been falling in love with Java since then. Make friend with him on Facebook and watch his Java videos you YouTube.
How to create, build and run a Java Hello World program with Eclipse
If you are new to Java programming and Eclipse IDE, this step-by-step tutorial helps you get started to be familiar with the most Java IDE by writing your first Java program using Eclipse. And you will be able to build and run your program inside Eclipse.
1. Download and Install Eclipse IDE
Eclipse is the most popular Integrated Development Environment (IDE) for developing Java applications. It is robust, feature-rich, easy-to-use and powerful IDE which is the #1 choice of almost Java programmers in the world. And it is totally FREE.
As of now (fall 2016), the latest release of Eclipse is Neon (version 4.6). Click the following link to download Eclipse:
You will see the download page like this:
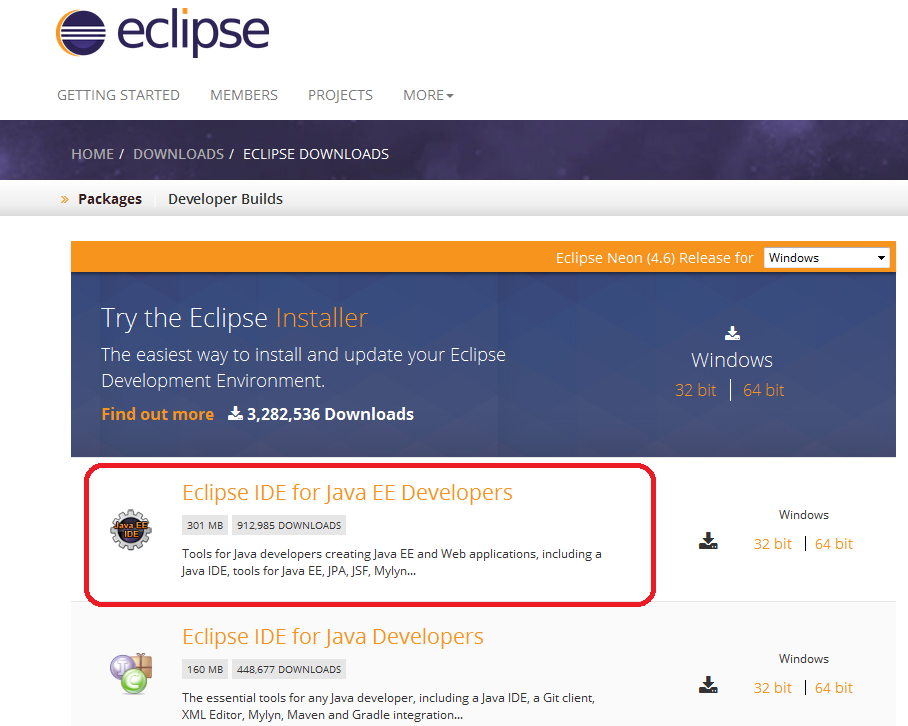
You can install Eclipse either by downloading the Eclipse Installer or package (zip file). I’d recommend you to download by package. Eclipse comes with various packages for different development purposes. For Java, there are two main packages listed as you see above:
- Eclipse IDE for Java EE Developers: This is for developing Java EE applications (web applications using Servlets & JSP).
- Eclipse IDE for Java Developers: This is for developing Java SE applications, a subset of the Java EE Developer package.
Click on the link 32-bit or 64-bit (depending on the bit version of your operating system) to start download the package.
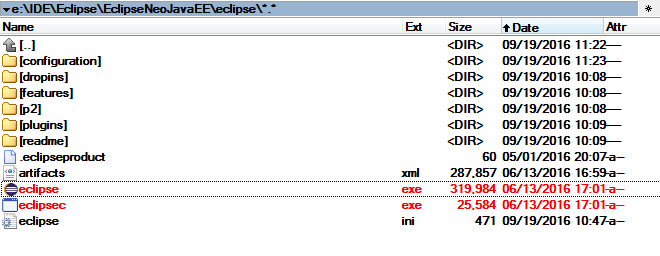
Extract this ZIP file into a directory on your computer. You will see a directory called eclipse containing Eclipse’s installed files:
Eclipse Neon requires Java 8 or newer so make sure you have JDK 8 already installed on your computer. If not, follow this tutorial to install JDK.
Click eclipse.exe file (Windows) to start the IDE. You will see the splash screen of Eclipse Neo:

That’s it! You have successfully installed Eclipse IDE. Next, let’s see how to create a workspace.
2. Choose a Workspace Directory
Eclipse organizes projects by workspaces. A workspace is a group of related projects and it is actually a directory on your computer. That’s why when you start Eclipse, it asks to choose a workspace location like this:
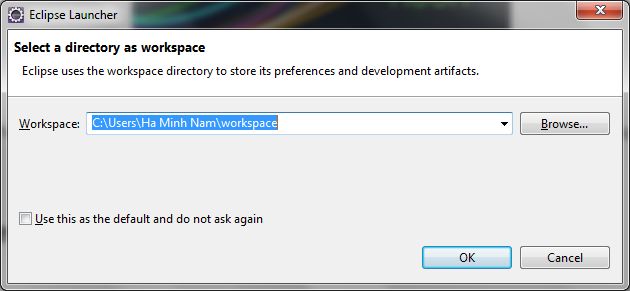
By default, Eclipse created a workspace directory at your USER_HOME\workspace. If you want to choose another directory, click Browse. Here I chose a different workspace:
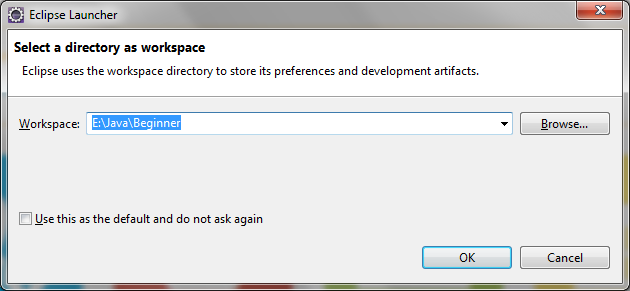
Check Use this as the default and do not ask again if you don’t want to be asked whenever you start Eclipse. You can always change workspace when Eclipse is running.
Click OK. You should see the welcome screen:
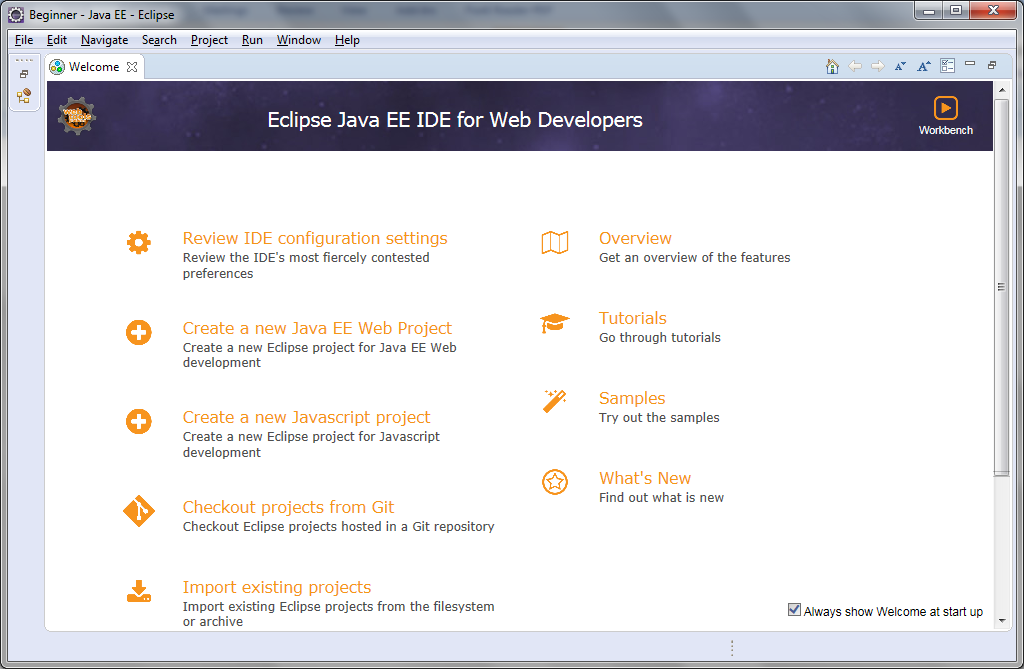
Now, we are ready to create a Java project.
3. Change Perspective
Before creating a new Java project, let familiarize yourself with Perspective. Imagine a perspective is a predefined configuration specialized for a specific aspect of development process such as Java, Java EE, Debug, Database Development, Web, etc. Depending on your need, you can switch back and forth among different perspectives during a development session.
Since we installed Eclipse IDE for Java EE Developers, the default perspective is Java EE. To change perspective, go to Window > Perspective > Open Perspective > Other… You will see a small dialog listing all available perspectives:

Here we choose Java perspective. Click OK. Here’s how the Java perspective would look like:
4. Create a Java Project
To create a new Java project in Eclipse, go to File > New > Java Project. The New Java Project wizard dialog appears let you specify configurations for the project:

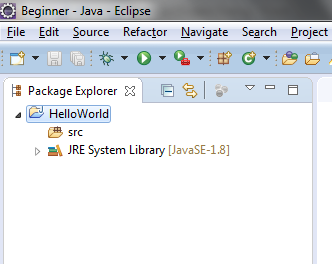
Enter project name: HelloWorld. Leave the rest as it is, and click Finish.
You should see the HelloWorld project is created in the Package Explorer view as following:
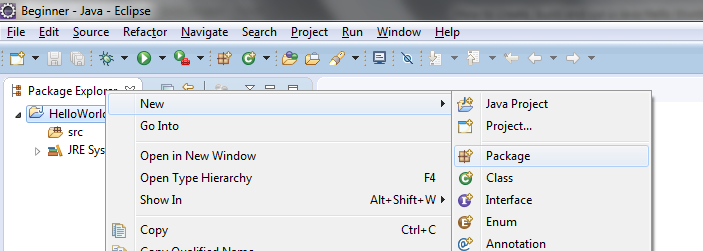
It’s recommended to create a package for your project. Right click on the project, and select New > Package from the context menu:
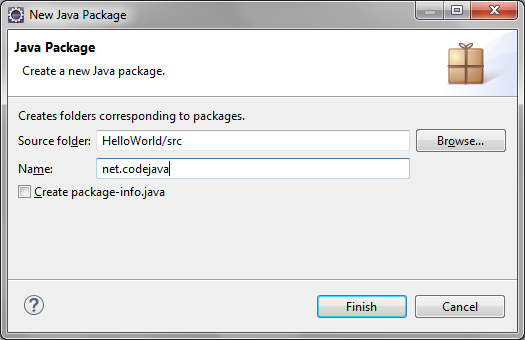
In the New Java Package dialog, enter the name your package. Here I enter net.codejava :
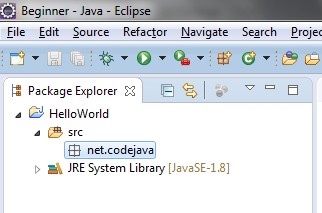
Click Finish. You should see the newly created package appears:
Now, it’s time to create a Java class for your hello world application.
5. Write Your First Java Program
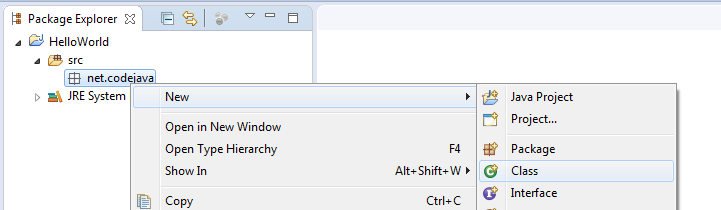
To create a new Java class under a specified package, right click on the package and select New > Class from the context menu:
The New Java Class dialog appears, type the name of class as HelloWorld and choose the option to generate the main() method:
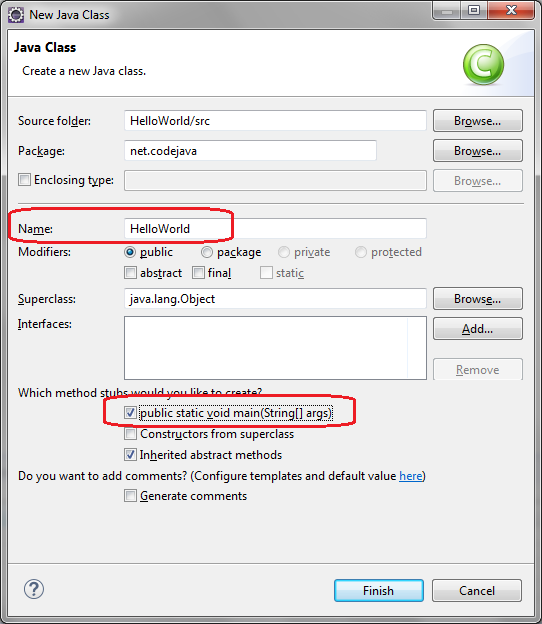
And click Finish. The HelloWorld class is generated like this:

Now, type some code in the main() method to print the message “Hello World” to the console:
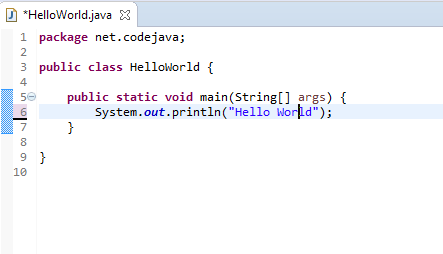
That’s it. We have created a Java hello world program using Eclipse IDE.
6. Compile, Build and Run Your First Java Program
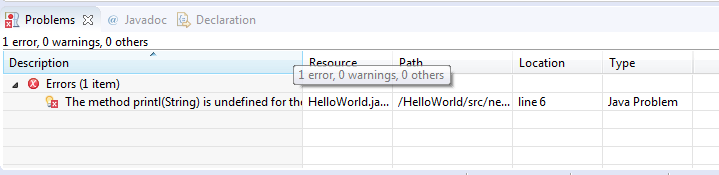
By default, Eclipse compiles the code automatically as you type. And it will report compile errors in the Problems view at the bottom like this:
If you want to disable automatically build feature, click the menu Project and uncheck Build Automatically:
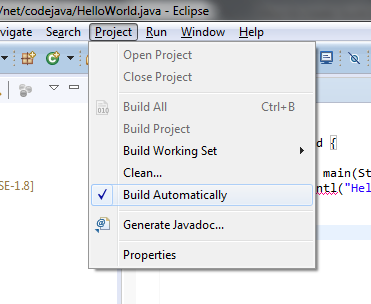
However, it’s strongly recommended to keep the auto build mode for it helps you detect errors instantly.
Now, let’s run the hello world application. Click menu Run > Run (or press Ctrl + F11), Eclipse will execute the application and show the output in the Console view:

That’s it! The HelloWorld program has run and printed the output “Hello World” and terminates.
We hope this tutorial help you get started with Eclipse and Java easily. Thank you for reading.
What’s next? I recommend you to continue with this article: Java OOP: Understand Classes and Objects
Watch this tutorial in video:
Related Java Hello World Tutorials:
Other Eclipse Tutorials:
About the Author:
Nam Ha Minh is certified Java programmer (SCJP and SCWCD). He started programming with Java in the time of Java 1.4 and has been falling in love with Java since then. Make friend with him on Facebook and watch his Java videos you YouTube.