What is java.library.path? How to set in Eclipse IDE? Example
java.library.path is a System property, which is used by Java programming language, mostly JVM, to search native libraries, required by a project. Similar to PATH and Classpath envir onment variable, java.library.path also includes a list of directory. When Java code loads a native library (a library or executable written in a language like C, C++, or native code) using System.loadLibrary(«name of library») method, java.library.path is scanned for specified library. If JVM doesn’t found the requested native library, then it throws java.lang.UnsatisfiedLinkError: no native library in java.library.path.
Now someone may argue that, why does Java program should depend on a native library, doesn’t this make a Java application platform-dependent ? Well, he would be right, but there are situations, where most of the code is already written in native languages, and you are just writing some Java code on top of that. In that scenario, instead of rewriting the whole stuff, you tend to use native libraries.
Sometimes a third-party JAR (written in Java) d epends upon some native components as well. If you have been using Tibco RV messaging, then you might know that Java API f or Tibco RV depends upon several DLL files, and until those files are present in java.library.path , you can not run that Java program successfully.
Since most of us, run Java programs from Eclipse IDE, it’s important to know How to set java.library.path in Eclipse. In this Java tutorial, I will show you a couple of ways to set java.library.path in Eclipse IDE, you can follow similar steps in other IDE like Netbeans or IntelliJ to set java.library.path.
3 Ways to set java.library.path in Eclipse IDE
If you are already familiar wit h setting PATH and Classpath in Java, then this shouldn’t be a problem. Since java.library.path is a system property, most common way to set this is by providing as JVM arguments. Since at low level (if you are using start-up scripts), Java program starts with «java» command, you can provide them system property using -Dpropery=value . In order to set java.library.path you can provide -Djava.library.path=C:\Windows to set it in Windows.
By the way, it’s a little different in Eclipse, which we will see in next section, which shows three places to set java.library.path in Eclipse.
1) You can set java.library.path in Eclipse by providing native library location for you libraries inside «java build path». Just follow below steps :
1.1) Select Project ==> Properties ==> Java Build Path ==> Libraries ==> JRE System Library ==> Native library location ==> Edit
1.2) Edit will open a dialog box, which allows you to choose an external folder, or a workspace location, to find native libraries
2) Similar to the above steps, you can also set native library location, which will then converted into java.library.path by Eclipse, into the source tab. Each source folder allows you to specify a native library location.
1.2) Each Source folder has one native library location, select and edit them to include your native libraries
3) A third way to set java.library.path is by using VM arguments. Open Run Configurations or Debug Configuration of your project and provide -Djava.library.path=»native library path» in the Arguments tab, under VM arguments.

So, you can see It’s not difficult to set java.library.path in Eclipse. It’s also worth noting that, this system property is only read when JVM startup . IF you further change this System property using System.setProperty(«java.library.path», «new path») , it won’t take into effect.
- 30 Useful Eclipse Shortcuts for Java Developers (list)
- How to remote debug Java application in Eclipse? (tutorial)
- 10 Eclipse debugging tips Java developer should know? (see here)
- How to attach source code for the JAR file in Eclipse? (guide)
- Eclipse shortcut to print System.out.println statements? (shortcut)
- How to increase the console buffer size in Eclipse? (steps)
- How to use spaces instead of tabs in Eclipse? (guide)
- How to create an executable JAR file from Eclipse? (example)
- 3 Books to Learn Eclipse IDE for Java developers (list)
- How to Increase Heap Size of Java Program running in Eclipse? (guide)
6 comments :
Doesn’t by using native library or code, you risk your Java program of making platform dependent? Isn’t it against of Java’s motive of creating application which is platform independent?
I have never set that java.library.path and never faced any issue. Do you know that is the default value of java.library.path, and why it’s not a problem to not set this?
Few things to note about java.library.path system property :
1) java.library.path is used to search native libraries used by your Java application e.g. tibco rv binaries, .dll files in windows and .so files in Linux.
2) If you don’t provide explicit value for java.library.path, it is automatically set to PATH by JVM in Windows operating system and to the value of LD_LIBRARY_PATH in UNIX e.g. Solaris or Linux.
3) They only contains location of native binaries not JAR files.
4) If your native libraries are not located on those location then you will get unsatisfied link error.
You can also check value of this system property by using following code :
System.out.println(«java.library.path : » + System.getProperty(«java.library.path»));
I have performed the steps as mentioned by specifying the path of the DLL under the native library but still the DLL is not found?
@Anonymous, are you trying in Eclipse or command line?
How to add JAR Files in Eclipse Project’s Build path? Example
In this Java Eclipse tutorial, I will show you two ways to add external JAR files in Eclipse Java projects. Many times we need to use external JAR files in our Java application for different needs like for general purposes you may use Google Guava or Apache Commons. If you are using Spring or Hibernate framework then you need their JAR files as well. In order to use any third-party library or framework, we have to add their JAR files in the classpath, to compile and run our Java programs. Since Eclipse is the most popular IDE for developing Java applications, it’s important to know how you can add external JARs into your Java project’s build path.
For example, suppose, you have downloaded an Apache commons JAR file from the internet and want to add that file to your Java project. In order to use classes and methods from that library, your project must reference those and this is what we will learn here.
You can even attach Java source files, corresponding to a JAR file for seeing actual code while navigating and debugging your Java program. This is really useful when you are stepping into the source code of a third-party library or any internal library while debugging. In my last article, I have shown you how to attach sources to a JAR file, which ideally should be next to this article, but never mind you can refer to them now.
Though you can add any external JAR files in your Java project on Eclipse, I suggest using Maven as a build tool for dependency management, it’s a lot easier to manage a central local repository using Maven for keeping those useful JAR files, instead of searching on the internet, downloading it and then manually adding into your Java project’s build path.
2 ways to add JAR file in Java project build path in Eclipse
Here are a couple of ways to add .jar files in the Java project on Eclipse IDE. Though there are different ways you can reuse JAR files e.g. in form of a library, Eclipse provides its own bundled JRE and JUnit library, but most of the time, we add .jar files as an external dependency. These are the JAR files, which you might have downloaded from the internet or copied from any other project.
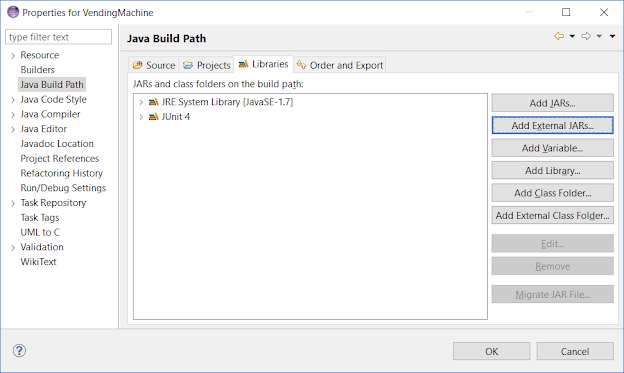
1) Open project properties windows by following steps, Select Project -> Right Click -> Properties, then select Java Build Path and go to Libraries tab and click on Add External JARs. This allows you to reference any JAR file in any folder on your machine.
Just make sure that the location of the JAR file is accessible. Once you have selected the JAR file after browsing, it will appear inside your project as Referenced Libraries.
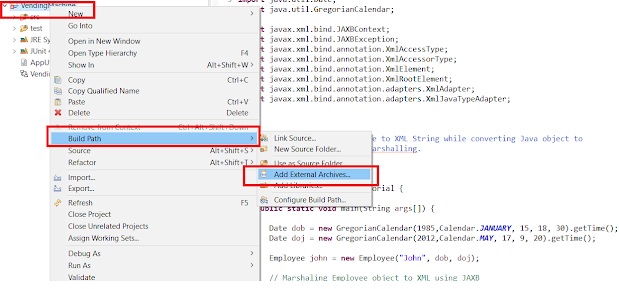
2. This is the shortcut of the earlier method, In this method, you don’t need to navigate project properties windows. Just Select project -> Right Click -> Build Path -> Add external archives .
This will open the same file explorer as the earlier method, which allows you to browse through directories and choose external JAR. Once successfully added, it will appear inside Referenced Libraries of your project.
That’s all on how to add JAR files in the Eclipse project build path. The second way is much quicker than the first way, as you only need a couple of selections, but knowledge of project properties windows helps a lot, like while changing compiler settings for your project as seen in my post avoiding must override method error in Eclipse. You can use it anyway as per your liking, but make sure that JAR appears in referenced libraries inside your project when you see it from project explorer.
- Top 30 Eclipse keyboard shortcuts for Java programmers (shortcuts)
- 3 Books to Learn Eclipse IDE for Java Programmers (books)
- 10 Essential Eclipse debugging tips for Java developers (tips)
- How to do remote debugging in Eclipse (guide)
- Eclipse shortcut to comment and uncomment several lines (article)
- How to increase heap size of Java Program in Eclipse (tutorial)
- How to solve the «main class not found error» in Eclipse? (guide)
- How to connect Eclipse to the Oracle database? (guide)