- Eclipse Installer 2023-06 R
- Try the Eclipse Installer 2023‑06 R
- 5 Steps to Install Eclipse
- 1. Download the Eclipse Installer
- 2. Start the Eclipse Installer executable
- 3. Select the package to install
- 4. Select your installation folder
- 5. Launch Eclipse
- How To Install Eclipse For Java On Windows
- Download Eclipse For Java
- Install Eclipse For Java Developers
- Launch Eclipse and Configure Workspace
- Hello World Project
- How to Download, Install, and Run JDK and Eclipse
- Community Q&A
- Tips
- You Might Also Like
Eclipse Installer 2023-06 R
The Eclipse Installer 2023‑06 R now includes a JRE for macOS, Windows and Linux.
Try the Eclipse Installer 2023‑06 R
The easiest way to install and update your Eclipse Development Environment.
5 Steps to Install Eclipse
We’ve recently introduced the Eclipse Installer, a new and more efficient way to install Eclipse. It is a proper installer (no zip files), with a self-extracting download that leads you through the installation process. For those who prefer not to use the Installer, the packages and zip files are still available on our package download page.
1. Download the Eclipse Installer
Eclipse is hosted on many mirrors around the world. Please select the one closest to you and start to download the Installer
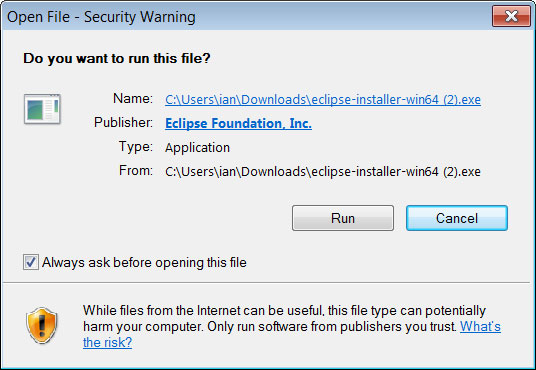
2. Start the Eclipse Installer executable
For Windows users, after the Eclipse Installer executable has finished downloading it should be available in your download directory. Start the Eclipse Installer executable. You may get a security warning to run this file. If the Eclipse Foundation is the Publisher, you are good to select Run.
For Mac and Linux users, you will still need to unzip the download to create the Installer. Start the Installer once it is available.
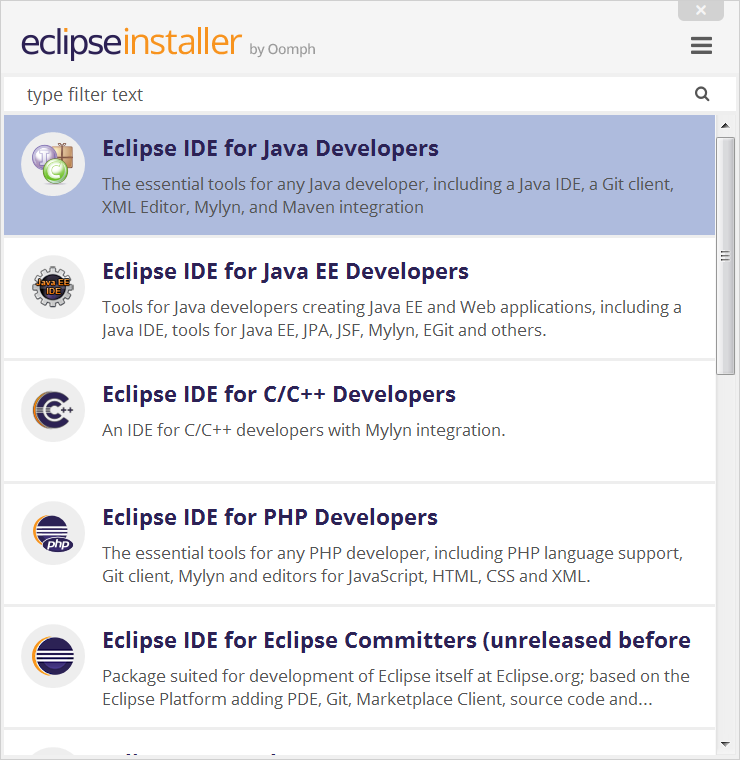
3. Select the package to install
The new Eclipse Installer shows the packages available to Eclipse users. You can search for the package you want to install or scroll through the list.
Select and click on the package you want to install.
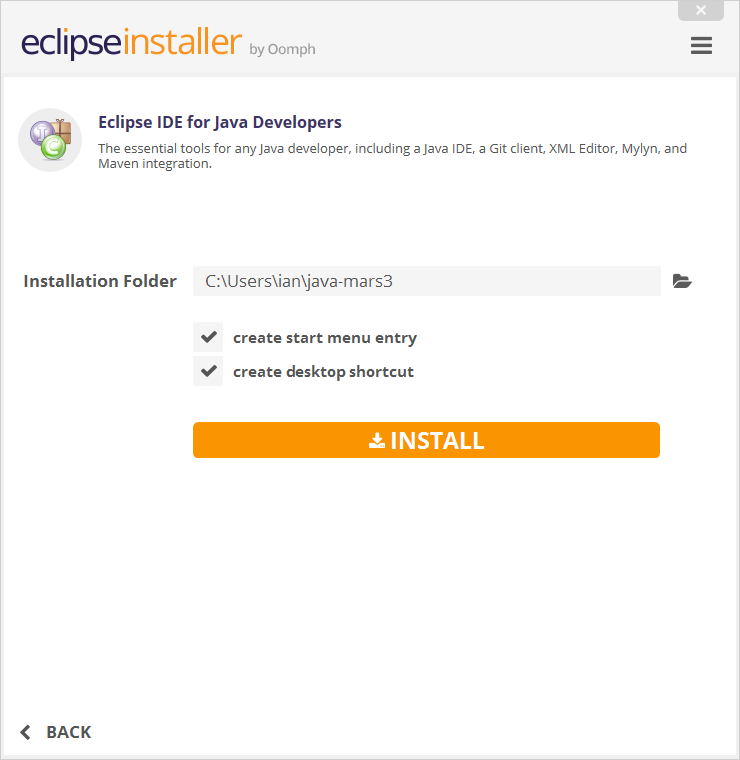
4. Select your installation folder
Specify the folder where you want Eclipse to be installed. The default folder will be in your User directory.
Select the ‘Install’ button to begin the installation.
5. Launch Eclipse
Once the installation is complete you can now launch Eclipse. The Eclipse Installer has done it’s work. Happy coding.
How To Install Eclipse For Java On Windows
Provides all the steps required to install Eclipse for Java Development on Windows 10 and getting started with Java development using the Hello World example.
Eclipse is the most popular IDE used for Java application development. The other popular options for Java development include IntelliJ IDEA, VSCode, and NetBeans.
Notes: It assumes that Java is already installed on the system. You may also be interested in How To Install OpenJDK 13 On Windows and How To Install Java 11 On Windows. You can also follow How To Install IntelliJ IDEA for Java on Windows to install IntelliJ IDEA on Windows 10.
Download Eclipse For Java
Open the Eclipse Packages Page to view the various Eclipse packages distributed by the Eclipse community. It lists the Java packages as shown in Fig 1.
Eclipse IDE for Enterprise Java Development and Eclipse IDE for Java Developers are the popular Java packages distributed by the Eclipse Foundation. I will cover the installation of Eclipse IDE for Java Developers and creating the Hello World Project to print Hello Java !! on the console. The same steps can be followed to install Eclipse IDE for Enterprise Java Development.
Click on the link Eclipse IDE for Java Developers to view the description, features, and download options as shown in Fig 2.
Click on the Windows 64-bit Link to view the download locations for Eclipse For Java Developers as shown in Fig 3.
Click on the Download Button to start the download.
Install Eclipse For Java Developers
In this step, we will install Eclipse for Java as downloaded by us in the previous step. Extract the Eclipse file downloaded by us to the preferred location. It should be similar to the one as shown in Fig 4.
You may also create the Desktop Shortcut to launch it from the desktop.
Launch Eclipse and Configure Workspace
In this step, we will execute the Eclipse and configure the workspace. A workspace is a collection of projects and arrangement of the development IDE.
Start Eclipse by either clicking the executable file from installation path or the desktop shortcut icon created by us. It will show the splash screen and show the dialog to choose workspace as shown in Fig 5.
Make sure that you have kept the checkbox to choose workspace at start of Eclipse as unchecked so that we can select a different workspace at the start of Eclipse.
Now click on the Launch Button to launch the Eclipse IDE with the selected workspace. The Eclipse will show the welcome screen as shown in Fig 6.
Close the Welcome Screen. The default workspace looks like the one as shown in Fig 7.
Hello World Project
In this step, we will create the Hello World Project and print Hello Java !! on Console. Click on File -> New -> Java Project to start creating the project. It will show the Create Java Project Wizard as shown in Fig 8 and Fig 9.
Click on the Next Button to continue with Java Settings as shown in Fig 10.
Now click on the Finish Button to create the Project. It will also ask to create the Module as shown in Fig 11.
I have skipped creating the module as part of this tutorial. Finally, it will create the project and show it on the Projects Panel as shown in Fig 12.
Now we will create the java file HelloJava.java. Right-click on the src folder, select New and click on the Class option to start creating the Java class file. It will show the New Java Class Dialog as shown in Fig 13 and Fig 14.
Click on the Finish Button to create the Java Class using the class package as shown in Fig 15.
Notes: In case you have installed the most recent version of Java i.e. JDK 13, you might see errors specific to the build path. You can fall back to using the JDK 12 or older versions of JDK.
Now update the HelloWorld class as shown in Fig 16.
Now right click on the HelloWorld.java and choose File -> Run As -> Java Application to compile and execute the program. It will show the output on Console as shown in Fig 17 and Fig 18.
This is how we can install Eclipse for Java Developers on the Windows systems and create the project and execute Java programs.
How to Download, Install, and Run JDK and Eclipse
wikiHow is a “wiki,” similar to Wikipedia, which means that many of our articles are co-written by multiple authors. To create this article, 14 people, some anonymous, worked to edit and improve it over time.
This article has been viewed 566,419 times.
Computer programming using Java is arguably the most important aspect of computing. Many of today’s popular applications and programs utilize java as the main source code, ranging from computer games to mobile phones. Eclipse is just one of the numerous script editing applications for developing java programs and allows students to write and compile java code and execute programs.

Visit the Java downloads page on Oracle’s website to find the JDK environment download. Scroll down until you find Java SE 6 Update 43, and download JDK.

Once you have selected download, accept the terms of service and choose the correct OS corresponding for the specific JDK. (Windows, Mac, Linux, etc.)


After the initial installation is done, a pop up asking you where your source java files will be. You can choose to change where you want to keep your folder but it’s best to stick with what you were given first.

When the installation is finished, we will begin to the installation of Eclipse. Go to http://www.eclipse.org/downloads/ .tet

For Windows users, you will have to know what type of version of your OS you have. If your computer is a 64 bit Windows, select Windows 64 and if you have a 32 bit Windows, select Windows 32 bit.

Once you have downloaded the Eclipse archive you will need to decompress the zip file, which will create the unzipped Eclipse folder. You may want to extract the archive to the root of C:\ drive, thus creating the folder “C:\eclipse”, or just moved the extracted eclipse folder to the root of C:\ drive if you extracted it already. Since Eclipse does not have any installer, there will be a file inside the Eclipse folder named eclipse.exe ( ). You can double click on the file to run Eclipse.

After eclipse has been fully installed and extracted, create a workspace folder where you will contain all the program files you create.

Now that you have finished installing Eclipse, restart your computer. Restarting your computer refreshes system memory and allows registration or configuration changes made by installers and uninstallers to take effect.

Community Q&A
I tried to install Eclipse several times but it keeps displaying «This app can’t be run on your PC». What is going on?
Are you using Windows, Linux, or Mac? The main reason for such a display is because your system does not support the version of Eclipse you have downloaded. Also, check to see if your system is 32 bit or 64 bit.
Thanks! We’re glad this was helpful.
Thank you for your feedback.
As a small thank you, we’d like to offer you a $30 gift card (valid at GoNift.com). Use it to try out great new products and services nationwide without paying full price—wine, food delivery, clothing and more. Enjoy! Claim Your Gift If wikiHow has helped you, please consider a small contribution to support us in helping more readers like you. We’re committed to providing the world with free how-to resources, and even $1 helps us in our mission. Support wikiHow
Just make a basic Text file and call it «index», for example. Then rename it from «index.txt» to «index.html».
Thanks! We’re glad this was helpful.
Thank you for your feedback.
As a small thank you, we’d like to offer you a $30 gift card (valid at GoNift.com). Use it to try out great new products and services nationwide without paying full price—wine, food delivery, clothing and more. Enjoy! Claim Your Gift If wikiHow has helped you, please consider a small contribution to support us in helping more readers like you. We’re committed to providing the world with free how-to resources, and even $1 helps us in our mission. Support wikiHow
Make sure that the version of Java you are installing matches your computer. 32-bit computers should install the 32-bit (also referred to as x86) version.
Thanks! We’re glad this was helpful.
Thank you for your feedback.
As a small thank you, we’d like to offer you a $30 gift card (valid at GoNift.com). Use it to try out great new products and services nationwide without paying full price—wine, food delivery, clothing and more. Enjoy! Claim Your Gift If wikiHow has helped you, please consider a small contribution to support us in helping more readers like you. We’re committed to providing the world with free how-to resources, and even $1 helps us in our mission. Support wikiHow
Tips
You Might Also Like


How to Set JAVA_HOME for JDK & JRE: A Step-by-Step Guide

Use Easy Windows CMD Commands to Check Your Java Version

How to Do Division in Java (Integer and Floating Point)

How to Compile and Run Java Programs Using Notepad++