- Русские Блоги
- Draw points opencv python
- Macro Definition Documentation
- ◆ CV_RGB
- How to Draw Points in OpenCV Python
- Method 1
- Step 1
- Step 2
- Step 3
- Step 4
- Step 5
- Method 2
- Step 1
- Step 2
- Step 3
- Step 4
- Step 5
- Output
- OpenCV Python – How to find and draw extreme points of an object on an image?
- Example
- Output
- Example
- Output
- Draw points opencv python
- Drawing Line
- Drawing Rectangle
- Drawing Circle
- Drawing Ellipse
- Drawing Polygon
- Adding Text to Images:
- Result
- Additional Resources
- Exercises
Русские Блоги
Используйте встроенный opencvФункция circle () может рисовать круг с определенным радиусом с точкой в центре., Объявление функции выглядит следующим образом:
cv2.circle(img, center, radius, color[, thickness[, lineType[, shift]]])Смысл параметров функции следующий:
- img: прямоугольник или изображение, на котором расположен круг, который нужно нарисовать
- center: координаты центра круга, например (100, 100)
- радиус: радиус, например 10
- color: цвет границы круга, например (0, 0, 255) красный, BGR
- Толщина: положительное значение означает ширину границы круга. Отрицательное значение означает рисование закрашенного круга.
- lineType: тип круглой границы, может быть 0, 4, 8
- shift: количество десятичных знаков для координаты центра и радиуса
Чтобы нарисовать точку, на самом деле нужно нарисовать сплошной круг с небольшим радиусом. Полный код для рисования точки и круга выглядит следующим образом:
#!/usr/bin/python # -*- coding: UTF-8 -*- import numpy as np import cv2 as cv img = np.zeros ((320, 320, 3), np.uint8) # Создать пустое изображение в оттенках серого print img.shape # Вывод: (480, 480, 3) point_size = 1 point_color = (0, 0, 255) # BGR толщина = 4 # может быть 0, 4, 8 # Координаты точки, которую нужно нарисовать points_list = [(160, 160), (136, 160), (150, 200), (200, 180), (120, 150), (145, 180)] for point in points_list: cv.circle(img, point, point_size, point_color, thickness) # Нарисуйте круг, центр: (160, 160), радиус: 60, цвет: point_color, сплошная линия cv.circle(img, (160, 160), 60, point_color, 0) cv.namedWindow("image") cv.imshow('image', img) cv.waitKey (10000) # Отображение 10000 мс, то есть исчезает через 10 с cv.destroyAllWindows()Draw points opencv python
Drawing functions work with matrices/images of arbitrary depth. The boundaries of the shapes can be rendered with antialiasing (implemented only for 8-bit images for now). All the functions include the parameter color that uses an RGB value (that may be constructed with the Scalar constructor ) for color images and brightness for grayscale images. For color images, the channel ordering is normally Blue, Green, Red. This is what imshow, imread, and imwrite expect. So, if you form a color using the Scalar constructor, it should look like:
\[\texttt (blue \_ component, green \_ component, red \_ component[, alpha \_ component])\]
If you are using your own image rendering and I/O functions, you can use any channel ordering. The drawing functions process each channel independently and do not depend on the channel order or even on the used color space. The whole image can be converted from BGR to RGB or to a different color space using cvtColor .
If a drawn figure is partially or completely outside the image, the drawing functions clip it. Also, many drawing functions can handle pixel coordinates specified with sub-pixel accuracy. This means that the coordinates can be passed as fixed-point numbers encoded as integers. The number of fractional bits is specified by the shift parameter and the real point coordinates are calculated as \(\texttt(x,y)\rightarrow\texttt(x*2^,y*2^)\) . This feature is especially effective when rendering antialiased shapes.
Note The functions do not support alpha-transparency when the target image is 4-channel. In this case, the color[3] is simply copied to the repainted pixels. Thus, if you want to paint semi-transparent shapes, you can paint them in a separate buffer and then blend it with the main image.
Macro Definition Documentation
◆ CV_RGB
OpenCV color channel order is BGR[A]
How to Draw Points in OpenCV Python
You can draw points in OpenCV Python by any of the given methods. I highly recommend you get the “Computer Vision: Models, Learning, and Inference Book” to learn Computer Vision.
Method 1
In this method, I will draw a red point on a black image/canvas using a circle function with zero radii.
Step 1
Import OpenCV and NumPy libraries. If OpenCV is not installed in your system then first install it using This Method.
import cv2 #cv2 is used for OpenCV library import numpy as np #numpy for
Step 2
Now create a black image/canvas using the NumPy library.
image=np.zeros((30,60,3),np.uint8) #Black Image
Step 3
Now I will draw a red circle on a black image with zero radii. The center of the circle is (30,10) and thickness is equal to -1 to fill the circle. This code will create a red point on the image.
#Draw a red circle with zero radius and -1 for filled circle image2 = cv2.circle(image, (30,10), radius=0, color=(0, 0, 255), thickness=-1)
Step 4
To display the image in a specified window use ”imshow” function.
cv2.imshow("Red Point on Black Image",image2) Step 5
“waitKey(0)” will display a window until any key is pressed. “destroyAllWindows()” will destroy all the windows that we created.
cv2.waitKey(0) cv2.destroyAllWindows()
Method 2
In this method, I will draw a red point on a black image/canvas using a pixel value.
Step 1
Import OpenCV and NumPy libraries. If OpenCV is not installed in your system then first install it using This Method.
import cv2 #cv2 is used for OpenCV library import numpy as np #numpy for
Step 2
Now create a black image/canvas using the NumPy library.
image=np.zeros((30,60,3),np.uint8) #Black Image
Step 3
Now I will draw a red point on a black image using pixel value. The pixel value [10,30] is the point on the image. The combination for red color is [0,0,255].
#Draw a red point image[10,30]=[0,0,255]
Step 4
To display the image in a specified window use ”imshow” function.
cv2.imshow("Red Point on Black Image",image2) Step 5
“waitKey(0)” will display a window until any key is pressed. “destroyAllWindows()” will destroy all the windows that we created.
cv2.waitKey(0) cv2.destroyAllWindows()
Output

OpenCV Python – How to find and draw extreme points of an object on an image?
Let’s understand how to find and draw extreme points of an object in an image with the help of some Python examples.
Example
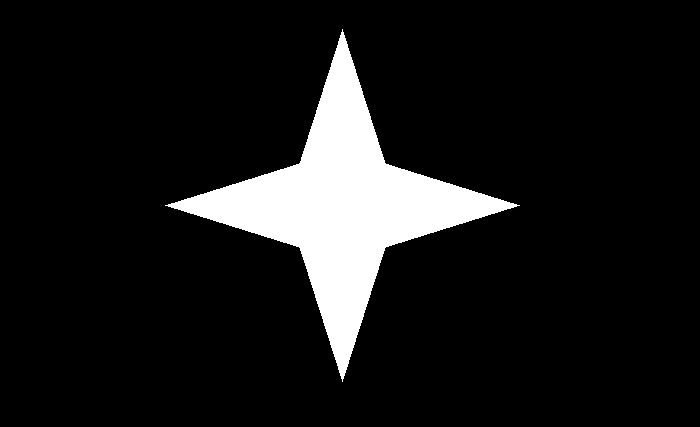
The Python 3 program below shows how to find and draw extreme points of an object in the image.
# import required libraries import cv2 # load the input image img = cv2.imread('four-point-star.png') # convert the input image to grayscale gray = cv2.cvtColor(img, cv2.COLOR_BGR2GRAY) # apply thresholding to convert grayscale to binary image ret,thresh = cv2.threshold(gray,150,255,0) # find the contours contours,hierarchy = cv2.findContours(thresh, cv2.RETR_TREE,cv2.CHAIN_APPROX_SIMPLE) print("Number of contours detected:", len(contours)) # select the first contour cnt = contours[0] # find the extreme points leftmost = tuple(cnt[cnt[:,:,0].argmin()][0]) rightmost = tuple(cnt[cnt[:,:,0].argmax()][0]) topmost = tuple(cnt[cnt[:,:,1].argmin()][0]) bottommost = tuple(cnt[cnt[:,:,1].argmax()][0]) points = [leftmost, rightmost, topmost, bottommost] # draw the points on th image for point in points: cv2.circle(img, point, 4, (0, 0, 255), -1) # display the image with drawn extreme points while True: cv2.imshow("Extreme Points", img) if cv2.waitKey(1) & 0xFF == 27: break cv2.destroyAllWindows()
We will use the following image as the Input File for this program −
Output
When we execute the above code, it will produce the following output −
Number of contours detected: 1
And we get the following window showing the output −
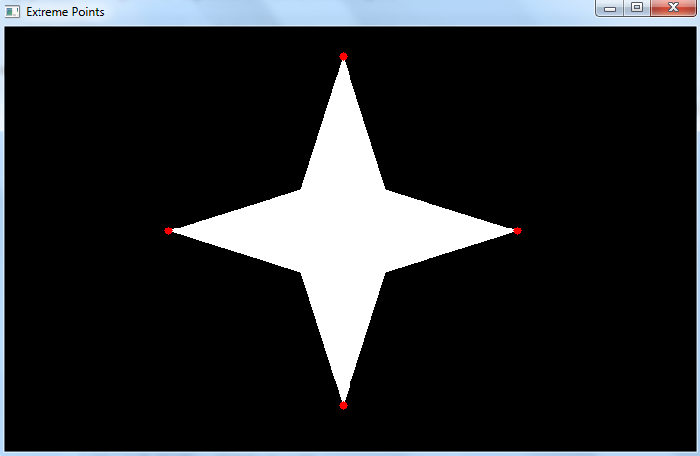
Notice the four extreme points leftmost, rightmost, topmost and bottommost are drawn in red color.
Example
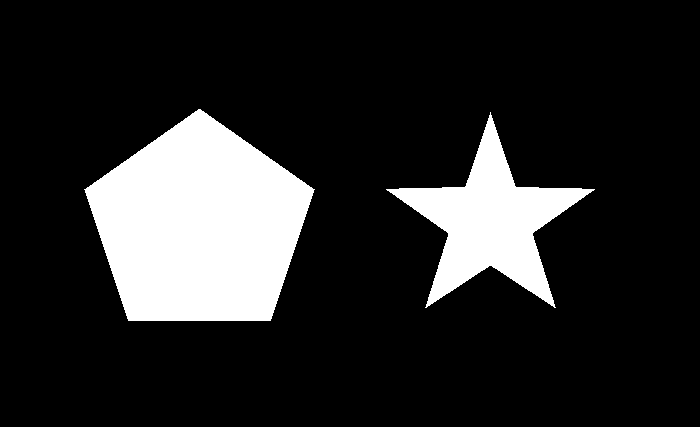
In this Python program, we draw extreme points of the objects in an input image.
# import required libraries import cv2 # load the input image img = cv2.imread('two-shapes.png') # convert the input image to grayscale gray = cv2.cvtColor(img, cv2.COLOR_BGR2GRAY) # apply thresholding to convert grayscale to binary image ret,thresh = cv2.threshold(gray,150,255,0) # find the contours contours,hierarchy = cv2.findContours(thresh, cv2.RETR_TREE,cv2.CHAIN_APPROX_SIMPLE) print("Number of contours detected:", len(contours)) # loop over all the contours for cnt in contours: # extreme points leftmost = tuple(cnt[cnt[:,:,0].argmin()][0]) rightmost = tuple(cnt[cnt[:,:,0].argmax()][0]) topmost = tuple(cnt[cnt[:,:,1].argmin()][0]) bottommost = tuple(cnt[cnt[:,:,1].argmax()][0]) points = [leftmost, rightmost, topmost, bottommost] # draw the points on th image for point in points: cv2.circle(img, point, 4, (0, 0, 255), -1) # display the image with drawn extreme points while True: cv2.imshow("Extreme Points", img) if cv2.waitKey(1) & 0xFF == 27: break cv2.destroyAllWindows()
We will use the following image as the Input File for this program −
Output
When we execute the above code, it will produce the following output −
Number of contours detected: 2
And we get the below window showing the output-
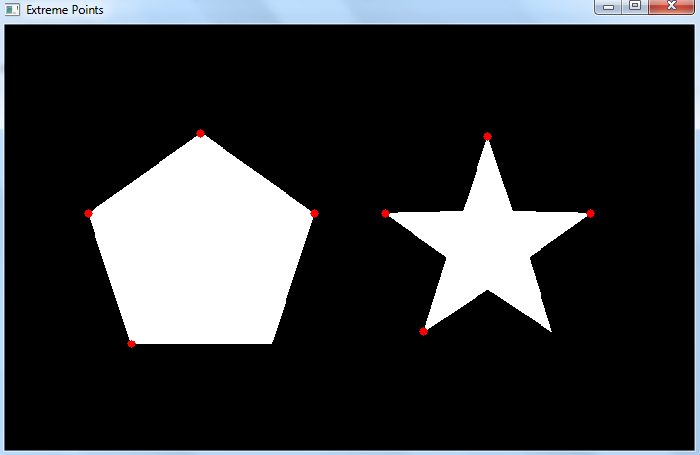
Notice that the extreme points leftmost, rightmost, topmost and bottommost are drawn in red color. In the above output, the extreme points for two different objects (shapes) are drawn.
Draw points opencv python
In all the above functions, you will see some common arguments as given below:
- img : The image where you want to draw the shapes
- color : Color of the shape. for BGR, pass it as a tuple, eg: (255,0,0) for blue. For grayscale, just pass the scalar value.
- thickness : Thickness of the line or circle etc. If -1 is passed for closed figures like circles, it will fill the shape. default thickness = 1
- lineType : Type of line, whether 8-connected, anti-aliased line etc. By default, it is 8-connected.cv.LINE_AA gives anti-aliased line which looks great for curves.
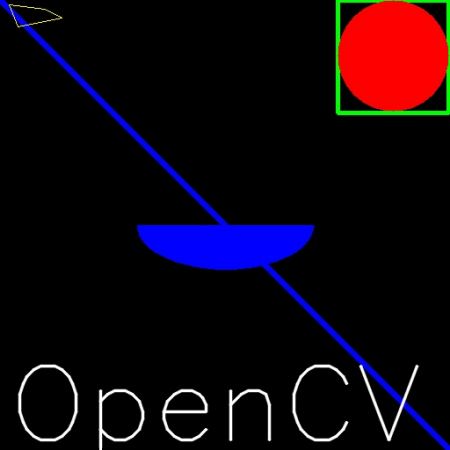
Drawing Line
To draw a line, you need to pass starting and ending coordinates of line. We will create a black image and draw a blue line on it from top-left to bottom-right corners.
Drawing Rectangle
To draw a rectangle, you need top-left corner and bottom-right corner of rectangle. This time we will draw a green rectangle at the top-right corner of image.
Drawing Circle
To draw a circle, you need its center coordinates and radius. We will draw a circle inside the rectangle drawn above.
Drawing Ellipse
To draw the ellipse, we need to pass several arguments. One argument is the center location (x,y). Next argument is axes lengths (major axis length, minor axis length). angle is the angle of rotation of ellipse in anti-clockwise direction. startAngle and endAngle denotes the starting and ending of ellipse arc measured in clockwise direction from major axis. i.e. giving values 0 and 360 gives the full ellipse. For more details, check the documentation of cv.ellipse(). Below example draws a half ellipse at the center of the image.
Drawing Polygon
To draw a polygon, first you need coordinates of vertices. Make those points into an array of shape ROWSx1x2 where ROWS are number of vertices and it should be of type int32. Here we draw a small polygon of with four vertices in yellow color.
Note If third argument is False, you will get a polylines joining all the points, not a closed shape. cv.polylines() can be used to draw multiple lines. Just create a list of all the lines you want to draw and pass it to the function. All lines will be drawn individually. It is a much better and faster way to draw a group of lines than calling cv.line() for each line.
Adding Text to Images:
To put texts in images, you need specify following things.
- Text data that you want to write
- Position coordinates of where you want put it (i.e. bottom-left corner where data starts).
- Font type (Check cv.putText() docs for supported fonts)
- Font Scale (specifies the size of font)
- regular things like color, thickness, lineType etc. For better look, lineType = cv.LINE_AA is recommended.
We will write OpenCV on our image in white color.
Result
So it is time to see the final result of our drawing. As you studied in previous articles, display the image to see it.
Additional Resources
Exercises

Generated on Wed Jul 26 2023 23:43:03 for OpenCV by 1.8.13