- PHP File Upload to Server with MySQL Database
- PHP file upload – Quick example
- PHP file upload configuration
- More optional directives to change the default settings
- File upload – server-side validation
- Upload file to the server with database
- PHP file upload and add a new row to the database
- List of uploaded images with edit, delete actions
- Edit form with file preview
- PHP model class to upload file
- Upload image as a blob to the database
- Uploading image file blob using database insert
- Conclusion
- PHP File Upload
- Configure The «php.ini» File
- Create The HTML Form
- Create The Upload File PHP Script
- Check if File Already Exists
- Limit File Size
- Limit File Type
- Complete Upload File PHP Script
- Complete PHP Filesystem Reference
PHP File Upload to Server with MySQL Database
File upload is an important component in building websites. This article will help you to implement a file upload to the server feature with PHP and a MySQL database.
Example use cases of where the file upload may be needed in a website,
- Photo upload via member profile page.
- Import CSV or Excel to Database to insert bulk data.
- Accept documents like KYC, CV from the user via a form.
Let us see how to code PHP file upload for a website. You can split this article into the following sections.
- PHP file upload – A quick example.
- File upload – server-side validation.
- Upload file to the server with database.
- Upload file as a blob to the database.
PHP file upload – Quick example
This quick example shows a simple code to achieve PHP file upload. It has an HTML form to choose a file to upload. Let the form with the following attributes for supporting file upload.
By choosing a file, it will be in a temporary directory. The $_FILES[“upload_file”][“tmp_name”] has that path. The PHP move_uploaded_file() uploads the file from this path to the specified target.
| $_FILES[‘’][‘tmp_name’] | PHP file upload temporary path |
| $_FILES[‘’][‘name’] | File name with extension |
| $_FILES[‘’][‘type’] | File MIME type. Eg: image/jpeg |
| $_FILES[‘’][‘size’] | File size (in bytes) |
| $_FILES[‘’][‘error’] | File upload error code if any |
| $_FILES[‘’][‘full_path’] | Full path as sent by the browser |
The form allows multi-file upload by having an array of file input.
PHP file upload configuration
Ensure that the server environment has enough settings to upload files.
More optional directives to change the default settings
- upload_tmp_dir – to change the system default.
- upload_max_filesize – to exceed the default limit.
- max_file_uploads – to break the per-request file upload limit.
- post_max_size – to breaks the POST data size.
- max_input_time – to set the limit in seconds to parse request data.
- max_execution_time – time in seconds to run the file upload script.
- memory_limit – to set the memory limit in bytes to be allocated.
File upload – server-side validation
When file uploading comes into the picture, then there should be proper validation. It will prevent unexpected responses from the server during the PHP file upload.
This code checks the following 4 conditions before moving the file to the target path. It validates,
- If the file is not empty.
- If the file does not already exist in the target.
- If the file type is one of the allowed extensions.
- If the file is within the limit.
It shows only the PHP script for validating the uploaded file. The form HTML will be the same as that of the quick example.
File already exists."; $isValidFile = false; > // Validate file extension $allowedFileType = array( 'jpg', 'jpeg', 'png' ); $fileExtension = strtolower(pathinfo($fileName, PATHINFO_EXTENSION)); if (! in_array($fileExtension, $allowedFileType)) < echo "File is not supported. Upload only " . implode(", ", $allowedFileType) . " files."; $isValidFile = false; > // Validate file size if ($_FILES["upload_file"]["size"] > 200000) < echo "File is too large to upload."; $isValidFile = 0; > if ($isValidFile) < move_uploaded_file($_FILES["upload_file"]["tmp_name"], $fileName); >> else < echo "No files have been chosen."; >> ?> Upload file to the server with database
This section gives a full-fledged PHP file upload example. It is with add, edit, preview, list images features. The add/edit allows users to choose an image file to upload to the server.
The home page displays a list of uploaded images with edit, delete action controls. The edit screen will show the preview of the existing file.
PHP file upload and add a new row to the database
This code is for showing a HTML form with a file upload option. This allows users to choose files to upload to the server.
The PHP code receives the uploaded file data in $_FILES. In this code, it checks for basic file validation to make sure of its uniqueness.
Then, it calls functions to upload and insert the file path to the database.
The uploadImage runs PHP move_upload_files() to put the uploaded file in a directory.
The insertImage calls database handlers to insert the uploaded path to the database.
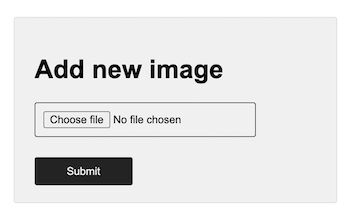
else < $result = $imageModel->uploadImage(); $id = $imageModel->insertImage($result); if (! empty($id)) < $_SESSION['message'] = "Image added to the server and database."; >else < $_SESSION['message'] = "Image upload incomplete."; >> header('Location: index.php'); > ?> Add new image
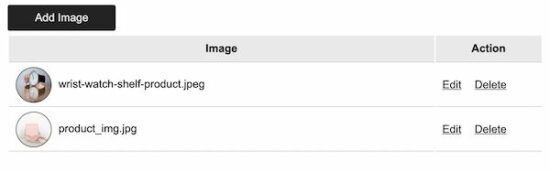
List of uploaded images with edit, delete actions
This is an extension of a usual PHP file upload example. It helps to build a file library interface in an application.
This page reads the uploaded images from the database using PHP. The getAllImages function returns the image path data in an array format.
The list page iterates this array and lists out the result. And it links the records with the appropriate edit, delete controls.
Add Image Image Action  " class="profile-photo" alt="photo">
 " class="btn-action">Edit )" class="btn-action">Delete > ?>
Edit form with file preview
This shows an edit form with an uploaded file preview. It allows replacing the file by uploading a new one.
The form action passes the id of the record to update the file path in the database.
The PHP code calls the updateImage with the upload result and the record id.
uploadImage(); $id = $imageModel->updateImage($result, $_GET["id"]); > $result = $imageModel->selectImageById($_GET["id"]); ?> View/Edit image