- Traversing an HTML table with JavaScript and DOM Interfaces
- Creating an HTML table dynamically
- Example
- HTML
- JavaScript
- Result
- Explanation
- Setting the background color of a paragraph
- Example
- HTML
- JavaScript
- Result
- Explanation
- Creating TextNodes with document.createTextNode(«..»)
- Inserting Elements with appendChild(..)
- Creating New Elements with the document object and the createElement(..) method
- Removing nodes with the removeChild(..) method
- Creating a table dynamically (back to Sample1.html)
- Reviewing the HTML Table structure
- Creating element nodes and inserting them into the document tree
- Manipulating the table with DOM and CSS
- Getting a text node from the table
- Getting an attribute value
- Hiding a column by changing style properties
- Found a content problem with this page?
Traversing an HTML table with JavaScript and DOM Interfaces
This article is an overview of some powerful, fundamental DOM level 1 methods and how to use them from JavaScript. You will learn how to create, access and control, and remove HTML elements dynamically. The DOM methods presented here are not specific to HTML; they also apply to XML. The demonstrations provided here will work fine in any modern browser.
Note: The DOM methods presented here are part of the Document Object Model (Core) level 1 specification. DOM level 1 includes both methods for generic document access and manipulation (DOM 1 Core) as well as methods specific to HTML documents (DOM 1 HTML).
Creating an HTML table dynamically
Example
In this example we add a new table to the page when a button is clicked.
HTML
input type="button" value="Generate a table" onclick="generateTable()" /> JavaScript
function generateTable() // creates a element and a element const tbl = document.createElement("table"); const tblBody = document.createElement("tbody"); // creating all cells for (let i = 0; i 2; i++) // creates a table row const row = document.createElement("tr"); for (let j = 0; j 2; j++) // Create a element and a text node, make the text // node the contents of the , and put the at // the end of the table row const cell = document.createElement("td"); const cellText = document.createTextNode(`cell in row $i>, column $j>`); cell.appendChild(cellText); row.appendChild(cell); > // add the row to the end of the table body tblBody.appendChild(row); > // put the in the tbl.appendChild(tblBody); // appends into document.body.appendChild(tbl); // sets the border attribute of tbl to '2' tbl.setAttribute("border", "2"); >
table margin: 1rem auto; > td padding: 0.5rem; > Result
Explanation
Note the order in which we created the elements and the text node:
Remember this technique. You will use it frequently in programming for the W3C DOM. First, you create elements from the top down; then you attach the children to the parents from the bottom up.
Here’s the HTML markup generated by the JavaScript code:
table border="2"> tbody> tr> td>cell is row 0 column 0td> td>cell is row 0 column 1td> tr> tr> td>cell is row 1 column 0td> td>cell is row 1 column 1td> tr> tbody> table>
Setting the background color of a paragraph
Example
In this example we change the background color of a paragraph when a button is clicked.
HTML
body> input type="button" value="Set paragraph background color" onclick="setBackground()" /> p>hip> p>hellop> body>
JavaScript
function setBackground() // now, get all the p elements in the document const paragraphs = document.getElementsByTagName("p"); // get the second paragraph from the list const secondParagraph = paragraphs[1]; // set the inline style secondParagraph.style.background = "red"; >
Result
Explanation
getElementsByTagName(tagNameValue) is a method available in any DOM Element or the root Document element. When called, it returns an array with all of the element’s descendants matching the tag name. The first element of the list is located at position [0] in the array.
We’ve performed following steps:
- First, we get all the p elements in the document:
const paragraphs = document.getElementsByTagName("p");
const secondParagraph = paragraphs[1];
Finally, we set background color to red using the style property of the paragraph object:
Creating TextNodes with document.createTextNode(«..»)
Use the document object to invoke the createTextNode method and create your text node. You just need to pass the text content. The return value is an object that represents the text node.
= document.createTextNode("world");
This means that you have created a node of the type TEXT_NODE (a piece of text) whose text data is «world» , and myTextNode is your reference to this node object. To insert this text into your HTML page, you need to make this text node a child of some other node element.
Inserting Elements with appendChild(..)
So, by calling secondParagraph.appendChild(node_element) , you are making the element a new child of the second
element.
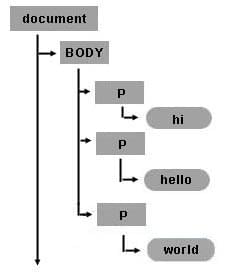
After testing this sample, note that the words hello and world are together: helloworld. So visually, when you see the HTML page it seems like the two text nodes hello and world are a single node, but remember that in the document model, there are two nodes. The second node is a new node of type TEXT_NODE , and it is the second child of the second
tag. The following figure shows the recently created Text Node object inside the document tree.
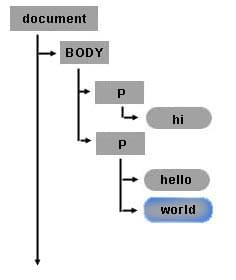
Note: createTextNode() and appendChild() is a simple way to include white space between the words hello and world. Another important note is that the appendChild method will append the child after the last child, just like the word world has been added after the word hello. So if you want to append a text node between hello and world, you will need to use insertBefore instead of appendChild .
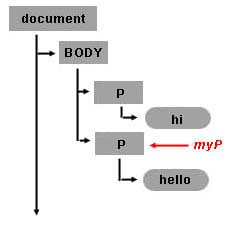
Creating New Elements with the document object and the createElement(..) method
You can create new HTML elements or any other element you want with createElement . For example, if you want to create a new
element as a child of the element, you can use the myBody in the previous example and append a new element node. To create a node call document.createElement(«tagname») . For example:
= document.createElement("p"); myBody.appendChild(myNewPTagNode);
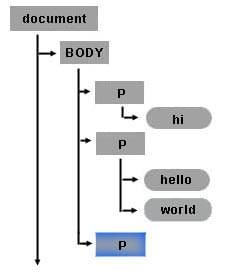
Removing nodes with the removeChild(..) method
Nodes can be removed. The following code removes text node myTextNode (containing the word «world») from the second
element, secondParagraph .
Text node myTextNode (containing the word «world») still exists. The following code attaches myTextNode to the recently created
element, myNewPTagNode .
The final state for the modified object tree looks like this:
Creating a table dynamically (back to Sample1.html)
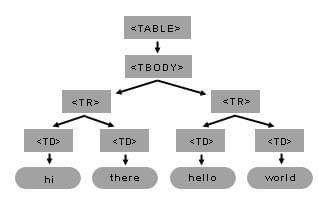
For the rest of this article we will continue working with sample1.html. The following figure shows the table object tree structure for the table created in the sample.
Reviewing the HTML Table structure
Creating element nodes and inserting them into the document tree
The basic steps to create the table in sample1.html are:
- Get the body object (first item of the document object).
- Create all the elements.
- Finally, append each child according to the table structure (as in the above figure). The following source code is a commented version for the sample1.html.
Note: At the end of the start function, there is a new line of code. The table’s border property was set using another DOM method, setAttribute() . setAttribute() has two arguments: the attribute name and the attribute value. You can set any attribute of any element using the setAttribute method.
html lang="en"> head> title> Sample code - Traversing an HTML Table with JavaScript and DOM Interfaces title> script> function start() // get the reference for the body const myBody = document.getElementsByTagName("body")[0]; // creates and elements const myTable = document.createElement("table"); const myTableBody = document.createElement("tbody"); // creating all cells for (let j = 0; j 3; j++) // creates a element const myCurrentRow = document.createElement("tr"); for (let i = 0; i 4; i++) // creates a element const myCurrentCell = document.createElement("td"); // creates a Text Node const currentText = document.createTextNode( `cell is row $j>, column $i>`, ); // appends the Text Node we created into the cell myCurrentCell.appendChild(currentText); // appends the cell into the row myCurrentRow.appendChild(myCurrentCell); > // appends the row into myTableBody.appendChild(myCurrentRow); > // appends into myTable.appendChild(myTableBody); // appends into myBody.appendChild(myTable); // sets the border attribute of myTable to 2; myTable.setAttribute("border", "2"); > script> head> body onload="start()">body> html>
Manipulating the table with DOM and CSS
Getting a text node from the table
This example introduces two new DOM attributes. First it uses the childNodes attribute to get the list of child nodes of myCell. The childNodes list includes all child nodes, regardless of what their name or type is. Like getElementsByTagName() , it returns a list of nodes.
The differences are that (a) getElementsByTagName() only returns elements of the specified tag name; and (b) getElementsByTagName() returns descendants at any level, not just immediate children.
Once you have the returned list, use [x] method to retrieve the desired child item. This example stores in myCellText the text node of the second cell in the second row of the table.
Then, to display the results in this example, it creates a new text node whose content is the data of myCellText , and appends it as a child of the element.
Note: If your object is a text node, you can use the data attribute and retrieve the text content of the node.
= document.getElementsByTagName("body")[0]; myTable = myBody.getElementsByTagName("table")[0]; myTableBody = myTable.getElementsByTagName("tbody")[0]; myRow = myTableBody.getElementsByTagName("tr")[1]; myCell = myRow.getElementsByTagName("td")[1]; // first item element of the childNodes list of myCell myCellText = myCell.childNodes[0]; // content of currentText is the data content of myCellText currentText = document.createTextNode(myCellText.data); myBody.appendChild(currentText);
Getting an attribute value
At the end of sample1 there is a call to setAttribute on the myTable object. This call was used to set the border property of the table. To retrieve the value of the attribute, use the getAttribute method:
Hiding a column by changing style properties
Once you have the object in your JavaScript variable, you can set style properties directly. The following code is a modified version of sample1.html in which each cell of the second column is hidden and each cell of the first column is changed to have a red background. Note that the style property was set directly.
html lang="en"> body onload="start()">body> script> function start() const myBody = document.getElementsByTagName("body")[0]; const myTable = document.createElement("table"); const myTableBody = document.createElement("tbody"); for (let row = 0; row 2; row++) const myCurrentRow = document.createElement("tr"); for (let col = 0; col 2; col++) const myCurrentCell = document.createElement("td"); const currentText = document.createTextNode(`cell is: $row>$col>`); myCurrentCell.appendChild(currentText); myCurrentRow.appendChild(myCurrentCell); // set the cell background color // if the column is 0. If the column is 1 hide the cell if (col === 0) myCurrentCell.style.background = "rgb(255, 0, 0)"; > else myCurrentCell.style.display = "none"; > > myTableBody.appendChild(myCurrentRow); > myTable.appendChild(myTableBody); myBody.appendChild(myTable); > script> html>
Found a content problem with this page?
This page was last modified on Jul 7, 2023 by MDN contributors.