- Java Package
- Built-in Package
- User-defined Package
- How to define a Java package?
- Package Naming convention
- How to create a package in Intellij IDEA?
- How to import packages in Java?
- Example: Package and importing package
- Table of Contents
- Using Package Members
- Referring to a Package Member by Its Qualified Name
- Importing a Package Member
- Importing an Entire Package
- Apparent Hierarchies of Packages
- Name Ambiguities
- The Static Import Statement
Java Package
A package is simply a container that groups related types (Java classes, interfaces, enumerations, and annotations). For example, in core Java, the ResultSet interface belongs to the java.sql package. The package contains all the related types that are needed for the SQL query and database connection.
If you want to use the ResultSet interface in your code, just import the java.sql package (Importing packages will be discussed later in the article).
As mentioned earlier, packages are just containers for Java classes, interfaces and so on. These packages help you to reserve the class namespace and create a maintainable code.
For example, you can find two Date classes in Java. However, the rule of thumb in Java programming is that only one unique class name is allowed in a Java project.
How did they manage to include two classes with the same name Date in JDK?
This was possible because these two Date classes belong to two different packages:
- java.util.Date — this is a normal Date class that can be used anywhere.
- java.sql.Date — this is a SQL Date used for the SQL query and such.
Based on whether the package is defined by the user or not, packages are divided into two categories:
Built-in Package
Built-in packages are existing java packages that come along with the JDK. For example, java.lang , java.util , java.io , etc. For example:
import java.util.ArrayList; class ArrayListUtilization < public static void main(String[] args) < ArrayListmyList = new ArrayList<>(3); myList.add(3); myList.add(2); myList.add(1); System.out.println(myList); > > The ArrayList class belongs to java.util package . To use it, we have to import the package first using the import statement.
User-defined Package
Java also allows you to create packages as per your need. These packages are called user-defined packages.
How to define a Java package?
To define a package in Java, you use the keyword package .
Java uses file system directories to store packages. Let’s create a Java file inside another directory.
Now, edit Test.java file, and at the beginning of the file, write the package statement as:
Here, any class that is declared within the test directory belongs to the com.test package.
package com.test; class Test < public static void main(String[] args)< System.out.println("Hello World!"); >> Here, the Test class now belongs to the com.test package.
Package Naming convention
The package name must be unique (like a domain name). Hence, there’s a convention to create a package as a domain name, but in reverse order. For example, com.company.name
Here, each level of the package is a directory in your file system. Like this:
And, there is no limitation on how many subdirectories (package hierarchy) you can create.
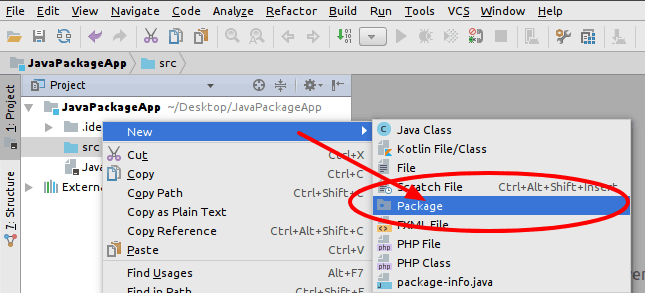
How to create a package in Intellij IDEA?
In IntelliJ IDEA, here’s how you can create a package:
- Right-click on the source folder.
- Go to new and then package.

- A pop-up box will appear where you can enter the package name.


Once the package is created, a similar folder structure will be created on your file system as well. Now, you can create classes, interfaces, and so on inside the package.

How to import packages in Java?
Java has an import statement that allows you to import an entire package (as in earlier examples), or use only certain classes and interfaces defined in the package.
The general form of import statement is:
import package.name.ClassName; // To import a certain class only import package.name.* // To import the whole package
import java.util.Date; // imports only Date class import java.io.*; // imports everything inside java.io package
The import statement is optional in Java.
If you want to use class/interface from a certain package, you can also use its fully qualified name, which includes its full package hierarchy.
Here is an example to import a package using the import statement.
import java.util.Date; class MyClass implements Date < // body >
The same task can be done using the fully qualified name as follows:
class MyClass implements java.util.Date < //body >
Example: Package and importing package
Suppose, you have defined a package com.programiz that contains a class Helper .
package com.programiz; public class Helper < public static String getFormattedDollar (double value)< return String.format("$%.2f", value); >> Now, you can import Helper class from com.programiz package to your implementation class. Once you import it, the class can be referred directly by its name. Here’s how:
import com.programiz.Helper; class UseHelper < public static void main(String[] args) < double value = 99.5; String formattedValue = Helper.getFormattedDollar(value); System.out.println("formattedValue Importing packages in Java" height="177" src="https://cdn.programiz.com/sites/tutorial2program/files/import-package-java_0.jpg" title="Java import package" width="400">Java import package
In Java, the import statement is written directly after the package statement (if it exists) and before the class definition.
For example,
package package.name; import package.ClassName; // only import a Class class MyClass < // body >
Table of Contents
Using Package Members
The types that comprise a package are known as the package members.
To use a public package member from outside its package, you must do one of the following:
- Refer to the member by its fully qualified name
- Import the package member
- Import the member's entire package
Each is appropriate for different situations, as explained in the sections that follow.
Referring to a Package Member by Its Qualified Name
So far, most of the examples in this tutorial have referred to types by their simple names, such as Rectangle and StackOfInts . You can use a package member's simple name if the code you are writing is in the same package as that member or if that member has been imported.
However, if you are trying to use a member from a different package and that package has not been imported, you must use the member's fully qualified name, which includes the package name. Here is the fully qualified name for the Rectangle class declared in the graphics package in the previous example.
You could use this qualified name to create an instance of graphics.Rectangle :
graphics.Rectangle myRect = new graphics.Rectangle();
Qualified names are all right for infrequent use. When a name is used repetitively, however, typing the name repeatedly becomes tedious and the code becomes difficult to read. As an alternative, you can import the member or its package and then use its simple name.
Importing a Package Member
To import a specific member into the current file, put an import statement at the beginning of the file before any type definitions but after the package statement, if there is one. Here's how you would import the Rectangle class from the graphics package created in the previous section.
Now you can refer to the Rectangle class by its simple name.
Rectangle myRectangle = new Rectangle();
This approach works well if you use just a few members from the graphics package. But if you use many types from a package, you should import the entire package.
Importing an Entire Package
To import all the types contained in a particular package, use the import statement with the asterisk (*) wildcard character.
Now you can refer to any class or interface in the graphics package by its simple name.
Circle myCircle = new Circle(); Rectangle myRectangle = new Rectangle();
The asterisk in the import statement can be used only to specify all the classes within a package, as shown here. It cannot be used to match a subset of the classes in a package. For example, the following does not match all the classes in the graphics package that begin with A .
// does not work import graphics.A*;
Instead, it generates a compiler error. With the import statement, you generally import only a single package member or an entire package.
Note: Another, less common form of import allows you to import the public nested classes of an enclosing class. For example, if the graphics.Rectangle class contained useful nested classes, such as Rectangle.DoubleWide and Rectangle.Square , you could import Rectangle and its nested classes by using the following two statements.
import graphics.Rectangle; import graphics.Rectangle.*;
Be aware that the second import statement will not import Rectangle .
Another less common form of import , the static import statement, will be discussed at the end of this section.
For convenience, the Java compiler automatically imports two entire packages for each source file: (1) the java.lang package and (2) the current package (the package for the current file).
Apparent Hierarchies of Packages
At first, packages appear to be hierarchical, but they are not. For example, the Java API includes a java.awt package, a java.awt.color package, a java.awt.font package, and many others that begin with java.awt . However, the java.awt.color package, the java.awt.font package, and other java.awt.xxxx packages are not included in the java.awt package. The prefix java.awt (the Java Abstract Window Toolkit) is used for a number of related packages to make the relationship evident, but not to show inclusion.
Importing java.awt.* imports all of the types in the java.awt package, but it does not import java.awt.color , java.awt.font , or any other java.awt.xxxx packages. If you plan to use the classes and other types in java.awt.color as well as those in java.awt , you must import both packages with all their files:
import java.awt.*; import java.awt.color.*;
Name Ambiguities
If a member in one package shares its name with a member in another package and both packages are imported, you must refer to each member by its qualified name. For example, the graphics package defined a class named Rectangle . The java.awt package also contains a Rectangle class. If both graphics and java.awt have been imported, the following is ambiguous.
In such a situation, you have to use the member's fully qualified name to indicate exactly which Rectangle class you want. For example,
The Static Import Statement
There are situations where you need frequent access to static final fields (constants) and static methods from one or two classes. Prefixing the name of these classes over and over can result in cluttered code. The static import statement gives you a way to import the constants and static methods that you want to use so that you do not need to prefix the name of their class.
The java.lang.Math class defines the PI constant and many static methods, including methods for calculating sines, cosines, tangents, square roots, maxima, minima, exponents, and many more. For example,
public static final double PI = 3.141592653589793; public static double cos(double a)
Ordinarily, to use these objects from another class, you prefix the class name, as follows.
double r = Math.cos(Math.PI * theta);
You can use the static import statement to import the static members of java.lang.Math so that you don't need to prefix the class name, Math . The static members of Math can be imported either individually:
import static java.lang.Math.PI;
import static java.lang.Math.*;
Once they have been imported, the static members can be used without qualification. For example, the previous code snippet would become:
Obviously, you can write your own classes that contain constants and static methods that you use frequently, and then use the static import statement. For example,
import static mypackage.MyConstants.*;
Note: Use static import very sparingly. Overusing static import can result in code that is difficult to read and maintain, because readers of the code won't know which class defines a particular static object. Used properly, static import makes code more readable by removing class name repetition.